2012 MERCEDES-BENZ SL ROADSTER roof rack
[x] Cancel search: roof rackPage 19 of 637

Selecting favourites ....................... 455
Selecting/setting access data ....... 434
Internet radio
Calling up ....................................... 454
Searching for stations .................... 454
iPod® ................................. 494, 497, 498
Alphabetic track selection ............. 498
Connecting to Media Interface ...... 494
Selecting a category/playlist ......... 497
ISOFIX child seat securing system .... 64
iTunes® .............................................. 498 J
Jack Storage location ............................ 577
Using ............................................. 607
Jump starting (engine) ...................... 586K
Key Changing the battery ....................... 88
Checking the battery ....................... 87
Convenience opening feature ........ 101
Display message ............................ 272
Door central locking/unlocking ....... 85
Emergency key element ................... 86
Important safety notes .................... 84
Loss ................................................. 89
Modifying the programming ............. 86
Opening/closing the roof .............. 105
Overview .......................................... 84
Positions (ignition lock) ................. 155
Problem (malfunction) ..................... 89
Starting the engine ........................ 157
Key positions
Key ................................................ 155
KEYLESS GO .................................. 155
KEYLESS-GO
Convenience closing ...................... 101
Display message ............................ 272
Locking ............................................ 85
Removing the Start/Stop button ... 156
Start/Stop button .......................... 155
Starting the engine ........................ 157
Unlocking ......................................... 85 Kickdown
Driving tips .................................... 167
Manual drive progra m.................... 171 L
Lamps see Warning and indicator lamps
Lane Keeping Assist
see Active Lane Keeping Assist
Lane recommendations .................... 353
Explanation .................................... 353
Presentation .................................. 353
Lap time (RACETIMER) ...................... 245
Licence plate lamp (display mes-
sage) ................................................... 256
Light sensor (display message) ....... 257
Lights
Activating/deactivating the Intel-
ligent Light System ........................ 240
Activating/deactivating the inte-
rior lighting delayed switch-off ....... 241
Active light function ....................... 131
Automatic headlamp mod e............ 127
Cornering light function ................. 131
Dipped-beam headlamp s............... 127
Driving abroad ............................... 126
Foglamps (extended range) ........... 132
Hazard warning lamps ................... 130
Headlamp flashe r........................... 130
Light switch ................................... 126
Main-beam headlamp s................... 130
Misted up headlamp s.................... 133
Motorway mod e............................. 132
Parking lamps ................................ 129
Rear foglamp ................................. 128
Setting the ambient lighting
brightness (on-board computer) .... 241
Setting the ambient lighting col-
our (on-board computer) ................ 241
Side lamps ..................................... 128
Switching the daytime driving
lights on/off (on-board com-
puter) ............................................. 239
Switching the exterior lighting
delayed switch-off on/off (on-
board computer) ............................ 241
Switching the spotlight on/of f....... 240 16
Index
Page 20 of 637

Switching the surround lighting
on/off (on-board computer) .......... 241
Turn signals ................................... 129
see Interior lighting
see Replacing bulbs
LIM indicator lamp
Cruise control ................................ 182
DISTRONIC PLUS ........................... 186
Variable SPEEDTRONIC ................. 194
Limiting the speed
see SPEEDTRONIC
LINGUATRONIC .................................. 312
Setting s......................................... 312
List of access data ............................ 437
New provider ................................. 437
List of mobile phone network pro-
viders ......................................... 434, 435
Calling up ....................................... 434
Empty ............................................ 434
With the selected provider ............. 435
Load/eject button ............................. 469
Loading aid (boot)
Raising/lowering the roof .............. 546
Locking
see Central locking
Locking (doors)
Automatic ........................................ 92
Emergency locking ........................... 93
From inside (central locking but-
ton) .................................................. 92
Locking centrally
see Central locking
Locking verification signal (on-
board computer) ............................... 242
Luggage cover
see Boot separator
Lumbar support
Adjusting (COMAND Online) .......... 319 M
M+S tyres ........................................... 598
MAGIC SKY CONTROL ....................... 109
Main-beam headlamps
Display message ............................ 256
Switching on/of f........................... 130
Map (navigation)
Adjusting the scale ........................ 372 Arrival time/distance to the des-
tination .......................................... 375
City model ..................................... 376
Geo-coordinate display .................. 375
Heading ......................................... 374
Information in the display .............. 375
Map settings .................................. 373
Moving ........................................... 373
North orientation ........................... 374
Notes ............................................. 372
POI symbols ................................... 374
RDS-TMC display
s......................... 365
Road display .................................. 375
Saving the crosshair position ......... 373
Showing the map data version ....... 382
Topographical map ........................ 376
Updating ........................................ 382
Updating process ........................... 383
Matt finish (cleaning instructions) .. 570
Media Inter-
fac
e ........................... 494, 495, 496, 497, 499
Alphabetical track selection .......... 498
Basic menu .................................... 495
Connecting an external audio
source ............................................ 494
Connecting an external video
source ............................................ 516
Connection options ....................... 494
iPod® ............................................ 494
Mode ............................................. 494
MP3 player .................................... 494
Notes for the MP3 player ............... 499
Playback options ........................... 499
Selecting categories ...................... 497
Selecting folders ............................ 497
Selecting music files ...................... 496
Selecting playlists .......................... 497
Switching on .................................. 495
USB mass storage device .............. 494
see Separate operating instructions
Media list ........................................... 474
Memory card (audio) ......................... 234
Memory function ............................... 123
Mercedes-Benz Contact .................... 427 Index
17
Page 34 of 637

Protection of the environment
General notes
H
Environmental note
Daimler's declared policy is one of compre-
hensive environmental protection.
Our objectives are to use the natural resour-
ces which form the basis of our existence on
this planet sparingly and in a manner which
takes the requirements of both nature and
humanity into consideration.
You too can help to protect the environment
by operating your vehicle in an environmen-
tally-responsible manner.
Fuel consumption and the rate of engine,
transmission, brake and tyre wear depend on
the following factors:
R operating conditions of your vehicle
R your personal driving style
You can influence both factors. Therefore,
please bear the following in mind:
Operating conditions:
R avoid short trips, as these increase fuel
consumption.
R observe the correct tyre pressure.
R do not carry any unnecessary weight in the
vehicle.
R remove the roof rack once you no longer
need it.
R a regularly serviced vehicle will contribute
to environmental protection. You should
therefore adhere to the service intervals.
R all maintenance work should be carried out
at a qualified specialist workshop.
Personal driving style:
R do not depress the accelerator pedal when
starting the engine.
R do not warm up the engine when the vehicle
is stationary.
R drive carefully and maintain a safe distance
from the vehicle in front.
R avoid frequent, sudden acceleration and
braking. R
change gear in good time and use each gear
only up to Ôof its maximum engine speed.
R switch off the engine in stationary traffic.
R monitor the vehicle's fuel consumption. Returning an end-of-life vehicle
EU countries only:
Mercedes-Benz will take back your old vehicle to dispose of it in an environmentally-respon-sible manner in accordance with the Euro-
pean Union (EU) End of Life Vehicles Direc-
tive.
There is a network of return points and dis-
assembly plants available. You can return
your vehicle to these plants free of charge.
This makes a valuable contribution to the
recycling process and the conservation of
resources.
For further information on recycling old vehi- cles, recovery and the terms of the policy,
visit the Mercedes-Benz homepage. Genuine Mercedes-Benz parts
H
Environmental note
Daimler AG also supplies reconditioned
assemblies and parts which are of the same
quality as new parts. For these, the same war-
ranty applies as for new parts.
! Airbags and seat belt tensioners, as well
as control units and sensors for these
restraint systems, may be installed in the
following areas of your vehicle:
R doors
R door pillars
R door sills
R seats
R dashboard
R instrument cluster
R centre console Introduction
31 Z
Page 110 of 637

A
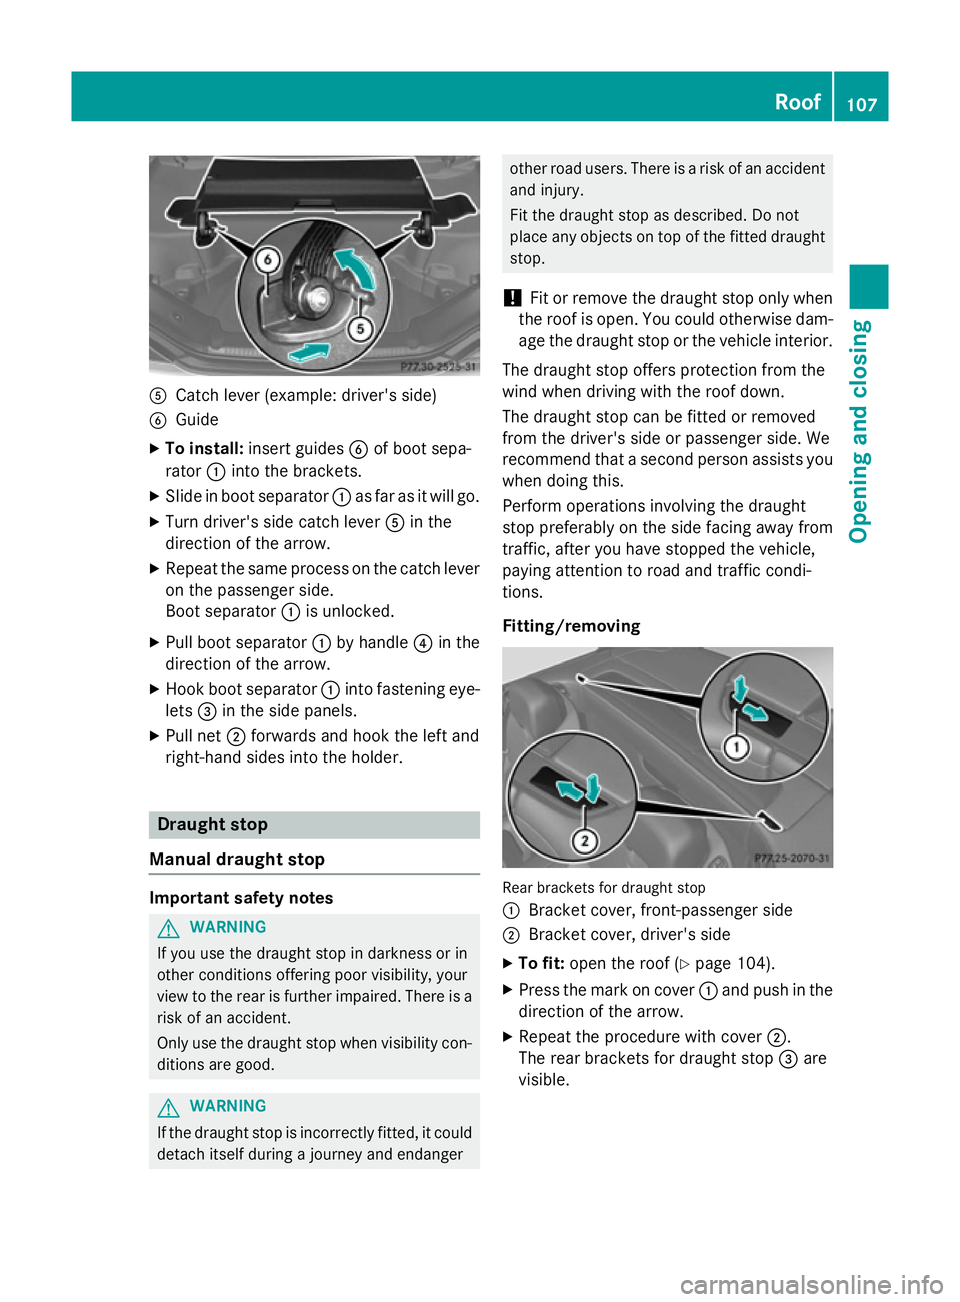
Catch lever (example: driver's side)
B Guide
X To install: insert guides Bof boot sepa-
rator :into the brackets.
X Slide in boot separator :as far as it will go.
X Turn driver's side catch lever Ain the
direction of the arrow.
X Repeat the same process on the catch lever
on the passenger side.
Boot separator :is unlocked.
X Pull boot separator :by handle ?in the
direction of the arrow.
X Hook boot separator :into fastening eye-
lets =in the side panels.
X Pull net ;forwards and hook the left and
right-hand sides into the holder. Draught stop
Manual draught stop Important safety notes
G
WARNING
If you use the draught stop in darkness or in
other conditions offering poor visibility, your
view to the rear is further impaired. There is a
risk of an accident.
Only use the draught stop when visibility con- ditions are good. G
WARNING
If the draught stop is incorrectly fitted, it could detach itself during a journey and endanger other road users. There is a risk of an accident
and injury.
Fit the draught stop as described. Do not
place any objects on top of the fitted draught stop.
! Fit or remove the draught stop only when
the roof is open. You could otherwise dam- age the draught stop or the vehicle interior.
The draught stop offers protection from the
wind when driving with the roof down.
The draught stop can be fitted or removed
from the driver's side or passenger side. We
recommend that a second person assists you
when doing this.
Perform operations involving the draught
stop preferably on the side facing away from
traffic, after you have stopped the vehicle,
paying attention to road and traffic condi-
tions.
Fitting/removing Rear brackets for draught stop
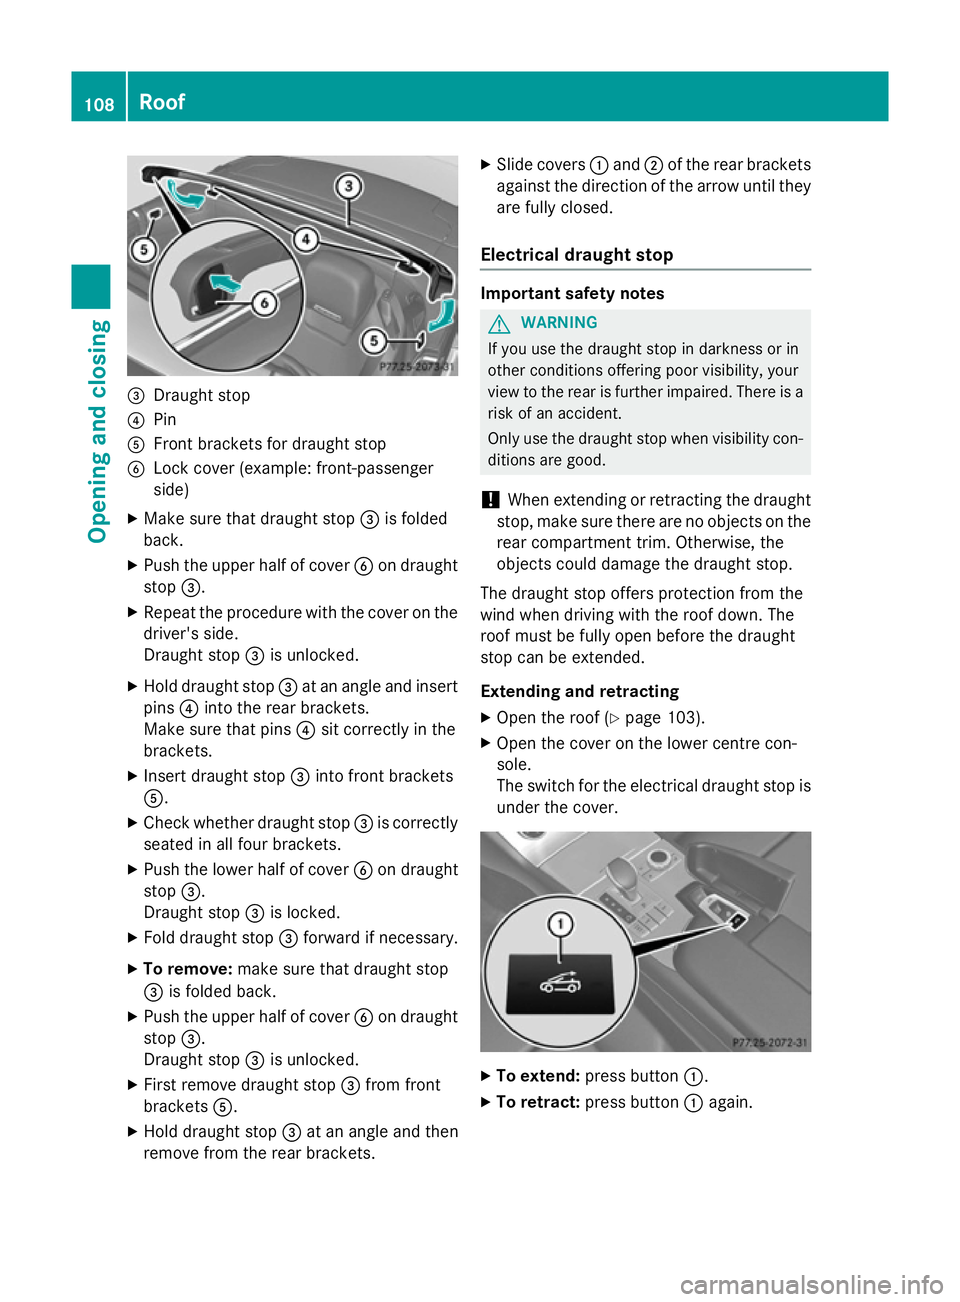
:
Bracket cover, front-passenger side
; Bracket cover, driver's side
X To fit: open the roof (Y page 104).
X Press the mark on cover :and push in the
direction of the arrow.
X Repeat the procedure with cover ;.
The rear brackets for draught stop =are
visible. Roof
107Opening and closing Z
Page 111 of 637

=
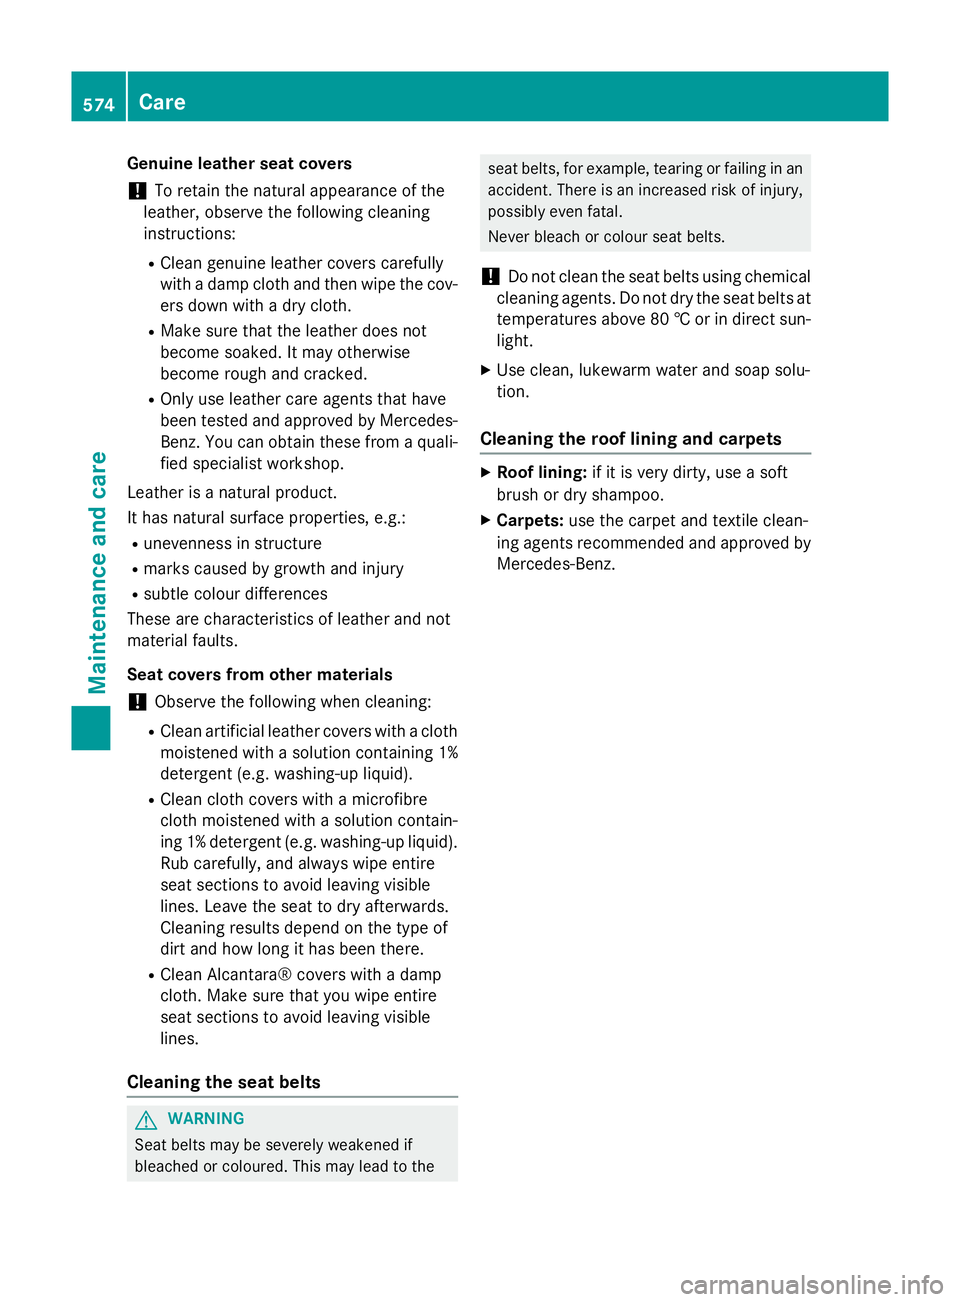
Draught stop
? Pin
A Front brackets for draught stop
B Lock cover (example: front-passenger
side)
X Make sure that draught stop =is folded
back.
X Push the upper half of cover Bon draught
stop =.
X Repeat the procedure with the cover on the
driver's side.
Draught stop =is unlocked.
X Hold draught stop =at an angle and insert
pins ?into the rear brackets.
Make sure that pins ?sit correctly in the
brackets.
X Insert draught stop =into front brackets
A.
X Check whether draught stop =is correctly
seated in all four brackets.
X Push the lower half of cover Bon draught
stop =.
Draught stop =is locked.
X Fold draught stop =forward if necessary.
X To remove: make sure that draught stop
= is folded back.
X Push the upper half of cover Bon draught
stop =.
Draught stop =is unlocked.
X First remove draught stop =from front
brackets A.
X Hold draught stop =at an angle and then
remove from the rear brackets. X
Slide covers :and ;of the rear brackets
against the direction of the arrow until they are fully closed.
Electrical draught stop Important safety notes
G
WARNING
If you use the draught stop in darkness or in
other conditions offering poor visibility, your
view to the rear is further impaired. There is a
risk of an accident.
Only use the draught stop when visibility con- ditions are good.
! When extending or retracting the draught
stop, make sure there are no objects on the
rear compartment trim. Otherwise, the
objects could damage the draught stop.
The draught stop offers protection from the
wind when driving with the roof down. The
roof must be fully open before the draught
stop can be extended.
Extending and retracting
X Open the roof (Y page 103).
X Open the cover on the lower centre con-
sole.
The switch for the electrical draught stop is
under the cover. X
To extend: press button :.
X To retract: press button :again. 108
RoofOpening and closing
Page 577 of 637

Genuine leather seat covers
! To retain the natural appearance of the
leather, observe the following cleaning
instructions:
R Clean genuine leather covers carefully
with a damp cloth and then wipe the cov-
ers down with a dry cloth.
R Make sure that the leather does not
become soaked. It may otherwise
become rough and cracked.
R Only use leather care agents that have
been tested and approved by Mercedes-
Benz. You can obtain these from a quali- fied specialist workshop.
Leather is a natural product.
It has natural surface properties, e.g.:
R unevenness in structure
R marks caused by growth and injury
R subtle colour differences
These are characteristics of leather and not
material faults.
Seat covers from other materials
! Observe the following when cleaning:
R Clean artificial leather covers with a cloth
moistened with a solution containing 1% detergent (e.g. washing-up liquid).
R Clean cloth covers with a microfibre
cloth moistened with a solution contain-
ing 1% detergent (e.g. washing-up liquid). Rub carefully, and always wipe entire
seat sections to avoid leaving visible
lines. Leave the seat to dry afterwards.
Cleaning results depend on the type of
dirt and how long it has been there.
R Clean Alcantara® covers with a damp
cloth. Make sure that you wipe entire
seat sections to avoid leaving visible
lines.
Cleaning the seat belts G
WARNING
Seat belts may be severely weakened if
bleached or coloured. This may lead to the seat belts, for example, tearing or failing in an
accident. There is an increased risk of injury,
possibly even fatal.
Never bleach or colour seat belts.
! Do not clean the seat belts using chemical
cleaning agents. Do not dry the seat belts at
temperatures above 80 † or in direct sun-
light.
X Use clean, lukewarm water and soap solu-
tion.
Cleaning the roof lining and carpets X
Roof lining: if it is very dirty, use a soft
brush or dry shampoo.
X Carpets: use the carpet and textile clean-
ing agents recommended and approved by
Mercedes-Benz. 574
CareMaintenance and care