2012 MERCEDES-BENZ SL ROADSTER fuel pressure
[x] Cancel search: fuel pressurePage 32 of 637
Locking (in an emergency) ............... 93
Locking (key) ................................... 85
Lowering ........................................ 609
Pulling away ................................... 158
Raising ........................................... 607
Registration ..................................... 34
Securing from rolling away ............ 606
Tow-starting ................................... 588
Towing away .................................. 588
Transporting .................................. 591
Unlocking (in an emergency) ........... 93
Unlocking (key) ................................ 85
Vehicle data ................................... 629
Vehicle battery
see Battery (vehicle)
Vehicle data ....................................... 629
Vehicle dimensions ........................... 629
Vehicle emergency locking ................ 93
Vehicle identification number
see VIN
Vehicle identification plate .............. 622
Vehicle level
Active Body Control (AMG vehi-
cles) ............................................... 202
Active Body Control (except AMG
vehicles) ........................................ 199
Display message ............................ 260
Vehicle tool kit .................................. 577
Video
Operating the DVD ......................... 235
see Video DVD
Video DVD .......................................... 514
Automatic picture shutoff .............. 501
Data carrier .................................... 511
DVD menu ..................................... 514
Fast forward/rewind ...................... 513
Function restrictions ...................... 511
Interactive content ........................ 516
Operation ....................................... 511
Pause function ............................... 513
Playing conditions .......................... 511
Safety notes .................................. 511
Selecting ........................................ 514
Selecting a film/title ...................... 514
Selecting a scene/chapter ............ 513
Setting the audio format ................ 515
Setting the language ...................... 515 Setting the picture ......................... 502
Showing/hiding the menu ............. 512
Showing/hiding the navigation
menu ............................................. 512
Stop function ................................. 513
Subtitles ........................................ 516
Switching on .................................. 512
Video-AUX
Setting the picture ......................... 502
VIN ...................................................... 622 W
Warning and indicator lamps ABS ................................................ 275
Brakes ........................................... 275
Distance warning signal ................. 283
ESP® ............................................. 277
ESP® OFF ...................................... 278
LIM (cruise control) ........................ 182
LIM (DISTRONIC PLUS) .................. 186
LIM (variable SPEEDTRONIC) ......... 194
Overview .......................................... 42
PASSENGER AIRBAG OFF ................ 63
Reserve fuel ................................... 280
Seat belt ........................................ 274
SRS ................................................ 280
Tyre pressure monitor ................... 284
Warning triangle ................................ 576
Washer fluid
Display message ............................ 272
Waypoints .......................... 335, 337, 338
Accepting waypoints for the
route .............................................. 338
Creating ......................................... 335
Editing ........................................... 337
Entering ......................................... 335
Searching for a filling station when the fuel level is lo w........................ 338
Weather display (COMAND
Online) ........................................ 447, 448
Calling up the weather map ........... 448
Information chart ........................... 447
Selecting locations in the informa-
tion chart ....................................... 447
Selecting the location .................... 447
Selecting the location in the
weather map .................................. 448 Index
29
Page 34 of 637

Protection of the environment
General notes
H
Environmental note
Daimler's declared policy is one of compre-
hensive environmental protection.
Our objectives are to use the natural resour-
ces which form the basis of our existence on
this planet sparingly and in a manner which
takes the requirements of both nature and
humanity into consideration.
You too can help to protect the environment
by operating your vehicle in an environmen-
tally-responsible manner.
Fuel consumption and the rate of engine,
transmission, brake and tyre wear depend on
the following factors:
R operating conditions of your vehicle
R your personal driving style
You can influence both factors. Therefore,
please bear the following in mind:
Operating conditions:
R avoid short trips, as these increase fuel
consumption.
R observe the correct tyre pressure.
R do not carry any unnecessary weight in the
vehicle.
R remove the roof rack once you no longer
need it.
R a regularly serviced vehicle will contribute
to environmental protection. You should
therefore adhere to the service intervals.
R all maintenance work should be carried out
at a qualified specialist workshop.
Personal driving style:
R do not depress the accelerator pedal when
starting the engine.
R do not warm up the engine when the vehicle
is stationary.
R drive carefully and maintain a safe distance
from the vehicle in front.
R avoid frequent, sudden acceleration and
braking. R
change gear in good time and use each gear
only up to Ôof its maximum engine speed.
R switch off the engine in stationary traffic.
R monitor the vehicle's fuel consumption. Returning an end-of-life vehicle
EU countries only:
Mercedes-Benz will take back your old vehicle to dispose of it in an environmentally-respon-sible manner in accordance with the Euro-
pean Union (EU) End of Life Vehicles Direc-
tive.
There is a network of return points and dis-
assembly plants available. You can return
your vehicle to these plants free of charge.
This makes a valuable contribution to the
recycling process and the conservation of
resources.
For further information on recycling old vehi- cles, recovery and the terms of the policy,
visit the Mercedes-Benz homepage. Genuine Mercedes-Benz parts
H
Environmental note
Daimler AG also supplies reconditioned
assemblies and parts which are of the same
quality as new parts. For these, the same war-
ranty applies as for new parts.
! Airbags and seat belt tensioners, as well
as control units and sensors for these
restraint systems, may be installed in the
following areas of your vehicle:
R doors
R door pillars
R door sills
R seats
R dashboard
R instrument cluster
R centre console Introduction
31 Z
Page 45 of 637
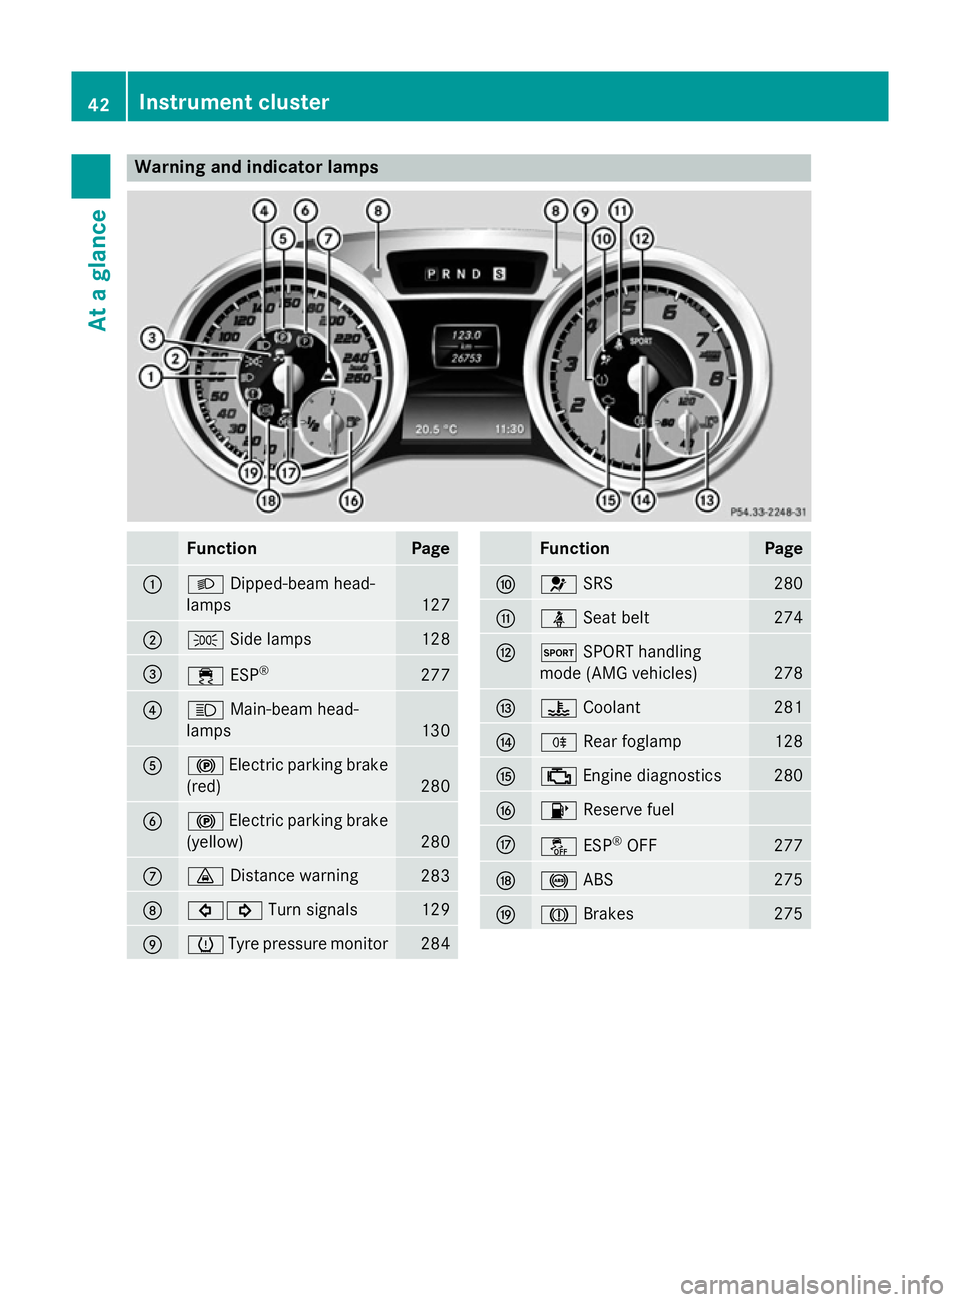
Warning and indicator lamps
Function Page
:
L
Dipped-beam head-
lamps 127
;
T
Side lamps 128
=
÷
ESP® 277
?
K
Main-beam head-
lamps 130
A
!
Electric parking brake
(red) 280
B
!
Electric parking brake
(yellow) 280
C
·
Distance warning 283
D
#!
Turn signals 129
E
h
Tyre pressure monitor 284 Function Page
F
6
SRS 280
G
ü
Seat belt 274
H
M
SPORT handling
mode (AMG vehicles) 278
I
?
Coolant 281
J
R
Rear foglamp 128
K
;
Engine diagnostics 280
L
8
Reserve fuel M
å
ESP®
OFF 277
N
!
ABS 275
O
J
Brakes 27542
Instrument clusterAt a glance
Page 174 of 637
dles if the transmission is in position
D. The
selected gear appears in the multifunction
display.
X Press the program selector button until M
(Y page 167) appears in the multifunction
display.
X AMG vehicles: turn the drive program
selector until Mappears in the multifunc-
tion display (Y page 168).
Shifting up X
Pull the right-hand steering wheel gearshift
paddle (Y page 169).
The automatic transmission shifts up to the next gear.
Before the engine speed reaches the red
area, an upshift indicator will be shown in
the multifunction display.
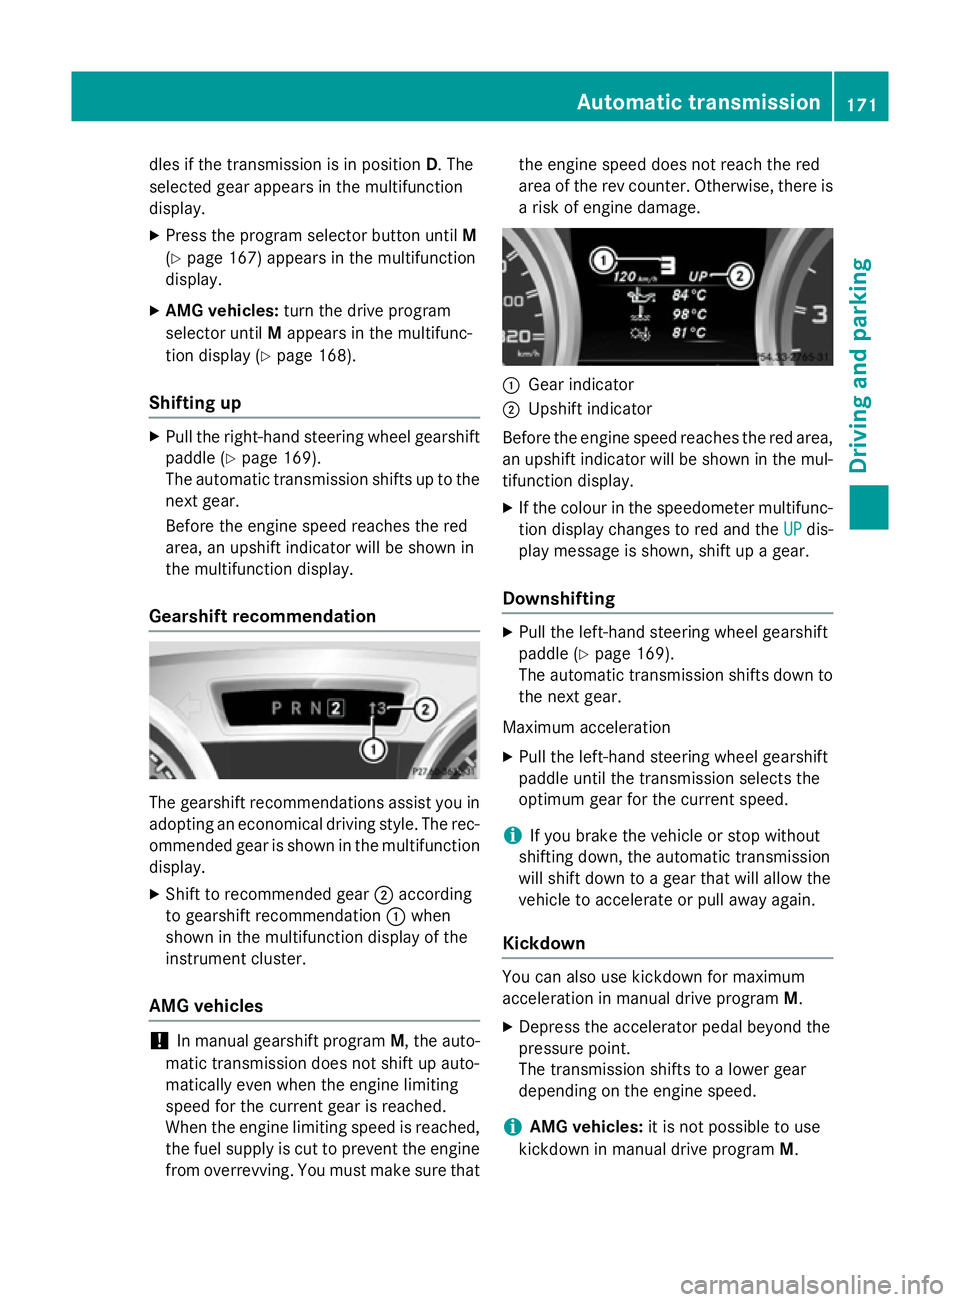
Gearshift recommendation The gearshift recommendations assist you in
adopting an economical driving style. The rec- ommended gear is shown in the multifunction
display.
X Shift to recommended gear ;according
to gearshift recommendation :when
shown in the multifunction display of the
instrument cluster.
AMG vehicles !
In manual gearshift program
M, the auto-
matic transmission does not shift up auto-
matically even when the engine limiting
speed for the current gear is reached.
When the engine limiting speed is reached, the fuel supply is cut to prevent the engine
from overrevving. You must make sure that the engine speed does not reach the red
area of the rev counter. Otherwise, there is
a risk of engine damage. :
Gear indicator
; Upshift indicator
Before the engine speed reaches the red area, an upshift indicator will be shown in the mul-
tifunction display.
X If the colour in the speedometer multifunc-
tion display changes to red and the UP UPdis-
play message is shown, shift up a gear.
Downshifting X
Pull the left-hand steering wheel gearshift
paddle (Y page 169).
The automatic transmission shifts down to
the next gear.
Maximum acceleration X Pull the left-hand steering wheel gearshift
paddle until the transmission selects the
optimum gear for the current speed.
i If you brake the vehicle or stop without
shifting down, the automatic transmission
will shift down to a gear that will allow the
vehicle to accelerate or pull away again.
Kickdown You can also use kickdown for maximum
acceleration in manual drive program M.
X Depress the accelerator pedal beyond the
pressure point.
The transmission shifts to a lower gear
depending on the engine speed.
i AMG vehicles:
it is not possible to use
kickdown in manual drive program M. Automatic transmission
171Driving and parking Z
Page 177 of 637
fuel. Otherwise, fuel can enter the fuel sys-
tem. Even small amounts of the wrong fuel could result in damage to the fuel system
and the engine. Notify a qualified specialist
workshop and have the fuel tank and fuel
lines drained completely.
! Overfilling the fuel tank could damage the
fuel system.
! Take care not to spill any fuel on painted
surfaces. You could otherwise damage the
paintwork.
! Use a filter when adding fuel from a fuel
can. The fuel lines and/or the diesel injec-
tion system could otherwise be blocked by
particles from the fuel can.
Do not get into the vehicle again during the
refuelling process. Otherwise, electrostatic
charge could build up again.
If you overfill the fuel tank, some fuel may
spray out when you remove the fuel pump
nozzle.
Further information on fuel and fuel quality
(Y page 623). Refuelling
General notes The fuel filler flap is unlocked or locked auto-
matically when you open or close the vehicle
with the key or using KEYLESS-GO.
The position of the 8fuel filler cap is dis-
played in the instrument cluster. The arrow
next to the filling pump indicates the side of
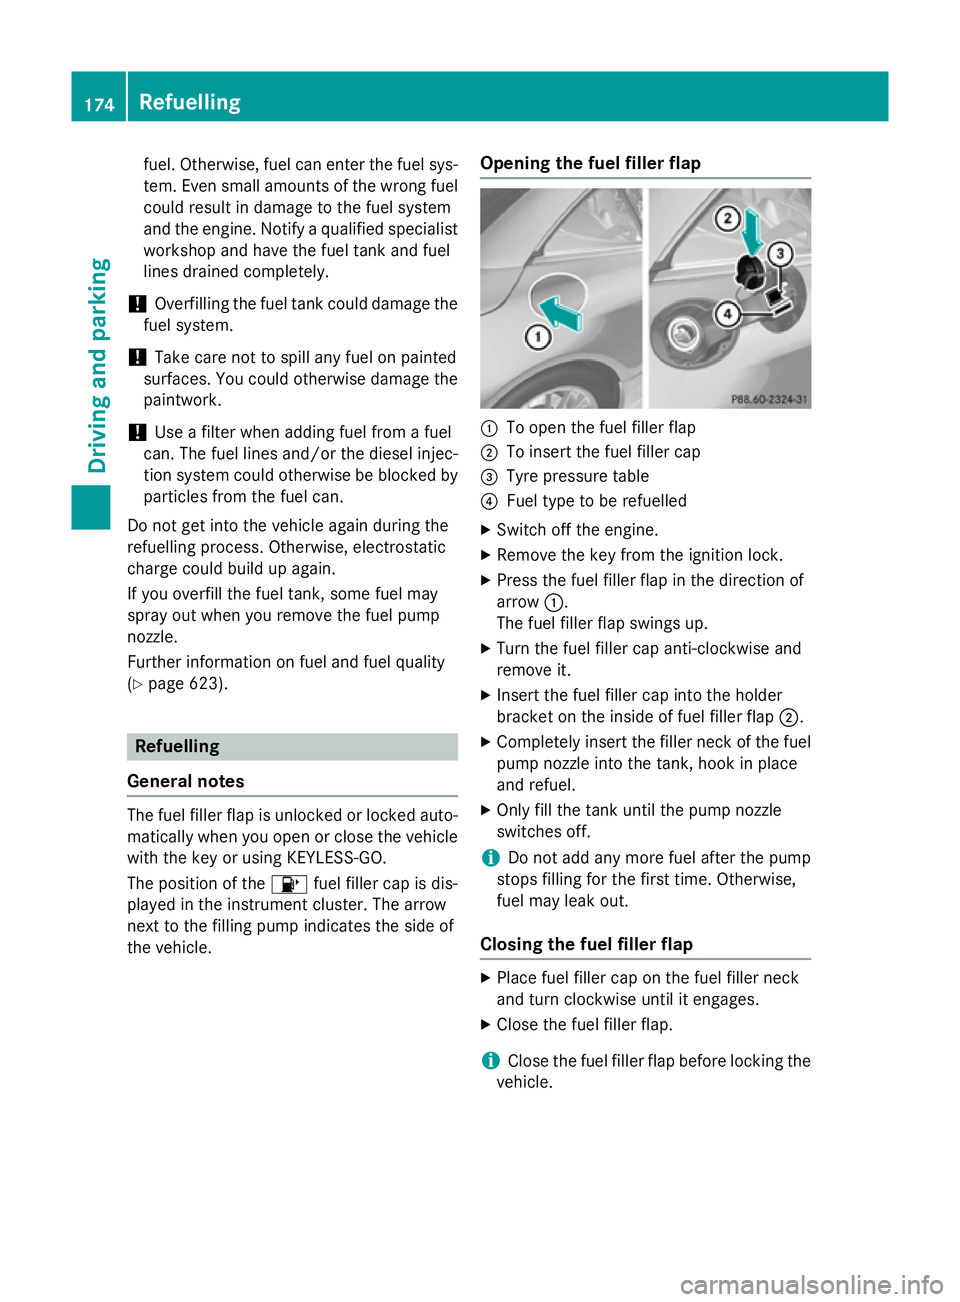
the vehicle. Opening the fuel filler flap :
To open the fuel filler flap
; To insert the fuel filler cap
= Tyre pressure table
? Fuel type to be refuelled
X Switch off the engine.
X Remove the key from the ignition lock.
X Press the fuel filler flap in the direction of
arrow :.
The fuel filler flap swings up.
X Turn the fuel filler cap anti-clockwise and
remove it.
X Insert the fuel filler cap into the holder
bracket on the inside of fuel filler flap ;.
X Completely insert the filler neck of the fuel
pump nozzle into the tank, hook in place
and refuel.
X Only fill the tank until the pump nozzle
switches off.
i Do not add any more fuel after the pump
stops filling for the first time. Otherwise,
fuel may leak out.
Closing the fuel filler flap X
Place fuel filler cap on the fuel filler neck
and turn clockwise until it engages.
X Close the fuel filler flap.
i Close the fuel filler flap before locking the
vehicle. 174
RefuellingDriving and parking
Page 181 of 637
During braking:
R a warning tone sounds
R the Release parking brake
Release parking brake message
appears
R the red !indicator lamp in the instru-
ment cluster flashes
When the vehicle has been braked to a stand- still, the electric parking brake is engaged. Parking up the vehicle
If you leave the vehicle parked up for longer
than four weeks, the battery may be damaged
by exhaustive discharging.
X Disconnect the battery or connect it to a
trickle charger.
i You can obtain information about trickle
chargers from a qualified specialist work-
shop.
If you leave the vehicle parked up for longer
than six weeks, the vehicle may suffer dam-
age as a result of lack of use.
X Visit a qualified specialist workshop and
seek advice. Driving tips
General notes
Important safety notes G
WARNING
If you switch off the ignition while driving,
safety-relevant functions are only available
with limitations, or not at all. This could affect, for example, the power steering and the brake
boosting effect. You will require considerably
more effort to steer and brake. There is a risk of an accident.
Do not switch off the ignition while driving. Drive sensibly – save fuel Observe the following tips to save fuel:
R The tyres should always be inflated to the
recommended tyre pressure.
R Remove unnecessary loads.
R Warm up the engine at low engine speeds.
R Avoid frequent acceleration or braking.
R Observe the service intervals in the Service
Booklet or in the service interval display.
Have all the maintenance work carried out
in accordance with Daimler AG regulations.
Fuel consumption also increases when driv-
ing in cold weather, in stop-start traffic, on
short journeys and in hilly terrain. ECO display
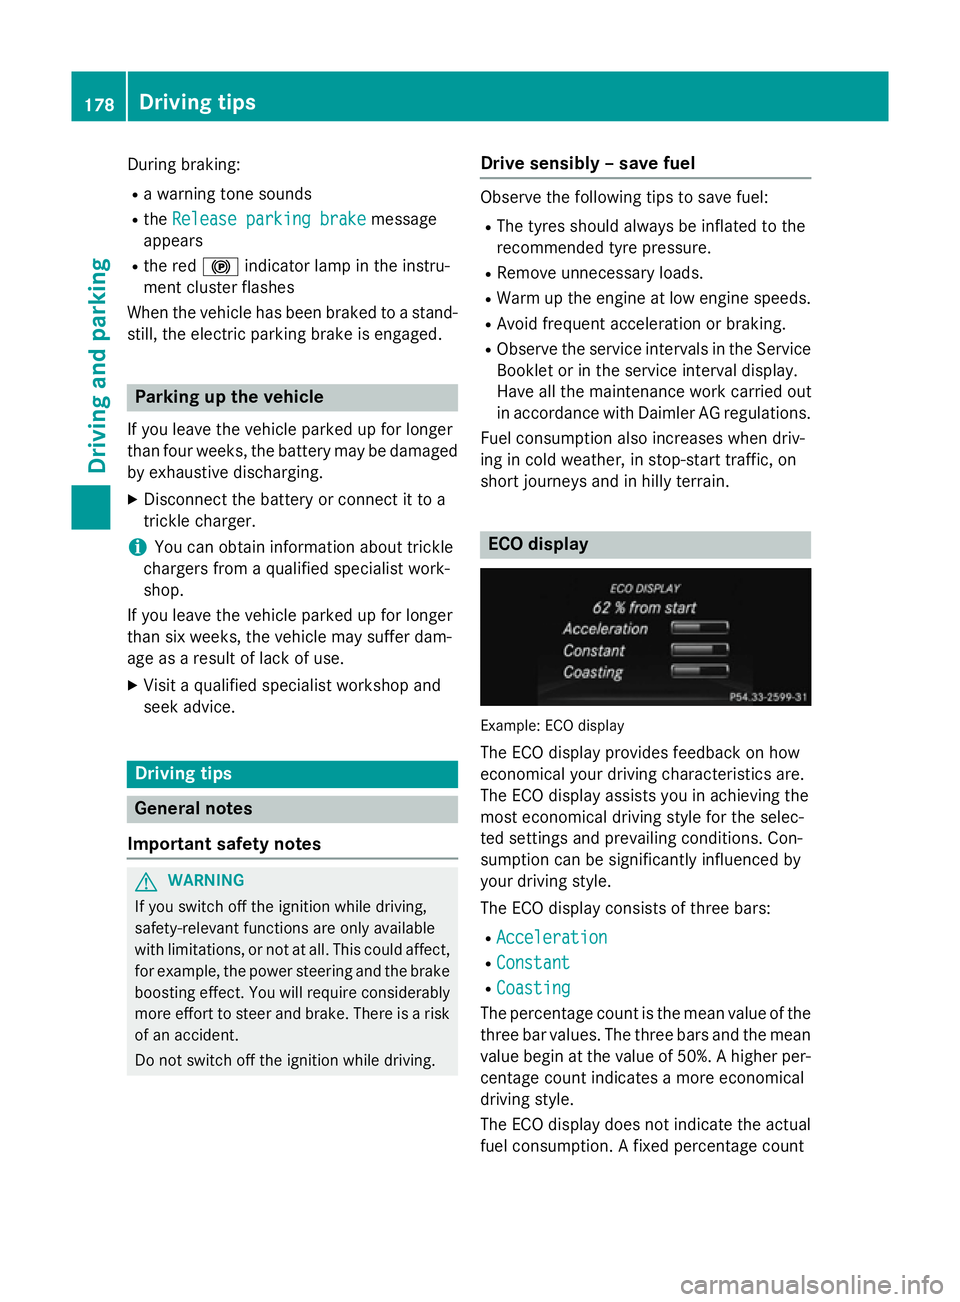
Example: ECO display
The ECO display provides feedback on how
economical your driving characteristics are.
The ECO display assists you in achieving the
most economical driving style for the selec-
ted settings and prevailing conditions. Con-
sumption can be significantly influenced by
your driving style.
The ECO display consists of three bars:
R Acceleration
Acceleration
R Constant Constant
R Coasting
Coasting
The percentage count is the mean value of the three bar values. The three bars and the mean
value begin at the value of 50%. A higher per- centage count indicates a more economical
driving style.
The ECO display does not indicate the actual
fuel consumption. A fixed percentage count 178
Driving
tipsDriving an d parking
Page 585 of 637
H
Environmental note
Have the used tyre sealant bottle disposed of professionally, e.g. at a qualified specialist
workshop.
If a tyre pressure of 180 kPa (1.8 bar/26 psi) has been achieved after ten minutes:
X Switch off the tyre inflation compressor.
X Unscrew the filler hose from the valve of
the faulty tyre.
X Stow the tyre sealant bottle, the tyre infla-
tion compressor and the warning triangle.
X Pull away immediately .
The maximum speed for a tyre sealed with
tyre sealant is 80 km/h. The upper part of
the TIREFIT sticker must be affixed to the
instrument cluster where it will be easily
seen by the driver.
X Stop after driving for approximately ten
minutes and check the tyre pressure with
the tyre inflation compressor.
The tyre pressure must now be at least
130 kPa (1.3 bar/19 psi). G
WARNING
If the required tyre pressure is not reached
after driving for a short period, the tyre is too badly damaged. The tyre sealant cannot
repair the tyre in this instance. Damaged tyres and a tyre pressure that is too low can signif-
icantly impair the vehicle's braking and driv-
ing characteristics. There is a risk of accident.
Do not continue driving. Contact a qualified
specialist workshop.
i In your vehicle, you will find a sticker with
the Mercedes-Benz Service24h telephone
number, e.g. on the B-pillar on the driver's
side.
X Correct the tyre pressure if it is still at least
130 kPa (1.3 bar/19 psi) (see the fuel filler
flap for values).
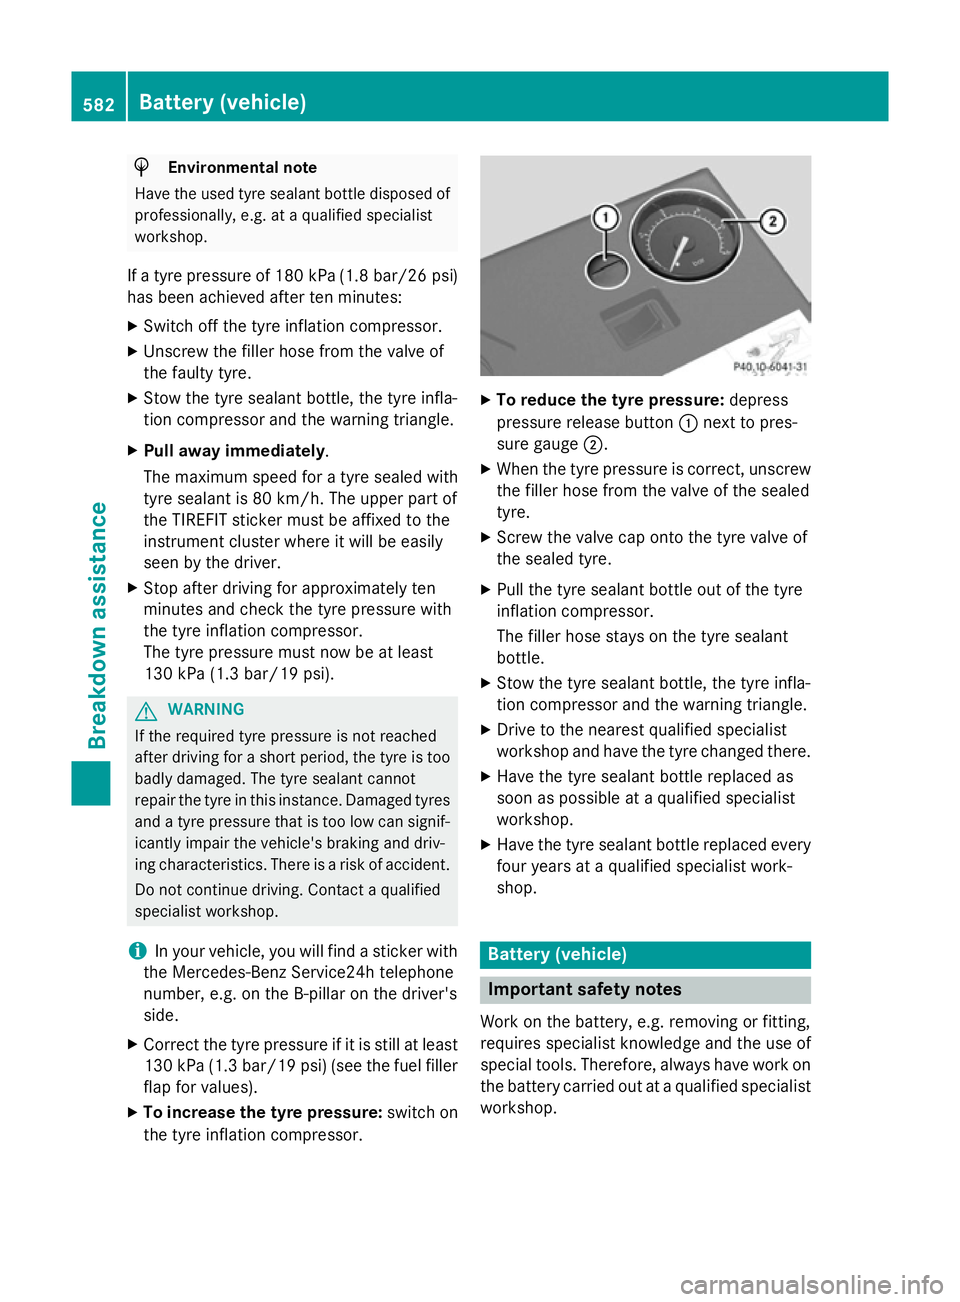
X To increase the tyre pressure: switch on
the tyre inflation compressor. X
To reduce the tyre pressure: depress
pressure release button :next to pres-
sure gauge ;.
X When the tyre pressure is correct, unscrew
the filler hose from the valve of the sealed
tyre.
X Screw the valve cap onto the tyre valve of
the sealed tyre.
X Pull the tyre sealant bottle out of the tyre
inflation compressor.
The filler hose stays on the tyre sealant
bottle.
X Stow the tyre sealant bottle, the tyre infla-
tion compressor and the warning triangle.
X Drive to the nearest qualified specialist
workshop and have the tyre changed there.
X Have the tyre sealant bottle replaced as
soon as possible at a qualified specialist
workshop.
X Have the tyre sealant bottle replaced every
four years at a qualified specialist work-
shop. Battery (vehicle)
Important safety notes
Work on the battery, e.g. removing or fitting,
requires specialist knowledge and the use of
special tools. Therefore, always have work on the battery carried out at a qualified specialist
workshop. 582
Battery (vehicle)Breakdown assistance
Page 599 of 637
Useful information
i This Owner's Manual describes all mod-
els, series and optional equipment for your
vehicle that were available at the time of
going to press. National variations are pos- sible. Note that your vehicle may not be
equipped with all of the functions descri-
bed. This is also the case for systems and
functions relevant to safety.
i Read the information on qualified special-
ist workshops: (Y page 34). Important safety notes
G
WARNING
If wheels and tyres of the wrong size are used, the wheel brakes or suspension components
may be damaged. There is a risk of an acci-
dent.
Always replace wheels and tyres with those
that fulfil the specifications of the original
part.
When replacing wheels, make sure to fit the
correct:
R designation
R type
When replacing tyres, make sure to fit the
correct:
R designation
R manufacturer
R type G
WARNING
A flat tyre severely impairs the driving, steer-
ing and braking characteristics of the vehicle.
There is a risk of accident.
Tyres without run-flat characteristics:
R do not drive with a flat tyre.
R immediately replace the flat tyre with your
emergency spare wheel or spare wheel, or
consult a qualified specialist workshop. Tyres with run-flat characteristics:
R pay attention to the information and warn-
ing notices on MOExtended tyres (tyres
with run-flat characteristics).
Accessories that are not approved for your
vehicle by Mercedes-Benz or that are not
being used correctly can impair the operating
safety.
Before purchasing and using non-approved
accessories, visit a qualified specialist work-
shop and enquire about:
R suitability
R legal stipulations
R factory recommendations
Information on dimensions and types of
wheels and tyres for your vehicle can be
found (Y page 610).
Information on air pressure for the tyres on
your vehicle can be found:
R on the tyre pressure label on the fuel filler
flap (Y page 174)
R in the "Tyre pressure" section
Modification work on the brake system and
wheels is not permitted. The use of wheel
spacers or brake dust shields is not permit-
ted. This invalidates the general operating
permit for the vehicle.
i Further information on wheels and tyres
can be obtained at any qualified specialist
workshop. Operation
Information on driving
Check the tyre pressures when the vehicle is
heavily laden and, if necessary, adjust.
While driving, pay attention to vibrations,
noises and unusual handling characteristics,
e.g. pulling to one side. This may indicate that the wheels or tyres are damaged. If you sus-
pect that a tyre is defective, reduce your
speed immediately. Stop the vehicle as soon
as possible to check the wheels and tyres for 596
OperationWheels and tyres