2012 MERCEDES-BENZ SL ROADSTER check oil
[x] Cancel search: check oilPage 16 of 637
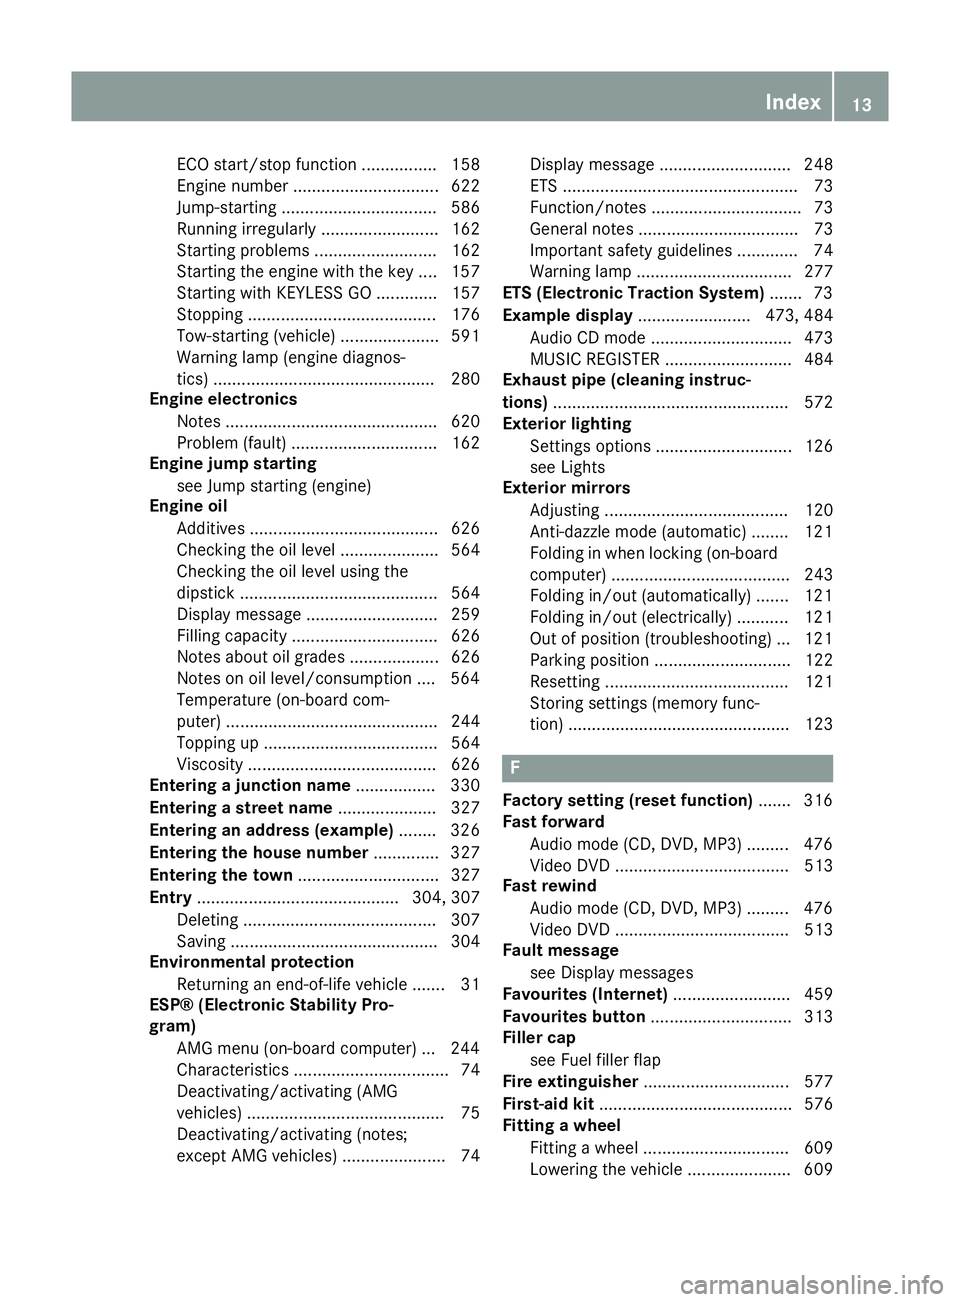
ECO start/stop functio
n................ 158
Engine number ............................... 622
Jump-starting ................................. 586
Running irregularly ......................... 162
Starting problems .......................... 162
Starting the engine with the key .... 157
Starting with KEYLESS GO ............. 157
Stopping ........................................ 176
Tow-starting (vehicle) ..................... 591
Warning lamp (engine diagnos-
tics) ............................................... 280
Engine electronics
Notes ............................................. 620
Problem (fault) ............................... 162
Engine jump starting
see Jump starting (engine)
Engine oil
Additives ........................................ 626
Checking the oil level ..................... 564
Checking the oil level using the
dipstick .......................................... 564
Display message ............................ 259
Filling capacity ............................... 626
Notes about oil grade s................... 626
Notes on oil level/consumption .... 564
Temperature (on-board com-
puter) ............................................. 244
Topping up ..................................... 564
Viscosity ........................................ 626
Entering a junction name ................. 330
Entering a street name ..................... 327
Entering an address (example) ........ 326
Entering the house number .............. 327
Entering the town .............................. 327
Entry ........................................... 304, 307
Deleting ......................................... 307
Saving ............................................ 304
Environmental protection
Returning an end-of-life vehicle ....... 31
ESP® (Electronic Stability Pro-
gram)
AMG menu (on-board computer) ... 244
Characteristics ................................. 74
Deactivating/activating (AMG
vehicles) .......................................... 75
Deactivating/activating (notes;
except AMG vehicles) ...................... 74 Display message ............................ 248
ETS .................................................. 73
Function/note s................................ 73
General notes .................................. 73
Important safety guidelines ............. 74
Warning lamp ................................. 277
ETS (Electronic Traction System) ....... 73
Example display ........................ 473, 484
Audio CD mode .............................. 473
MUSIC REGISTER ........................... 484
Exhaust pipe (cleaning instruc-
tions) .................................................. 572
Exterior lighting
Settings options ............................. 126
see Lights
Exterior mirrors
Adjusting ....................................... 120
Anti-dazzle mode (automatic) ........ 121
Folding in when locking (on-boardcomputer) ...................................... 243
Folding in/out (automatically )....... 121
Folding in/out (electrically) ........... 121
Out of position (troubleshooting) ... 121
Parking position ............................. 122
Resetting ....................................... 121
Storing settings (memory func-
tion) ............................................... 123 F
Factory setting (reset function) ....... 316
Fast forward
Audio mode (CD, DVD, MP3) ......... 476
Video DVD ..................................... 513
Fast rewind
Audio mode (CD, DVD, MP3) ......... 476
Video DVD ..................................... 513
Fault message
see Display messages
Favourites (Internet) ......................... 459
Favourites button .............................. 313
Filler cap
see Fuel filler flap
Fire extinguisher ............................... 577
First-aid kit ......................................... 576
Fitting a wheel
Fitting a wheel ............................... 609
Lowering the vehicle ...................... 609 Index
13
Page 176 of 637
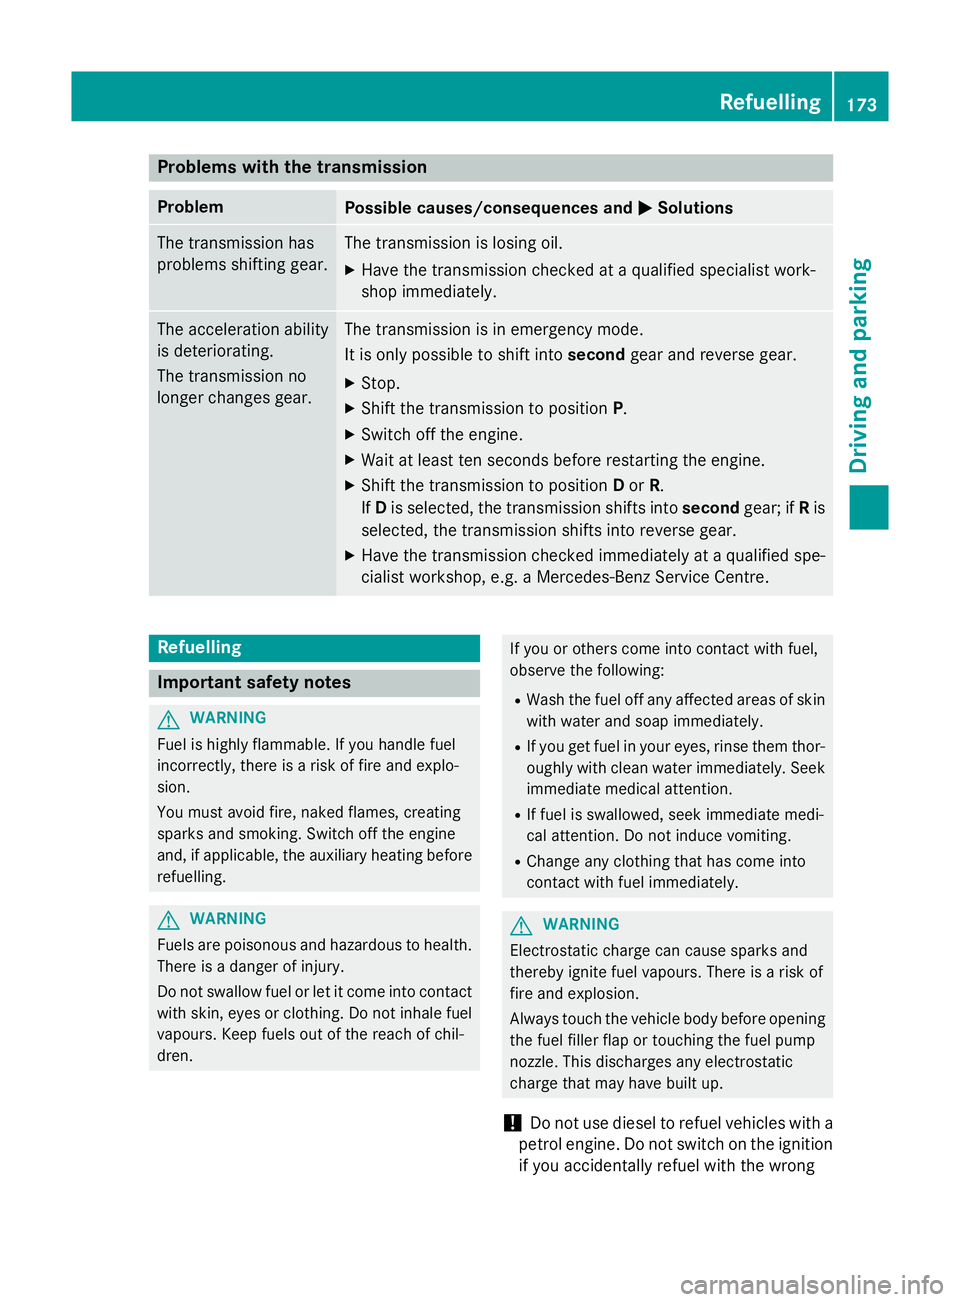
Problems with the transmission
Problem
Possible causes/consequences and
M
MSolutions The transmission has
problems shifting gear. The transmission is losing oil.
X Have the transmission checked at a qualified specialist work-
shop immediately. The acceleration ability
is deteriorating.
The transmission no
longer changes gear. The transmission is in emergency mode.
It is only possible to shift into
secondgear and reverse gear.
X Stop.
X Shift the transmission to position P.
X Switch off the engine.
X Wait at least ten seconds before restarting the engine.
X Shift the transmission to position Dor R.
If D is selected, the transmission shifts into secondgear; ifRis
selected, the transmission shifts into reverse gear.
X Have the transmission checked immediately at a qualified spe-
cialist workshop, e.g. a Mercedes-Benz Service Centre. Refuelling
Important safety notes
G
WARNING
Fuel is highly flammable. If you handle fuel
incorrectly, there is a risk of fire and explo-
sion.
You must avoid fire, naked flames, creating
sparks and smoking. Switch off the engine
and, if applicable, the auxiliary heating before refuelling. G
WARNING
Fuels are poisonous and hazardous to health. There is a danger of injury.
Do not swallow fuel or let it come into contact
with skin, eyes or clothing. Do not inhale fuel
vapours. Keep fuels out of the reach of chil-
dren. If you or others come into contact with fuel,
observe the following:
R Wash the fuel off any affected areas of skin
with water and soap immediately.
R If you get fuel in your eyes, rinse them thor-
oughly with clean water immediately. Seek
immediate medical attention.
R If fuel is swallowed, seek immediate medi-
cal attention. Do not induce vomiting.
R Change any clothing that has come into
contact with fuel immediately. G
WARNING
Electrostatic charge can cause sparks and
thereby ignite fuel vapours. There is a risk of
fire and explosion.
Always touch the vehicle body before opening the fuel filler flap or touching the fuel pump
nozzle. This discharges any electrostatic
charge that may have built up.
! Do not use diesel to refuel vehicles with a
petrol engine. Do not switch on the ignition if you accidentally refuel with the wrong Refuelling
173Driving and parking Z
Page 262 of 637
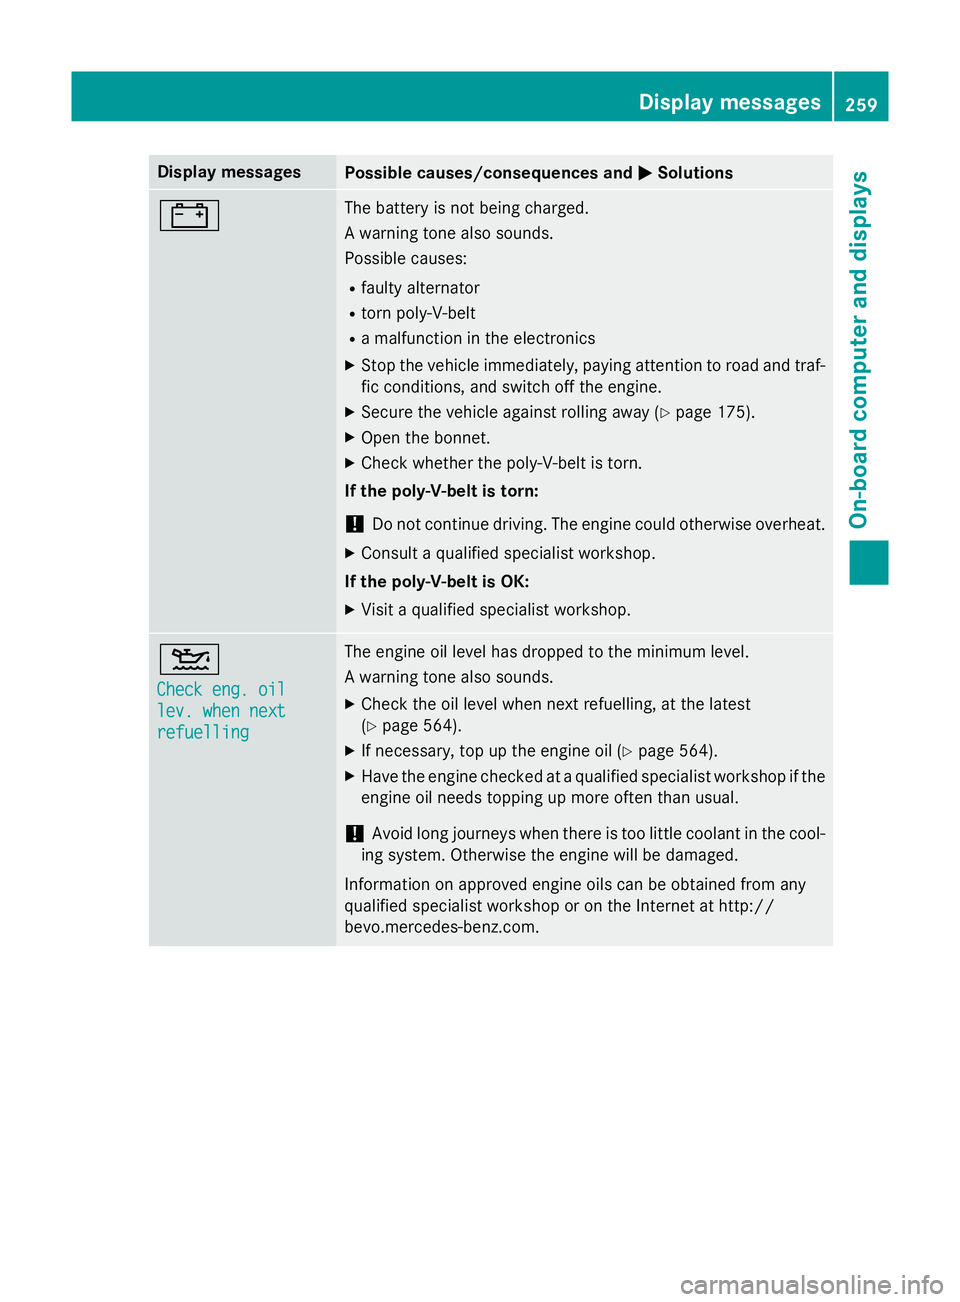
Display messages
Possible causes/consequences and
M
MSolutions # The battery is not being charged.
A warning tone also sounds.
Possible causes:
R faulty alternator
R torn poly-V-belt
R a malfunction in the electronics
X Stop the vehicle immediately, paying attention to road and traf-
fic conditions, and switch off the engine.
X Secure the vehicle against rolling away (Y page 175).
X Open the bonnet.
X Check whether the poly-V-belt is torn.
If the poly-V-belt is torn:
! Do not continue driving. The engine could otherwise overheat.
X Consult a qualified specialist workshop.
If the poly-V-belt is OK:
X Visit a qualified specialist workshop. 4
Check eng. oil Check eng. oil
lev. when next lev. when next
refuelling refuelling The engine oil level has dropped to the minimum level.
A warning tone also sounds.
X Check the oil level when next refuelling, at the latest
(Y page 564).
X If necessary, top up the engine oil (Y page 564).
X Have the engine checked at a qualified specialist workshop if the
engine oil needs topping up more often than usual.
! Avoid long journeys when there is too little coolant in the cool-
ing system. Otherwise the engine will be damaged.
Information on approved engine oils can be obtained from any
qualified specialist workshop or on the Internet at http://
bevo.mercedes-benz.co m. Display
messages
259On-board computer and displays Z
Page 263 of 637
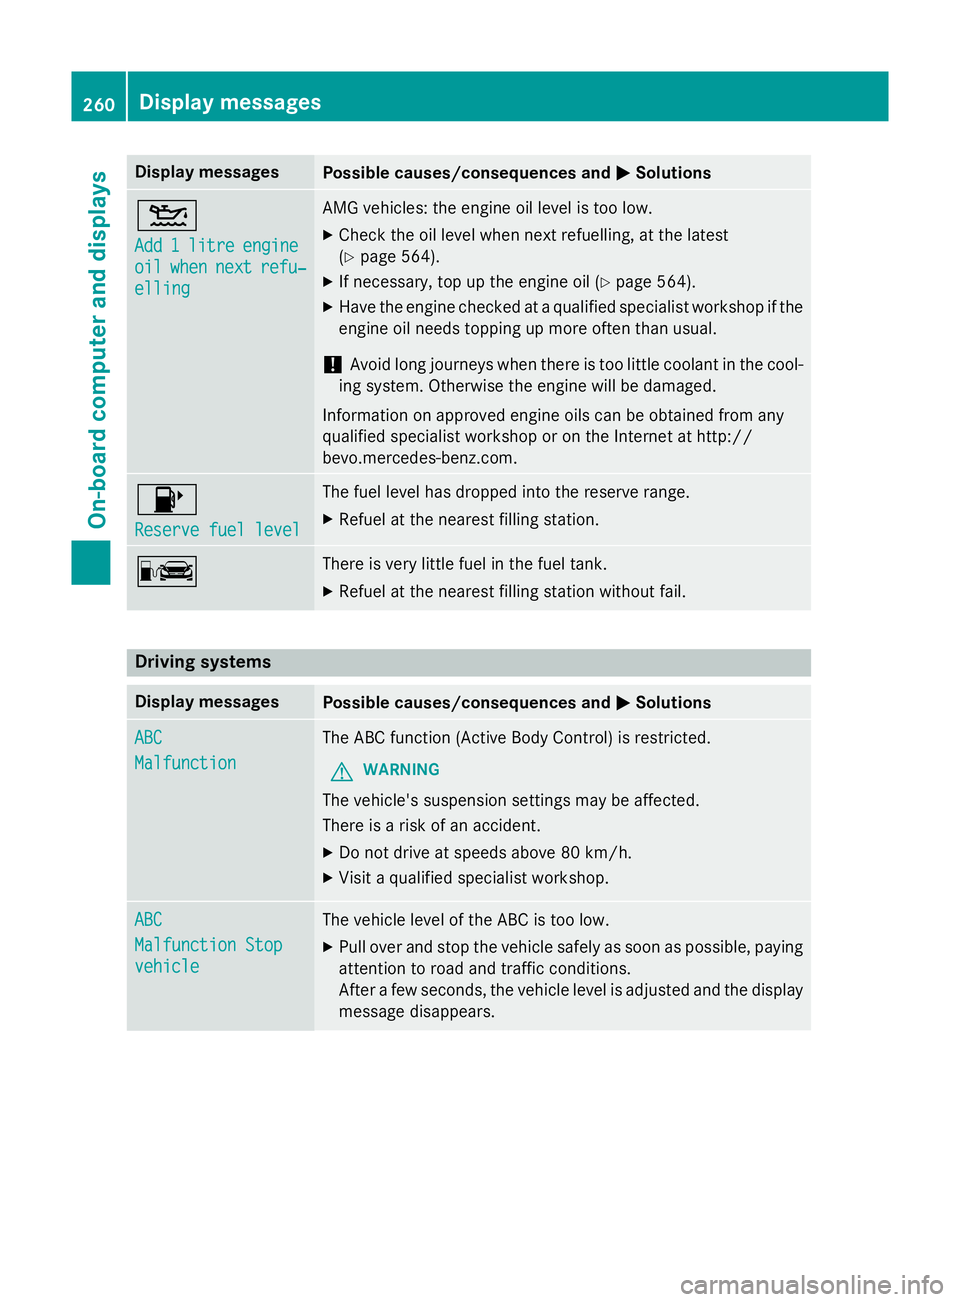
Display messages
Possible causes/consequences and
M
MSolutions 4
Add Add
1
1litre
litre engine
engine
oil
oil when
when next
next refu‐
refu‐
elling
elling AMG vehicles: the engine oil level is too low.
X Check the oil level when next refuelling, at the latest
(Y page 564).
X If necessary, top up the engine oil (Y page 564).
X Have the engine checked at a qualified specialist workshop if the
engine oil needs topping up more often than usual.
! Avoid long journeys when there is too little coolant in the cool-
ing system. Otherwise the engine will be damaged.
Information on approved engine oils can be obtained from any
qualified specialist workshop or on the Internet at http://
bevo.mercedes-benz.co m.8
Reserve fuel level Reserve fuel level The fuel level has dropped into the reserve range.
X Refuel at the nearest filling station. C There is very little fuel in the fuel tank.
X Refuel at the nearest filling station without fail. Driving systems
Display messages
Possible causes/consequences and
M
MSolutions ABC
ABC
Malfunction Malfunction The ABC function (Active Body Control) is restricted.
G WARNING
The vehicle's suspension settings may be affected.
There is a risk of an accident. X Do not drive at speeds above 80 km/h.
X Visit a qualified specialist workshop. ABC ABC
Malfunction Stop Malfunction Stop
vehicle vehicle The vehicle level of the ABC is too low.
X Pull over and stop the vehicle safely as soon as possible, paying
attention to road and traffic conditions.
After a few seconds, the vehicle level is adjusted and the display
message disappears. 260
Display messagesOn-board computer and displays
Page 567 of 637
Engine oil
Notes on oil level Depending on your driving style, the vehicle
consumes up to 0.8 litres of oil per 1,000 km.
The oil consumption may be higher than this
when the vehicle is new or if you frequently
drive at high engine speeds.
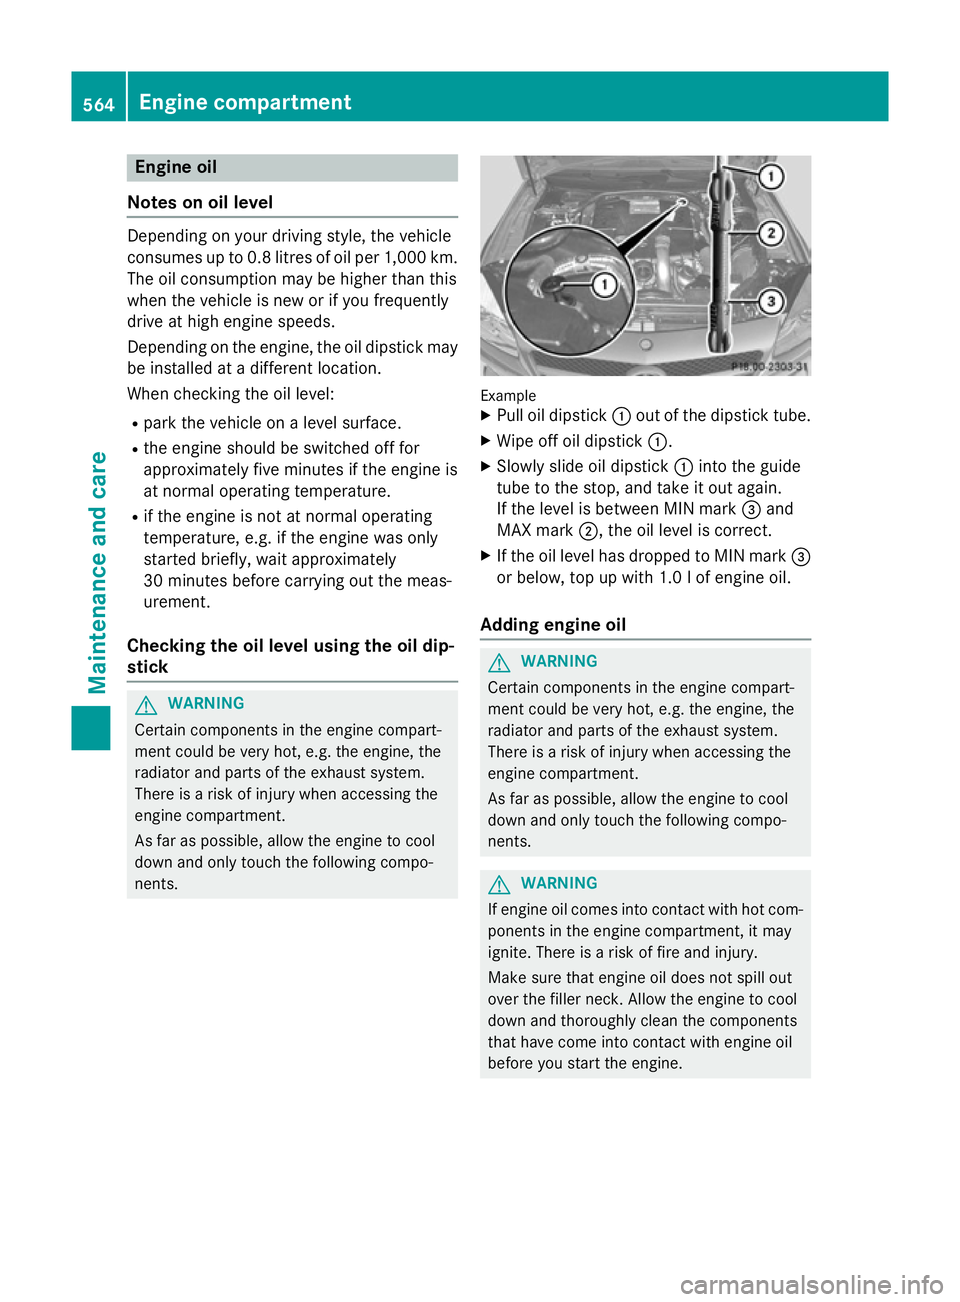
Depending on the engine, the oil dipstick may be installed at a different location.
When checking the oil level:
R park the vehicle on a level surface.
R the engine should be switched off for
approximately five minutes if the engine is
at normal operating temperature.
R if the engine is not at normal operating
temperature, e.g. if the engine was only
started briefly, wait approximately
30 minutes before carrying out the meas-
urement.
Checking the oil level using the oil dip-
stick G
WARNING
Certain components in the engine compart-
ment could be very hot, e.g. the engine, the
radiator and parts of the exhaust system.
There is a risk of injury when accessing the
engine compartment.
As far as possible, allow the engine to cool
down and only touch the following compo-
nents. Example
X Pull oil dipstick :out of the dipstick tube.
X Wipe off oil dipstick :.
X Slowly slide oil dipstick :into the guide
tube to the stop, and take it out again.
If the level is between MIN mark =and
MAX mark ;, the oil level is correct.
X If the oil level has dropped to MIN mark =
or below, top up with 1.0 l of engine oil.
Adding engine oil G
WARNING
Certain components in the engine compart-
ment could be very hot, e.g. the engine, the
radiator and parts of the exhaust system.
There is a risk of injury when accessing the
engine compartment.
As far as possible, allow the engine to cool
down and only touch the following compo-
nents. G
WARNING
If engine oil comes into contact with hot com- ponents in the engine compartment, it may
ignite. There is a risk of fire and injury.
Make sure that engine oil does not spill out
over the filler neck. Allow the engine to cool
down and thoroughly clean the components
that have come into contact with engine oil
before you start the engine. 564
Engine compartmentMaintenance and care
Page 568 of 637
H
Environmental note
When topping up the oil, take care not to spill any. If oil enters the soil or waterways, it is
harmful to the environment.
! Only use engine oils and oil filters that
have been approved for vehicles with a ser-
vice system. You can obtain a list of the
engine oils and oil filters tested and
approved in accordance with the
Mercedes-Benz Specifications for Service
Products at any Mercedes-Benz Service
Centre.
Damage to the engine or exhaust system is caused by the following:
R using engine oils and oil filters that have
not been specifically approved for the
service system
R changing the engine oil and oil filter after
missing the change interval required by
the service system
R using engine oil additives
! Do not add too much oil. If the oil level is
above the "max" mark on the dipstick, too
much oil has been added. This can lead to
damage to the engine or the catalytic con-
verter. Have excess oil siphoned off. Example: engine oil filler cap
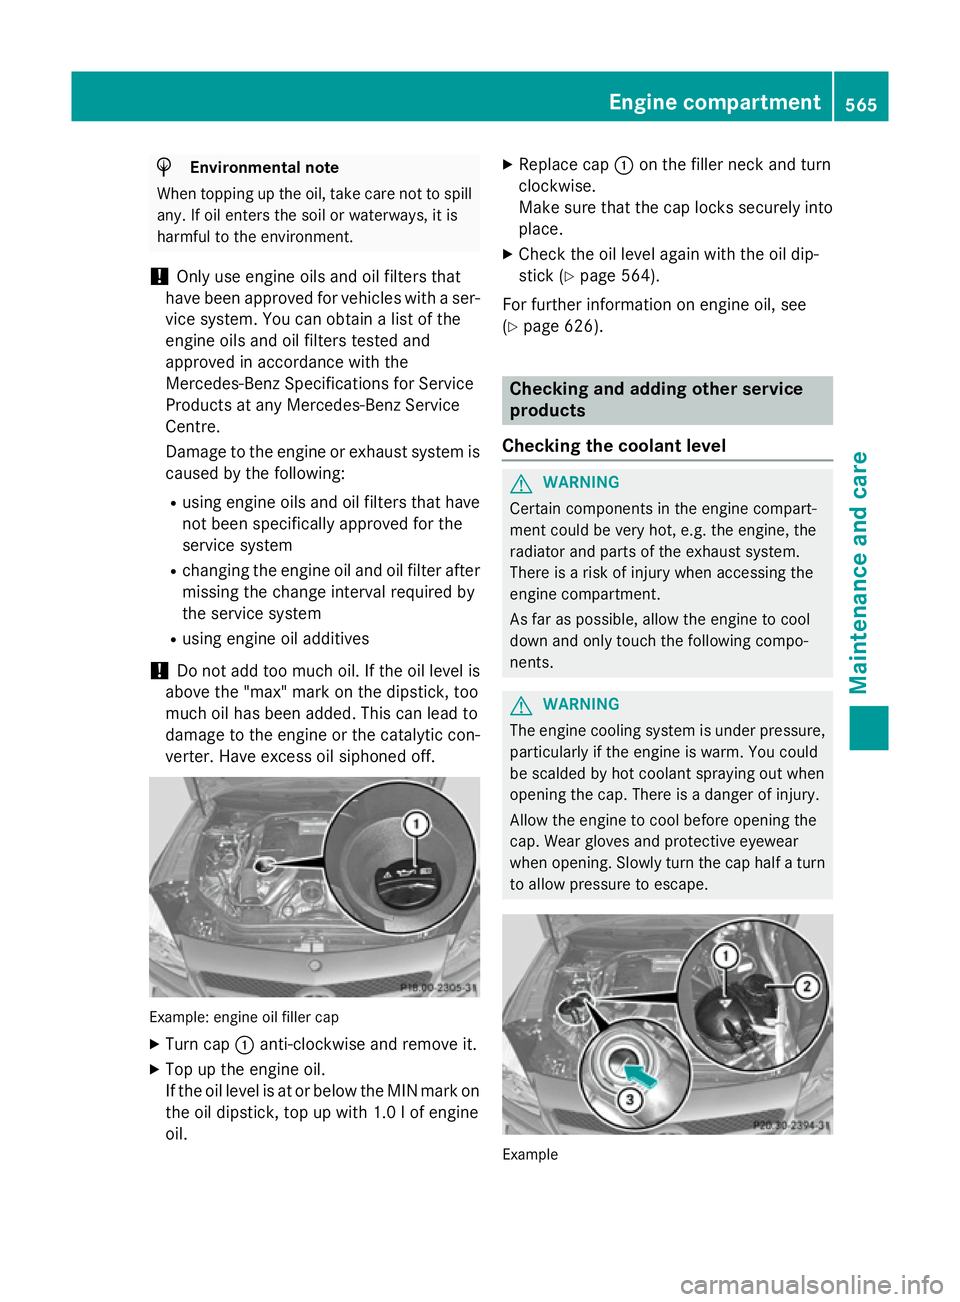
X Turn cap :anti-clockwise and remove it.
X Top up the engine oil.
If the oil level is at or below the MIN mark on
the oil dipstick, top up with 1.0 l of engine
oil. X
Replace cap :on the filler neck and turn
clockwise.
Make sure that the cap locks securely into place.
X Check the oil level again with the oil dip-
stick (Y page 564).
For further information on engine oil, see
(Y page 626). Checking and adding other service
products
Checking the coolant level G
WARNING
Certain components in the engine compart-
ment could be very hot, e.g. the engine, the
radiator and parts of the exhaust system.
There is a risk of injury when accessing the
engine compartment.
As far as possible, allow the engine to cool
down and only touch the following compo-
nents. G
WARNING
The engine cooling system is under pressure, particularly if the engine is warm. You could
be scalded by hot coolant spraying out when
opening the cap. There is a danger of injury.
Allow the engine to cool before opening the
cap. Wear gloves and protective eyewear
when opening. Slowly turn the cap half a turn
to allow pressure to escape. Example Engine compartment
565Maintenance and care Z
Page 571 of 637
In these or similar operating conditions, have
the air filter, engine oil and oil filter, for exam- ple, changed more frequently. The tyres mustbe checked more frequently if the vehicle is
operated under increased loads. Further
information can be obtained at a qualified
specialist workshop, e.g. a Mercedes-Benz
Service Centre.
Driving abroad An extensive Mercedes-Benz Service network
is also available in other countries. You can
obtain further information from any
Mercedes-Benz Service Centre. Care
Notes on care
H
Environmental note
Dispose of empty packaging and cleaning
cloths in an environmentally responsible man- ner.
! For cleaning your vehicle, do not use any
of the following:
R dry, rough or hard cloths
R abrasive cleaning agents
R solvents
R cleaning agents containing solvents
Do not scrub.
Do not touch the surfaces or protective
films with hard objects, e.g. a ring or ice
scraper. You could otherwise scratch or
damage the surfaces and protective film.
! Do not park up the vehicle for an extended
period straight after cleaning it, particularly after having cleaned the wheels with wheel
cleaner. Wheel cleaners could cause
increased corrosion of the brake discs and
brake pads/linings. For this reason, you
should drive for a few minutes after clean-
ing. Braking heats the brake discs and the
brake pads/linings, thus drying them. The
vehicle can then be parked up. Regular care of your vehicle is a condition for
retaining the quality in the long term.
Use care products and cleaning agents rec-
ommended and approved by Mercedes-Benz. Washing the vehicle and cleaning the
paintwork
Automatic car wash G
WARNING
Braking efficiency is reduced after the vehicle has been washed. There is a risk of an acci-
dent.
After washing the vehicle, brake carefully
while paying attention to the traffic conditions in order to restore full braking efficiency.
! If DISTRONIC PLUS or the HOLD function
is activated, the vehicle brakes automati-
cally in certain situations. To prevent dam-
age to the vehicle, deactivate DISTRONIC
PLUS and the HOLD function in the follow-
ing or other similar situations:
R when towing the vehicle
R in the car wash
! It is preferable to use car washes with
adjustable high-pressure pre-cleaning that
corresponds to the specification for the
Cabriolet programme. In car washes that
use high water pressures, there is a risk
that a small amount of water may leak into
the vehicle.
! Vehicles with HANDS-FREE ACCESS: if a
key with KEYLESS-GO is within the detec-
tion range of the KEYLESS-GO antenna, the
following situations could lead to the unin-
tentional opening of the boot lid:
R using a car wash
R using a high-pressure cleaner
Make sure that the key is at least 2 maway
from the vehicle.
! Make sure that the automatic transmis-
sion is in position Nwhen washing your 568
CareMaintenance and care
Page 612 of 637
hubs could otherwise be damaged when
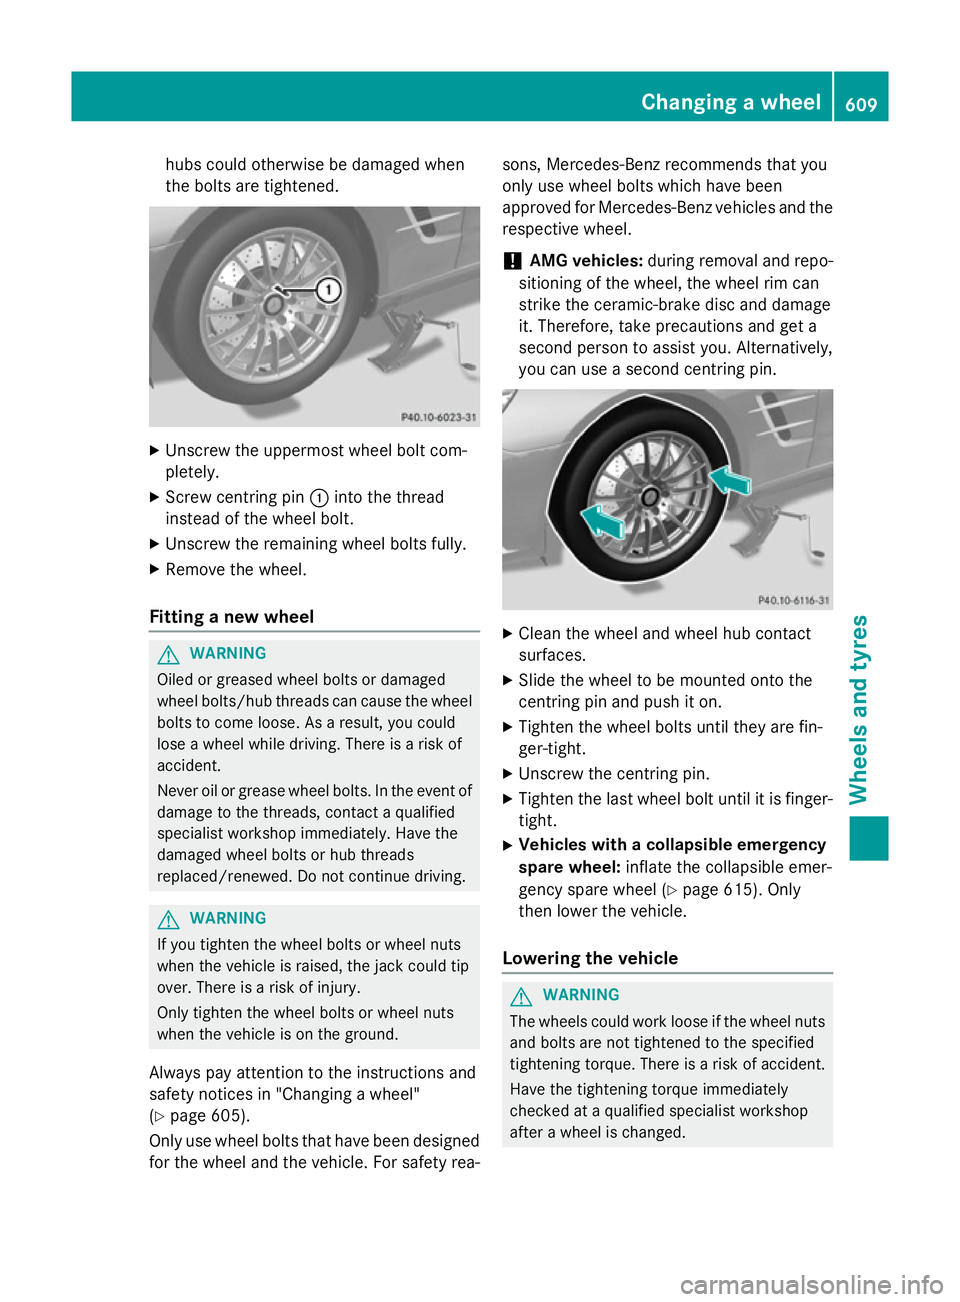
the bolts are tightened. X
Unscrew the uppermost wheel bolt com-
pletely.
X Screw centring pin :into the thread
instead of the wheel bolt.
X Unscrew the remaining wheel bolts fully.
X Remove the wheel.
Fitting a new wheel G
WARNING
Oiled or greased wheel bolts or damaged
wheel bolts/hub threads can cause the wheel bolts to come loose. As a result, you could
lose a wheel while driving. There is a risk of
accident.
Never oil or grease wheel bolts. In the event of damage to the threads, contact a qualified
specialist workshop immediately. Have the
damaged wheel bolts or hub threads
replaced/renewed. Do not continue driving. G
WARNING
If you tighten the wheel bolts or wheel nuts
when the vehicle is raised, the jack could tip
over. There is a risk of injury.
Only tighten the wheel bolts or wheel nuts
when the vehicle is on the ground.
Always pay attention to the instructions and
safety notices in "Changing a wheel"
(Y page 605).
Only use wheel bolts that have been designed
for the wheel and the vehicle. For safety rea- sons, Mercedes-Benz recommends that you
only use wheel bolts which have been
approved for Mercedes-Benz vehicles and the
respective wheel.
! AMG vehicles:
during removal and repo-
sitioning of the wheel, the wheel rim can
strike the ceramic-brake disc and damage
it. Therefore, take precautions and get a
second person to assist you. Alternatively,
you can use a second centring pin. X
Clean the wheel and wheel hub contact
surfaces.
X Slide the wheel to be mounted onto the
centring pin and push it on.
X Tighten the wheel bolts until they are fin-
ger-tight.
X Unscrew the centring pin.
X Tighten the last wheel bolt until it is finger-
tight.
X Vehicles with a collapsible emergency
spare wheel: inflate the collapsible emer-
gency spare wheel (Y page 615). Only
then lower the vehicle.
Lowering the vehicle G
WARNING
The wheels could work loose if the wheel nuts and bolts are not tightened to the specified
tightening torque. There is a risk of accident.
Have the tightening torque immediately
checked at a qualified specialist workshop
after a wheel is changed. Changing a wheel
609Wheels and tyres Z