2012 MERCEDES-BENZ SL ROADSTER change time
[x] Cancel search: change timePage 309 of 637
X
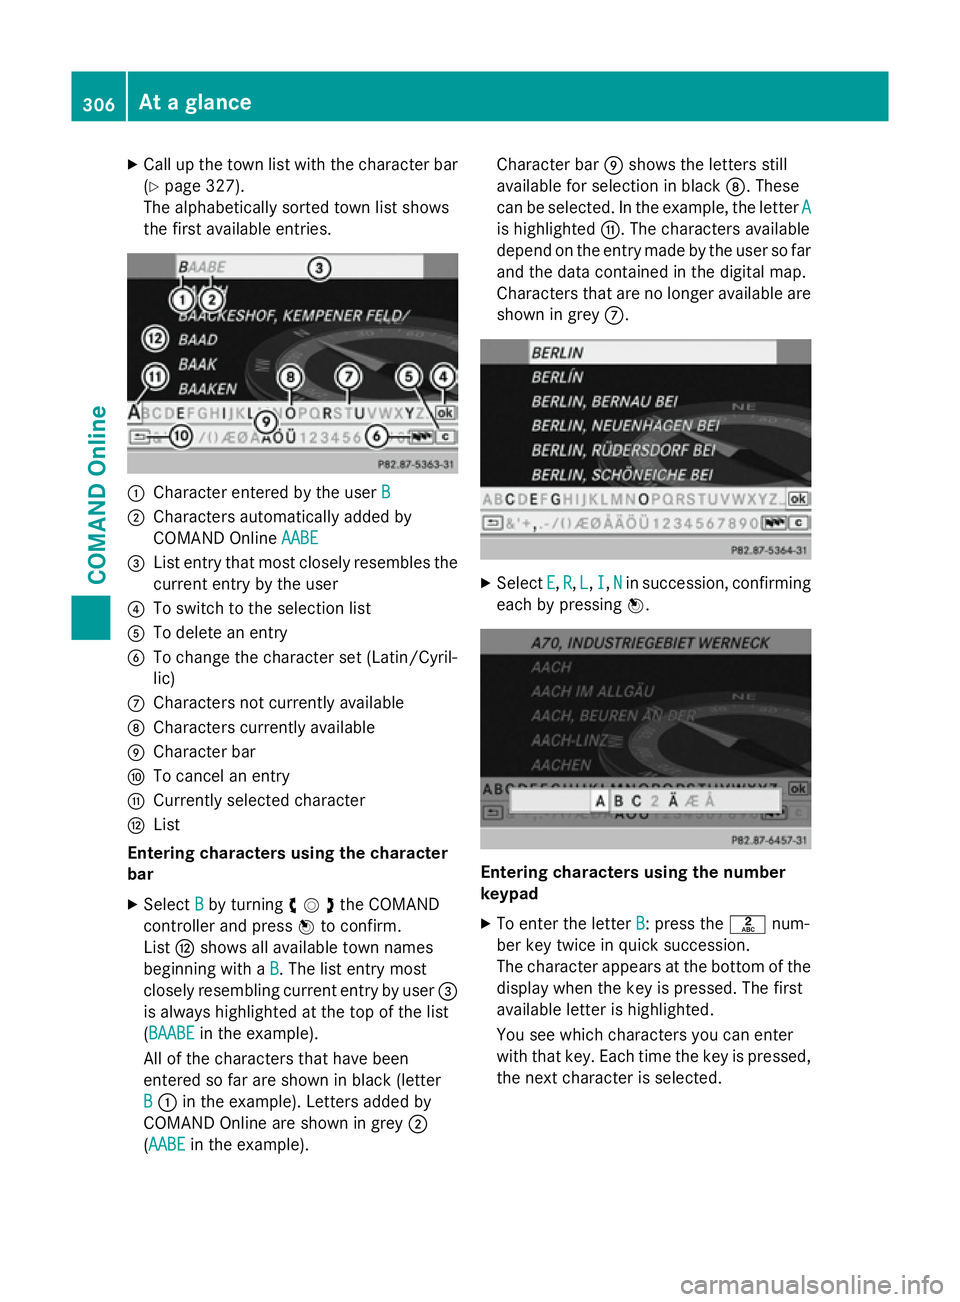
Call up the town list with the character bar
(Y page 327).
The alphabetically sorted town list shows
the first available entries. :
Character entered by the user B
B
; Characters automatically added by
COMAND Online AABE
AABE
= List entry that most closely resembles the
current entry by the user
? To switch to the selection list
A To delete an entry
B To change the character set (Latin/Cyril-
lic)
C Characters not currently available
D Characters currently available
E Character bar
F To cancel an entry
G Currently selected character
H List
Entering characters using the character
bar
X Select B
B by turning cVdthe COMAND
controller and press Wto confirm.
List Hshows all available town names
beginning with a B
B. The list entry most
closely resembling current entry by user =
is always highlighted at the top of the list
(BAABE BAABE in the example).
All of the characters that have been
entered so far are shown in black (letter
B
B : in the example). Letters added by
COMAND Online are shown in grey ;
(AABE AABE in the example). Character bar
Eshows the letters still
available for selection in black D. These
can be selected. In the example, the letter A A
is highlighted G. The characters available
depend on the entry made by the user so far and the data contained in the digital map.
Characters that are no longer available are
shown in grey C. X
Select E E,R
R, L
L, I
I,N
Nin succession, confirming
each by pressing W. Entering characters using the number
keypad
X To enter the letter B
B: press thelnum-
ber key twice in quick succession.
The character appears at the bottom of the
display when the key is pressed. The first
available letter is highlighted.
You see which characters you can enter
with that key. Each time the key is pressed,
the next character is selected. 306
At a glanceCOMAND Online
Page 311 of 637
X
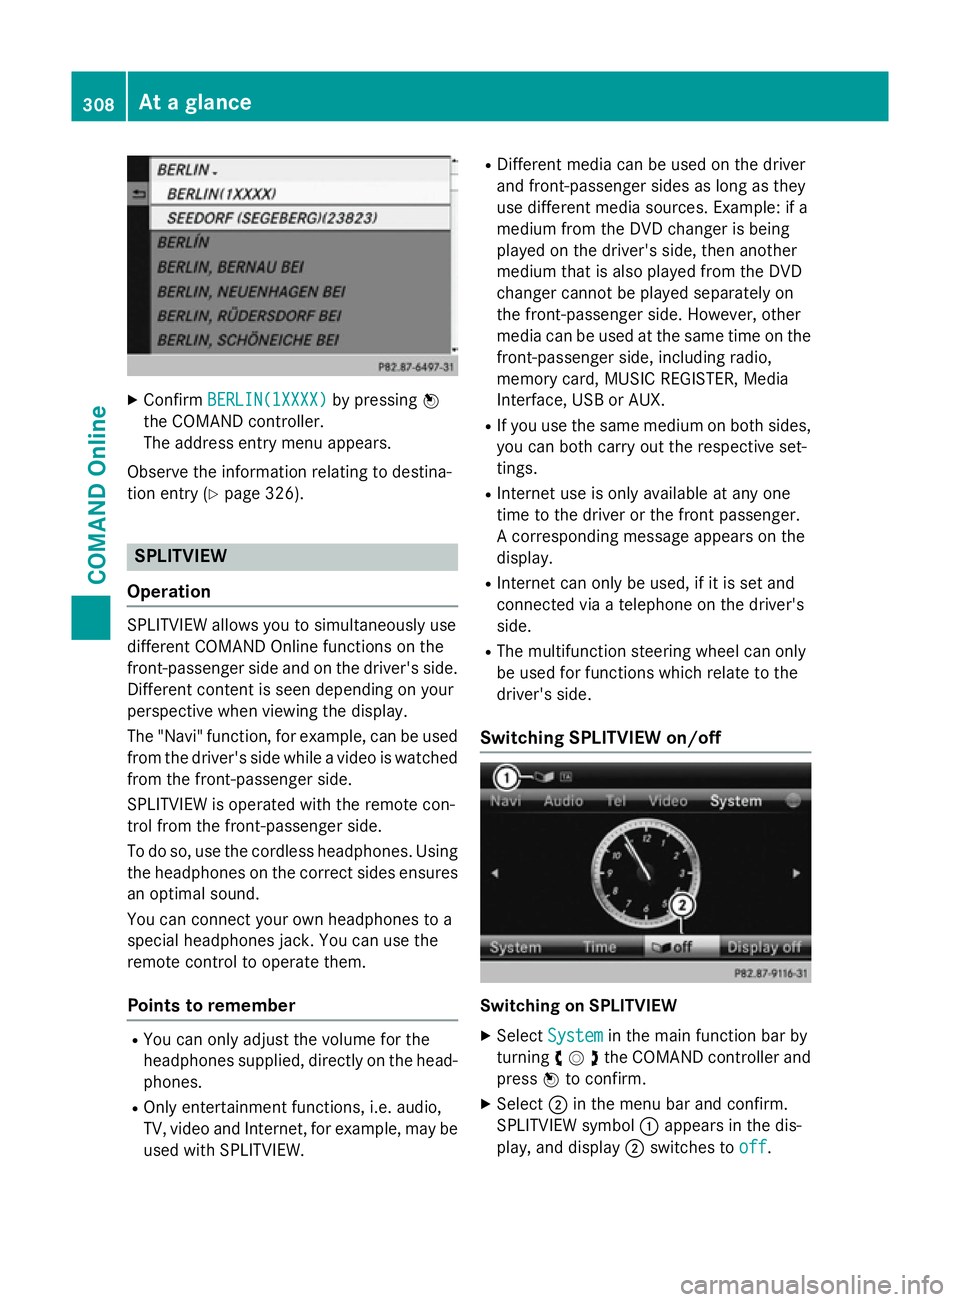
Confirm BERLIN(1XXXX)
BERLIN(1XXXX) by pressingW
the COMAND controller.
The address entry menu appears.
Observe the information relating to destina-
tion entry (Y page 326). SPLITVIEW
Operation SPLITVIEW allows you to simultaneously use
different COMAND Online functions on the
front-passenger side and on the driver's side.
Different content is seen depending on your
perspective when viewing the display.
The "Navi" function, for example, can be used
from the driver's side while a video is watched from the front-passenger side.
SPLITVIEW is operated with the remote con-
trol from the front-passenger side.
To do so, use the cordless headphones. Using
the headphones on the correct sides ensures
an optimal sound.
You can connect your own headphones to a
special headphones jack. You can use the
remote control to operate them.
Points to remember R
You can only adjust the volume for the
headphones supplied, directly on the head-
phones.
R Only entertainment functions, i.e. audio,
TV, video and Internet, for example, may be
used with SPLITVIEW. R
Different media can be used on the driver
and front-passenger sides as long as they
use different media sources. Example: if a
medium from the DVD changer is being
played on the driver's side, then another
medium that is also played from the DVD
changer cannot be played separately on
the front-passenger side. However, other
media can be used at the same time on the
front-passenger side, including radio,
memory card, MUSIC REGISTER, Media
Interface, USB or AUX.
R If you use the same medium on both sides,
you can both carry out the respective set-
tings.
R Internet use is only available at any one
time to the driver or the front passenger.
A corresponding message appears on the
display.
R Internet can only be used, if it is set and
connected via a telephone on the driver's
side.
R The multifunction steering wheel can only
be used for functions which relate to the
driver's side.
Switching SPLITVIEW on/off Switching on SPLITVIEW
X Select System System in the main function bar by
turning cVdthe COMAND controller and
press Wto confirm.
X Select ;in the menu bar and confirm.
SPLITVIEW symbol :appears in the dis-
play, and display ;switches to off
off. 308
At a glanceCOMAND Online
Page 314 of 637
Design Explanation
Day design
Day design The display is set perma-
nently to day design. Night design
Night design The display is set perma-
nently to night design. Automatic
Automatic If the
Automatic
Automatic setting
is selected, COMAND
Online evaluates the
readings from the auto-
matic vehicle light sen-
sor and automatically
switches between the
display designs. Time settings
General notes If COMAND Online is equipped with a naviga-
tion system and has GPS reception, COMAND
Online automatically sets the time and date.
You can change the time in minute incre-
ments. The date can also be changed.
i If you adjust the time in minute incre-
ments, any time zone settings and settings
for changing between summer and stand-
ard time are lost. Switching between sum-
mer and standard time (Y page 311).
i The following navigation system functions
require the time, time zone and summer/
standard time to be set correctly in order to
work properly:
R route guidance on routes with time-
dependent traffic guidance
R calculation of expected time of arrival
i Use this function to set the time for all
displays in the vehicle.
Setting the time/date format X
Press the Wbutton.
X Select Time Timeby turning cVdthe COMAND
controller and press Wto confirm. X
Select Format
Format and press Wto confirm.
The #symbols show the current settings.
X Set the format by turning cVdthe
COMAND controller and press Wto con-
firm. Abbreviation Meaning
DD
DD
.MM
MM .YY
YY Day . Month . Year
(date format, two digits)
MM MM
/DD
DD /YYYY
YYYY Month/Day/Year
date format, year (all
four digits)
YY YY
/MM
MM /DD
DD Year/Month/Day
date format, year (two
digits) HH HH
:MM
MM
(24 hrs)
(24 hrs) Hours : Minutes
(24 hour time format)
HH HH
:MM
MM (AM/PM)
(AM/PM) Hours : Minutes
(AM/PM time format)
Adjusting the time zone and switching
to summer time
X
Press W.
X Select Time Timeby turning cVdthe COMAND
controller and press Wto confirm.
X Select Time Timezone zoneand press Wto confirm.
A list of countries or time zones appears.
The #dot indicates the current setting.
X Select the country or time zone by turning
cVd the COMAND controller and press W
to confirm.
A time zone list may also be displayed,
depending on the country selected.
X Select the time zone and press Wto con-
firm.
The entry for the Automatic time set‐
Automatic time set‐
tings tings is accepted.
Subsequent operation depends on whether
the automatic changeover function to sum-
mer time is available. System settings
311COMAND Online Z
Page 315 of 637
X
To change manually: selectON
ON orOFF
OFF and
press Wto confirm.
X To change to automatic time: select
Automatic
Automatic and pressWto confirm.
The entry for the Automatic time set‐
Automatic time set‐
tings
tings is accepted.
X To switch the automatic time setting
off/on: press the Wbutton.
X Select Time Timeby turning cVdthe COMAND
controller and press Wto confirm.
X Press Wto confirm the Automatic
Automatic time
time
settings
settings.
Switch the automatic time setting off ªor
on again O.
To switch on: the menu item is switched
on as the default setting. If the Automatic Automatic
time settings
time settings is switched off and you
switch it on again, the last settings for the
time zone and summer time changeover
are selected.
To switch off: the time zone is deselected
and the summer time is switched off. If
Automatic Automatic is set for the summer time
changeover, a prompt will appear asking
whether this should be maintained.
X Select Yes
YesorNo
No and press Wto confirm.
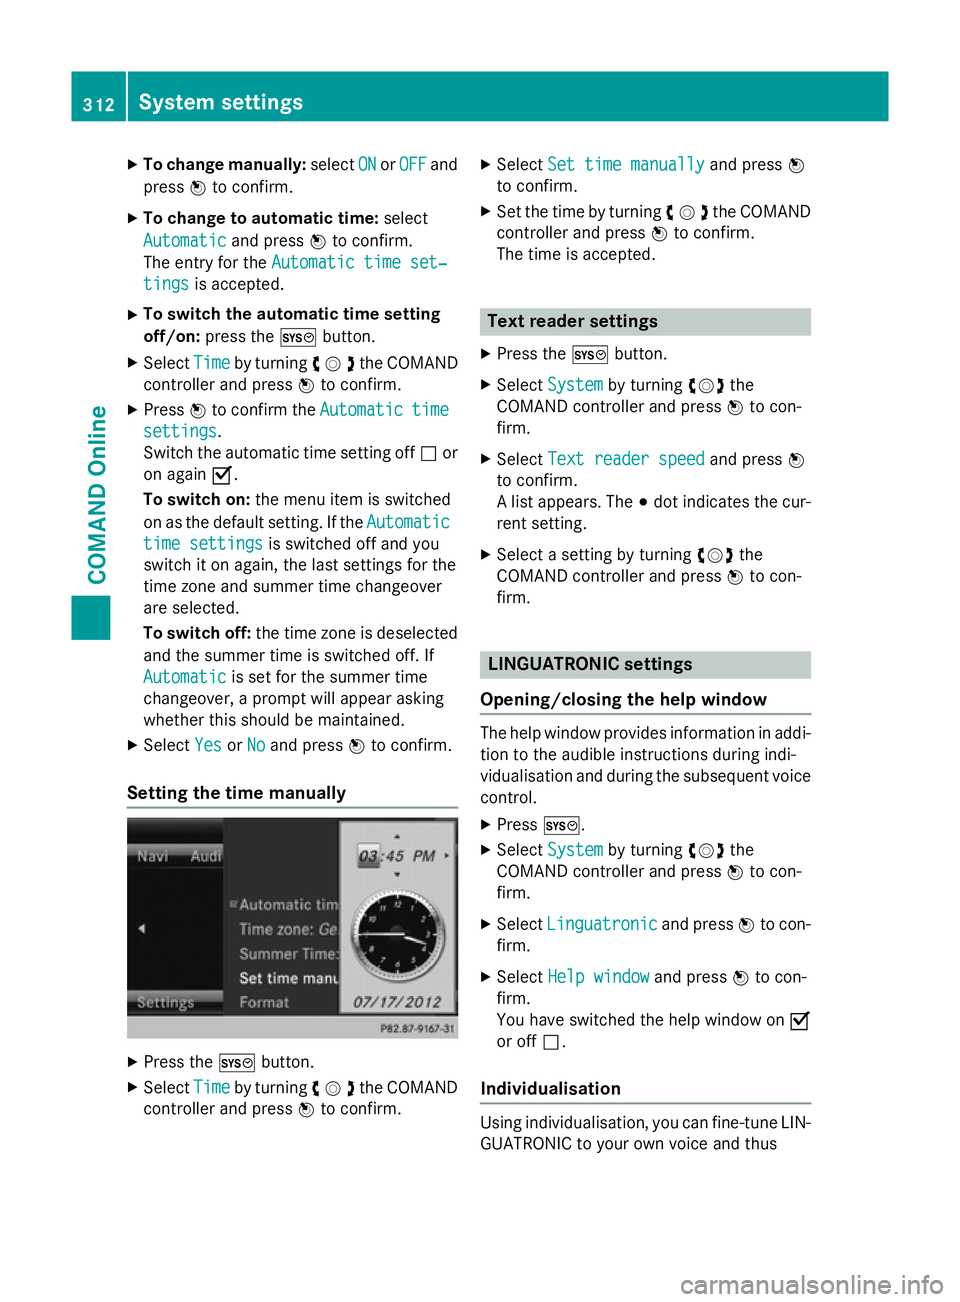
Setting the time manually X
Press the Wbutton.
X Select Time Timeby turning cVdthe COMAND
controller and press Wto confirm. X
Select Set time manually
Set time manually and pressW
to confirm.
X Set the time by turning cVdthe COMAND
controller and press Wto confirm.
The time is accepted. Text reader settings
X Press the Wbutton.
X Select System System by turning cVdthe
COMAND controller and press Wto con-
firm.
X Select Text reader speed
Text reader speed and pressW
to confirm.
A list appears. The #dot indicates the cur-
rent setting.
X Select a setting by turning cVdthe
COMAND controller and press Wto con-
firm. LINGUATRONIC settings
Opening/closing the help window The help window provides information in addi-
tion to the audible instructions during indi-
vidualisation and during the subsequent voice
control.
X Press W.
X Select System System by turning cVdthe
COMAND controller and press Wto con-
firm.
X Select Linguatronic
Linguatronic and pressWto con-
firm.
X Select Help window Help window and pressWto con-
firm.
You have switched the help window on O
or off ª.
Individualisation Using individualisation, you can fine-tune LIN-
GUATRONIC to your own voice and thus 312
System settingsCOMAND Online
Page 326 of 637
X
To switch off the display: selectBack
Backand
press Wto confirm or press the %but-
ton. Navigation
Features of your COMAND Online
This Supplement describes all the standard
and optional equipment for your COMAND
Online system, as available at the time of
going to print. Country-specific differences
are possible. Please note that your
COMAND Online system may not be equip-
ped with all the features described. Introduction
Important safety notes G
WARNING
Operating the integrated information systems and communications equipment in the vehicle
while driving will distract you from traffic con-
ditions. You could then lose control of the
vehicle. There is a risk of an accident.
Only operate these devices if road traffic con-
ditions permit. If you are unsure about the
surrounding conditions, pull over to a safe
location and make entries only while the vehi-
cle is stationary.
You must observe the legal requirements for
the country in which you are currently driving when operating COMAND Online.
COMAND Online calculates the route to the
destination without taking account of the fol- lowing, for example:
R traffic lights
R stop and give way signs
R parking or stopping restrictions
R road narrowing
R other road and traffic rules and regulations
COMAND Online may give incorrect driving
recommendations if the data on the digital map does not correspond to the actual con-
ditions. For example, a route may have been
diverted or the direction of a one-way street
may have changed.
For this reason, you must always observe
road and traffic rules and regulations during
your journey. Road and traffic rules and reg-
ulations always have priority over the sys-
tem's driving recommendations.
General notes Operational readiness of the navigation
system
In vehicles for certain countries, the naviga-
tion system is not operational immediately
after delivery. The digital map is not pre-
installed.
If this is the case, the following message
appears in the display after you switch to nav-
igation mode:
Please insert the map DVD to acti‐ Please insert the map DVD to acti‐
vate navigation vate navigation.
X To install the digital map: (Ypage 382).
The navigation system must determine the
position of the vehicle before first use or
whenever operational status is restored.
Therefore, you may have to drive for a while
before precise route guidance is possible.
GPS reception
Correct functioning of the navigation system
depends, amongst other things, on GPS
reception. In certain situations, GPS recep-
tion may be impaired, there may be interfer-
ence or there may be no reception at all, e.g.
in tunnels or multi-storey car parks.
i The functionality of a roof aerial (tele-
phone, GPS) may be impaired if roof carri-
ers are used.
Entry restriction
On vehicles for certain countries, there is a
restriction on entering data.
The restriction is active above a vehicle speed of approximately 5 km/h. The restriction is Navigation
323COMAND Online Z
Page 328 of 637
Basic settings
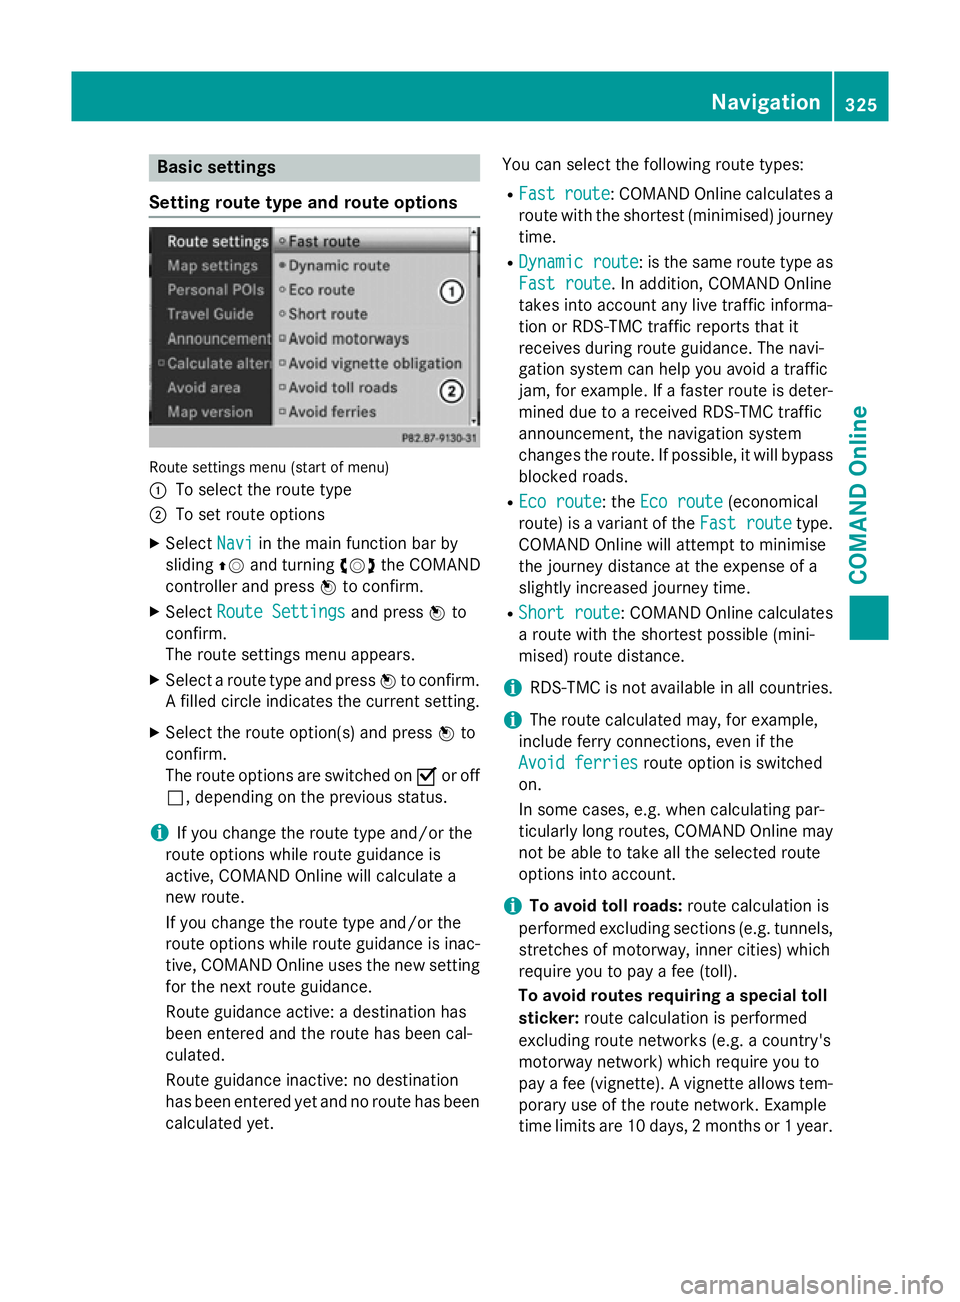
Setting route type and route options Route settings menu (start of menu)
:
To select the route type
; To set route options
X Select Navi Naviin the main function bar by
sliding ZVand turning cVdthe COMAND
controller and press Wto confirm.
X Select Route Settings
Route Settings and pressWto
confirm.
The route settings menu appears.
X Select a route type and press Wto confirm.
A filled circle indicates the current setting.
X Select the route option(s) and press Wto
confirm.
The route options are switched on Oor off
ª, depending on the previous status.
i If you change the route type and/or the
route options while route guidance is
active, COMAND Online will calculate a
new route.
If you change the route type and/or the
route options while route guidance is inac- tive, COMAND Online uses the new setting
for the next route guidance.
Route guidance active: a destination has
been entered and the route has been cal-
culated.
Route guidance inactive: no destination
has been entered yet and no route has been
calculated yet. You can select the following route types:
R Fast
Fast route route: COMAND Online calculates a
route with the shortest (minimised) journey time.
R Dynamic route
Dynamic route : is the same route type as
Fast route
Fast route. In addition, COMAND Online
takes into account any live traffic informa-
tion or RDS-TMC traffic reports that it
receives during route guidance. The navi-
gation system can help you avoid a traffic
jam, for example. If a faster route is deter-
mined due to a received RDS-TMC traffic
announcement, the navigation system
changes the route. If possible, it will bypass
blocked roads.
R Eco route
Eco route: the Eco route Eco route(economical
route) is a variant of the Fast route
Fast routetype.
COMAND Online will attempt to minimise
the journey distance at the expense of a
slightly increased journey time.
R Short route Short route: COMAND Online calculates
a route with the shortest possible (mini-
mised) route distance.
i RDS-TMC is not available in all countries.
i The route calculated may, for example,
include ferry connections, even if the
Avoid ferries
Avoid ferries route option is switched
on.
In some cases, e.g. when calculating par-
ticularly long routes, COMAND Online may
not be able to take all the selected route
options into account.
i To avoid toll roads:
route calculation is
performed excluding sections (e.g. tunnels,
stretches of motorway, inner cities) which
require you to pay a fee (toll).
To avoid routes requiring a special toll
sticker: route calculation is performed
excluding route networks (e.g. a country's
motorway network) which require you to
pay a fee (vignette). A vignette allows tem- porary use of the route network. Example
time limits are 10 days, 2 months or 1 year. Navigation
325COMAND Online Z
Page 338 of 637
select another destination.
select another destination.
mes-
sage.
Entering a destination using Mercedes-
Benz Apps X
To switch to navigation mode: press the
Ø button.
X To show the menu: pressWthe COMAND
controller.
X Select Destination
Destination in the navigation sys-
tem menu bar by turning cVdthe
COMAND controller and press Wto con-
firm.
X Select Mercedes-Benz Mercedes-Benz Apps
Appsand press W
to confirm.
If an Internet connection is established, you
will see the message Do you want to
Do you want to
accept the navigation data sent
accept the navigation data sent
via Mercedes-Benz Apps?
via Mercedes-Benz Apps?
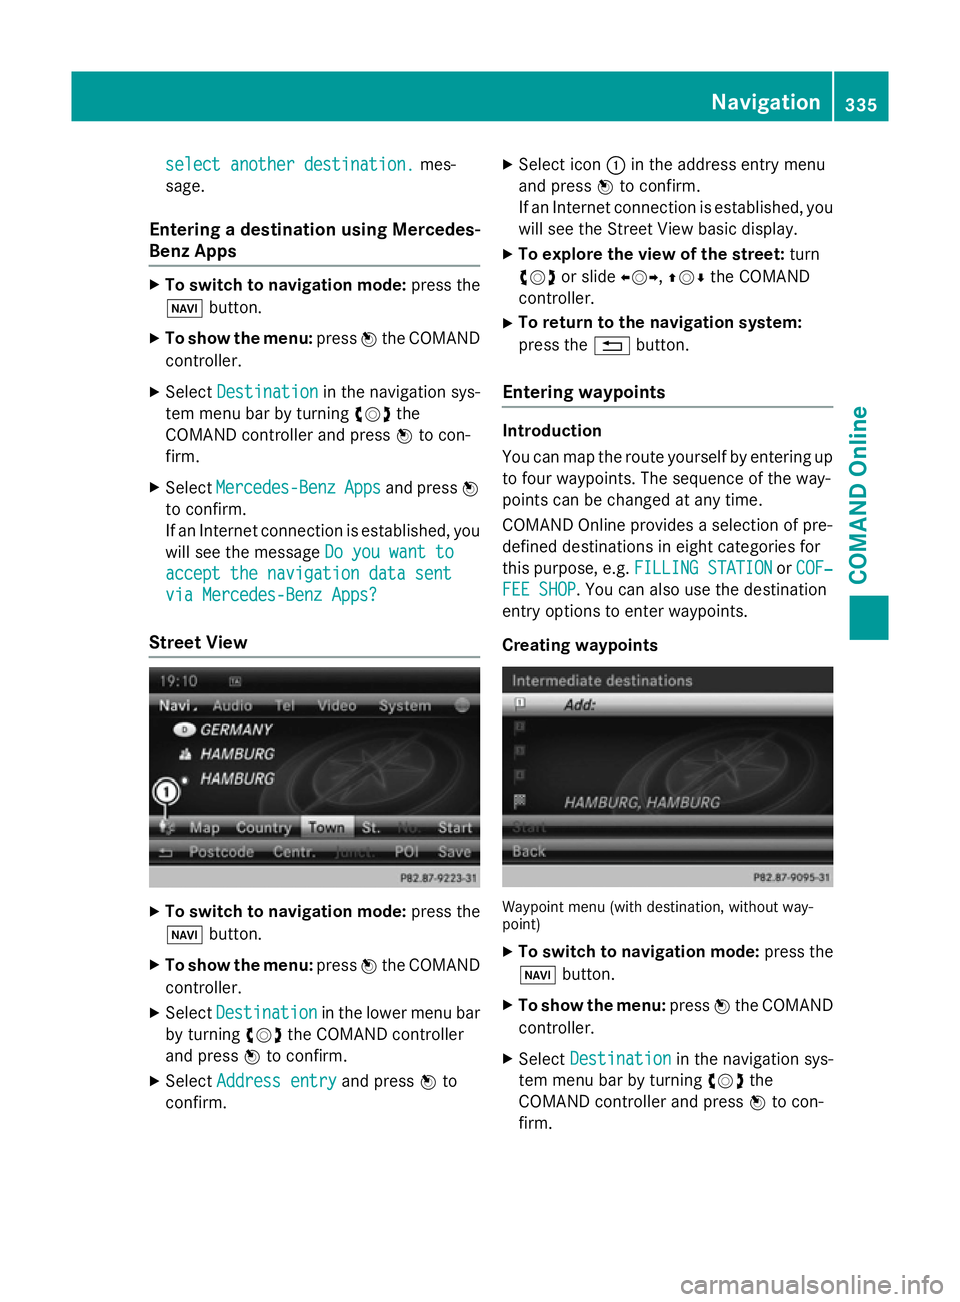
Street View X
To switch to navigation mode: press the
Ø button.
X To show the menu: pressWthe COMAND
controller.
X Select Destination Destination in the lower menu bar
by turning cVdthe COMAND controller
and press Wto confirm.
X Select Address entry
Address entry and pressWto
confirm. X
Select icon :in the address entry menu
and press Wto confirm.
If an Internet connection is established, you
will see the Street View basic display.
X To explore the view of the street: turn
cVd or slide XVY,ZVÆthe COMAND
controller.
X To return to the navigation system:
press the %button.
Entering waypoints Introduction
You can map the route yourself by entering up
to four waypoints. The sequence of the way-
points can be changed at any time.
COMAND Online provides a selection of pre-
defined destinations in eight categories for
this purpose, e.g. FILLING STATION FILLING STATION orCOF‐
COF‐
FEE SHOP
FEE SHOP. You can also use the destination
entry options to enter waypoints.
Creating waypoints Waypoint menu (with destination, without way-
point)
X To switch to navigation mode: press the
Ø button.
X To show the menu: pressWthe COMAND
controller.
X Select Destination Destination in the navigation sys-
tem menu bar by turning cVdthe
COMAND controller and press Wto con-
firm. Navigation
335COMAND Online Z
Page 355 of 637
Those roads, for example, that are closed to
through-traffic.
R roads that have time restrictions (e.g.
closed on Sundays and public holidays) are
considered for route guidance on days
when they are open. For this purpose, the
relevant times must be correctly stored in
the database.
Displaying during route guidance Changing direction
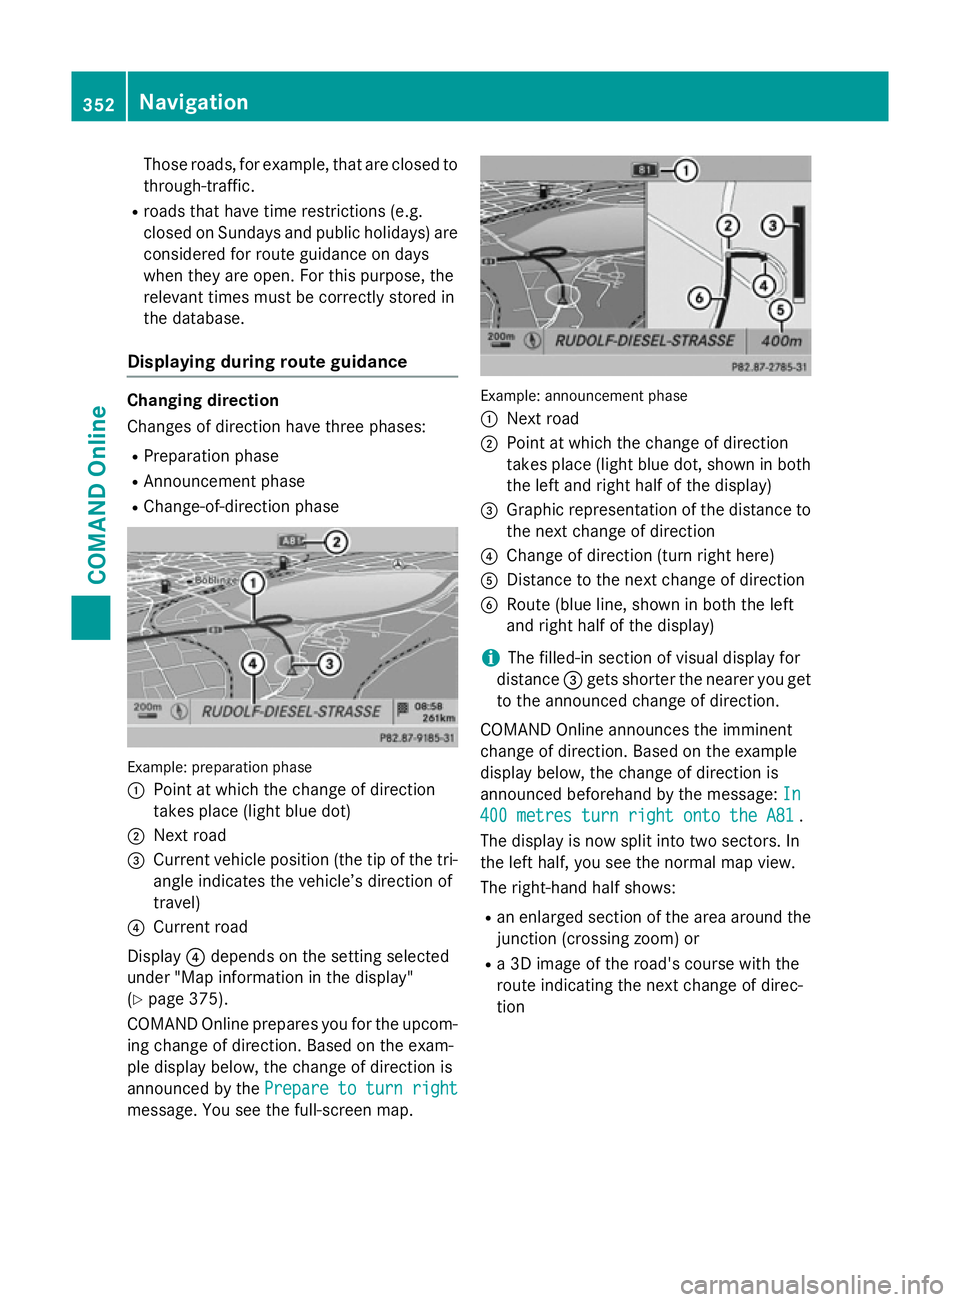
Changes of direction have three phases:
R Preparation phase
R Announcement phase
R Change-of-direction phase Example: preparation phase
:
Point at which the change of direction
takes place (light blue dot)
; Next road
= Current vehicle position (the tip of the tri-
angle indicates the vehicle’s direction of
travel)
? Current road
Display ?depends on the setting selected
under "Map information in the display"
(Y page 375).
COMAND Online prepares you for the upcom-
ing change of direction. Based on the exam-
ple display below, the change of direction is
announced by the Prepare to turn right
Prepare to turn right
message. You see the full-screen map. Example: announcement phase
:
Next road
; Point at which the change of direction
takes place (light blue dot, shown in both
the left and right half of the display)
= Graphic representation of the distance to
the next change of direction
? Change of direction (turn right here)
A Distance to the next change of direction
B Route (blue line, shown in both the left
and right half of the display)
i The filled-in section of visual display for
distance =gets shorter the nearer you get
to the announced change of direction.
COMAND Online announces the imminent
change of direction. Based on the example
display below, the change of direction is
announced beforehand by the message: In In
400 metres turn right onto the A81
400 metres turn right onto the A81 .
The display is now split into two sectors. In
the left half, you see the normal map view.
The right-hand half shows:
R an enlarged section of the area around the
junction (crossing zoom) or
R a 3D image of the road's course with the
route indicating the next change of direc-
tion 352
NavigationCOMAND Online