2012 MERCEDES-BENZ SL ROADSTER charging
[x] Cancel search: chargingPage 9 of 637
Authorised workshop
see Qualified specialist workshop
AUTO lights
Display message ............................ 257
see Lights
Automatic engine start (ECO start/
stop function) .................................... 159
Automatic engine switch-off (ECO
start/stop function) .......................... 159
Automatic headlamp mode .............. 127
Automatic transmission
Accelerator pedal position ............ .167
Automatic drive program .............. .169
Changing gear ............................... 167
Display message ............................ 269
Driving tips ................................... .167
Emergency running mode .............. 173
Engaging the park position ............ 164
Kickdown ....................................... 167
Manual drive program .................... 169
Manual drive program (vehicles
with Sports package AMG) ............ 170
Overview ........................................ 163
Problem (fault) ............................... 173
Program selector button ................ 167
Pulling away ................................... 158
Selector lever ................................ 163
Starting the engine ........................ 157
Steering wheel gearshift paddle s... 169
Transmission position display ........ 165
Transmission positions .................. 166
Automatic transmission emer-
gency running mode ......................... 173
AUX (audio)
Notes/socket ................................ 500
Switching to ................................... 500
AUX (video)
Connecting an external video
source ............................................ 516
Setting the volume and sound ....... 517
Showing/hiding the menu ............. 517
Switching to ................................... 517
AUX jacks ........................................... 521
CD/DVD drive ............................... 521
Avoiding an area ................................ 379 B
Back button ....................................... 296
BAS (Brake Assist System) ................. 71
BAS PLUS (Brake Assist System
PLUS) .................................................... 72
Battery (key)
Checking .......................................... 87
Important safety notes .................... 87
Replacing ......................................... 88
Battery (vehicle)
Charging ........................................ 584
Display message ............................ 259
Important safety notes .................. 582
Jump starting ................................. 586
Overview ........................................ 582
Belt
see Seat belts
Belt force limiter
Activation ......................................... 60
Function ........................................... 60
Belt tensioner
Activation ......................................... 51
Function ........................................... 60
Bird's-eye view (navigation) ............. 374
Blind Spot Assist
see Active Blind Spot Assist
Bluetooth®
Activating audio mode ................... 491
Activating/deactivating ................. 313
Conditions (telephone) .................. 389
Connecting another mobile
phone ............................................ 393
Connecting audio devices .............. 488
Device list ...................................... 489
Entering the passcode ................... 391
External authorisation .................... 392
General information ....................... 313
Interface ........................................ 388
Introduction ................................... 388
Reconnecting an audio device ....... 490
Searching for a mobile phone ........ 390
Setting s......................................... 313
Telephone basic menu ................... 394
Telephony ...................................... 389
Telephony notes ............................ 387
Bluetooth® audio basic display ....... 4916
Index
Page 29 of 637
Accepting or rejecting a waiting
call ................................................. 399
Accepting/ending cal l................... 396
Adjusting the volume for calls ....... 299
Automatically reconnecting
mobile phone ................................. 393
Calling (outgoing call) .................... 397
Conference connection .................. 400
Connecting a Mobile phone (gen-
eral information) ............................ 390
Deregistering (de-authorising) a
mobile phone ................................. 393
Display message ............................ 271
Ending an active call ...................... 400
Entering a number ......................... 397
Entering phone numbers ................ 397
External authorisation (Blue-
tooth®) .......................................... 392
Function restrictions ...................... 388
General notes ................................ 387
Incoming call ................................. 396
Making a call ................................. 399
Making a call via speed dial ........... 397
Menu (on-board computer) ............ 235
Number from the phone book ........ 236
Operating options .......................... 388
Overview of functions .................... 398
Reception and transmission vol-
ume ............................................... 396
Redialling ....................................... 236
Rejecting a call .............................. 396
Rejecting/ending a call ................. 236
Safety notes .................................. 387
Sending DTMF tones ...................... 398
Single call ...................................... 398
Switching hands-free microphone
on/of f............................................ 398
Telephone compartment ................ 545
Text message (SMS) ...................... 409
Toggling ......................................... 400
Using the telephone ....................... 396
see Bluetooth®
Telephone basic menu ...................... 394
Bluetooth® interface ..................... 394
Telephone mode
Redialling ....................................... 397 Telephone module with Blue-
tooth® (SAP profile)
Activating the modul e.................... 420
Call lists ......................................... 425
Charging a mobile phone ............... 426
Connecting the mobile phone ........ 421
Data modem mode ........................ 423
Data roaming ................................. 424
Deactivating the module ................ 427
Disconnecting the mobile phone ... 426
Installing the module ..................... 420
Network provider ........................... 424
Phone number transmission .......... 423
Removing the module .................... 427
Resetting the module ..................... 426
Saving/deleting the PIN for the
SIM car d........................................ 423
Setting the ringtone ....................... 423
Setting s......................................... 423
SIM card mode .............................. 421
Speed-dial keys ............................. 425
Text messages ............................... 425
Transferring the phone book .......... 424
Telephone number
Entering ......................................... 397
Teletext
TV (Rear Seat Entertainment Sys-
tem) ............................................... 535
Teletext (TV) ...................................... 508
Temperature
Coolant .......................................... 228
Coolant (on-board computer) ......... 244
Engine oil (on-board computer) ...... 244
Outside temperature ...................... 229
Setting (climate control )................ 145
TEMPOMAT
Function/note s............................. 182
Text message (SMS)
Call sender .................................... 410
Deleting ......................................... 411
Inbox .............................................. 409
Reading .......................................... 410
Reading alou d................................ 410
Storing sender in address book ..... 411
Storing the sender as a new
address book entry ........................ 411 26
Index
Page 137 of 637
Interior lighting
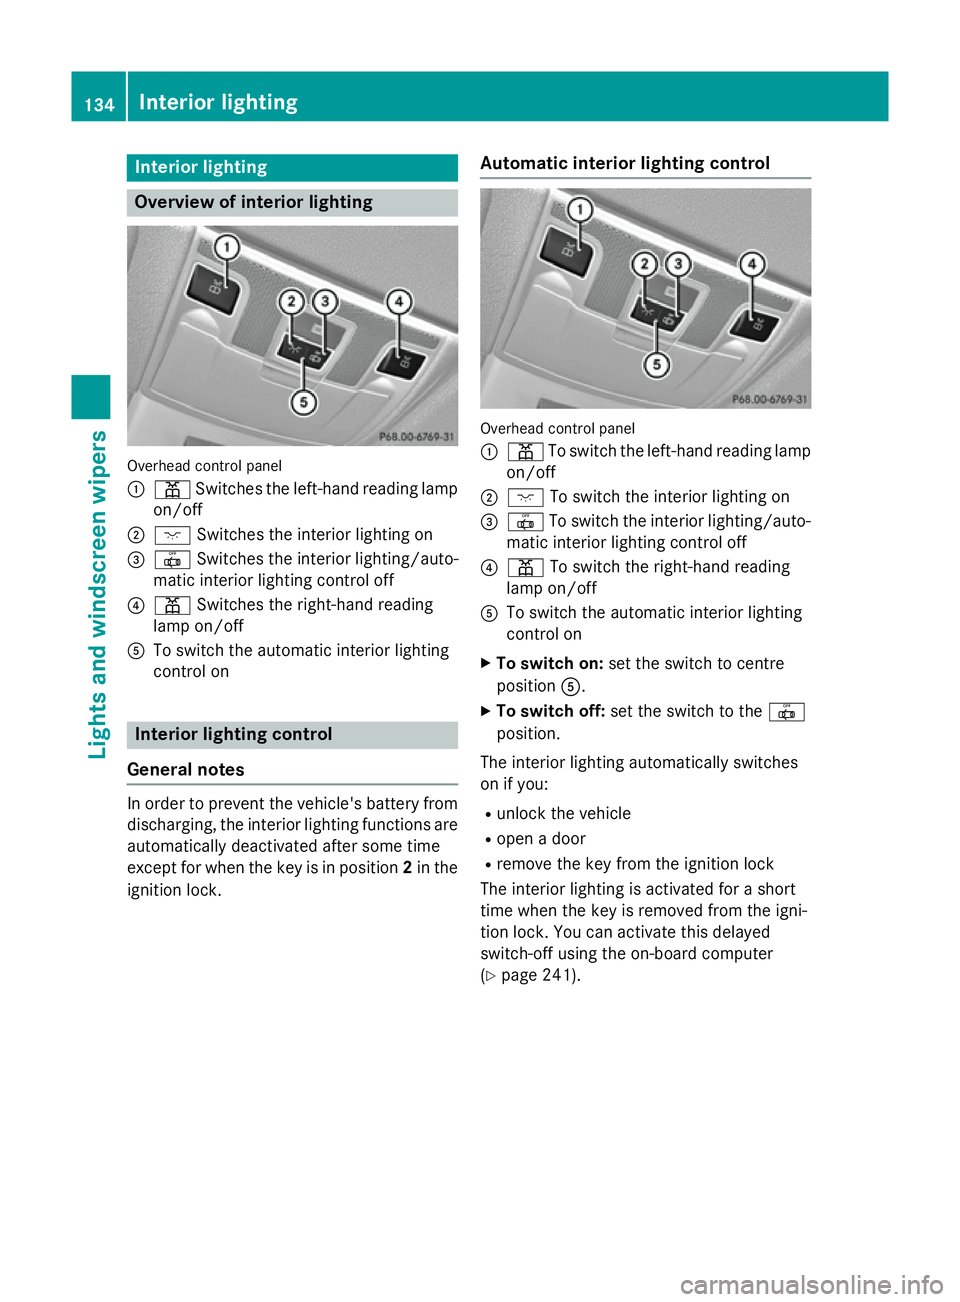
Overview of interior lighting
Overhead control panel
:
p Switches the left-hand reading lamp
on/off
; c Switches the interior lighting on
= | Switches the interior lighting/auto-
matic interior lighting control off
? p Switches the right-hand reading
lamp on/off
A To switch the automatic interior lighting
control on Interior lighting control
General notes In order to prevent the vehicle's battery from
discharging, the interior lighting functions are
automatically deactivated after some time
except for when the key is in position 2in the
ignition lock. Automatic interior lighting control Overhead control panel
:
p To switch the left-hand reading lamp
on/off
; c To switch the interior lighting on
= | To switch the interior lighting/auto-
matic interior lighting control off
? p To switch the right-hand reading
lamp on/off
A To switch the automatic interior lighting
control on
X To switch on: set the switch to centre
position A.
X To switch off: set the switch to the |
position.
The interior lighting automatically switches
on if you:
R unlock the vehicle
R open a door
R remove the key from the ignition lock
The interior lighting is activated for a short
time when the key is removed from the igni-
tion lock. You can activate this delayed
switch-off using the on-board computer
(Y page 241). 134
Interior lightingLights and windscreen wipers
Page 181 of 637
During braking:
R a warning tone sounds
R the Release parking brake
Release parking brake message
appears
R the red !indicator lamp in the instru-
ment cluster flashes
When the vehicle has been braked to a stand- still, the electric parking brake is engaged. Parking up the vehicle
If you leave the vehicle parked up for longer
than four weeks, the battery may be damaged
by exhaustive discharging.
X Disconnect the battery or connect it to a
trickle charger.
i You can obtain information about trickle
chargers from a qualified specialist work-
shop.
If you leave the vehicle parked up for longer
than six weeks, the vehicle may suffer dam-
age as a result of lack of use.
X Visit a qualified specialist workshop and
seek advice. Driving tips
General notes
Important safety notes G
WARNING
If you switch off the ignition while driving,
safety-relevant functions are only available
with limitations, or not at all. This could affect, for example, the power steering and the brake
boosting effect. You will require considerably
more effort to steer and brake. There is a risk of an accident.
Do not switch off the ignition while driving. Drive sensibly – save fuel Observe the following tips to save fuel:
R The tyres should always be inflated to the
recommended tyre pressure.
R Remove unnecessary loads.
R Warm up the engine at low engine speeds.
R Avoid frequent acceleration or braking.
R Observe the service intervals in the Service
Booklet or in the service interval display.
Have all the maintenance work carried out
in accordance with Daimler AG regulations.
Fuel consumption also increases when driv-
ing in cold weather, in stop-start traffic, on
short journeys and in hilly terrain. ECO display
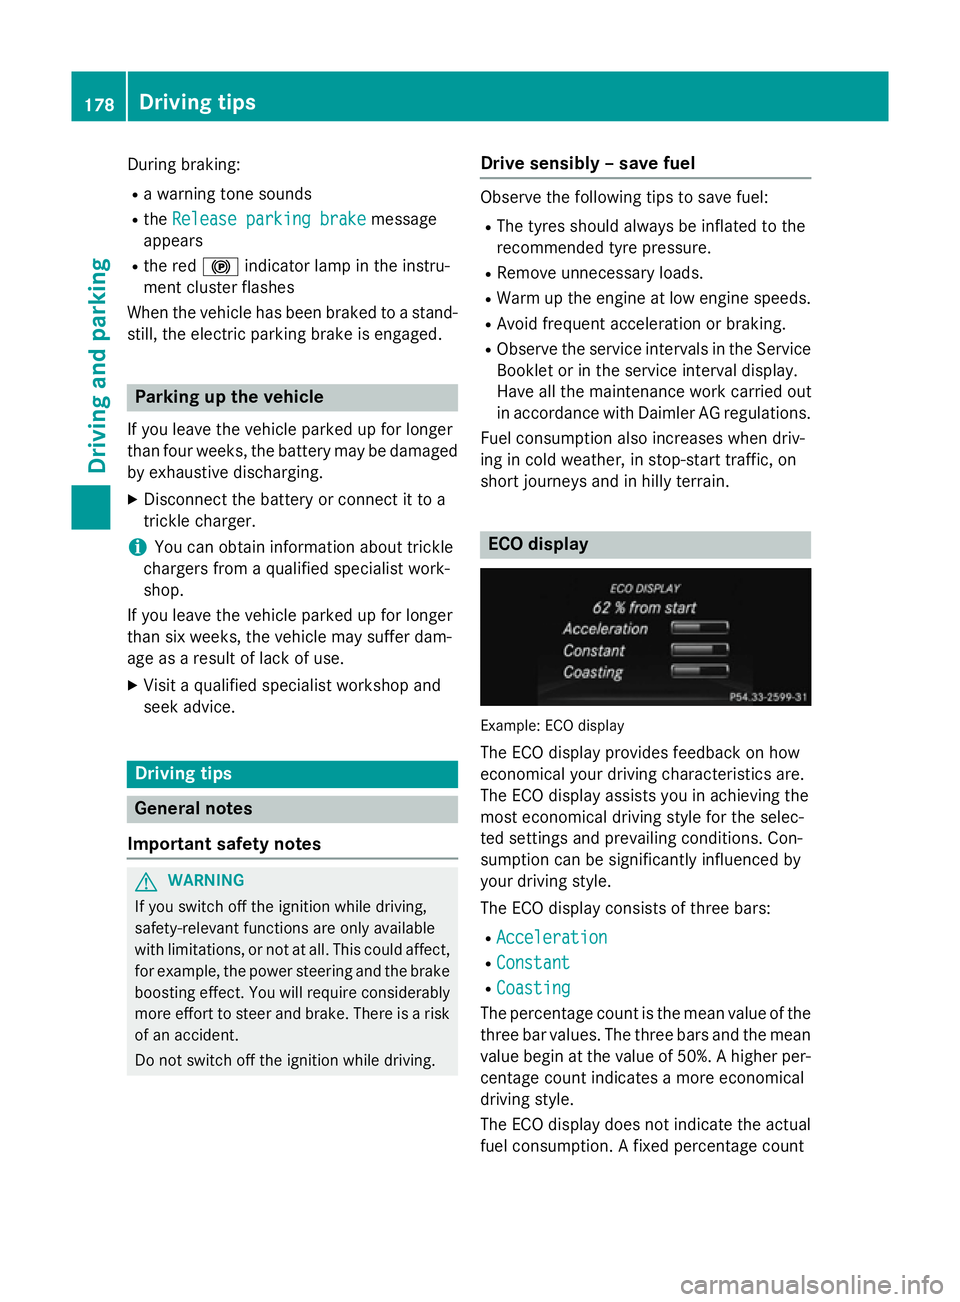
Example: ECO display
The ECO display provides feedback on how
economical your driving characteristics are.
The ECO display assists you in achieving the
most economical driving style for the selec-
ted settings and prevailing conditions. Con-
sumption can be significantly influenced by
your driving style.
The ECO display consists of three bars:
R Acceleration
Acceleration
R Constant Constant
R Coasting
Coasting
The percentage count is the mean value of the three bar values. The three bars and the mean
value begin at the value of 50%. A higher per- centage count indicates a more economical
driving style.
The ECO display does not indicate the actual
fuel consumption. A fixed percentage count 178
Driving
tipsDriving an d parking
Page 256 of 637
Display messages
Possible causes/consequences and
M
MSolutions !
Parking Parking
brake
brakeinop‐
inop‐
erative
erative The yellow
!warning lamp lights up. The red !indicator
lamp flashes for about ten seconds after the electric parking brake
has been applied or released. It then goes out or remains lit.
The electric parking brake is malfunctioning, e.g. because of over- voltage or undervoltage.
X Rectify the cause of the overvoltage or undervoltage, e.g. by
charging the battery or restarting the engine.
X Apply or release the electric parking brake.
If the electric parking brake still cannot be applied or released: X Switch off the ignition and turn it back on.
X Apply or release the electric parking brake.
If the electric parking brake still cannot be released: X Consult a qualified specialist workshop. The red
!indicator lamp flashes and the yellow !warning
lamp is lit.
It is not possible to apply the electric parking brake manually.
X Move the transmission selector lever to P.
X Visit a qualified specialist workshop. !
Turn on the igni‐ Turn on the igni‐
tion to release tion to release
the parking brake the parking brake The red
!indicator lamp lights up.
You attempted to release the electric parking brake while the igni-
tion was switched off.
X Key: turn the key to position 1in the ignition lock.
X KEYLESS-GO: switch on the ignition. J
Check brake fluid Check brake fluid
level level There is insufficient brake fluid in the brake fluid reservoir.
In addition, the red Jwarning lamp lights up in the instrument
cluster and a warning tone sounds.
G WARNING
Braking efficiency may be impaired.
There is a risk of an accident. X Pull over and stop the vehicle safely as soon as possible, paying
attention to road and traffic conditions. Do not continue driving
under any circumstances.
X Secure the vehicle to prevent it from rolling away (Y page 175).
X Consult a qualified specialist workshop.
X Do not top up the brake fluid. This does not correct the fault. Display
messages
253On-board computer and displays Z
Page 429 of 637
Deleting call lists
X Enter the number "0002" in the telephone
basic menu.
X Press the 6button.
The call lists stored in the module are reset and will no longer appear starting with the
next phone book transfer.
The call lists of the connected mobile phone
are not deleted. Deleting the call lists of the
mobile phone (see the operating instructions
for the mobile phone).
Deleting call lists from COMAND Online
(Y page 407).
i In SIM card mode, the
Delete call Delete call
lists
lists menu item is available in COMAND
Online.
Terminating the connection between
the mobile phone and the module Automatic disconnection
Once outside the receiving range, the Blue-
tooth ®
connection between the mobile phone
and the module is automatically terminated.
Manual disconnection
X Terminate the Bluetooth ®
connection on
the mobile phone (see the operating
instructions for the mobile phone).
Re-establishing a connection
X You can re-establish the Bluetooth ®
con-
nection after disconnecting manually
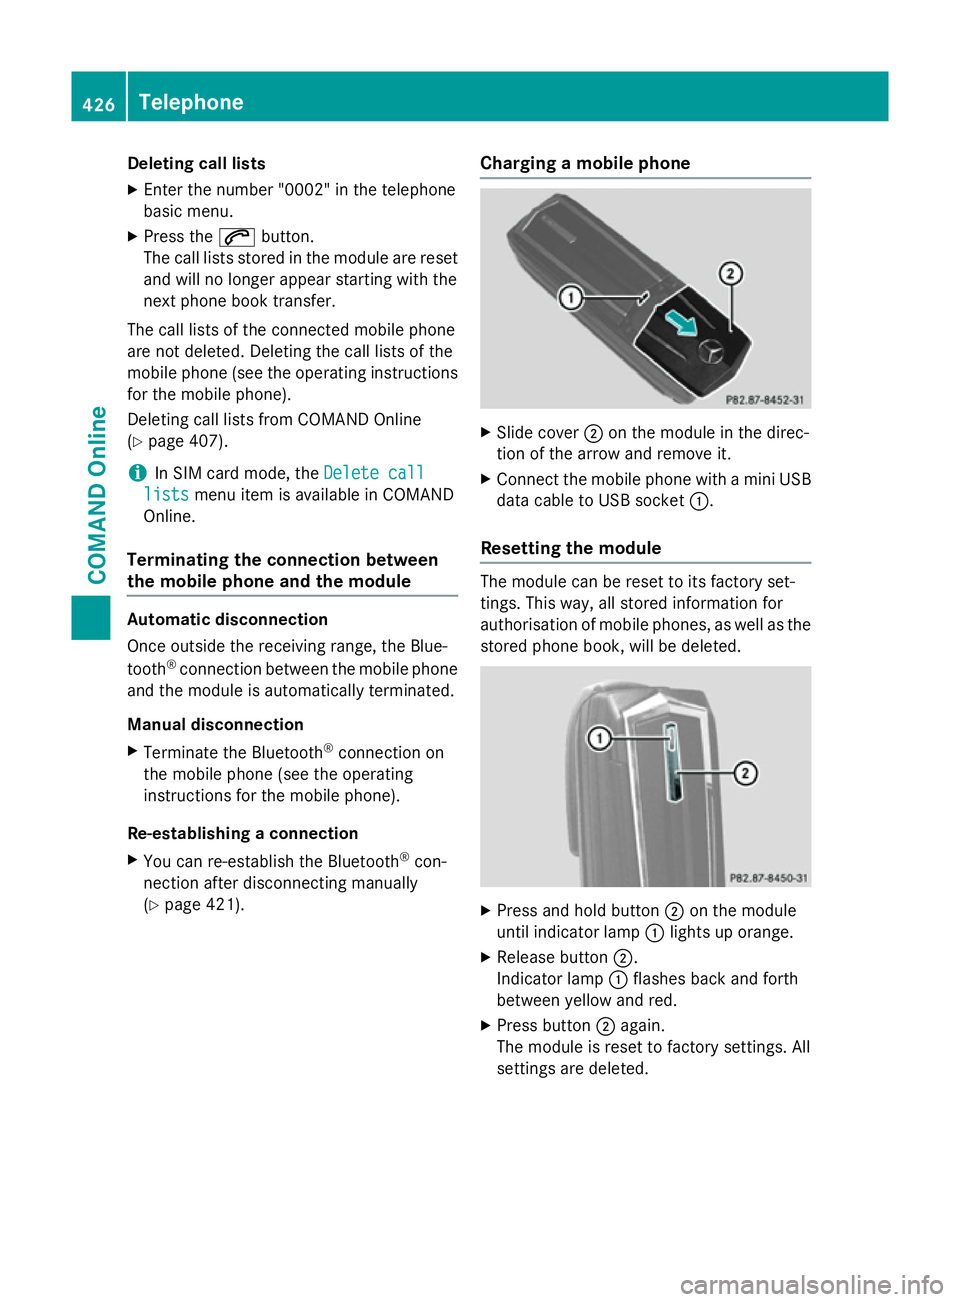
(Y page 421). Charging a mobile phone X
Slide cover ;on the module in the direc-
tion of the arrow and remove it.
X Connect the mobile phone with a mini USB
data cable to USB socket :.
Resetting the module The module can be reset to its factory set-
tings. This way, all stored information for
authorisation of mobile phones, as well as the stored phone book, will be deleted. X
Press and hold button ;on the module
until indicator lamp :lights up orange.
X Release button ;.
Indicator lamp :flashes back and forth
between yellow and red.
X Press button ;again.
The module is reset to factory settings. All
settings are deleted. 426
TelephoneCOMAND Online
Page 556 of 637
will find further information on charging the
battery on (Y page 582). Garage door opener
General notes The HomeLink
®
garage door opener integra-
ted in the rear-view mirror allows you to oper- ate up to three different door and gate sys-
tems.
Once programmed, the integrated garage
door opener in the rear-view mirror will
assume the function of the garage door sys-
tem's remote control. Please also read the
operating instructions for the garage door
system.
When programming a garage door opener,
park the vehicle outside the garage. Do not
run the engine while programming.
The garage door opener is only available for
certain countries. Observe the legal require-
ments for each individual country.
The HomeLink ®
garage door opener is com-
patible with most European garage and gate
opener drives. More information on Home-
Link ®
and/or compatible products is availa-
ble:
R at a qualified specialised workshop
R via the HomeLink ®
Hotline
(0) 08000 466 354 65 or alternatively
+49 (0) 6838 907-277
R on the Internet at
http://www.homelink.com
Important safety notes G
WARNING
When you operate or program the garage door with the integrated garage door opener, per-
sons in the range of movement of the garage
door can become trapped or struck by the
garage door. There is a risk of injury.
When using the integrated garage door
opener, always make sure that nobody is within the range of movement of the garage
door.
G
WARNING
Combustion engines emit poisonous exhaust
gases such as carbon monoxide. Inhaling
these exhaust gases leads to poisoning. There is a risk of fatal injury. Therefore never leave
the engine running in enclosed spaces with-
out sufficient ventilation.
Programming Programming buttons
Pay attention to the "Important safety notes"
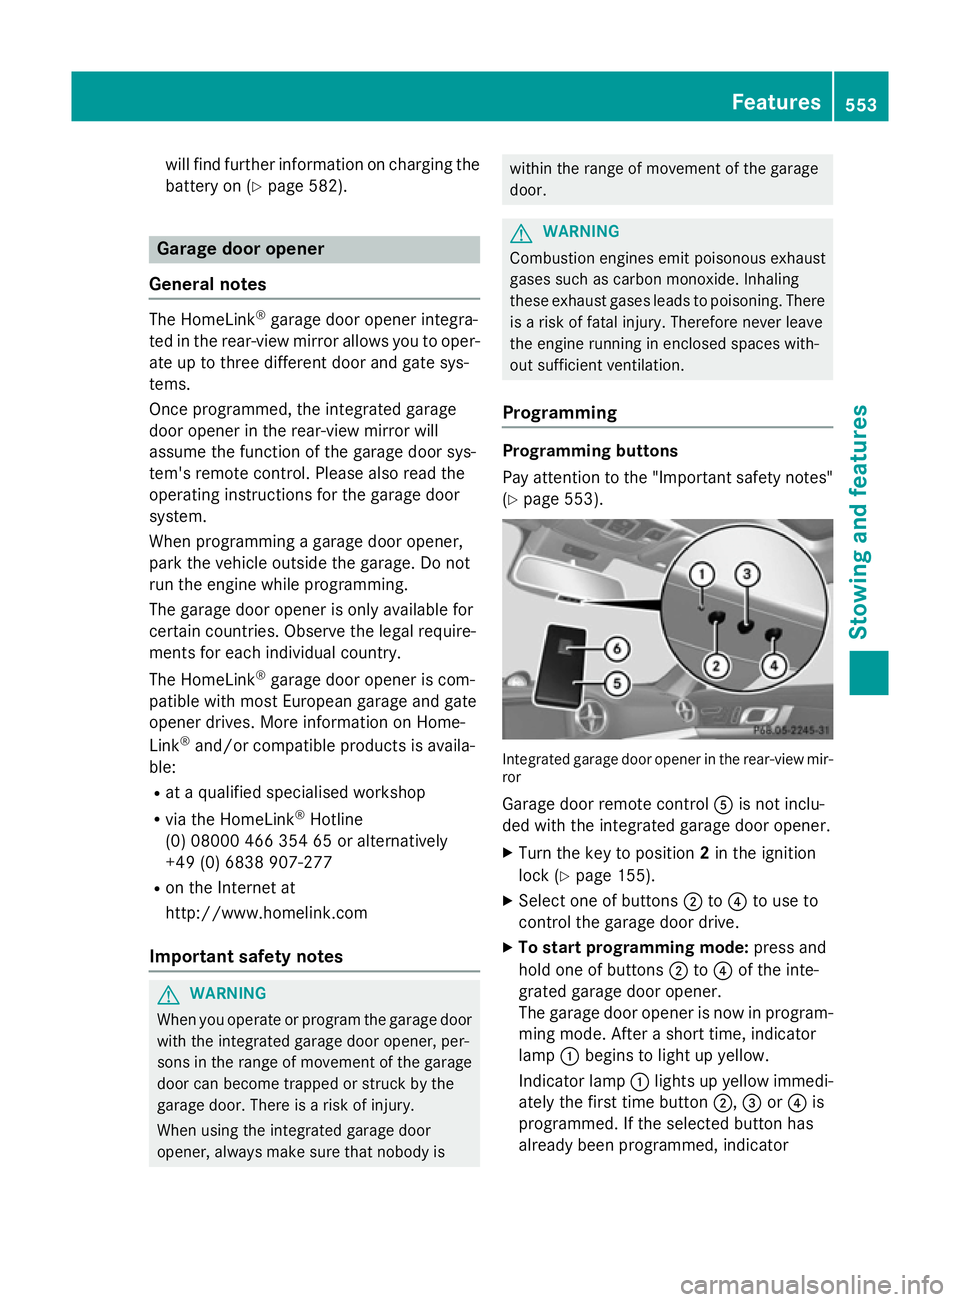
(Y page 553). Integrated garage door opener in the rear-view mir-
ror
Garage door remote control Ais not inclu-
ded with the integrated garage door opener.
X Turn the key to position 2in the ignition
lock (Y page 155).
X Select one of buttons ;to? to use to
control the garage door drive.
X To start programming mode: press and
hold one of buttons ;to? of the inte-
grated garage door opener.
The garage door opener is now in program-
ming mode. After a short time, indicator
lamp :begins to light up yellow.
Indicator lamp :lights up yellow immedi-
ately the first time button ;,=or? is
programmed. If the selected button has
already been programmed, indicator Features
553Stowing and features Z
Page 586 of 637
G
WARNING
Work carried out incorrectly on the battery
may lead to a malfunction, e.g. a short circuit. This, in turn, may restrict the functions of the
safety-relevant systems, e.g. the lighting sys-
tem, ABS (Anti-lock Braking System) or ESP ®
(Electronic Stability Program). The operating
safety of your vehicle may then be compro-
mised. You could then lose control of the vehi-
cle, e.g.:
R when braking
R when making sudden steering movements
and/or travelling at an inappropriate
speed.
There is a risk of an accident.
In the event of a short circuit or similar situa-
tion, inform a qualified specialist workshop
immediately. Do not drive any further. You
should have all work involving the battery car- ried out at a qualified specialist workshop.
Further information on ABS and ESP ®
(Y page 71) and (Y page 73). G
WARNING
Electrostatic build-up can lead to the creation of sparks, which could ignite the highly explo-
sive gases of a battery. There is a risk of an
explosion.
Before handling the battery, touch the vehicle body to remove any existing electrostatic
build-up.
The highly flammable gas mixture is created
while the battery is charging and when jump-
starting.
Always make sure that neither you nor the
battery is electrostatically charged. Electro-
static charge is created, for example:
R by wearing synthetic fibre clothing
R due to friction between clothing and the
seat
R when you pull or push the battery across
carpet or other synthetic materials
R when you rub the battery with a cloth G
WARNING
During the charging process, a battery produ- ces hydrogen gas. If a short circuit occurs or
sparks are created, the hydrogen gas can
ignite. There is a risk of an explosion.
R Make sure that the positive terminal of a
connected battery does not come into con-
tact with vehicle parts.
R Never place metal objects or tools on a bat-
tery.
R It is important that you observe the descri-
bed order of the battery terminals when
connecting and disconnecting a battery.
R When jump-starting, make sure that the
battery poles with identical polarity are
connected.
R It is particularly important to observe the
described order when connecting and dis-
connecting the jump leads.
R Never connect or disconnect the battery
terminals while the engine is running. G
WARNING
Battery acid is caustic. There is a risk of injury. Avoid contact with the skin, eyes or clothing.
Do not inhale any battery gases. Do not lean
over the battery. Keep children away from
batteries. Wash battery acid immediately with water and seek medical attention. H
Environmental note Batteries contain pollutants.
It is illegal to dispose of them
with the household rubbish.
They must be collected sep-
arately and disposed of in anenvironmentally responsible
recycling system. Dispose of batteries in an
environmentally responsible
manner. Take discharged
batteries to a qualified spe-
cialist workshop or to a col-
lection point for used batter-
ies. Battery (vehicle)
583Breakdown assistance Z