Page 129 of 248
 Owners Manual Bluetooth
In the menu
Bluetooth you can select the following menu points:
■ User - the overview of the stored users
■ Connect
■ Disconnect
■ Rename
■ Delete
■ New user - Search for user")
Bluetooth
In the menu
Bluetooth you can select the following menu points:
■ User - the overview of the stored users
■ Connect
■ Disconnect
■ Rename
■ Delete
■ New user - Search for users who are in the reception range
■ Visibility - Switching on the visibility of the hands-free system for other devi-
ces
■ Media player
■ Active device
■ Paired devices
■Connect
■ Rename
■ Delete
■ Authorisation
■ Search - search for available media players
■ Visibility - Switching on the visibility of the media player hands-free sys-
tem in the environment
■ Extras
■Modem - overview of the active and paired devices for the connection to
the internet
■ Active device
■ Paired devices
■ Phone name - the possibility to change the name of the hands-free system
(pre-set SKODA UHV)
Settings
In the menu Settings you can select the following menu points:
■ Phone book
■ Update - scan the telephone book
■ Select memory
■SIM & phone
■ SIM card
■ Mobile phone - Initial setting which allows contacts on the SIM card to
be scanned, it is necessary to switch to the menu point SIM & phone■
List
■ Surname
■ First name
■ Own number - optionally display your own telephone number on the display of
the device of the person you are calling (this function is network-dependent)
■ Network depnd. .
■ Yes
■ No
■ Signal settings
■ Ring tone
■ Volume
■Turn vol. up
■ Turn vol. down
■ Phone settings
■ Select operator
■ Automatic
■ Manual
■ Network mode
■ GSM
■ Automatic
■ SIM mode - valid for telephones with the rSAP profile, in which the opera-
tion of two SIM cards simultaneously is supported - you can choose which
SIM card you want to associate with the hands-free system
■ Change
■ Phone Mode - Toggle between rSAP and HFP mode
■ Premium - rSAP mode
■ Handsfree - HFP mode
■ Off time - Setting in five-minute steps
■ Data
- Settings for the Internet access point - ask network operator for details
■ Switch off ph. (Switch off ph.) - switches off the phone unit (phone remains
coupled)
Back
Return in the main menu of the information display. 127
Communication Using the system Safety Driving Tips General Maintenance Breakdown assistance Technical data
Page 130 of 248
 Owners Manual Voice control
Dialogue On vehicles which are factory-fitted with the navigation system Co-
lumbus, it is only possible to operate the voice control via this de-
vice, see the operating instructions fo")
Voice control
Dialogue On vehicles which are factory-fitted with the navigation system Co-
lumbus, it is only possible to operate the voice control via this de-
vice, see the operating instructions for Columbus.
The period of time in which the system is ready to receive voice commands and to
carry them out is called a dialogue. The system gives audible feedback and guides
you if necessary through the relevant functions.
Optimum understanding of the commands depends on several factors:
● Speak with a normal tone of voice without intonation and excessive pauses.
● Avoid a bad pronunciation.
● Close the doors, windows and sliding roof, in order to reduce or stop disturbing
exterior noise.
● It is recommended to speak louder at higher speeds, so that the tone of your
voice is louder than the increased surrounding noise.
● During the dialogue limit additional noise in the vehicle, e.g. simultaneously
talking occupants.
● Do not speak, if the system makes an announcement.
● The microphone for voice control is inserted in the moulded headliner and di-
rected to the driver and front passenger. Therefore the driver and the front pas-
senger can operate the equipment.
Switch on voice control (dialogue)
You can start the dialogue at any time by pressing the 1 button on the multi-
function steering wheel ⇒ page 125.
If the system does not recognise your command, it repeats the first part of the aid
and thus a new entry is possible. After the 2nd error the system repeats the sec-
ond part of the aid. After the 3rd error the answer
“Procedure cancelled ” is given
and the dialogue is ended.
Switching off voice control (dialogue)
If the system is currently playing a message, you will need to end the message
currently being played by pressing the 1 button on the multi-function steering
wheel. If the system expects a voice command, you can end the dialogue yourself:
●
Do some with the CANCEL voice command;
● by pressing the 1 button on the multi-function steering wheel.
Note
The dialogue of an incoming call is immediately interrupted.
Voice commands Basic voice commands for operating the telephone control unit
Voice command Action
HELP After this command the system repeats all possible
commands.
CALL NAME After this command a name can be entered which es-
tablishes a connection to the requested partner. DIAL NUMBER After this command a phone number can be entered
which establishes a connection to the requested par-
ty.
REDIAL The last selected telephone number is selected.
READ ADDRESSBOOK The system reads the contacts in the telephone
book.
READ MESSAGES The system reads the messages which were received
while the telephone was connected with the hands-
free system. SHORT DIALOGUE Help is clearly reduced (good operating knowledge
provided).
LONG DIALOGUE Help is not reduced (suitable for beginners).
CANCEL The dialogue is ended.
Store voice recording of a contact
If automatic name recognition does not work reliably for some contacts, you will
can choose to save your own voice entry for the contact in the menu point
Phone
book - Voice Tag - Record.
You can also store your own voice entry using voice control in the menu FURTHER
OPTIONS . 128
Communication
Page 131 of 248
 Owners Manual Internet connection
An Internet connection can be established via a PC or PDA.
The control unit on the hands-free system supports the GPRS, EDGE and UMTS/3G
technologies.
An Internet is only possible")
Internet connection
An Internet connection can be established via a PC or PDA.
The control unit on the hands-free system supports the GPRS, EDGE and UMTS/3G
technologies.
An Internet is only possible via a telephone which is connected via the rSAP pro-
file.
The procedure for connecting to the Internet can vary depending on the type and
version of the operating system as well as the type of the device to be connected.
Successfully connecting to the internet requires appropriate knowledge of the op-
erating system for connecting the device .
Process of connection
– Connect the mobile phone with the hands-free system.
– Set the access point (depending on the operator, usually the “Internet”) in the
menu Phone - Settings - Data .
– Switch on the visibility of the hands-free system for the other devices in the
menu Phone - Bluetooth
- Visibility.
– Have the device to be connected search for available Bluetooth ®
devices.
– From the list of found devices, choose the hands-free system (“SKODA_BT” by
default).
– On the device to be connected, enter the password and follow any instructions
given on this device or in the information display.
– Enter the required Internet address in the browser. The operating system re-
quests the entry of the telephone number for the internet access (depending
on the operator, usually
“*99#”).
Music playback via Bluetooth ®The universal telephone preinstallation GSM IIl makes it possible to play back mu-
sic via Bluetooth ®
from the devices such as MP3 player, mobile phone or note-
book.
In order to enable the music playback via Bluetooth ®
, it is necessary to first con-
nect the device to be connected with the hands-free system in the menu Phone -
Bluetooth - Media player . The music playback process is performed on the connected device. Note
● The device to be connected must support the Bluetooth ®
profile A2DP, see
Owner's manual of the device to be coupled.
● This function is not available in vehicles fitted with the car radio Blues.
Multimedia AUX-IN and MDI inputs The input AUX-IN is located below the armrest of the front seats and is marked
with .
The input MDI is located in the glove box.
The inputs AUX-IN and MDI are used to connect external audio sources (e.g. iPod
or MP3 player) and play back music from these devices via your factory-fitted radio
or radio navigation system.
The description of the operation can be found in the relevant Owner's Manual of
your radio or your radio navigation system. Note
● The loudspeakers in the vehicle are matched to a power output of the radio
and radio navigation system of 4x 20 W.
● For the equipment sound system, the loudspeakers are matched to a power
output of the amplifier of 4x40°W + 6x20
W. 129
Communication Using the system Safety Driving Tips General Maintenance Breakdown assistance Technical data
Page 132 of 248
 Owners Manual CD changer
Fig. 115 The CD changer
The CD changer for the radio and radio navigation system is located in the left
side compartment of the luggage compartment.
Inserting the CD
– Touch the button")
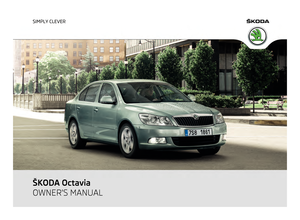
CD changer
Fig. 115 The CD changer
The CD changer for the radio and radio navigation system is located in the left
side compartment of the luggage compartment.
Inserting the CD
– Touch the button C
⇒ fig. 115 and guide the CD (compact disc) into the CD-
case B . The CD is automatically loaded onto the lowest free position in the CD
changer. The LED in the corresponding button D stops flashing.
Fill CD changer with CDs
– Hold the button C pressed for longer than 2 seconds and guide the CDs one
after the other (maximum 6
CDs) into the CD case B . The LEDs in the buttons
D are no longer flashing.
Inserting a CD to one definite position
– Briefly touch the button C . The LEDs in the buttons
D light up at the memory
spaces, which are already assigned and flash in the case of free memory
spaces.
– Touch the desired button D and guide the CD into the CD-case
B .
Ejecting CD
– Briefly touch the button A , in order to eject a CD. For assigned memory
spaces, now the LEDs light up in the buttons D .
– Touch the corresponding button D . The CD is ejected.
Ejecting all CDs
– Hold the button A pressed for more than 2 seconds, in order to eject the CDs.
All CDs in the CD-changer are ejected consecutively. Note
● Always guide the CD into the CD-case B with the printed side pointing up-
wards.
● Never push the CD with force into the CD-case as the insertion is performed
automatically.
● After loading a CD into the CD-changer, you must wait until the LED of the cor-
responding button D lights up. Then the CD-case
B is free to load the next CD.
● If you have selected a position, on which a CD is already located, this CD will be
ejected. Take out the ejected CD and load the desired CD. 130
Communication
Page 133 of 248
 Owners Manual Safety
Passive Safety
Basic information
Driving the safe way Passive safety measures reduce the risk of injury in accident situa-
tions.
In this section you will find important information, tips and n")
Safety
Passive Safety
Basic information
Driving the safe way Passive safety measures reduce the risk of injury in accident situa-
tions.
In this section you will find important information, tips and notes on the subject of
passive safety in your vehicle. We have combined everything here which you
should be familiar with, for example, regarding seat belts, airbags, child seats and
safety of children. It is therefore important, in particular, to comply with the notes
and warnings in this section for your own interest and in the interest of those
travelling with you. WARNING
● This chapter contains important information on how to use the vehicle for
the driver and his occupants. You will find further information on safety, which
concerns you and those travelling with you, in the following chapters of this
Owner's Manual.
● The complete on-board literature should always be in the vehicle. This ap-
plies in particular, if you rent out or sell the vehicle.
Safety equipment The safety equipment is part of the occupant protection and it can
reduce the risk of injuries in accident situations.
“Do not put at risk
” your safety and the safety of those travelling with you . In the
event of an accident, the safety equipment can reduce the risk of injuries.
The following list contains part of the safety equipment in your vehicle:
● three-point seat belts for all the seats;
● belt force limiter for front and outer rear seats;
● belt tensioners for front seats; ●
seat belt height adjusters for front seats;
● front airbag for the driver and front passenger;
● side airbags;
● head airbags;
● anchoring points for child seat using the “ISOFIX” system;
● anchoring points for child seat using the “Top Tether” system;
● head restraints adjustable for height;
● adjustable steering column.
The specified safety equipment works together, in order to optimally protect you
and those travelling with you in accident situations. The safety equipment does
not protect you or the people travelling with you, if you or your occupants adopt
an incorrect seated position or the equipment is not correctly adjusted or used.
For this reason you will be provided with information on why these equipment
components are very important, how it protects you and the occupants, what
should be observed when using the equipment and how you and the people trav-
elling with you can make full use of the existing safety equipment. This Owner's
Manual contains important warning notes, which you and those travelling with
you should pay attention to in order to reduce a risk of injury.
Safety concerns everybody!
Before setting off The driver is always fully responsible for his occupants and for the
operating safety of the vehicle.
For your own safety and the safety of the people travelling with you, please pay
attention to the following points before setting off.
● Ensure that the lighting and the turn signal system are functioning properly.
● Inspect the tyre inflation pressure.
● Ensure that all the windows offer a good visibility to the outside.
● Safely attach the items of luggage ⇒ page 66
, Loading the luggage compart-
ment. £ 131
Passive Safety Using the system Safety Driving Tips General Maintenance Breakdown assistance Technical data
Page 134 of 248
 Owners Manual ●
Ensure that no objects can obstruct the pedal.
● Adjust the mirror, the front seat and the head restraint to match your body
size.
● Point out to your occupants that the head restraints must b")
●
Ensure that no objects can obstruct the pedal.
● Adjust the mirror, the front seat and the head restraint to match your body
size.
● Point out to your occupants that the head restraints must be adjusted to
match their body size.
● Protect the children in suitable child seats with correctly fastened seat belts
⇒ page 147, Transporting children safely.
● Adopt the correct seated position ⇒
page 132, Correct seated position. Also
inform your occupants to adopt the correct seated position.
● Fasten the seat belt correctly. Also inform your occupants to properly fasten
the seat belts ⇒
page 137, How are seat belts correctly fastened?.
What influences the driving safety? The driving safety is primarily determined by the style of driving
and the personal behaviour of all the occupants.
The driver is fully responsible for himself and his occupants. If your driving safety
is effected, you place yourself and the oncoming traffic at risk.
Please refer to the following guidelines.
● Do not get distracted from concentrating on the traffic situation, e.g. by your
occupants or mobile phone calls.
● Never drive when your driving ability is impaired, e.g. through medication, alco-
hol, drugs.
● Keep to the traffic regulations and the permissible speed limit.
● Adjust the driving speed at all times to the road condition as well as to the
traffic and weather conditions.
● Take regular breaks on long journeys - at the latest every two hours. Correct seated position
Correct seated position for the driver Correct seated position for the driver is important for safe and re-
laxed driving.
Fig. 116 The correct distance of the driver from the steering wheel/The correct head restraint
adjustment for the driver
For your own safety and to reduce the risk of injury in the event of an accident, we
recommend the following setting.
● Adjust the steering wheel so that the distance between the steering wheel
and your chest is at least 25 cm ⇒ fig. 116 - left.
● Position the driver seat in the forward/back direction so that you are able to
fully press the pedals with your legs at a slight angle.
● Adjust the seat backrest so that you are able to reach the highest point of the
steering wheel with your arms at a slight angle.
● Adjust the head restraint so that the top edge of the head restraint is at the
same level as the upper part of your head ⇒
fig. 116 - right.
● Fasten the seat belt correctly ⇒
page 137, How are seat belts correctly fas-
tened?.
Manual driver seat adjustment ⇒ page 60, Adjusting the front seats.
Electrical driver seat adjustment ⇒ page 61, Adjusting front seats electrically. £132
Passive Safety
Page 135 of 248
 Owners Manual WARNING
● The front seats and the head restraints must always be adjusted to match
the body size of the seat occupant as well as the seat belts must always be
correctly fastened in order to provide")
WARNING
● The front seats and the head restraints must always be adjusted to match
the body size of the seat occupant as well as the seat belts must always be
correctly fastened in order to provide an optimal protection for you and your
occupants.
● The driver must maintain a distance of at least 25 cm to the steering wheel
⇒ fig. 116 left. Not maintaining this minimum distance will mean that the air-
bag system will not be able to properly protect you - hazard!
● When driving, hold the steering wheel with both hands firmly on the outer
edge in the 9 o'clock and 3 o'clock position. Never hold the steering wheel
firmly in the 12 o'clock position or in another way (e.g. in the middle of the
steering wheel or at the inner steering wheel edge). In such cases, injuries to
the arms, the hands and the head can occur when the driver airbag is de-
ployed.
● The seat backrests must not be angled too far back when driving other-
wise this will affect proper operation of the seat belts and of the airbag sys-
tem - risk of injury!
● Ensure that there are no objects in the footwell as any objects may get be-
hind the pedals during a driving or braking manoeuvre. You would then no
longer be able to operate the clutch, to brake or accelerate.
Correct seated position for the front passenger The front passenger must maintain a distance of at least 25 cm
from the dash panel so that the airbag offers him the greatest pos-
sible safety it is deployed.
For the safety of the front passenger and to reduce the risk of injury in the event
of an accident, we recommend the following setting:
● Adjust the front passenger seat as far as possible to the rear.
● Adjust the head restraint so that the top edge of the head restraint is at the
same level as the upper part of your head ⇒
fig. 116 - right.
● Fasten the seat belt correctly ⇒
page 137, How are seat belts correctly fas-
tened?.
In exceptional cases the front passenger airbag can be deactivated ⇒ page 145,
Deactivating an airbag.
Manual front passenger adjustment ⇒ page 60, Adjusting the front seats. Electrical front passenger seat adjustment
⇒
page 61, Adjusting front seats elec-
trically. WARNING
● The front seats and the head restraints must always be adjusted to match
the body size of the seat occupant as well as the seat belts must always be
correctly fastened in order to provide an optimal protection for you and your
occupants.
● The front passenger must maintain a distance of at least 25 cm to the dash
panel. Not maintaining this minimum distance will mean that the airbag sys-
tem will not be able to properly protect you - hazard!
● Always keep your feet in the footwell when the car is being driven - never
place your feet on the instrument panel, out of the window or on the surfaces
of the seats. You will be exposed to increased risk of injury if it becomes nec-
essary to apply the brake or in the event of an accident. If an airbag is de-
ployed, you may suffer fatal injuries when adopting an incorrect seated posi-
tion!
● The seat backrests must not be angled too far back when driving other-
wise this will affect proper operation of the seat belts and of the airbag sys-
tem - risk of injury!
Correct seated position for the occupants on the rear seats Occupants on the rear seats must sit upright, keep the feet in the
footwell and must have their seat belts correctly fastened.
To reduce the risk of injury in the event of a sudden braking manoeuvre or an acci-
dent, the occupants on the rear seats must observe the following:
● Adjust the head restraints so that the top edge of the head restraints is at the
same level as the upper part of your head ⇒ fig. 116 - on the right.
● Fasten the seat belt correctly ⇒ page 137,
How are seat belts correctly fas-
tened?.
● If you are transporting ⇒ page 147, Transporting children safely
children in the
vehicle, please use a suitable child restraint system. £ 133
Passive Safety Using the system Safety Driving Tips General Maintenance Breakdown assistance Technical data
Page 136 of 248
 Owners Manual WARNING
● The head restraints must always be adjusted to match the body size, in or-
der to offer an optimal protection for you and your occupants.
● Always keep your feet in the footwell when the")
WARNING
● The head restraints must always be adjusted to match the body size, in or-
der to offer an optimal protection for you and your occupants.
● Always keep your feet in the footwell when the car is being driven - never
put your feet out of the window or on the surfaces of the seats. You will be
exposed to increased risk of injury if it becomes necessary to apply the brake
or in the event of an accident. If the head airbag is deployed and when adopt-
ing an incorrect seated position, you are exposing yourself to an increased risk
of injury and in the event of an accident you may suffer fatal injuries!
● If the occupants on the rear seats are not sitting upright, the risk of injury
is increased due to incorrect routing of the seat belt.
Examples of an incorrect seated position An incorrect seated position can lead to severe injuries or death for
the occupants.
Seat belts offer their optimum protection only if the webbing of the seat belts is
properly routed. Incorrect seated positions considerably reduce the protective
functions of the seat belts and therefore increase the risk of injury due to an in-
correct routing of the seat belt. The driver is fully responsible for himself and the
occupants, in particular for the children. Do not permit an occupant to adopt an
incorrect seated position when the car is moving.
The following list contains the examples of seated positions which are dangerous
for the occupants. This list is not complete, however we would like you to get in-
terested in this subject.
Therefore, while the car is moving never:
● stand up in the vehicle;
● stand up on the seats;
● kneel on the seats;
● tilt the seat backrest fully to the back;
● lean against the dash panel;
● lie on the rear seat bench;
● only sit on the front area of the seat;
● sit to the side;
● lean out of the window;
● put the feet out of the window; ●
put the feet on the dash panel;
● put the feet on the seat upholstery;
● transport somebody in the footwell;
● have the seat belt not fastened when driving;
● occupy the luggage compartment. WARNING
● If the occupant adopts an incorrect seated position, he is exposed to life-
threatening injuries, in case he is hit by a deployed airbag.
● Before setting off, please adopt the correct seated position and do not
change this seated position while the car is moving. Also advise your occu-
pants to adopt the correct seated position and not to change this seated posi-
tion while the car is moving. 134
Passive Safety
 1
1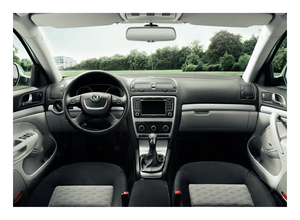 2
2 3
3 4
4 5
5 6
6 7
7 8
8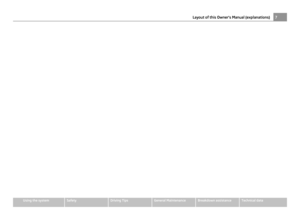 9
9 10
10 11
11 12
12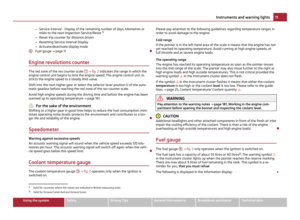 13
13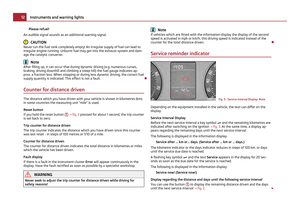 14
14 15
15 16
16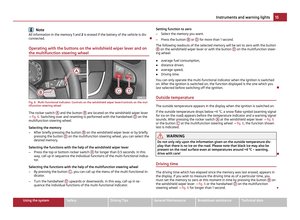 17
17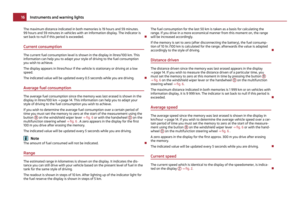 18
18 19
19 20
20 21
21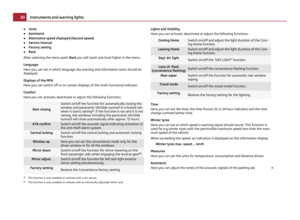 22
22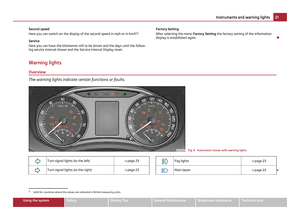 23
23 24
24 25
25 26
26 27
27 28
28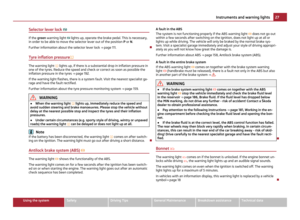 29
29 30
30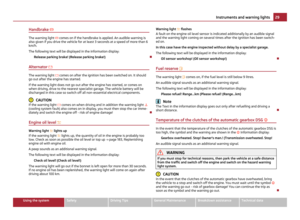 31
31 32
32 33
33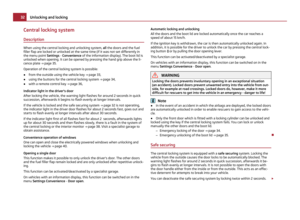 34
34 35
35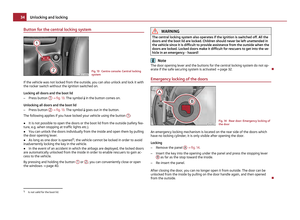 36
36 37
37 38
38 39
39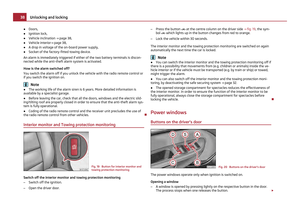 40
40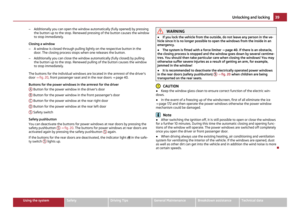 41
41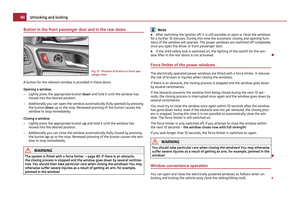 42
42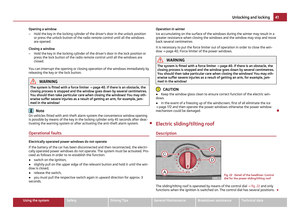 43
43 44
44 45
45 46
46 47
47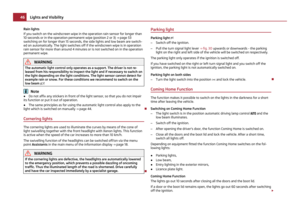 48
48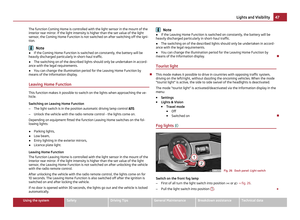 49
49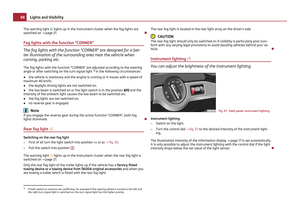 50
50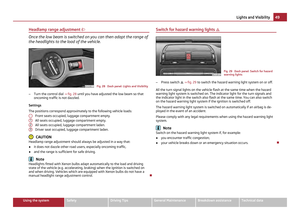 51
51 52
52 53
53 54
54 55
55 56
56 57
57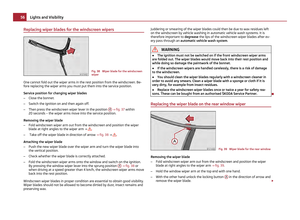 58
58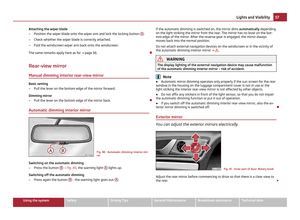 59
59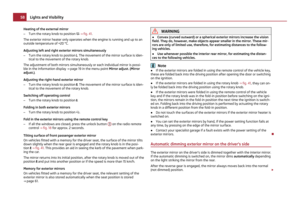 60
60 61
61 62
62 63
63 64
64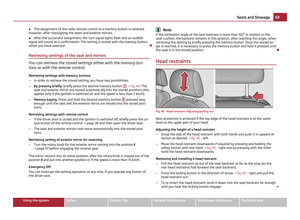 65
65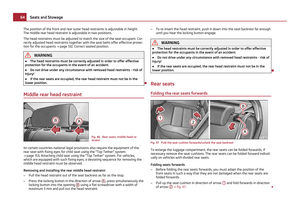 66
66 67
67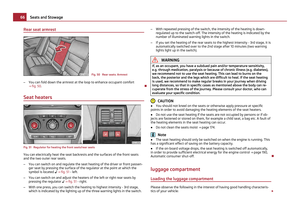 68
68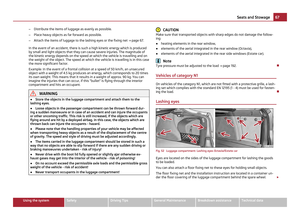 69
69 70
70 71
71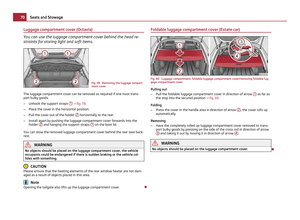 72
72 73
73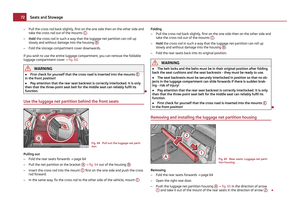 74
74 75
75 76
76 77
77 78
78 79
79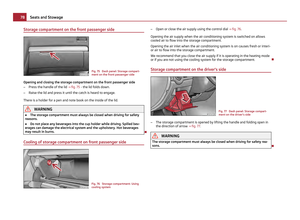 80
80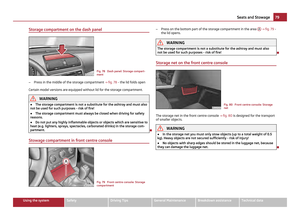 81
81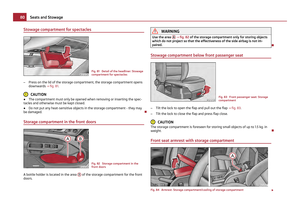 82
82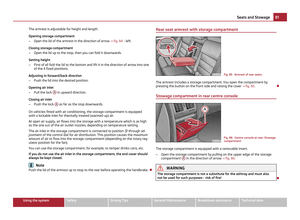 83
83 84
84 85
85 86
86 87
87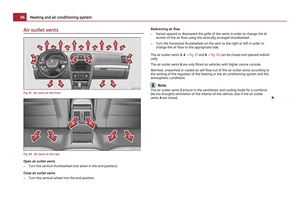 88
88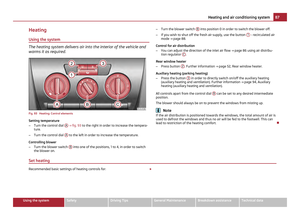 89
89 90
90 91
91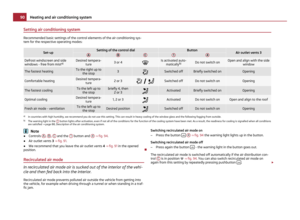 92
92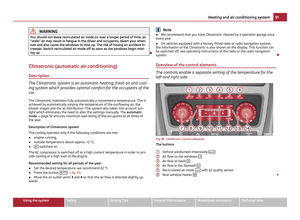 93
93 94
94 95
95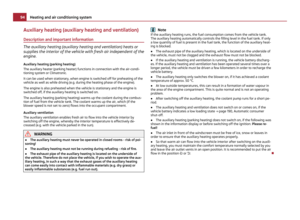 96
96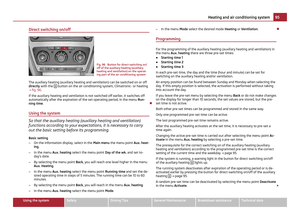 97
97 98
98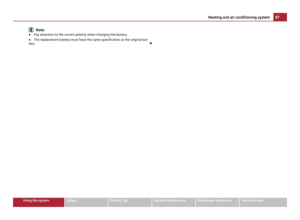 99
99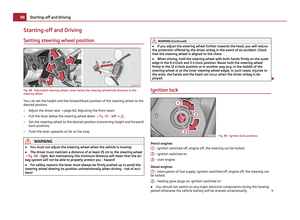 100
100 101
101 102
102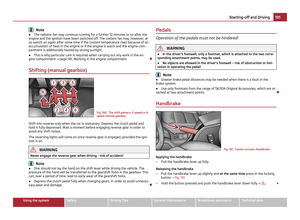 103
103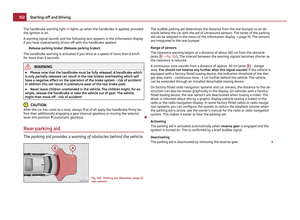 104
104 105
105 106
106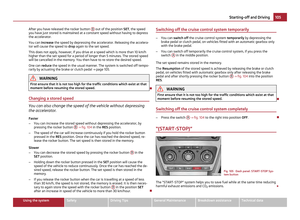 107
107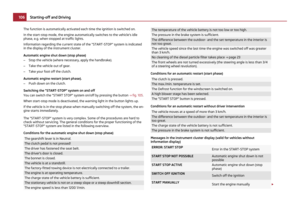 108
108 109
109 110
110 111
111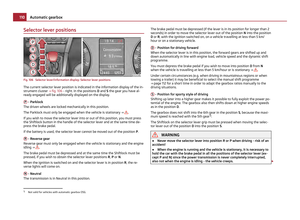 112
112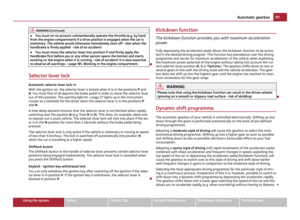 113
113 114
114 115
115 116
116 117
117 118
118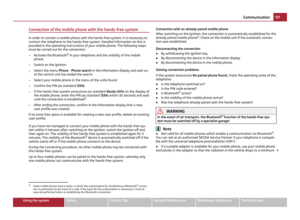 119
119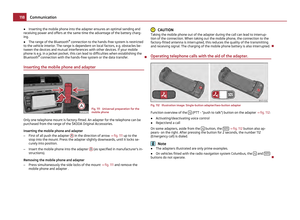 120
120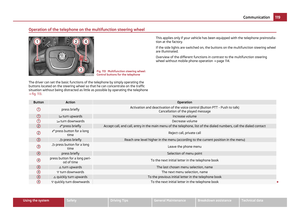 121
121 122
122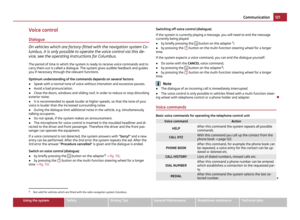 123
123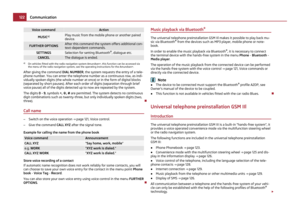 124
124 125
125 126
126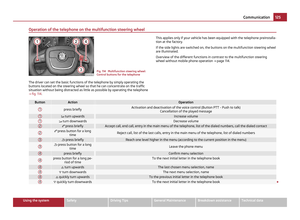 127
127 128
128 129
129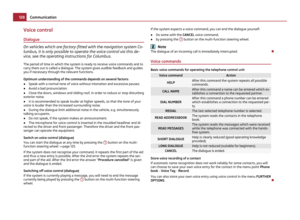 130
130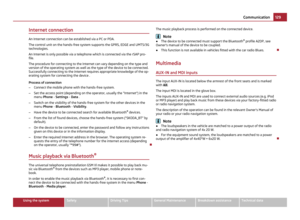 131
131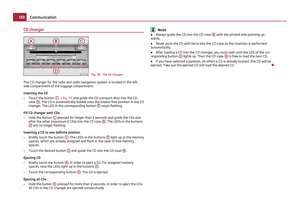 132
132 133
133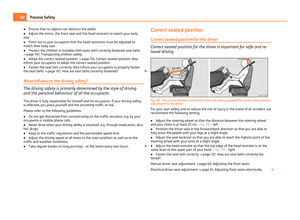 134
134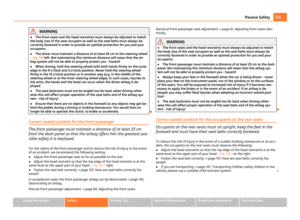 135
135 136
136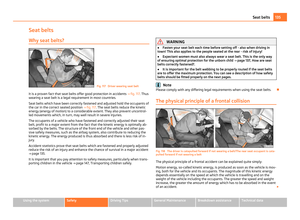 137
137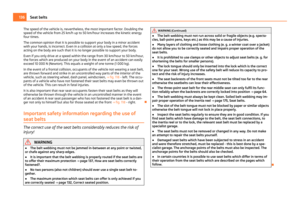 138
138 139
139 140
140 141
141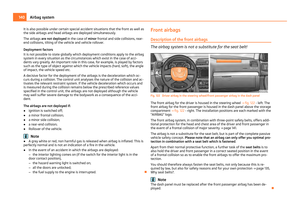 142
142 143
143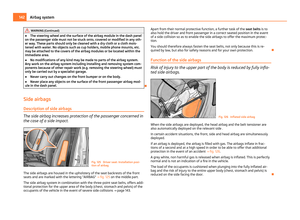 144
144 145
145 146
146 147
147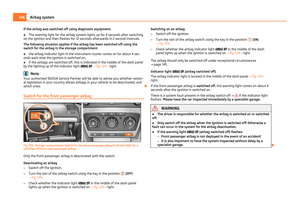 148
148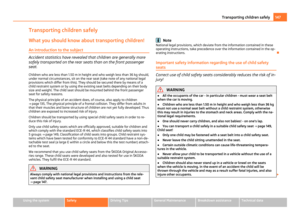 149
149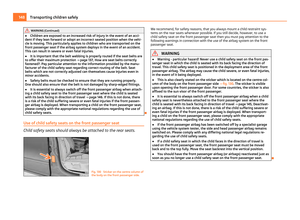 150
150 151
151 152
152 153
153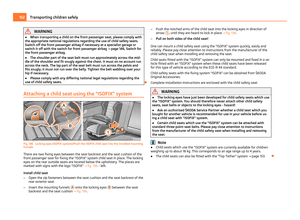 154
154 155
155 156
156 157
157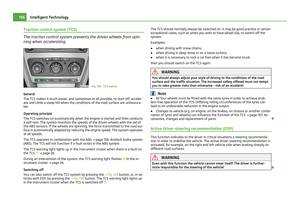 158
158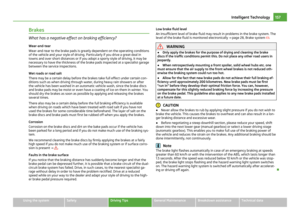 159
159 160
160 161
161 162
162 163
163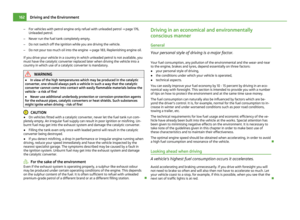 164
164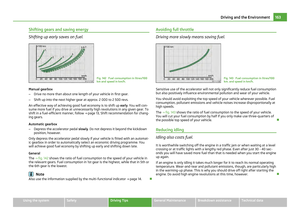 165
165 166
166 167
167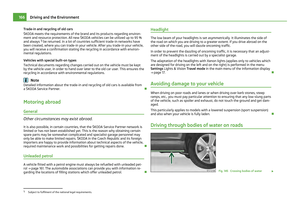 168
168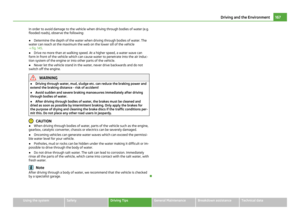 169
169 170
170 171
171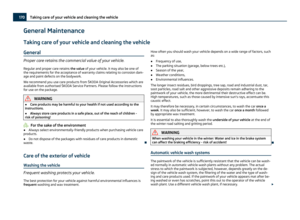 172
172 173
173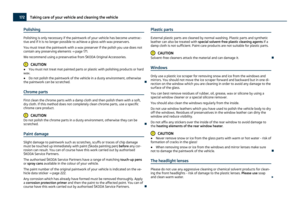 174
174 175
175 176
176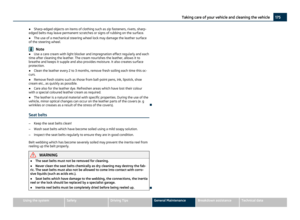 177
177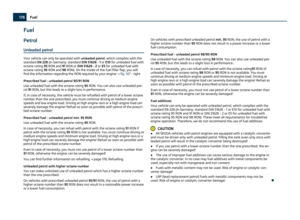 178
178 179
179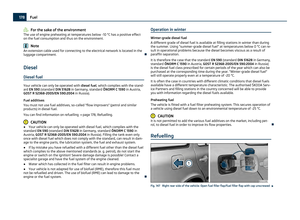 180
180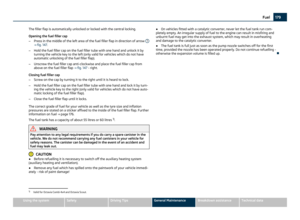 181
181 182
182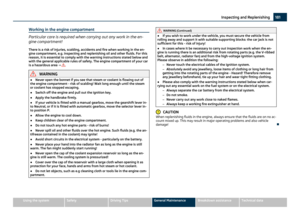 183
183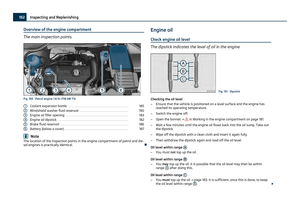 184
184 185
185 186
186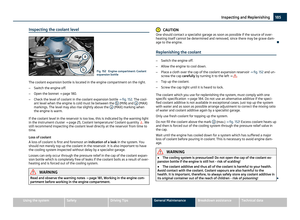 187
187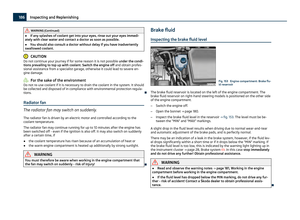 188
188 189
189 190
190 191
191 192
192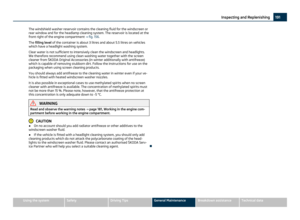 193
193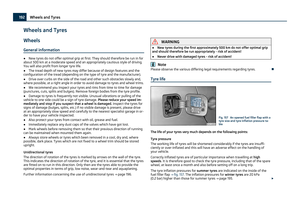 194
194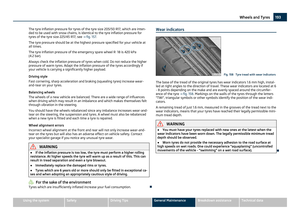 195
195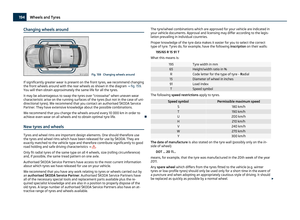 196
196 197
197 198
198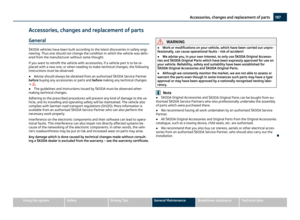 199
199 200
200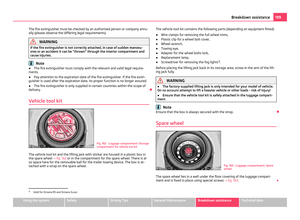 201
201 202
202 203
203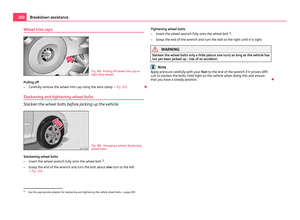 204
204 205
205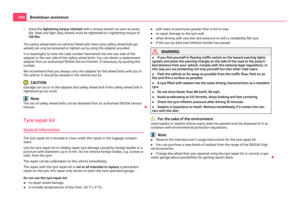 206
206 207
207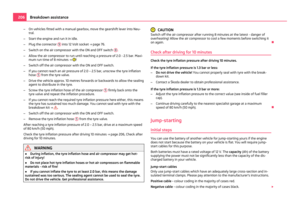 208
208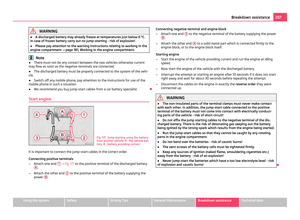 209
209 210
210 211
211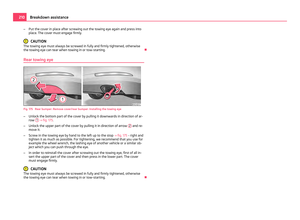 212
212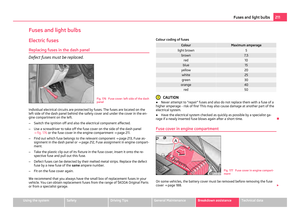 213
213 214
214 215
215 216
216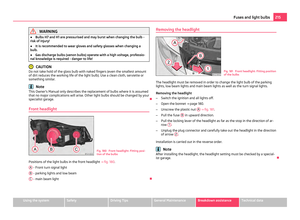 217
217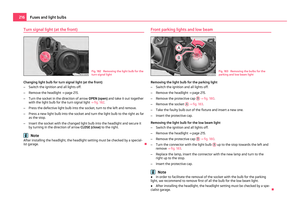 218
218 219
219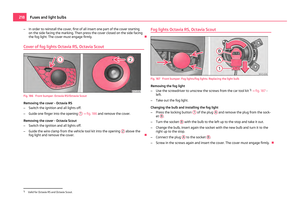 220
220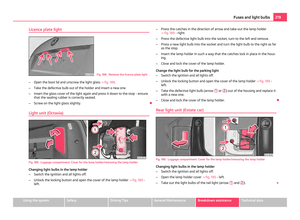 221
221 222
222 223
223 224
224 225
225 226
226 227
227 228
228 229
229 230
230 231
231 232
232 233
233 234
234 235
235 236
236 237
237 238
238 239
239 240
240 241
241 242
242 243
243 244
244 245
245 246
246 247
247