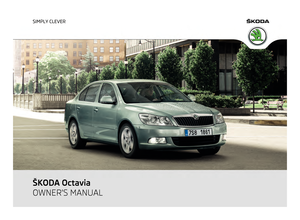
Page 17 of 248
 Owners Manual Note
All information in the memory 1 and 2 is erased if the battery of the vehicle is dis-
connected.
Operating with the buttons on the windshield wiper lever and on
the multifunction steering wh")
Note
All information in the memory 1 and 2 is erased if the battery of the vehicle is dis-
connected.
Operating with the buttons on the windshield wiper lever and on
the multifunction steering wheel Fig. 6 Multi-functional indicator: Controls on the windshield wiper lever/controls on the mul-
tifunction steering wheel
The rocker switch A and the button
B are located on the windshield wiper lever
⇒ fig. 6 . Switching over and resetting is performed with the handwheel D on the
multifunction steering wheel.
Selecting the memory
– After briefly pressing the button B on the windshield wiper lever or by briefly
pressing the button D on the multifunction steering wheel, you can select the
desired memory.
Selecting the functions with the help of the windshield wiper lever
– Press the top or bottom rocker switch A for longer than 0.5 seconds. In this
way, call up in sequence the individual functions of the multi-functional indica-
tor.
Selecting the functions with the help of the multifunction steering wheel
– By pressing the button C , you can call up the menu of the multi-functional in-
dicator.
– Turn the handwheel D upwards or downwards. In this way, call up in se-
quence the individual functions of the multi-functional indicator. Setting function to zero
–
Select the memory you want.
– Press the button B or
D for more than 1 second.
The following readouts of the selected memory will be set to zero with the button B on the windshield wiper lever or with the button
D on the multifunction steer-
ing wheel:
● average fuel consumption,
● distance driven,
● average speed,
● Driving time.
You can only operate the multi-functional indicator when the ignition is switched
on. After the ignition is switched on, the function displayed is the one which you
last selected before switching off the ignition.
Outside temperature The outside temperature appears in the display when the ignition is switched on.
If the outside temperature drops below +4
°C, a snow flake symbol (warning signal
for ice on the road) appears before the temperature indicator and a warning signal
sounds. After pressing the rocker switch A at the windshield wiper lever
⇒ fig. 6
or the button C at the multifunction steering wheel
⇒
fig. 6 , the function shown
last is indicated. WARNING
Do not only rely upon the information given on the outside temperature dis-
play that there is no ice on the road. Please note that black ice may also be
present on the road surface even at temperatures around +4
°C – warning,
drive with care!
Driving time The driving time which has elapsed since the memory was last erased, appears in
the display. If you wish to measure the driving time as of a particular time, you
must set the memory to zero at this moment in time by pressing the button
B on
the windshield wiper lever ⇒ fig. 6 or the handwheel D on the multifunction
steering wheel ⇒ fig. 6 for longer than 1
second. £ 15
Instruments and warning lights Using the system Safety Driving Tips General Maintenance Breakdown assistance Technical data
Page 18 of 248
 Owners Manual The maximum distance indicated in both memories is 19 hours and 59 minutes.
99
hours and 59 minutes in vehicles with an Information display. The indicator is
set back to null if this period is exceed")
The maximum distance indicated in both memories is 19 hours and 59 minutes.
99
hours and 59 minutes in vehicles with an Information display. The indicator is
set back to null if this period is exceeded.
Current consumption The current fuel consumption level is shown in the display in litres/100 km. This
information can help you to adapt your style of driving to the fuel consumption
you wish to achieve.
The display appears in litres/hour if the vehicle is stationary or driving at a low
speed.
The indicated value will be updated every 0.5 seconds while you are driving.
Average fuel consumption The average fuel consumption since the memory was last erased is shown in the
display in litres/100 km
⇒
page 14. This information can help you to adapt your
style of driving to the fuel consumption you wish to achieve.
If you wish to determine the average fuel consumption over a certain period of
time you must set the memory to zero at the start of the measurement using the
button B on the windshield wiper lever
⇒
fig. 6 or with the handwheel D on the
multifunction steering wheel ⇒ fig. 6 . A zero appears in the display for the first
100 m you drive after erasing the memory.
The indicated value will be updated every 5 seconds while you are driving. Note
The amount of fuel consumed will not be indicated.
Range The estimated range in kilometres is shown on the display. It indicates the dis-
tance you can still drive with your vehicle based on the present level of fuel in the
tank for the same style of driving.
The readout is shown in steps of 10 km. After lighting up of the indicator light for
the fuel reserve the display is shown in steps of 5 km. The fuel consumption for the last 50 km is taken as a basis for calculating the
range. If you drive in a more economical manner from this moment on, the range
will be increased accordingly.
If the memory is set to zero (after disconnecting the battery), the fuel consump-
tion of 10 ltr./100 km is calculated for the range; afterwards the value is adapted
accordingly to the style of driving.
Distance driven The distance driven since the memory was last erased appears in the display
⇒ page 14. If you wish to measure the distance driven of a particular time, you
must set the memory to zero at this moment in time by pressing the button
B ⇒
fig. 6 on the windshield wiper lever or the handwheel D on the multifunction
steering wheel ⇒ fig. 6 .
The maximum distance indicated in both memories is 1
999 km or on vehicles with
information display, it is 9 999 km. The indicator is set back to null if this period is
exceeded.
Average speed The average speed since the memory was last erased is shown in the display in
km/hour
⇒
page 14. If you wish to determine the average vehicle speed over a cer-
tain period of time you must set the memory to zero at the start of the measure-
ment using the button B on the windshield wiper lever
⇒ fig. 6 or with the hand-
wheel D on the multifunction steering wheel
⇒ fig. 6 .
A zero appears in the display for the first approx. 300 m you drive after erasing
the memory.
The indicated value will be updated every 5 seconds while you are driving.
Current speed The current speed which is identical to the display of the speedometer, is indica-
ted on the display
2
⇒
fig. 2. 16
Instruments and warning lights
Page 19 of 248
 Owners Manual Oil temperature
If the oil temperature is lower than 50 °C or if a fault in the system for checking
the oil temperature is present, three lines are displayed instead of the oil temper-
ature.
War")
Oil temperature
If the oil temperature is lower than 50 °C or if a fault in the system for checking
the oil temperature is present, three lines are displayed instead of the oil temper-
ature.
Warning against excessive speeds Adjust the speed limit while the vehicle is stationary
– With the A button on the multi-function steering wheel
⇒ fig. 6 or the hand-
wheel D on the multi-function steering wheel
⇒ fig. 6 , choose the menu
point Warning against excessive speeds .
– Choose the B button on the multi-function steering wheel, or the handwheel
D on the multi-function steering wheel, the activate the option for setting
the speed limit (the value flashes).
– Use the A button on the windshield wiper lever or the handwheel
D on the
multi-function steering wheel to set the required speed limit., e.g. 50
km/h.
– Use the B button on the windshield wiper lever or the handwheel
D on the
multi-function steering wheel to confirm the required speed limit, or wait
around 5 seconds. The setting saves automatically (the value stops flashing).
This allows you to set the speed in 5 km/h intervals.
Adjust the speed limit while the vehicle is moving
– With the A button on the multi-function windshield wiper lever or the hand-
wheel D on the multi-function steering wheel, choose the menu point
Warn-
ing against excessive speeds .
– You can drive at the desired speed, e.g. 50 km/h.
– Use the B button on the multi-function steering wheel, or the handwheel
Don the multi-function steering wheel to accept the current speed as the speed
limit (the value flashes).
If you wish to change the speed limit that was set, it is changed in 5 km/h inter-
vals (e.g. the accepted speed of 47 km/h increases to 50 km/h or decreases to 45
km/h).
– Press the B button on the windshield wiper lever a second time or the hand-
wheel D on the multi-function steering wheel to confirm the required speed
limit, or wait around 5 seconds. The setting saves automatically (the value
stops flashing). Change or delete speed limit
–
With the A button on the multi-function windshield wiper lever or the hand-
wheel D on the multi-function steering wheel, choose the menu point
Warn-
ing against excessive speeds .
– Press the button B on the windshield wiper lever or the handwheel
D on the
multifunction steering wheel to delete the speed limit.
– Press the button B on the windshield wiper lever a second time or the hand-
wheel D on the multifunction steering wheel to activate the speed limit.
If you exceed the set speed limit, an acoustic warning signal will sound as a warn-
ing. At the same time the message Warning against excessive speeds appears
with the set limit value.
The set speed limit remains stored even after switching off the ignition. WARNING
Concentrate fully at all times on your steering! As the driver you are fully re-
sponsible for road safety.
MAXI DOT display (information display) Introduction The information display provides you with information in a convenient way con-
cerning the current operating state of your vehicle . The information system also
provides you with data (depending on the equipment installed in the vehicle) re-
lating to the radio, mobile phone, multi-functional indicator, radio navigation sys-
tem, the unit connected to the MDI input and the automatic gearbox.
Certain functions and operating conditions are always being checked on the vehi-
cle when the ignition is switched on and also while driving.
Functional faults, if required repair work and other information are indicated by
red symbols ⇒
page 19 and yellow symbols ⇒ page 19.
Lighting up of certain symbols is combined with an acoustic warning signal.
Information and texts giving warnings are also shown in the display ⇒ page 21.
The following information can be shown in the display (depending on the equip-
ment installed on the vehicle): £ 17
Instruments and warning lights Using the system Safety Driving Tips General Maintenance Breakdown assistance Technical data
Page 20 of 248
 Owners Manual Main menu ⇒ page 18
Door, luggage compartment door and bonnet ajar
warning ⇒ page 18
Service Interval Display ⇒
page 12 Selector lever position for an automatic gearbox ⇒
page 108 �")
Main menu ⇒ page 18
Door, luggage compartment door and bonnet ajar
warning ⇒ page 18
Service Interval Display ⇒
page 12 Selector lever position for an automatic gearbox ⇒
page 108
Main menu Fig. 7 Information display: Controls on the windshield wiper lever/controls on the multifunc-
tion steering wheel
Operating with the buttons on the windshield wiper lever
– You can activate the Main Menu by pressing the rocker switch A
⇒ fig. 7 for
more than 1
second.
– You can select individual menu points by means of the rocker switch A . When
the pushbutton B is briefly pressed, the information you have selected is dis-
played.
Operating with the buttons on the multifunction steering wheel
– You can activate the Main menu by pressing the rocker switch C
⇒ fig. 7
for
more than 1 second.
– By briefly pressing the C button you will reach one level higher.
– You can select the individual menus by pressing the handwheel D . After brief-
ly pressing the handwheel D , the desired menu is indicated.
You can select the following information (depending on the equipment installed
on the vehicle):
■ MFD ⇒
page 14 ■
Audio
■ Navigation
■ Phone ⇒ page 116
■ Aux.
Heating ⇒ page 94
■ Assistants ⇒ page 46
■ Vehicle status ⇒ page 19
■ Settings ⇒ page 19
The menu point Audio is only then displayed when the factory-fitted car radio is
switched on.
The menu point Navigation is only then displayed when the factory-fitted radio
navigation system is switched on.
The menu point Aux. heating is only then displayed, if the vehicle is factory-fitted
with auxiliary heating.
The menu point Assistants is only then displayed, if the vehicle is fitted with cor-
nering lights. Note
● If warning messages are shown in the information display, these messages
can be confirmed with the button B on the windshield wiper lever or with the
button D on the multifunction steering wheel in order to call up the main menu.
● If you do not activate the information display at that moment, the menu shifts
to one level higher every 10 seconds.
● The operation of the factory-fitted car stereo or radio navigation system is de-
scribed in separate operating instructions to be found in the on-board literature.
Door, luggage compartment door and bonnet ajar warning The door, luggage compartment and bonnet ajar warning lights up if at least one
door, the luggage compartment or bonnet are not closed. The symbol indicates
which door is still open or whether the luggage compartment door or bonnet is
not closed
.
The symbol goes out as soon as the doors, luggage compartment door and bonnet
are completely closed.
A warning signal sounds if the car is driven at a speed of more than 6km/hour and
if the engine or the luggage compartment door is open. 18
Instruments and warning lights
Page 21 of 248
 Owners Manual Auto Check Control
Car state The Auto Check Control carries out a check of certain functions and vehicle com-
ponents. The check is performed constantly when the ignition is switched on,
both when the")
Auto Check Control
Car state The Auto Check Control carries out a check of certain functions and vehicle com-
ponents. The check is performed constantly when the ignition is switched on,
both when the vehicle is stationary, as well as when driving.
Some operational faults, urgent repairs, service work or other information appear
in the display of the instrument cluster. The displays are shown with a red or yel-
low light symbol depending on the priority of the message.
The red symbols indicate danger (priority 1) while the yellow symbols indicate a
warning (priority 2). Information for the driver may also appear in addition to the
symbols ⇒ page 21.
There is at least one error message when the term Vehicle status is displayed in
the menu. After selecting this menu the first of the error messages is displayed.
Several error messages are shown on the display under the message e.g. 1/3. This
indicates that the first of a total of three error messages is displayed. Investigate
the displayed faults as soon as possible.
As long as the operational faults are not rectified, the symbols are always indica-
ted again. After the first display, the symbols are indicated without information for
the driver.
If a fault occurs, a warning signal will also sound in addition to the symbol and
text in the display:
● Priority 1 - three warning signals
● Priority 2 - one warning signal
Red symbols A red symbol signals danger.
– Bring the vehicle to a stop.
– Switch the engine off.
– Investigate the function indicated.
– Obtain professional assistance.
Meaning of the red symbols: Engine oil pressure too low ⇒
page 25 Overheated clutches of the automatic gear-
box DSG ⇒ page 29
Three successive warning signals will sound if a red symbol appears.
Yellow symbols A yellow symbol signals a warning.
Check the relevant function as soon as possible.
The meaning of the yellow symbols: Check engine oil level,
engine oil sensor faulty
⇒ page 29
Problem with en-
gine oil pressure It is also important to have the vehicle inspected
without delay by a specialist garage. The informa-
tion about the maximum permissible engine speed is displayed together with this symbol. In certain countries, if a yellow symbol appears
one warning signal will sound as
well.
If several operational faults of priority 2 exist, the symbols appear one after the
other and are each illuminated for about 5 seconds.
Set-up You can change certain settings by means of the information display. The current
setting is shown on the information display in the respective menu at the top be-
low the line.
You can select the following information (depending on the equipment installed
on the vehicle):
●
Language
● MFD Data
● Convenience
● Lights & Vision
● Time
● Winter tyres £ 19
Instruments and warning lights Using the system Safety Driving Tips General Maintenance Breakdown assistance Technical data
Page 22 of 248
 Owners Manual ●
Units
● Assistants
● Alternative speed displayed (Second speed)
● Service Interval
● Factory setting
● Back
After selecting the menu point Back you will reach one level higher in the me")
●
Units
● Assistants
● Alternative speed displayed (Second speed)
● Service Interval
● Factory setting
● Back
After selecting the menu point Back you will reach one level higher in the menu.
Language
Here you can set in which language the warning and information texts should be
displayed.
Displays of the MFA
Here you can switch off or on certain displays of the multi-functional indicator.
Comfort
Here you can activate, deactivate or adjust the following functions: Rain closing Switch on/off the function for automatically closing the
window and panoramic tilt/slide sunroof in a locked rain
when it starts raining a)
. If the function is set and it is not
raining, the windows including the panoramic tilt/slide
sunroof will close automatically after approx. 12
hours.ATA confirm Switch on/off the acoustic signal indicating activation of
the anti-theft alarm system.
Central locking Switch on/off the central locking and automatic locking
function. Window op. Here you can set the convenience mode only for the
driver window or for all the windows.
Mirror down Switch on/off the function for mirror lowering on the
front passenger side when engaging the reverse gear b)
. Mirror adjust. Switch on/off the function for left and right exterior
mirror setting simultaneously.
Factory setting
Restore the Convenience factory setting.
a)
This function is only available on vehicles with a rain sensor.
b) This function is only available on vehicles with an electrically adjustable driver seat. Lights and Visibility
Here you can activate, deactivate or adjust the following functions: Coming Home Switch on/off and adjust the light duration of the Com-
ing Home function.
Leaving Home Switch on/off and adjust the light duration of the Com-
ing Home function.
Dayl. dri. light
Switch on/off the “DAY LIGHT” function.
Lane ch. flash
(convenience flashing) Switch on/off the convenience flashing function.
Rear wiper Switch on/off the function for automatic rear window
wiping.
Travel mode
Switch on/off the travel model function.
Factory setting
Restore the factory setting for the lighting.
Time
Here you can set the time, the time format (12 or 24 hour indicator) and the time
change summer/winter time.
Winter tyres
Here you can set at which speed a warning signal should sound. This function is
used for e.g winter tyres with the permissible maximum speed less than the maxi-
mum speed of the vehicle.
When exceeding the speed, an indication is displayed on the information display:
Winter tyres max. speed
... km/h
Measures
Here you can set the units for temperature, consumption and distance driven.
Assistants
Here you can adjust the tones of the acoustic signals of the parking aid. £20
Instruments and warning lights
Page 23 of 248
Second speed
Here you can switch on the display of the second speed in mph or in km/h
1)
.
Service
Here you can have the kilometres still to be driven and the days until the follow-
ing service interval shown and the Service Interval Display reset. Factory Setting
After selecting the menu
Factory Setting the factory setting of the information
display is established again.
Warning lights
Overview The warning lights indicate certain functions or faults.
Fig. 8 Instrument cluster with warning lights
Turn signal lights (to the left)
⇒ page 23
Turn signal lights (to the right)
⇒ page 23
Fog lights
⇒ page 23
Main beam
⇒ page 23 £1)
Valid for countries where the values are indicated in British measuring units. 21
Instruments and warning lights Using the system Safety Driving Tips General Maintenance Breakdown assistance Technical data
Page 24 of 248
 Owners Manual
Low beam
⇒ page 23
Rear fog light
⇒ page 23
Speed regulating system
⇒ page 23
Failure of the light bulbs
⇒ page 23
Diesel particle filter (diesel engine)
⇒ page")
Low beam
⇒ page 23
Rear fog light
⇒ page 23
Speed regulating system
⇒ page 23
Failure of the light bulbs
⇒ page 23
Diesel particle filter (diesel engine)
⇒ page 23
Airbag system
⇒ page 24
Control system for exhaust
⇒ page 24
Electromechanical power steering
⇒ page 24
Engine oil pressure
⇒ page 25
EPC fault light (petrol engine)
⇒ page 25
Glow plug system (diesel engine)
⇒ page 25
Coolant temperature/coolant level
⇒ page 25
Traction control system (TCS)
⇒ page 26
Electronic stability programme (ESP)
⇒ page 26
Switch off traction control system (TCS)
⇒ page 26
Selector lever lock
⇒ page 27
Tyre pressure
⇒ page 27
Antilock brake system (ABS)
⇒ page 27
Bonnet
⇒ page 27
Seat belt warning light
⇒ page 28
Boot lid
⇒ page 28
Open door
⇒ page 28
Fluid level in windshield washer system
⇒ page 28
Brake system
⇒ page 28
Handbrake
⇒ page 29
Generator
⇒ page 29
Engine oil level
⇒ page 29
Fuel reserve
⇒ page 29 WARNING
● If you do not pay attention to the warning lights coming on and the corre-
sponding descriptions and warning notes, this may result in severe body inju-
ries or major vehicle damage.
● The engine compartment of your car is a hazardous area. There is a risk of
injuries, scalding, accidents and fire when working in the engine compart-
ment, e.g. inspecting and replenishing oil and other fluids. It is also essential
to observe all warnings ⇒
page 181, Working in the engine compartment. Note
● The arrangement of the indicator lights depends on the model version. The
symbols shown in the following functional description are to be found as indicator
lights in the instrument cluster.
● Operational faults are shown in the instrument cluster as red symbols (priority
1 - danger) or yellow symbols (priority 2 - warning). 22
Instruments and warning lights
 1
1 2
2 3
3 4
4 5
5 6
6 7
7 8
8 9
9 10
10 11
11 12
12 13
13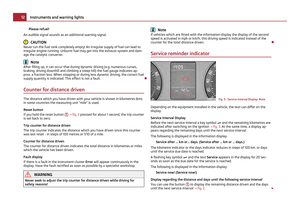 14
14 15
15 16
16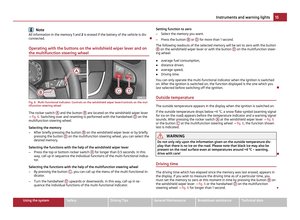 17
17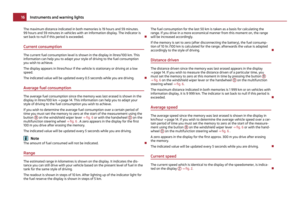 18
18 19
19 20
20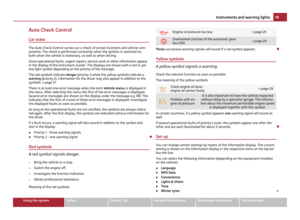 21
21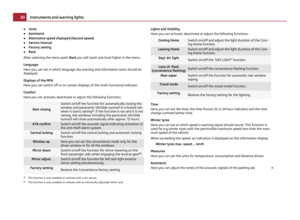 22
22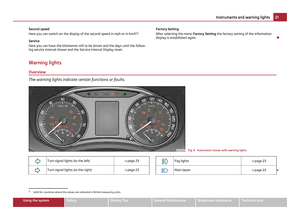 23
23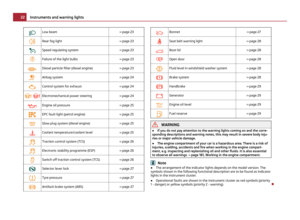 24
24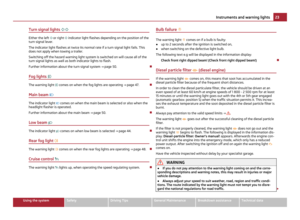 25
25 26
26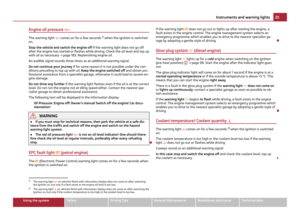 27
27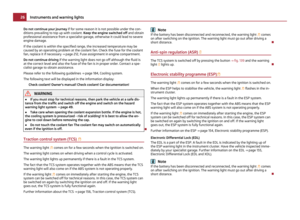 28
28 29
29 30
30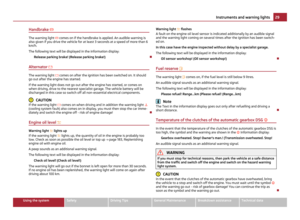 31
31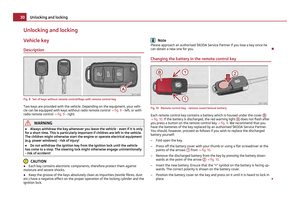 32
32 33
33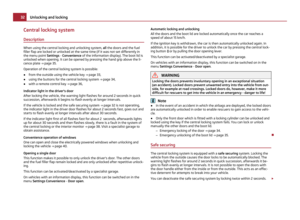 34
34 35
35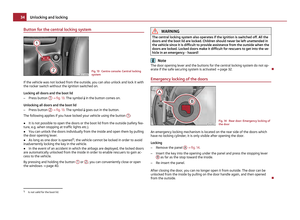 36
36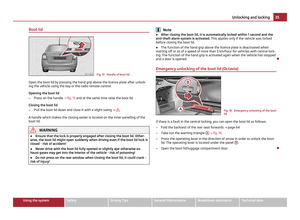 37
37 38
38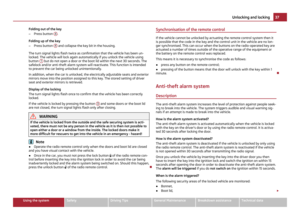 39
39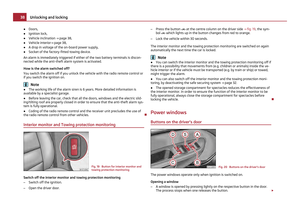 40
40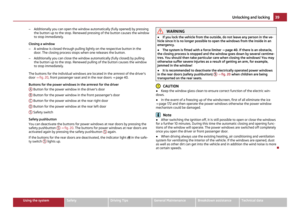 41
41 42
42 43
43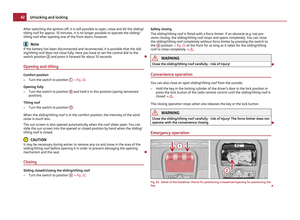 44
44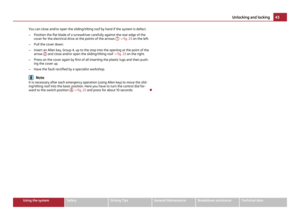 45
45 46
46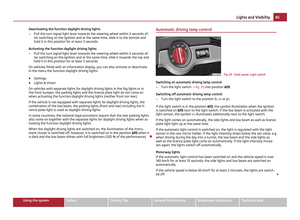 47
47 48
48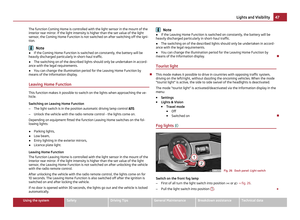 49
49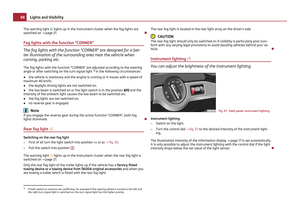 50
50 51
51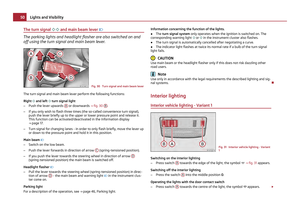 52
52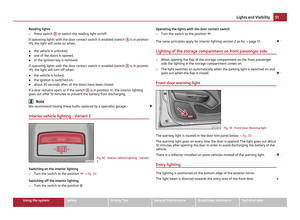 53
53 54
54 55
55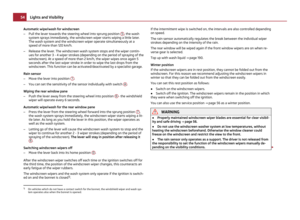 56
56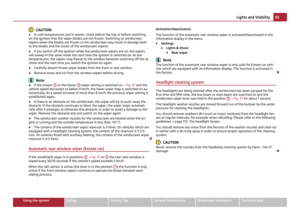 57
57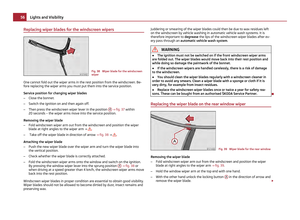 58
58 59
59 60
60 61
61 62
62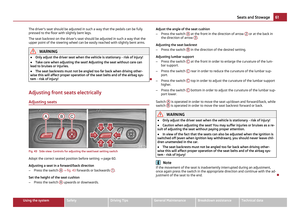 63
63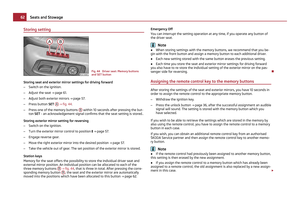 64
64 65
65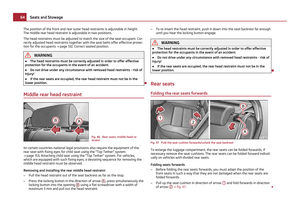 66
66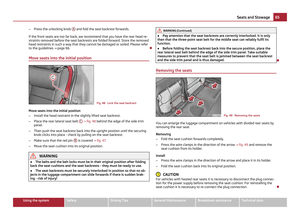 67
67 68
68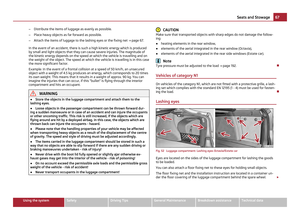 69
69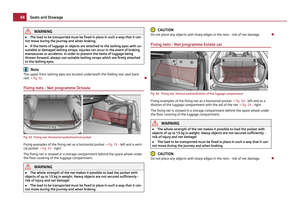 70
70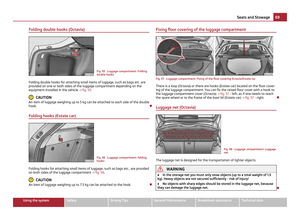 71
71 72
72 73
73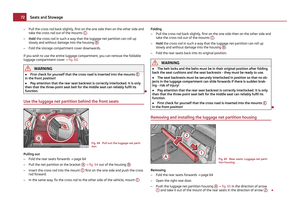 74
74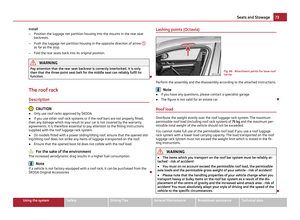 75
75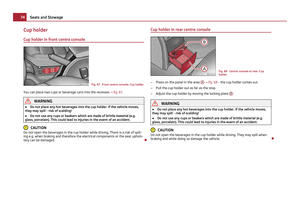 76
76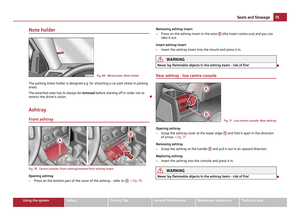 77
77 78
78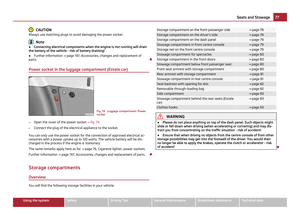 79
79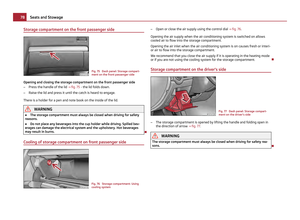 80
80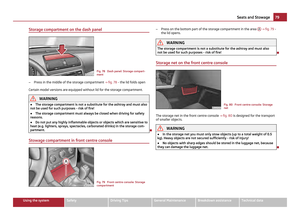 81
81 82
82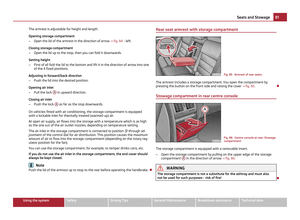 83
83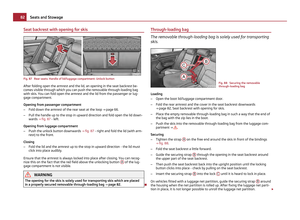 84
84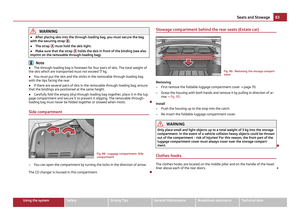 85
85 86
86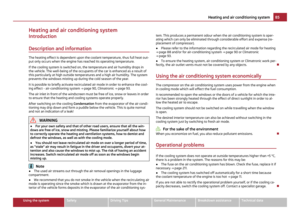 87
87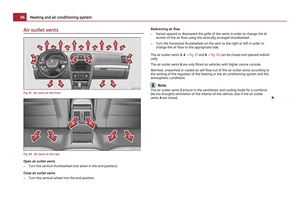 88
88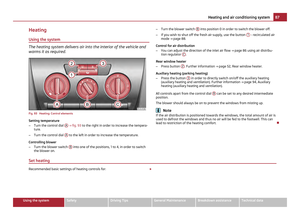 89
89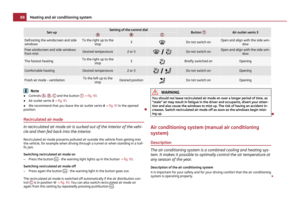 90
90 91
91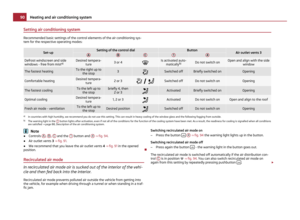 92
92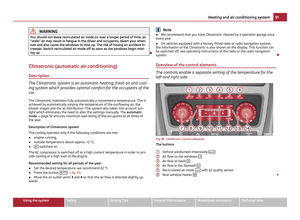 93
93 94
94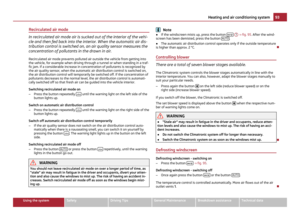 95
95 96
96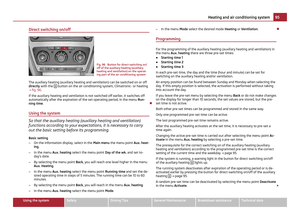 97
97 98
98 99
99 100
100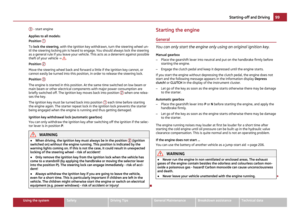 101
101 102
102 103
103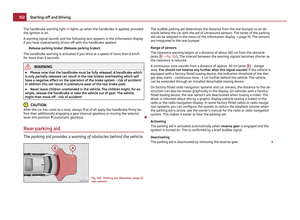 104
104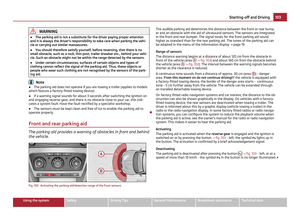 105
105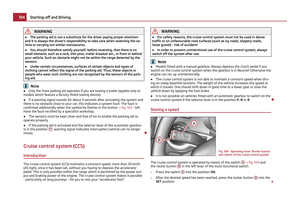 106
106 107
107 108
108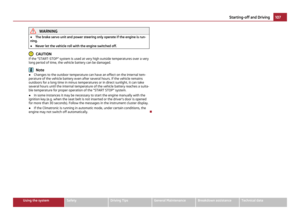 109
109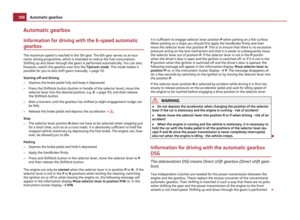 110
110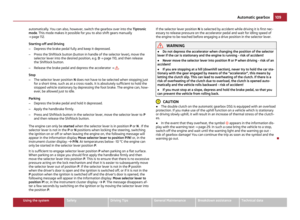 111
111 112
112 113
113 114
114 115
115 116
116 117
117 118
118 119
119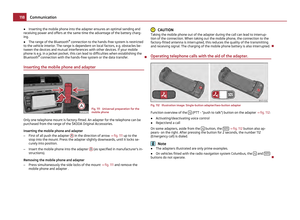 120
120 121
121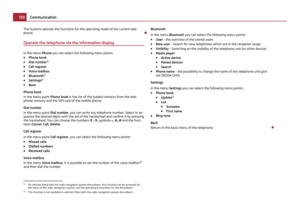 122
122 123
123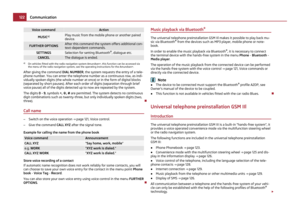 124
124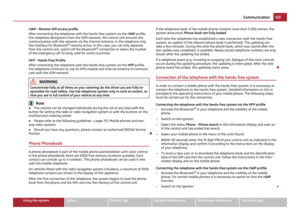 125
125 126
126 127
127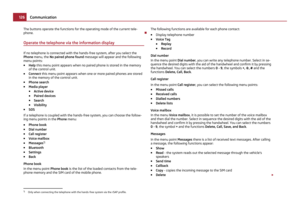 128
128 129
129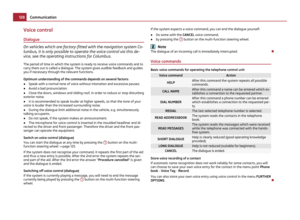 130
130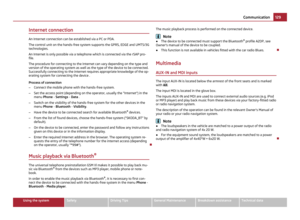 131
131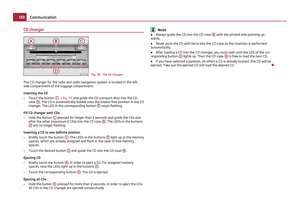 132
132 133
133 134
134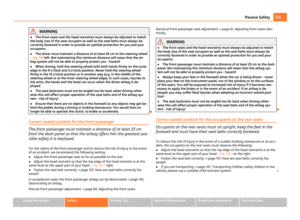 135
135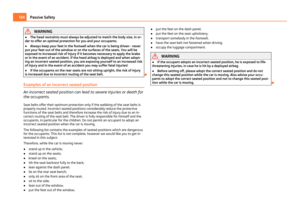 136
136 137
137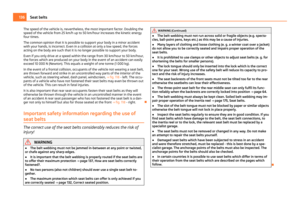 138
138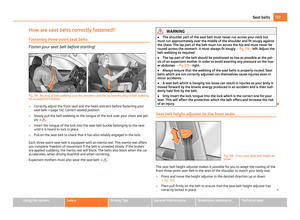 139
139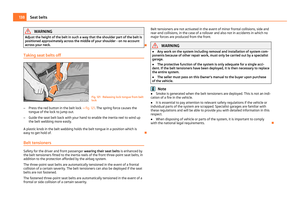 140
140 141
141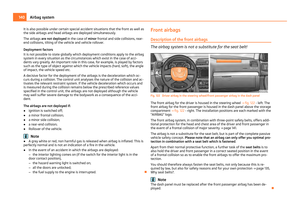 142
142 143
143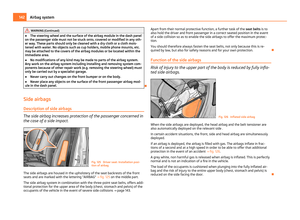 144
144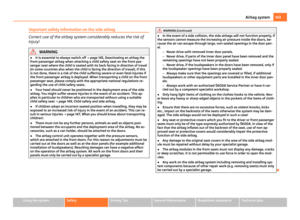 145
145 146
146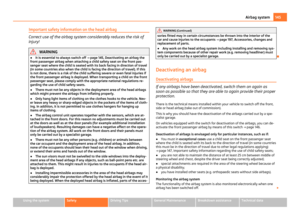 147
147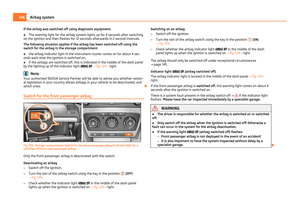 148
148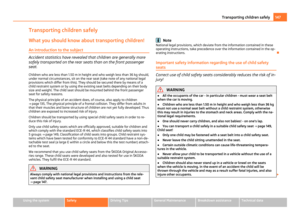 149
149 150
150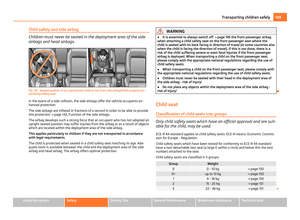 151
151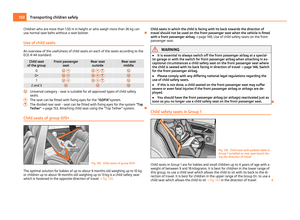 152
152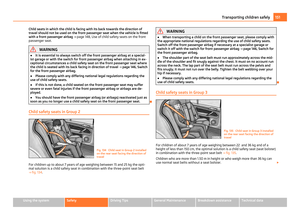 153
153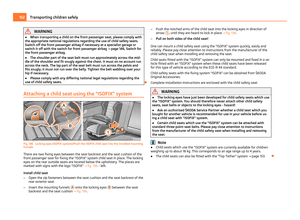 154
154 155
155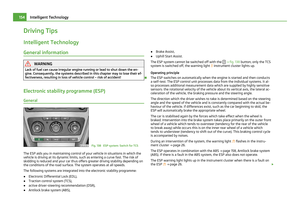 156
156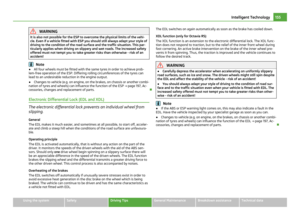 157
157 158
158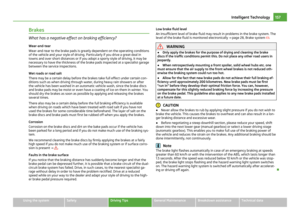 159
159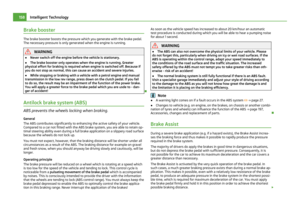 160
160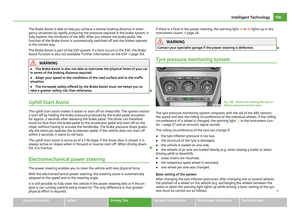 161
161 162
162 163
163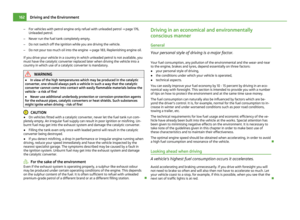 164
164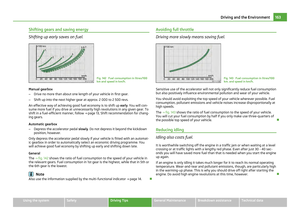 165
165 166
166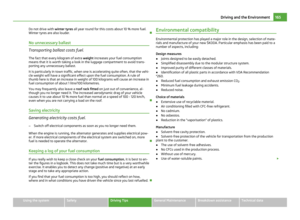 167
167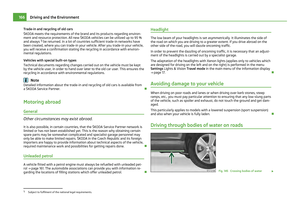 168
168 169
169 170
170 171
171 172
172 173
173 174
174 175
175 176
176 177
177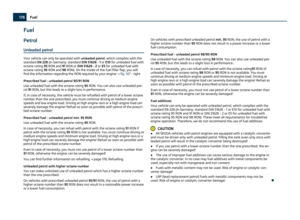 178
178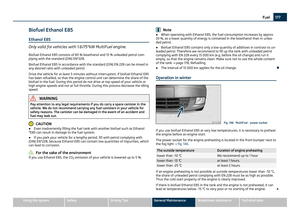 179
179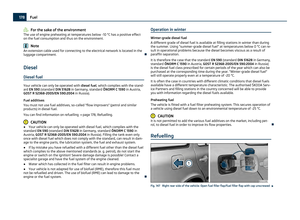 180
180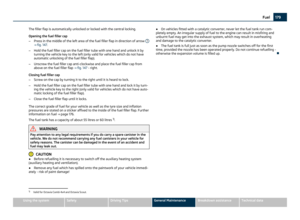 181
181 182
182 183
183 184
184 185
185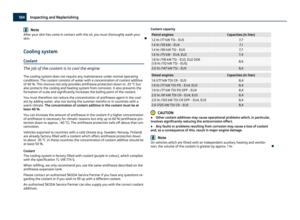 186
186 187
187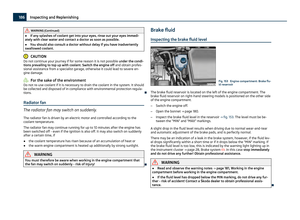 188
188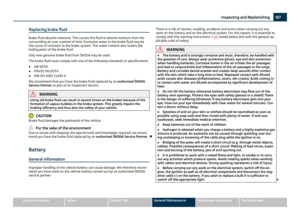 189
189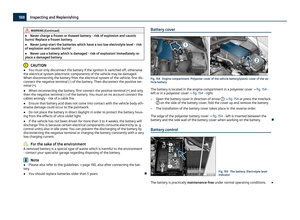 190
190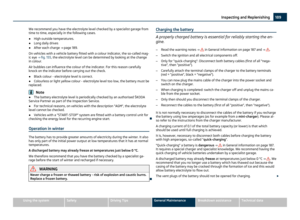 191
191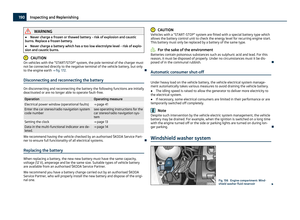 192
192 193
193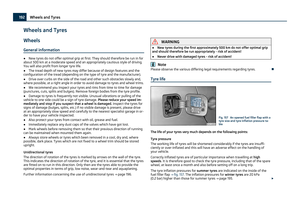 194
194 195
195 196
196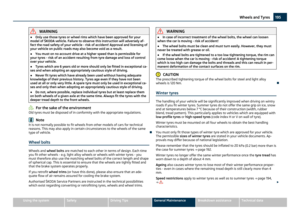 197
197 198
198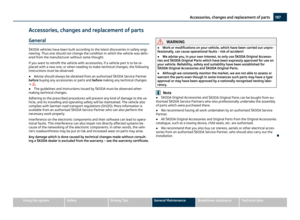 199
199 200
200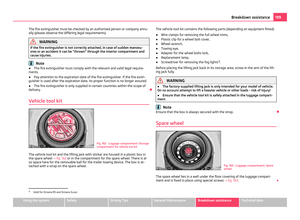 201
201 202
202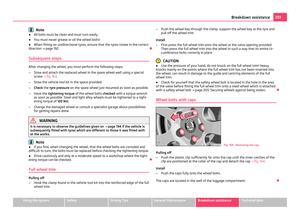 203
203 204
204 205
205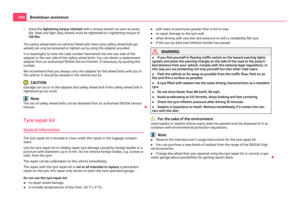 206
206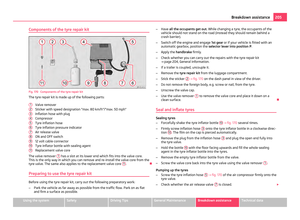 207
207 208
208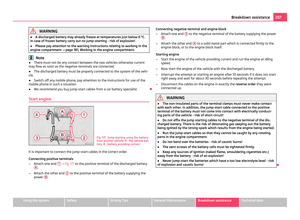 209
209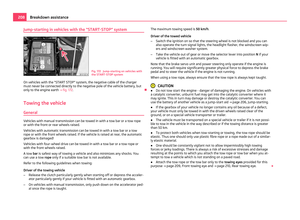 210
210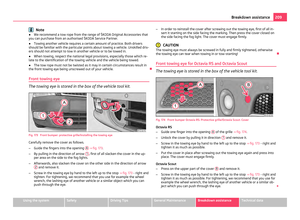 211
211 212
212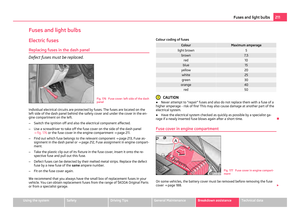 213
213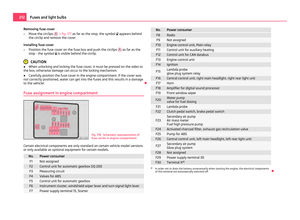 214
214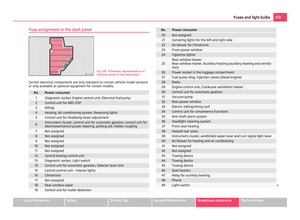 215
215 216
216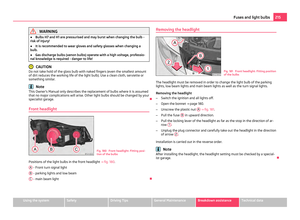 217
217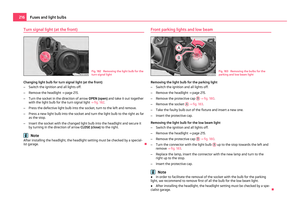 218
218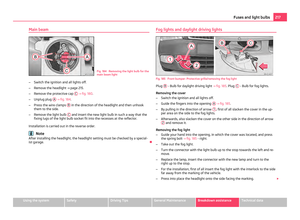 219
219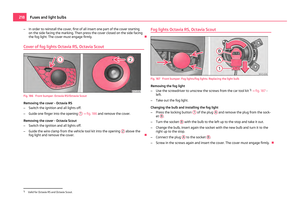 220
220 221
221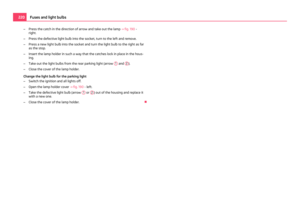 222
222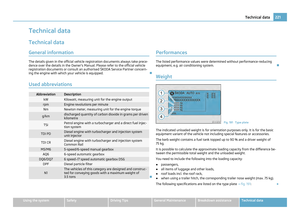 223
223 224
224 225
225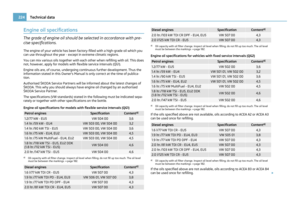 226
226 227
227 228
228 229
229 230
230 231
231 232
232 233
233 234
234 235
235 236
236 237
237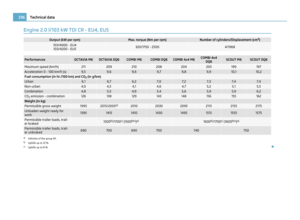 238
238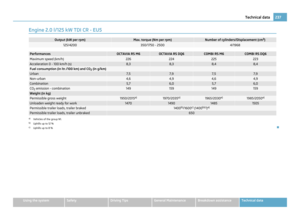 239
239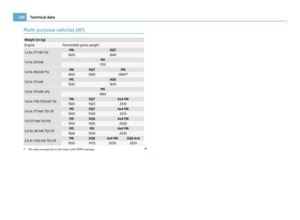 240
240 241
241 242
242 243
243 244
244 245
245 246
246 247
247 Owners Manual Second speed
Here you can switch on the display of the second speed in mph or in km/h
1)
.
Service
Here you can have the kilometres still to be driven and the days until the follow-
ing service interv")