Page 113 of 248
 Owners Manual WARNING (Continued)
● You must on no account unintentionally operate the throttle (e.g. by hand
from the engine compartment) if a drive position is engaged when the car is
stationary. The vehicle wo")
WARNING (Continued)
● You must on no account unintentionally operate the throttle (e.g. by hand
from the engine compartment) if a drive position is engaged when the car is
stationary. The vehicle would otherwise immediately start off - also when the
handbrake is firmly applied - risk of an accident!
● You must move the selector lever into position P and firmly apply the
handbrake first before you or any other person opens the bonnet and starts
working on the engine when it is running - risk of accident! It is also essential
to observe all warnings ⇒ page 181, Working in the engine compartment
.
Selector lever lock Automatic selector lever lock
With the ignition on, the selector lever is locked when it is in the positions P and
N. You must first of all depress the brake pedal in order to move the selector lever
out of this position. The warning light ⇒
page 27 lights up in the instrument
cluster as a reminder for the driver when the selector lever is in the positions P
and N.
A time delay element ensures that the selector lever is not blocked when rapidly
switching over the position N (e.g. from R to D). This does, for example, allow one
to seesaw out a stuck vehicle. The selector lever lock will click into place if the lev-
er is in the N position for more than 2 seconds without the brake pedal being
pressed.
The selector lever lock is only active if the vehicle is stationary or moving at speed
of less than 5 km/hour. The lock is switched off automatically into position N
when the car is travelling at a higher speed.
Shiftlock button
The Shiftlock button in the handle of selector lever prevents certain selector lever
positions being engaged inadvertently. The selector lever lock is cancelled when
you press the Shiftlock button.
Keylock - Ignition key withdrawal lock
You can only withdraw the ignition key after switching off the ignition if the selec-
tor lever is in position P. If the ignition key is withdrawn, the selector lever is
blocked in position P . Kickdown function The kickdown function provides you with maximum acceleration
power.
Fully depressing the accelerator pedal allows the kickdown function to be activa-
ted in the desired driving program. This function has precedence over the driving
programme and serves for maximum acceleration of the vehicle when exploiting
the maximum power potential of the engine without taking into account the cur-
rent selector lever position ( D, S or Tiptronic ). The gearbox shifts down to one or
several gears in line with the driving state and the vehicle accelerates. The gear-
box does not shift up into the highest gear until the engine has reached its maxi-
mum revolutions for this gear range. WARNING
Please note that using the kickdown function can result in the driven wheels
spinning on a smooth or slippery road surface - risk of skidding!
Dynamic shift programme The automatic gearbox of your vehicle is controlled electronically. Shifting up and
down through the gears is performed automatically on the basis of pre-defined
driving programmes.
Adopting a moderate style of driving
will cause the gearbox to select the most
economical driving programme. Shifting up into a higher gear as soon as possible
and shifting down as late as possible will have a favourable effect on your fuel
consumption.
Adopting a sporty style of driving with rapid movements of the accelerator pedal
combined with sharp acceleration and frequent changes in speed, exploiting the
top speed of the car or depressing the accelerator pedal (kickdown function), will
cause the gearbox to switch over to this style of driving and shift down earlier
with frequent changes in gears in comparison to the moderate style of driving.
Selecting the most appropriate driving programme for the particular style of driv-
ing is a continuous process. Irrespective of this it is, however, possible to switch or
shift down into a dynamic shift programme by depressing the accelerator rapidly.
The gearbox shifts down into a lower gear matching the speed of the car and this
allows you to accelerate rapidly (e.g. when overtaking) without having to depress £ 111
Automatic gearbox Using the system Safety Driving Tips General Maintenance Breakdown assistance Technical data
Page 114 of 248
 Owners Manual the accelerator pedal fully into the kickdown range. The original programme will
be reactivated to match your particular style of driving once the gearbox has shif-
ted up again.
When driving in hilly")
the accelerator pedal fully into the kickdown range. The original programme will
be reactivated to match your particular style of driving once the gearbox has shif-
ted up again.
When driving in hilly regions, the gears are selected to match uphill and downhill
sections. This avoids the gearbox frequently shifting up and down when negotiat-
ing an uphill stretch. When driving downhill, it is possible to shift down into the
Tiptronic position, in order to exploit the engine brake torque.
Tiptronic The Tiptronic allows the driver to also shift gears manually.
Fig. 107 Selector lever: manual shifting/information display: Manual shifting of gears
The selector lever position you have engaged is indicated in the information dis-
play of the instrument cluster together with the engaged gear
⇒ fig. 107 - right.
Switching over to manual shifting
– Push the selector lever to the right out of position D. After switching over, the
current engaged gear is indicated in the display.
Shifting up gears
– One-touch forward of the selector lever (in the Tiptronic position) ⇒ fig. 107 + .
Shifting down gears
– One-touch back of the selector lever (in the Tiptronic position) - .
It is possible to switch over to manual both when the car is stationary and also
when driving. When you accelerate, the gearbox shifts up automatically into the higher gear just
before the maximum permissible engine speed is reached.
If you select a lower gear, the automatic gearbox does not shift down until there
is no risk of the engine overrevving.
If you operate the kickdown function, the gearbox shifts into a lower gear in line
with the vehicle speed and engine speed.
Manual shifting on the multifunction steering wheel Fig. 108 Multifunction steering wheel:
Manual shifting of gears
Switching over to manual shifting
– Push the selector lever to the right out of position D. After switching over, the
current engaged gear is indicated in the display.
Shifting up gears
– Press the right rocker switch +
⇒
fig. 108 for the multifunction steering wheel.
Shifting down gears
– Press the left rocker switch -
⇒
fig. 108 for the multifunction steering wheel.
Temporarily switching over to manual shifting
– If the selector lever is in position D or S, press the left rocker switch - or the
right rocker switch + for the multifunction steering wheel.
– If the rocker switches - or
+ are not pressed for some time, the manual shift-
ing switches off. You can also switch off the temporary switch over to manual
shifting by pressing the right rocker switch + for more than 1 second.
112
Automatic gearbox
Page 115 of 248
 Owners Manual Emergency programme
An emergency programme exists in the event of a fault in the sys-
tem.
The gearbox operates in a corresponding emergency programme if there are func-
tional faults in the gearbox e")
Emergency programme
An emergency programme exists in the event of a fault in the sys-
tem.
The gearbox operates in a corresponding emergency programme if there are func-
tional faults in the gearbox electronics. This is indicated by all of the segments in
the display lighting up or going out.
A functional fault can have the following effect:
● The gearbox only shifts into certain gears.
● The reverse gear R cannot be used.
● The manual shift programme (Tiptronic) is switched off in the emergency
mode.
If the gearbox has switched over to emergency mode, drive to the nearest spe-
cialist garage in order to have the fault rectified.
Selector lever-emergency unlocking Fig. 109 Selector lever-emergency un-
locking
In case of interruption of the power supply (e.g. flat vehicle battery, defective
fuse) or defect of the selector lever lock, the selector lever can no longer be shif-
ted from the position P in the normal way and the vehicle can no longer be moved.
The selector lever must be unlocked in case of emergency.
– Apply the handbrake firmly.
– Open the storage compartment in front centre console or the front ashtray.
– Carefully pull up the front left and right cover. –
Pull up rear cover.
– Use a finger to press the yellow plastic part in direction of arrow ⇒ fig. 109 .
– Simultaneously press the shiftlock button in the handle of the selector lever
and shift the lever into the position N (if the selector lever is shifted again into
the position P , it is once again blocked). 113
Automatic gearbox Using the system Safety Driving Tips General Maintenance Breakdown assistance Technical data
Page 116 of 248
Communication
Multifunction steering wheel
Operate radio and radio navigation system on the multifunction steering wheel Fig. 110 Multifunction steering wheel:
control buttons
The buttons for setting the basic functions of the factory-fitted radio and radio
navigation system are located on the multifunction steering wheel ⇒ fig. 110 . You can of course operate the radio and radio navigation system at the appliance.
You will find a description in the relevant Owner's manual.
If the side lights are switched on, the buttons on the multifunction steering wheel
are illuminated.
The buttons apply for the respective operating mode of the current radio or radio
navigation system.
By pressing or turning the buttons, you can carry out the following functions. £114
Communication
Page 117 of 248
 Owners Manual Button Action Radio, traffic information CD/CD changer/MP3 Navigation
1
press briefly
Switch off/on tone/activation and deactivation of the voice control
a)1 press button for a
long period of tim")
Button Action Radio, traffic information CD/CD changer/MP3 Navigation
1
press briefly
Switch off/on tone/activation and deactivation of the voice control
a)1 press button for a
long period of time switch off/on without
function 1
turn upwards Increase volume
1
turn downwards Decrease volume
2
press briefly Changing to the next stored radio station
Changing to the next stored traffic information Interrupting the traffic report Changing to the next title
2 press button for a
long time Interruption of the traffic report Fast forward
3
press briefly Changing to the previously stored radio station
Changing to the previously stored traffic information Interrupting the traffic report Changing to the previous title
3 press button for a
long time Interruption of the traffic report Fast rewind
4
press briefly Changing the audio source
5
press briefly Call up the main menu
6
press briefly Interruption of the traffic report without function
6
turn upwards Display of the stored/accessible stations
scroll upwards
Interruption of the traffic report Changing to the previous title
without
function 6
turn downwards Display of the stored/accessible stations
scroll downwards
Interruption of the traffic report Changing to the next title
a)
Valid for the radio navigation system Columbus. Note
● The loudspeakers in the vehicle are matched to a power output of the radio
and radio navigation system of 4x 20 W.
● For the equipment sound system, the loudspeakers are matched to a power
output of the amplifier of 4x40°W + 6x20
W.
Mobile phones and two-way radio systems The installation of a mobile phone and two-way radio system in a vehicle should
be carried out by a specialist garage. ŠKOSA permits the operation of mobile phones and two-way radio systems with a
professionally installed external aerial and a maximum transmission power of up
to 10 watts.
It is essential that you inform a specialist garage about the possibilities to assem-
ble and operate mobile phones and two-way radio sets which have a power out-
put of more than 10 W. They will inform you which technical possibilities exist for
retrofitting mobile phones.
When using a mobile phone inside the vehicle, which is not inserted into the
phone adapter, and thus has no connection to the external aerial, the electromag-
netic radiation can exceed the current limit value. If a suitable adapter is available £ 115
Communication Using the system Safety Driving Tips General Maintenance Breakdown assistance Technical data
Page 118 of 248
 Owners Manual for your mobile phone, use your mobile phone exclusively in the adapter so that
the radiation in the vehicle drops to a minimum. This also improves the quality of
the connection.
Operation of mobile p")
for your mobile phone, use your mobile phone exclusively in the adapter so that
the radiation in the vehicle drops to a minimum. This also improves the quality of
the connection.
Operation of mobile phones or two-way radio systems may interfere with func-
tioning of the electronic systems of your vehicle. The reasons for this may be:
● no external aerial,
● external aerial incorrectly installed,
● transmission power greater than 10 watts. WARNING
● If a mobile phone or a two-way radio system is operated in the vehicle
without using an external aerial or an external aerial which has been incor-
rectly installed, this can increase the strength of the electromagnetic field in
the interior of the vehicle.
● Please concentrate fully at all times on your driving!
● You must not install two-way radio systems, mobile phones or mounts on
the covers of the airbags or within the immediate deployment range of air-
bags. This might result in injuries to the occupants in the event of an accident.
● Never leave a mobile phone on a seat, on the dash panel or in another
area, from which it can be thrown during a sudden braking manoeuvre, an ac-
cident or a collision. In this case, the occupants of the vehicle might be injured. Note
Observe the country-specific regulations for the use of mobile phones in vehicles.
Universal telephone preinstallation GSM II Introduction The universal telephone preinstallation GSM II is a built-in “hands-free system”, it
provides a voice operated convenience mode via the multifunction steering wheel or the radio navigation system.
All communication between a telephone and the hands-free system of your vehi-
cle can only be established with the help of the Bluetooth ®
technology. The
adapter serves only for charging the telephone and for transmitting the signal to
the external aerial of the vehicle. To ensure an optimum signal transmission, always leave the telephone with the
adapter in the telephone mount.
Furthermore the volume can be changed individually during the call at any time
with the button for setting the radio or radio navigation system or with the but-
tons on the multifunction steering wheel.
WARNING
Concentrate fully at all times on your steering! As the driver you are fully re-
sponsible for road safety. Use the telephone system only to such an extent, so
that you are in full control of your vehicle at any time. Note
● Please refer to the following guidelines ⇒ page 115, Mobile phones and two-
way radio systems.
● Should you have any questions, please contact an authorised ŠKODA Service
Partner.
Phone Phonebook A phone phonebook is part of the mobile phone preinstallation with voice control.
In the phone phonebook there are 2500 free memory locations available. Each
contact can contain up to 4 numbers. This phone phonebook can be used in line
with the mobile telephone.
On vehicles fitted with the radio navigation system Columbus, a maximum of 1200
telephone contacts are shown in the display of this appliance.
After the first connection of the telephone, the system begins to load the phone
book from the phone and the SIM card into the memory of the control unit.
Each time the telephone has established a new connection with the hands-free
system, an update of the relevant phone book is performed. The updating can
take a few minutes. During this time the phone book, which was stored after the
last update was completed, is available. Newly stored telephone numbers are only
shown after the updating has ended.
If the number of contacts loaded exceeds 2 500, the phone book is not complete.
If a telephone event (e.g. incoming or outgoing call, dialogue of the voice control)
occurs during the updating procedure, the updating is interrupted. After the tele-
phone event has ended, the updating starts anew. 116
Communication
Page 119 of 248
 Owners Manual Connection of the mobile phone with the hands-free system
In order to connect a mobile phone with the hands-free system, it is necessary to
connect the telephone to the hands-free system. Detailed inf")
Connection of the mobile phone with the hands-free system
In order to connect a mobile phone with the hands-free system, it is necessary to
connect the telephone to the hands-free system. Detailed information on this is
provided in the operating instructions of your mobile phone. The following steps
must be carried out for the connection:
– Activate the Bluetooth ®
in your telephone and the visibility of the mobile
phone.
– Switch on the ignition.
– Select the menu Phone - Phone search in the information display and wait un-
til the control unit has ended the search.
– Select your mobile phone in the menu of the units found.
– Confirm the PIN (as standard 1234).
– If the hands-free system announces (as standard Skoda UHV) on the display of
the mobile phone, enter the PIN (as standard 1234) within 30 seconds and wait
until the connection is established 1)
.
– After ending the connection, confirm in the information display that a new
user profile was created.
If no more free space is available for creating a new user profile, delete an existing
user profile.
If you have not managed to connect your mobile phone with the hands-free sys-
tem within 3 minutes after switching on the ignition, switch the ignition off and
then again on. The visibility of the hands-free system is established again for 3
minutes. The visibility of the Bluetooth ®
device is automatically switched off if the
vehicle starts off or if the mobile phone connects to the device.
During the connecting procedure, no other mobile phone may be connected with
the hands-free system.
Up to four mobile phones can be paired to the hands-free system, whereby only
one mobile phone can communicate with the hands-free system. Connection with an already paired mobile phone
After switching on the ignition, the connection is automatically established for the
already paired mobile phone
1)
. Check on the mobile unit if the automatic connec-
tion was established.
Disconnecting the connection
● By withdrawing the ignition key.
● By disconnecting the device in the information display.
● By disconnecting the device in the mobile phone.
Solving connection problems
If the system announces No paired phone found, check the operating state of the
telephone:
● Is the telephone switched on?
● Is the PIN code entered?
● Is Bluetooth ®
active?
● Is the visibility of the mobile phone active?
● Was the telephone already paired with the hands-free system? WARNING
In the event of air transport, the Bluetooth ®
function of the hands-free sys-
tem must be switched off by a specialist garage! Note
● Not valid for all mobile phones which enable a communication via Bluetooth ®
.
You can ask at an authorised ŠKODA Service Partner if your telephone is compati-
ble with the universal telephone preinstallation GSM II.
● If a suitable adapter is available for your mobile phone, use your mobile phone
exclusively in the adapter so that the radiation in the vehicle drops to a minimum. £1)
Some mobile phones have a menu, in which the authorization for establishing a Bluetooth ®
connec-
tion is performed via the input of a code. If the input for the authorization is necessary, it must al-
ways be performed when re-establishing the Bluetooth connection. 117
Communication Using the system Safety Driving Tips General Maintenance Breakdown assistance Technical data
Page 120 of 248
 Owners Manual ●
Inserting the mobile phone into the adapter ensures an optimal sending and
receiving power and offers at the same time the advantage of the battery charg-
ing.
● The range of the Bluetooth ®
c")
●
Inserting the mobile phone into the adapter ensures an optimal sending and
receiving power and offers at the same time the advantage of the battery charg-
ing.
● The range of the Bluetooth ®
connection to the hands-free system is restricted
to the vehicle interior. The range is dependent on local factors, e.g. obstacles be-
tween the devices and mutual interferences with other devices. If your mobile
phone is e.g. in a jacket pocket, this can lead to difficulties when establishing the
Bluetooth ®
connection with the hands-free system or the data transfer.
Inserting the mobile phone and adapter Fig. 111 Universal preparation for the
mobile phone
Only one telephone mount is factory-fitted. An adapter for the telephone can be
purchased from the range of the ŠKODA Original Accessories.
Inserting the mobile phone and adapter
– First of all push the adapter A in the direction of arrow
⇒ fig. 111 up to the
stop into the mount. Press the adapter slightly downwards, until it locks se-
curely into position.
– Insert the mobile phone into the adapter A (as specified in manufacturer's in-
structions).
Removing the mobile phone and adapter
– Press simultaneously the side locks of the mount ⇒ fig. 111 and remove the
mobile phone and adapter . CAUTION
Taking the mobile phone out of the adapter during the call can lead to interrup-
tion of the connection. When taking out the mobile phone, the connection to the
factory-fitted antenna is interrupted, this reduces the quality of the transmitting
and receiving signal. The charging of the mobile phone battery is also interrupted.
Operating telephone calls with the aid of the adapter. Fig. 112 Illustration image: Single-button adapter/two-button adapter
Function overview of the
(PTT - “push to talk”) button on the adapter
⇒
fig. 112 :
● Activating/deactivating voice control
● Reject/end a call
On some adapters, aside from the button, the
SOS
⇒ fig. 112 button also ap-
pears- on the right. After pressing the button for 2 seconds, the number 112
(Emergency call) is dialed. Note
● The adapters illustrated are only prime examples.
● On vehicles fitted with the radio navigation system Columbus, the and
SOS buttons do not operate.
118
Communication
 1
1 2
2 3
3 4
4 5
5 6
6 7
7 8
8 9
9 10
10 11
11 12
12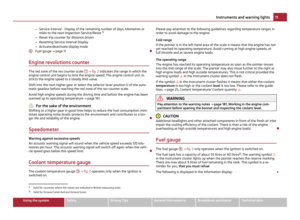 13
13 14
14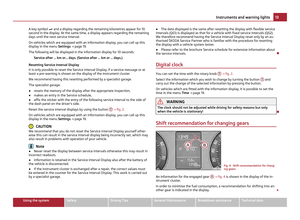 15
15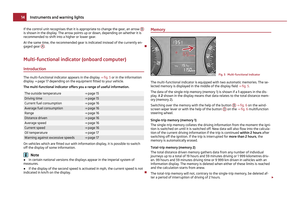 16
16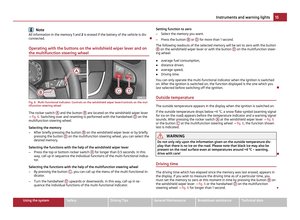 17
17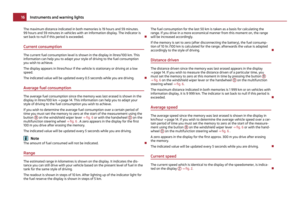 18
18 19
19 20
20 21
21 22
22 23
23 24
24 25
25 26
26 27
27 28
28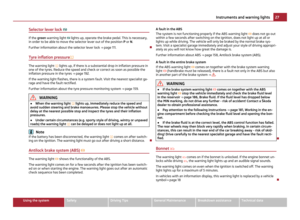 29
29 30
30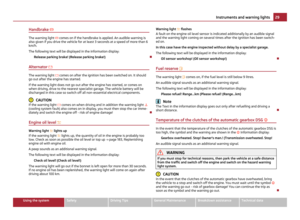 31
31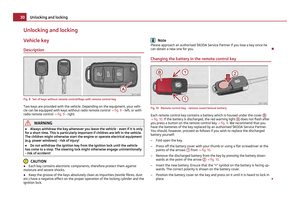 32
32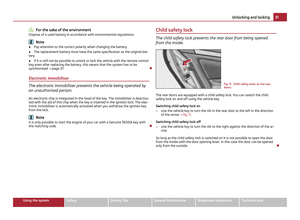 33
33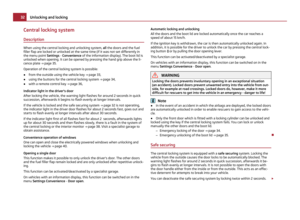 34
34 35
35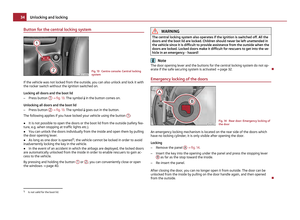 36
36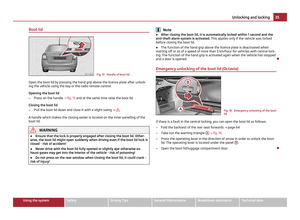 37
37 38
38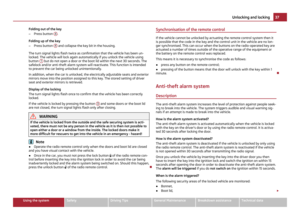 39
39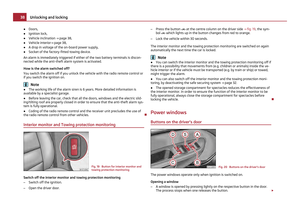 40
40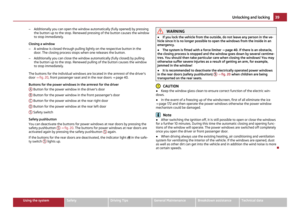 41
41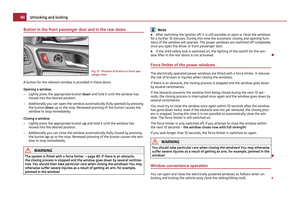 42
42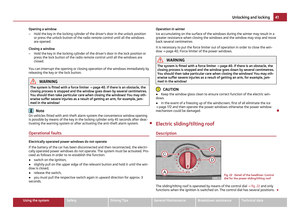 43
43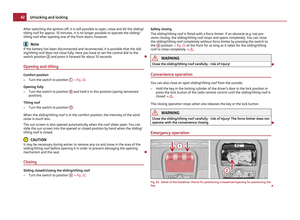 44
44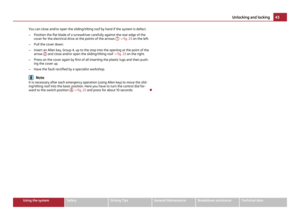 45
45 46
46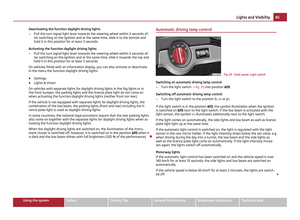 47
47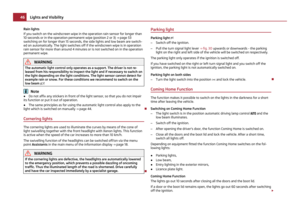 48
48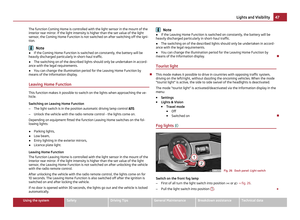 49
49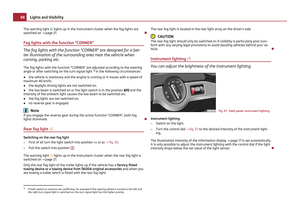 50
50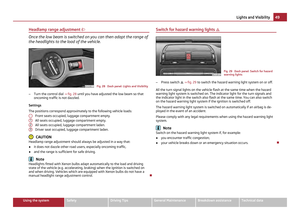 51
51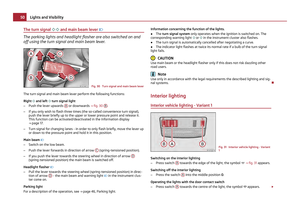 52
52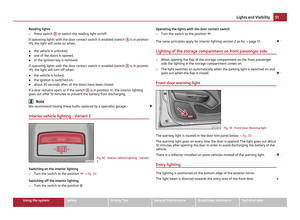 53
53 54
54 55
55 56
56 57
57 58
58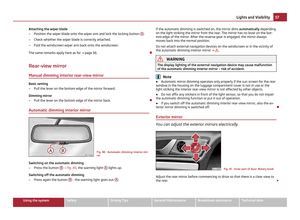 59
59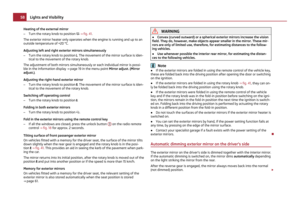 60
60 61
61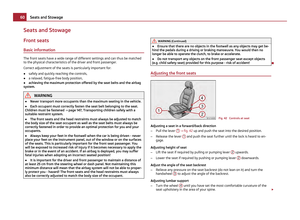 62
62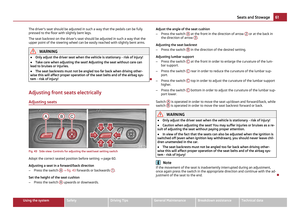 63
63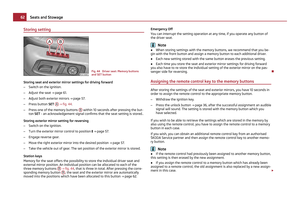 64
64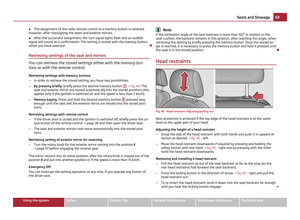 65
65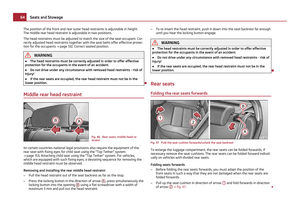 66
66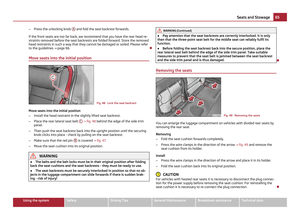 67
67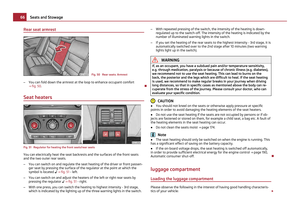 68
68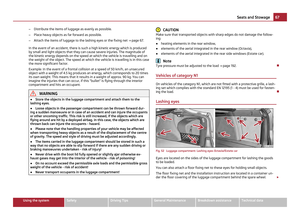 69
69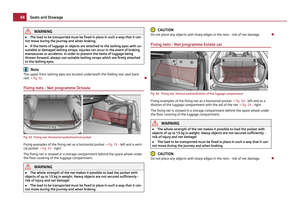 70
70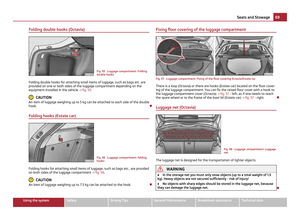 71
71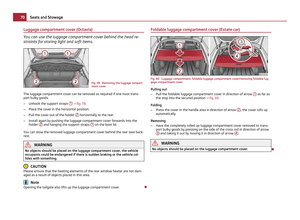 72
72 73
73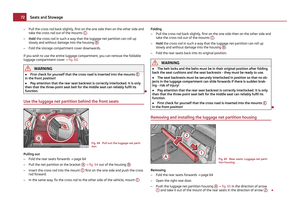 74
74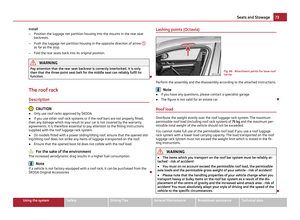 75
75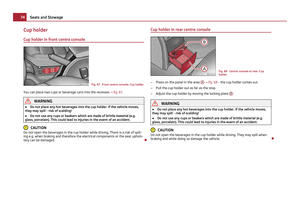 76
76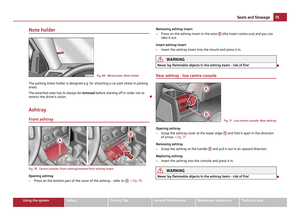 77
77 78
78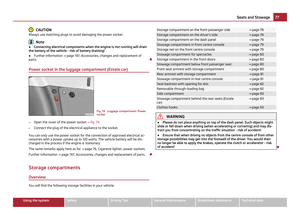 79
79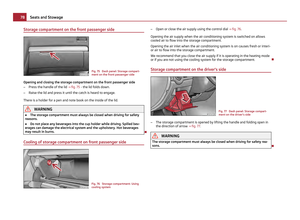 80
80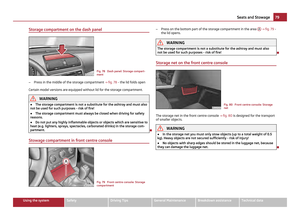 81
81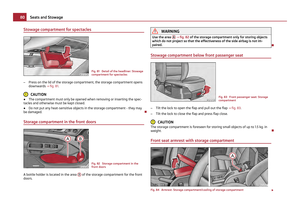 82
82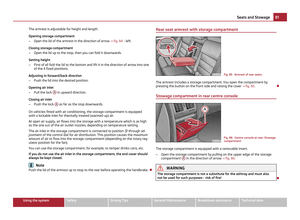 83
83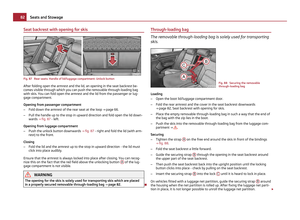 84
84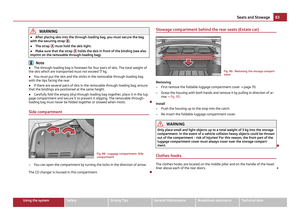 85
85 86
86 87
87 88
88 89
89 90
90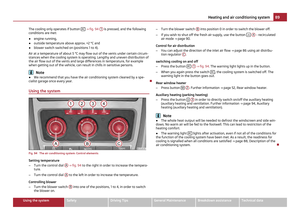 91
91 92
92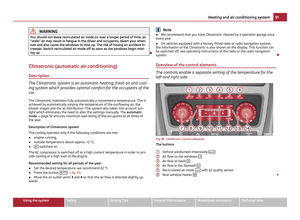 93
93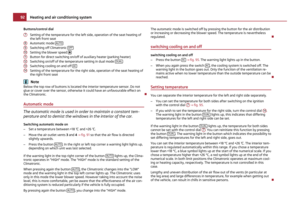 94
94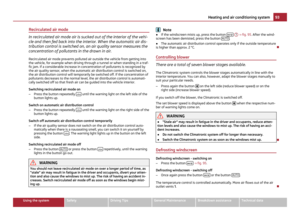 95
95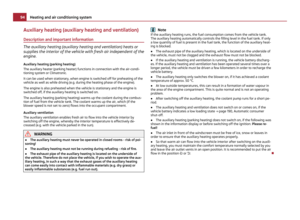 96
96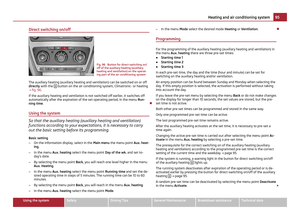 97
97 98
98 99
99 100
100 101
101 102
102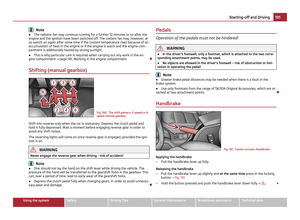 103
103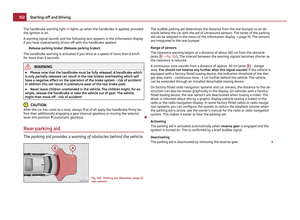 104
104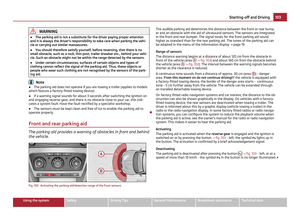 105
105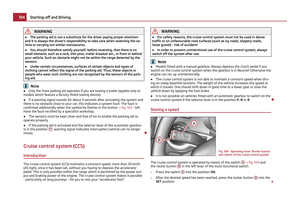 106
106 107
107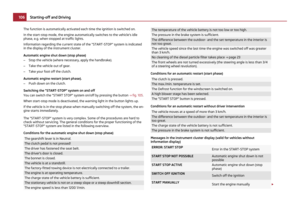 108
108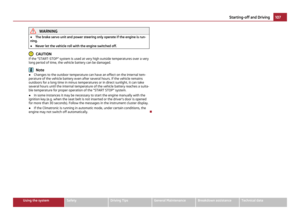 109
109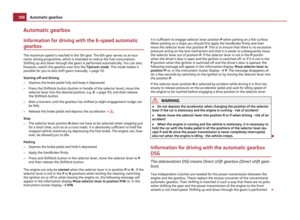 110
110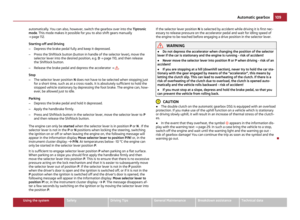 111
111 112
112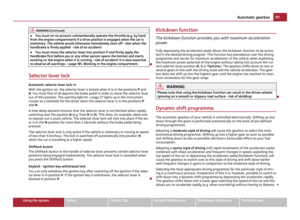 113
113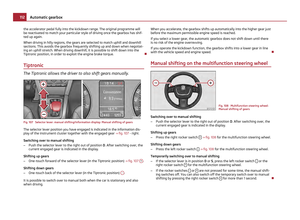 114
114 115
115 116
116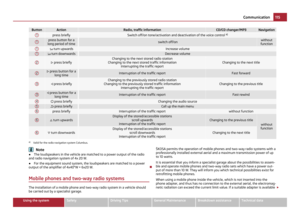 117
117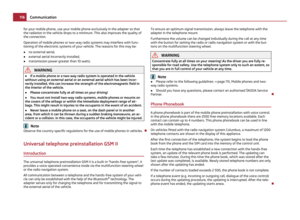 118
118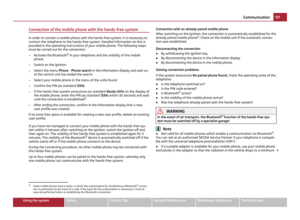 119
119 120
120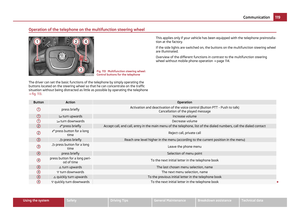 121
121 122
122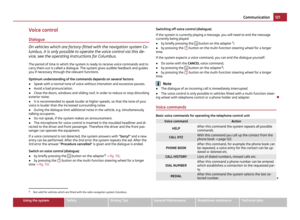 123
123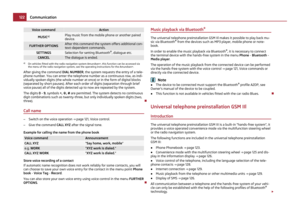 124
124 125
125 126
126 127
127 128
128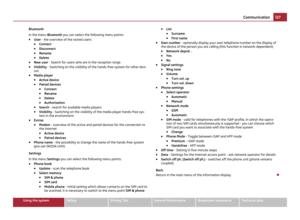 129
129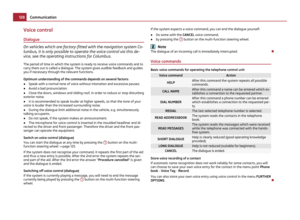 130
130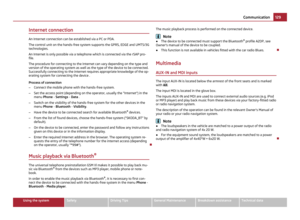 131
131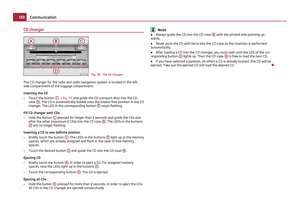 132
132 133
133 134
134 135
135 136
136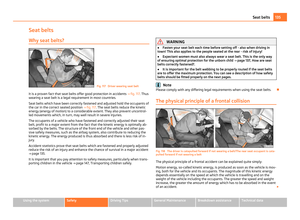 137
137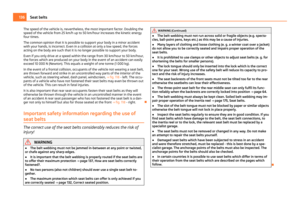 138
138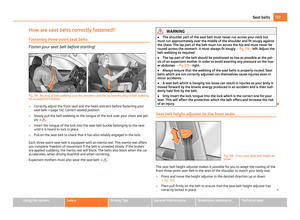 139
139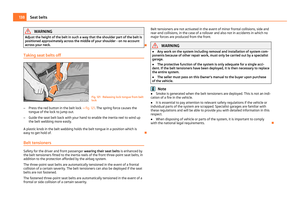 140
140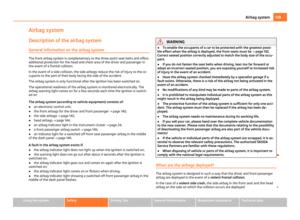 141
141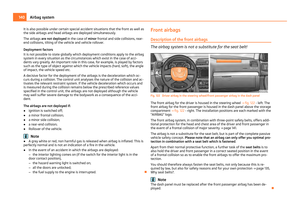 142
142 143
143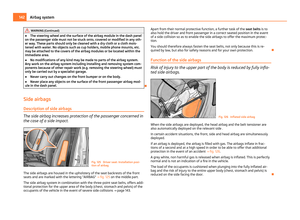 144
144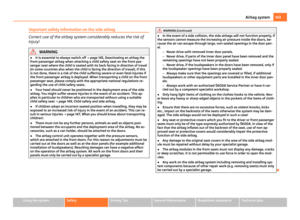 145
145 146
146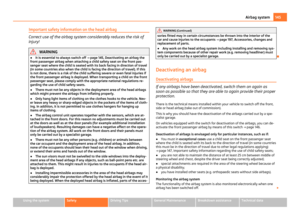 147
147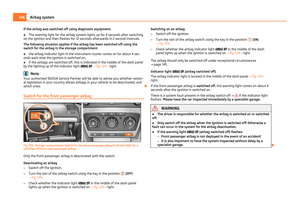 148
148 149
149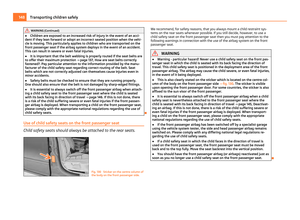 150
150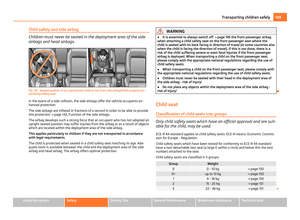 151
151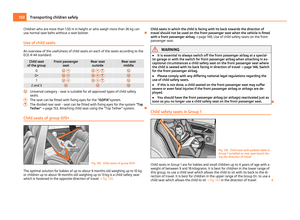 152
152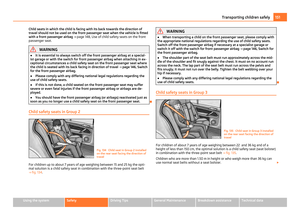 153
153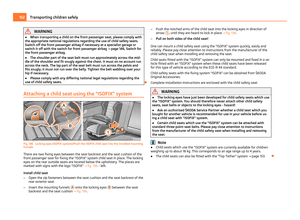 154
154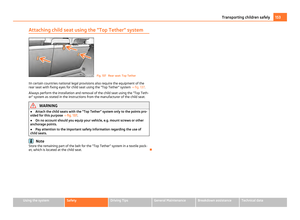 155
155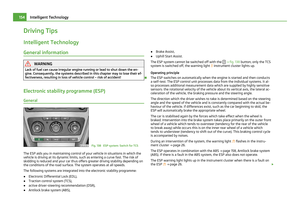 156
156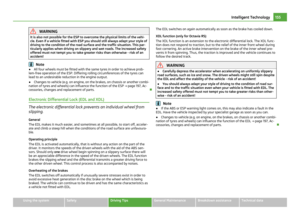 157
157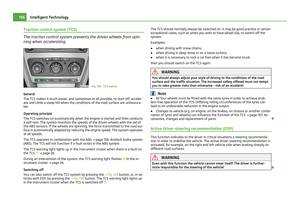 158
158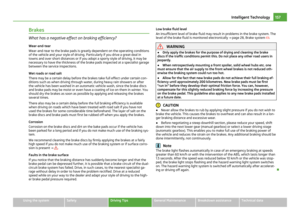 159
159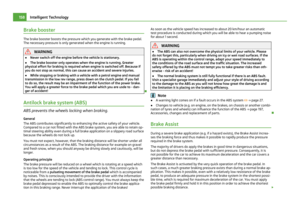 160
160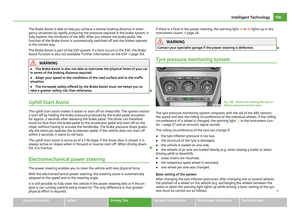 161
161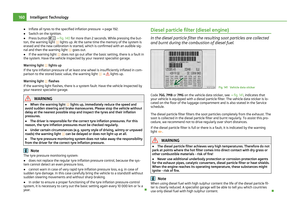 162
162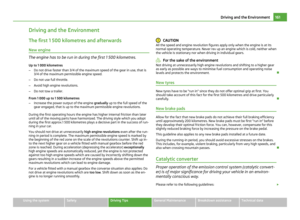 163
163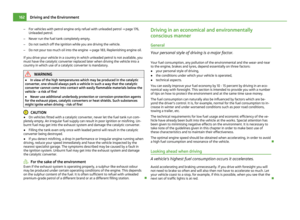 164
164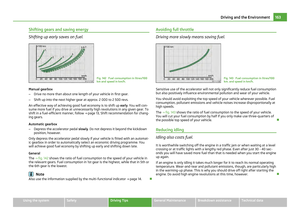 165
165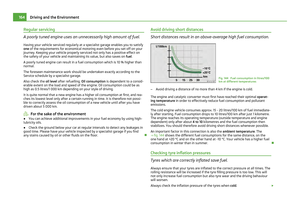 166
166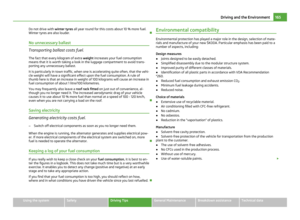 167
167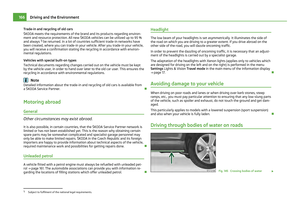 168
168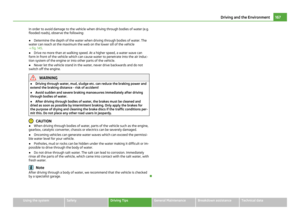 169
169 170
170 171
171 172
172 173
173 174
174 175
175 176
176 177
177 178
178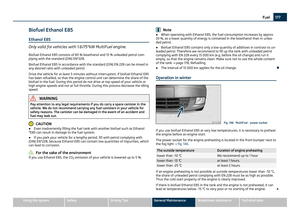 179
179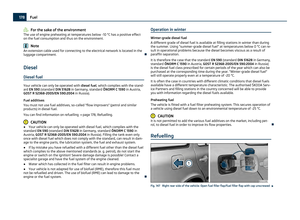 180
180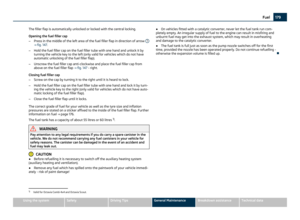 181
181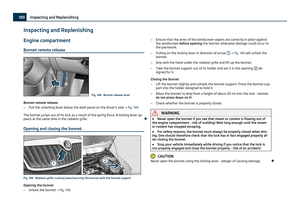 182
182 183
183 184
184 185
185 186
186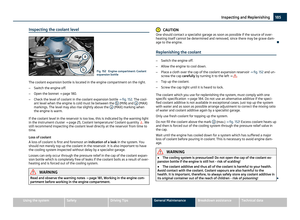 187
187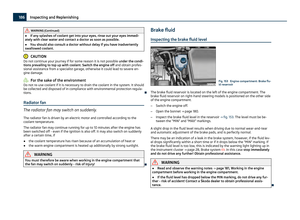 188
188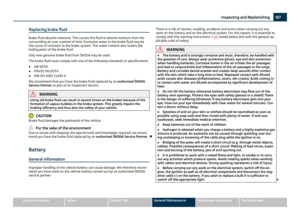 189
189 190
190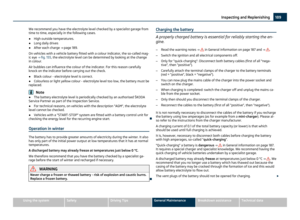 191
191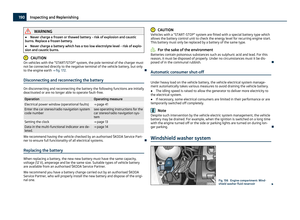 192
192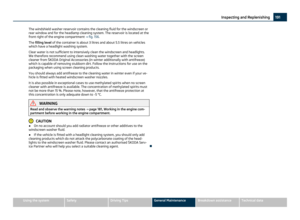 193
193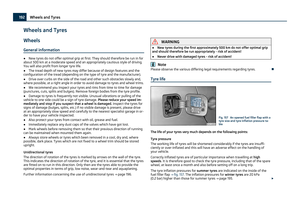 194
194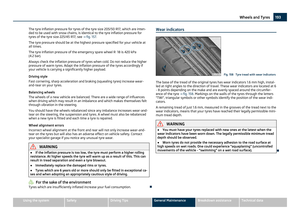 195
195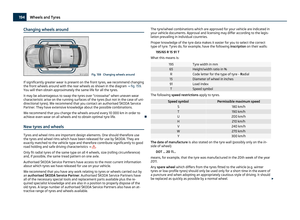 196
196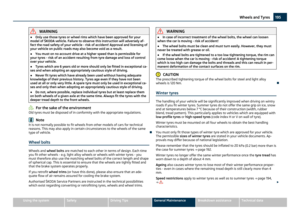 197
197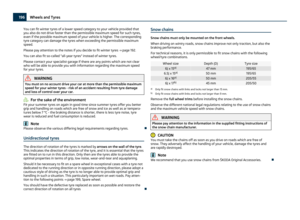 198
198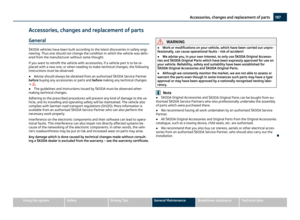 199
199 200
200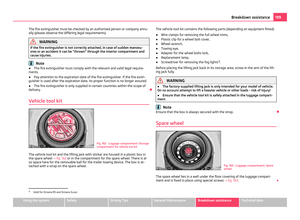 201
201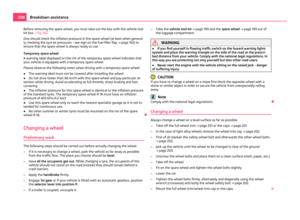 202
202 203
203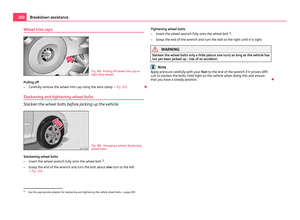 204
204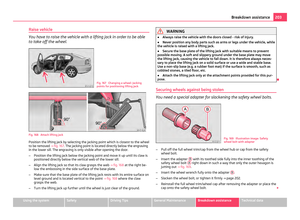 205
205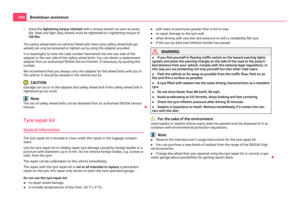 206
206 207
207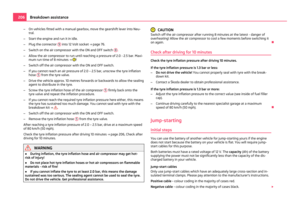 208
208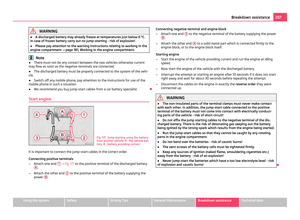 209
209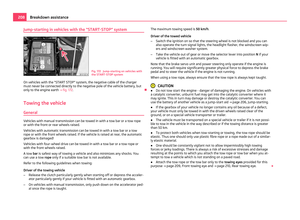 210
210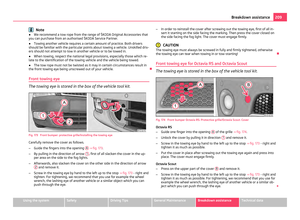 211
211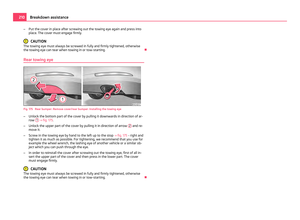 212
212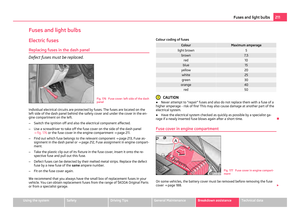 213
213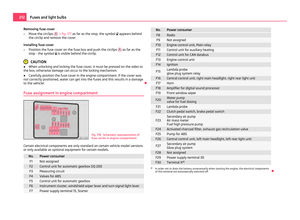 214
214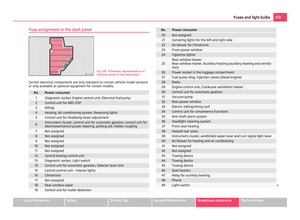 215
215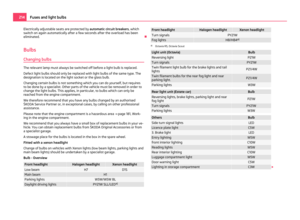 216
216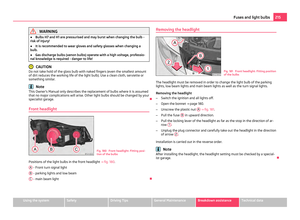 217
217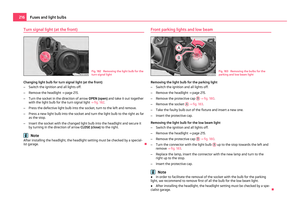 218
218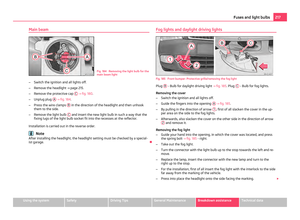 219
219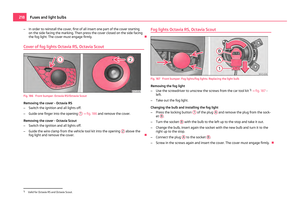 220
220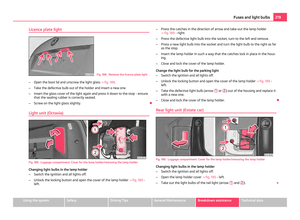 221
221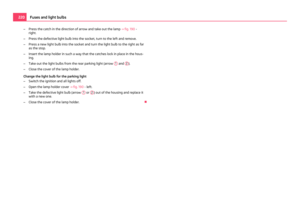 222
222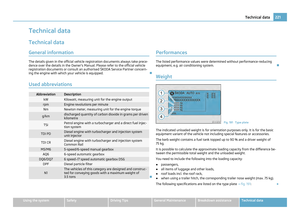 223
223 224
224 225
225 226
226 227
227 228
228 229
229 230
230 231
231 232
232 233
233 234
234 235
235 236
236 237
237 238
238 239
239 240
240 241
241 242
242 243
243 244
244 245
245 246
246 247
247 Owners Manual Communication
Multifunction steering wheel
Operate radio and radio navigation system on the multifunction steering wheel Fig. 110 Multifunction steering wheel:
control buttons
The buttons for setting")