2009 SUBARU TRIBECA relay
[x] Cancel search: relayPage 1523 of 2453
EN(H6DO)(diag)-362
Diagnostic Procedure with Diagnostic Trouble Code (DTC)
ENGINE (DIAGNOSTICS)
Step Check Yes No
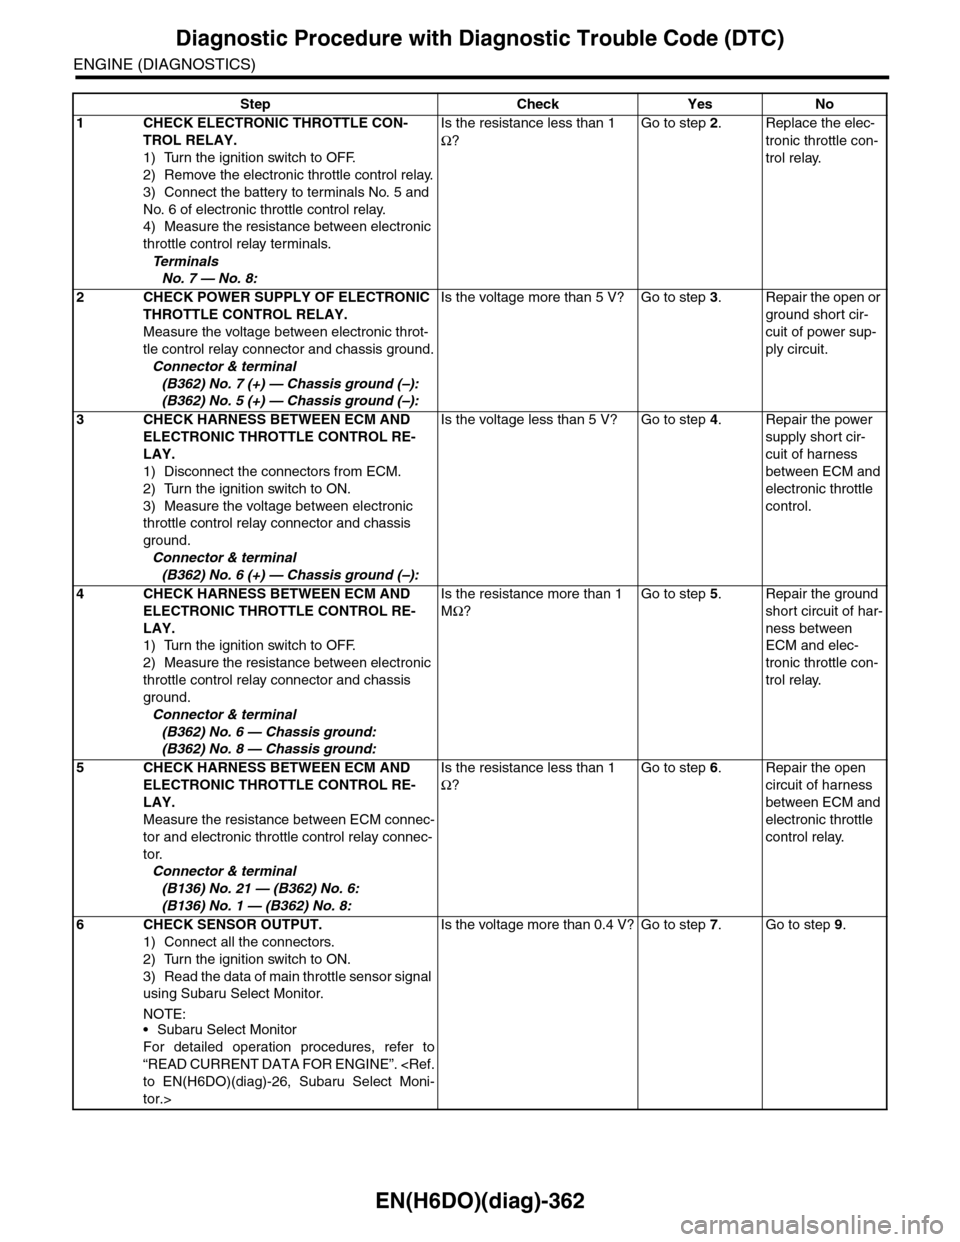
1CHECK ELECTRONIC THROTTLE CON-
TROL RELAY.
1) Turn the ignition switch to OFF.
2) Remove the electronic throttle control relay.
3) Connect the battery to terminals No. 5 and
No. 6 of electronic throttle control relay.
4) Measure the resistance between electronic
throttle control relay terminals.
Te r m i n a l s
No. 7 — No. 8:
Is the resistance less than 1
Ω?
Go to step 2.Replace the elec-
tronic throttle con-
trol relay.
2CHECK POWER SUPPLY OF ELECTRONIC
THROTTLE CONTROL RELAY.
Measure the voltage between electronic throt-
tle control relay connector and chassis ground.
Connector & terminal
(B362) No. 7 (+) — Chassis ground (–):
(B362) No. 5 (+) — Chassis ground (–):
Is the voltage more than 5 V? Go to step 3.Repair the open or
ground short cir-
cuit of power sup-
ply circuit.
3CHECK HARNESS BETWEEN ECM AND
ELECTRONIC THROTTLE CONTROL RE-
LAY.
1) Disconnect the connectors from ECM.
2) Turn the ignition switch to ON.
3) Measure the voltage between electronic
throttle control relay connector and chassis
ground.
Connector & terminal
(B362) No. 6 (+) — Chassis ground (–):
Is the voltage less than 5 V? Go to step 4.Repair the power
supply short cir-
cuit of harness
between ECM and
electronic throttle
control.
4CHECK HARNESS BETWEEN ECM AND
ELECTRONIC THROTTLE CONTROL RE-
LAY.
1) Turn the ignition switch to OFF.
2) Measure the resistance between electronic
throttle control relay connector and chassis
ground.
Connector & terminal
(B362) No. 6 — Chassis ground:
(B362) No. 8 — Chassis ground:
Is the resistance more than 1
MΩ?
Go to step 5.Repair the ground
short circuit of har-
ness between
ECM and elec-
tronic throttle con-
trol relay.
5CHECK HARNESS BETWEEN ECM AND
ELECTRONIC THROTTLE CONTROL RE-
LAY.
Measure the resistance between ECM connec-
tor and electronic throttle control relay connec-
tor.
Connector & terminal
(B136) No. 21 — (B362) No. 6:
(B136) No. 1 — (B362) No. 8:
Is the resistance less than 1
Ω?
Go to step 6.Repair the open
circuit of harness
between ECM and
electronic throttle
control relay.
6CHECK SENSOR OUTPUT.
1) Connect all the connectors.
2) Turn the ignition switch to ON.
3) Read the data of main throttle sensor signal
using Subaru Select Monitor.
NOTE:•Subaru Select Monitor
For detailed operation procedures, refer to
“READ CURRENT DATA FOR ENGINE”.
tor.>
Is the voltage more than 0.4 V? Go to step 7.Go to step 9.
Page 1526 of 2453
EN(H6DO)(diag)-365
Diagnostic Procedure with Diagnostic Trouble Code (DTC)
ENGINE (DIAGNOSTICS)
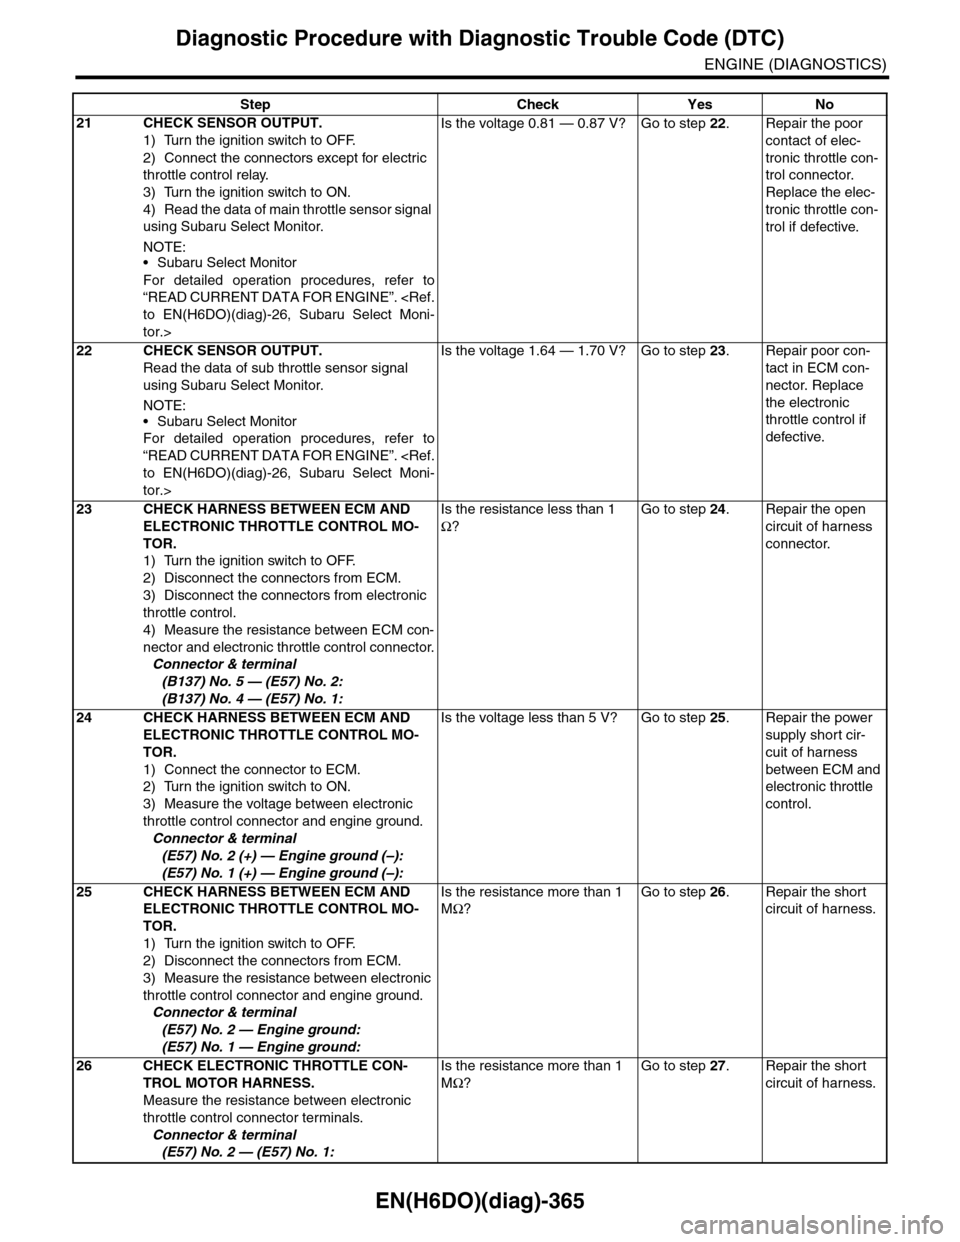
21 CHECK SENSOR OUTPUT.
1) Turn the ignition switch to OFF.
2) Connect the connectors except for electric
throttle control relay.
3) Turn the ignition switch to ON.
4) Read the data of main throttle sensor signal
using Subaru Select Monitor.
NOTE:•Subaru Select Monitor
For detailed operation procedures, refer to
“READ CURRENT DATA FOR ENGINE”.
tor.>
Is the voltage 0.81 — 0.87 V? Go to step 22.Repair the poor
contact of elec-
tronic throttle con-
trol connector.
Replace the elec-
tronic throttle con-
trol if defective.
22 CHECK SENSOR OUTPUT.
Read the data of sub throttle sensor signal
using Subaru Select Monitor.
NOTE:
•Subaru Select Monitor
For detailed operation procedures, refer to
“READ CURRENT DATA FOR ENGINE”.
tor.>
Is the voltage 1.64 — 1.70 V? Go to step 23.Repair poor con-
tact in ECM con-
nector. Replace
the electronic
throttle control if
defective.
23 CHECK HARNESS BETWEEN ECM AND
ELECTRONIC THROTTLE CONTROL MO-
TOR.
1) Turn the ignition switch to OFF.
2) Disconnect the connectors from ECM.
3) Disconnect the connectors from electronic
throttle control.
4) Measure the resistance between ECM con-
nector and electronic throttle control connector.
Connector & terminal
(B137) No. 5 — (E57) No. 2:
(B137) No. 4 — (E57) No. 1:
Is the resistance less than 1
Ω?
Go to step 24.Repair the open
circuit of harness
connector.
24 CHECK HARNESS BETWEEN ECM AND
ELECTRONIC THROTTLE CONTROL MO-
TOR.
1) Connect the connector to ECM.
2) Turn the ignition switch to ON.
3) Measure the voltage between electronic
throttle control connector and engine ground.
Connector & terminal
(E57) No. 2 (+) — Engine ground (–):
(E57) No. 1 (+) — Engine ground (–):
Is the voltage less than 5 V? Go to step 25.Repair the power
supply short cir-
cuit of harness
between ECM and
electronic throttle
control.
25 CHECK HARNESS BETWEEN ECM AND
ELECTRONIC THROTTLE CONTROL MO-
TOR.
1) Turn the ignition switch to OFF.
2) Disconnect the connectors from ECM.
3) Measure the resistance between electronic
throttle control connector and engine ground.
Connector & terminal
(E57) No. 2 — Engine ground:
(E57) No. 1 — Engine ground:
Is the resistance more than 1
MΩ?
Go to step 26.Repair the short
circuit of harness.
26 CHECK ELECTRONIC THROTTLE CON-
TROL MOTOR HARNESS.
Measure the resistance between electronic
throttle control connector terminals.
Connector & terminal
(E57) No. 2 — (E57) No. 1:
Is the resistance more than 1
MΩ?
Go to step 27.Repair the short
circuit of harness.
Step Check Yes No
Page 1529 of 2453
EN(H6DO)(diag)-368
Diagnostic Procedure with Diagnostic Trouble Code (DTC)
ENGINE (DIAGNOSTICS)
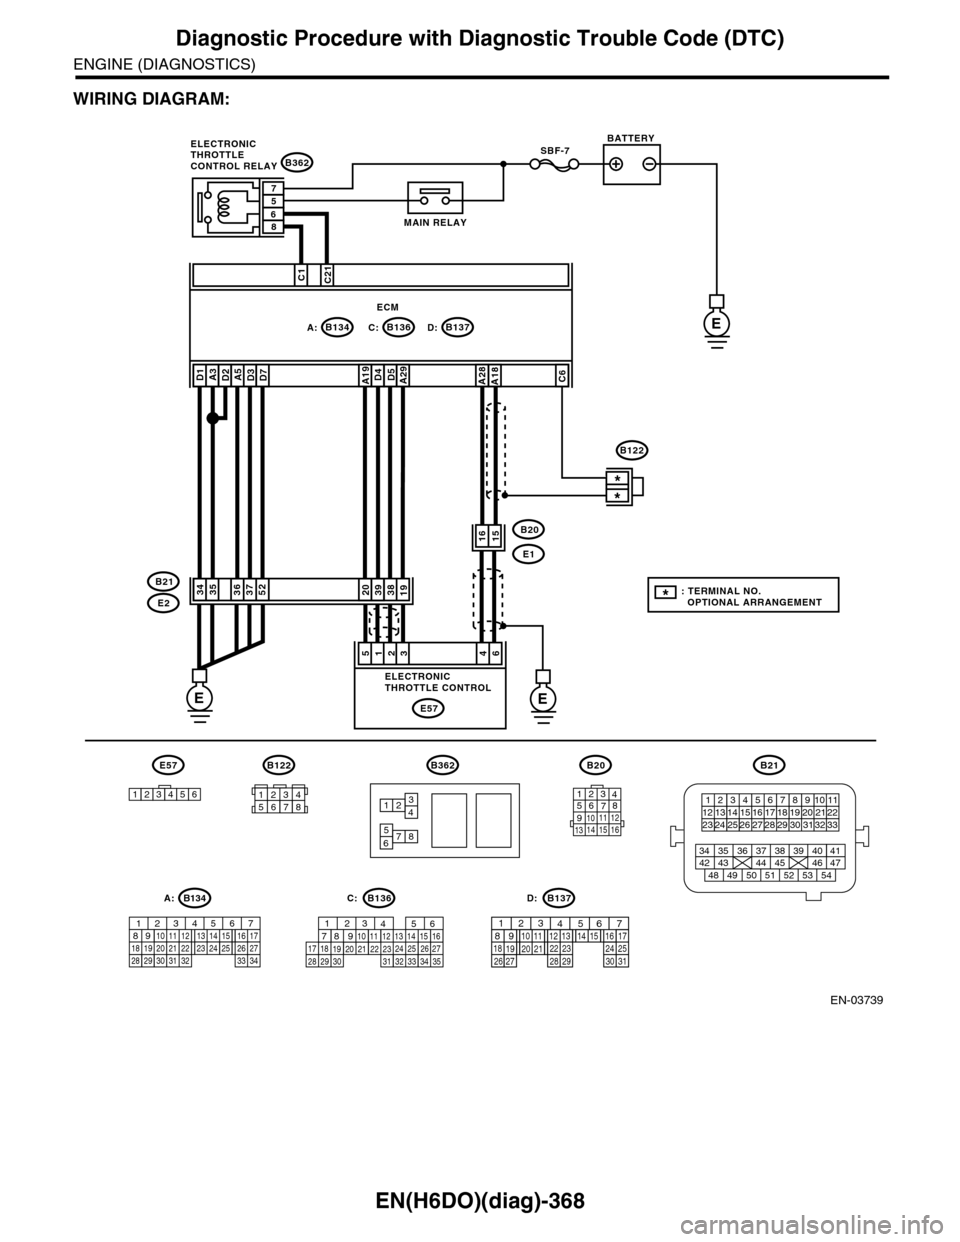
WIRING DIAGRAM:
EN-03739
SBF-7
B134A:B137B136D:
B362
E1
B20
C:E
EE
C1C21
38392019
1615
*
*
E2
B21
E57
461235
D4D5A29A19A5D3D7A3D2D1
3536375234
A28A18C6
ECM
57
86
B362
12
78
34
56
B21
12345678910 1112 1314 1516 1718 1920 21222324 25
34 35 36 37 38 39 40 41
48 49 50 51 52 53 5442 43 44 45 46 47
26 2728 2930 313233
B122
12345678
1289563410 11 121920 2129 3031
13 14 15161727281822 2324 25 267
32 3334 35
B136C:
12789563410 11 121920 2129 30 31
13 14 151617
27 281822 23 24 2526
B137D:
BATTERY
MAIN RELAY
ELECTRONICTHROTTLECONTROL RELAY
ELECTRONICTHROTTLE CONTROL
B20
1234567891011 121314 15 16
E57
123456
B122
*: TERMINAL NO. OPTIONAL ARRANGEMENT
A:B134
85610 11 12 13 14 157213416
3019 20 2228 29
91718252123 24323126 2733 34
Page 1530 of 2453
EN(H6DO)(diag)-369
Diagnostic Procedure with Diagnostic Trouble Code (DTC)
ENGINE (DIAGNOSTICS)
Step Check Yes No
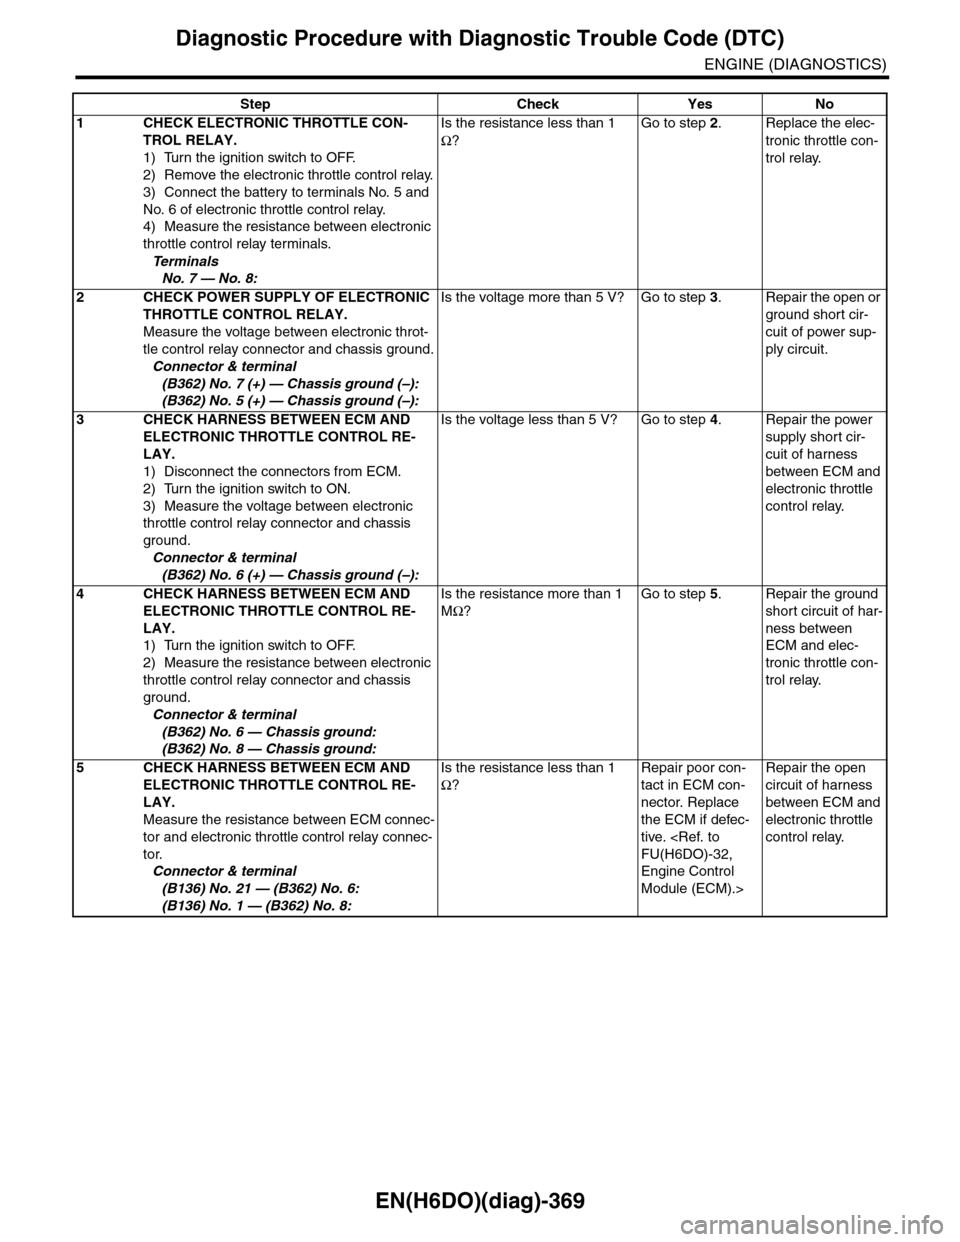
1CHECK ELECTRONIC THROTTLE CON-
TROL RELAY.
1) Turn the ignition switch to OFF.
2) Remove the electronic throttle control relay.
3) Connect the battery to terminals No. 5 and
No. 6 of electronic throttle control relay.
4) Measure the resistance between electronic
throttle control relay terminals.
Te r m i n a l s
No. 7 — No. 8:
Is the resistance less than 1
Ω?
Go to step 2.Replace the elec-
tronic throttle con-
trol relay.
2CHECK POWER SUPPLY OF ELECTRONIC
THROTTLE CONTROL RELAY.
Measure the voltage between electronic throt-
tle control relay connector and chassis ground.
Connector & terminal
(B362) No. 7 (+) — Chassis ground (–):
(B362) No. 5 (+) — Chassis ground (–):
Is the voltage more than 5 V? Go to step 3.Repair the open or
ground short cir-
cuit of power sup-
ply circuit.
3CHECK HARNESS BETWEEN ECM AND
ELECTRONIC THROTTLE CONTROL RE-
LAY.
1) Disconnect the connectors from ECM.
2) Turn the ignition switch to ON.
3) Measure the voltage between electronic
throttle control relay connector and chassis
ground.
Connector & terminal
(B362) No. 6 (+) — Chassis ground (–):
Is the voltage less than 5 V? Go to step 4.Repair the power
supply short cir-
cuit of harness
between ECM and
electronic throttle
control relay.
4CHECK HARNESS BETWEEN ECM AND
ELECTRONIC THROTTLE CONTROL RE-
LAY.
1) Turn the ignition switch to OFF.
2) Measure the resistance between electronic
throttle control relay connector and chassis
ground.
Connector & terminal
(B362) No. 6 — Chassis ground:
(B362) No. 8 — Chassis ground:
Is the resistance more than 1
MΩ?
Go to step 5.Repair the ground
short circuit of har-
ness between
ECM and elec-
tronic throttle con-
trol relay.
5CHECK HARNESS BETWEEN ECM AND
ELECTRONIC THROTTLE CONTROL RE-
LAY.
Measure the resistance between ECM connec-
tor and electronic throttle control relay connec-
tor.
Connector & terminal
(B136) No. 21 — (B362) No. 6:
(B136) No. 1 — (B362) No. 8:
Is the resistance less than 1
Ω?
Repair poor con-
tact in ECM con-
nector. Replace
the ECM if defec-
tive.
Engine Control
Module (ECM).>
Repair the open
circuit of harness
between ECM and
electronic throttle
control relay.
Page 1531 of 2453
EN(H6DO)(diag)-370
Diagnostic Procedure with Diagnostic Trouble Code (DTC)
ENGINE (DIAGNOSTICS)
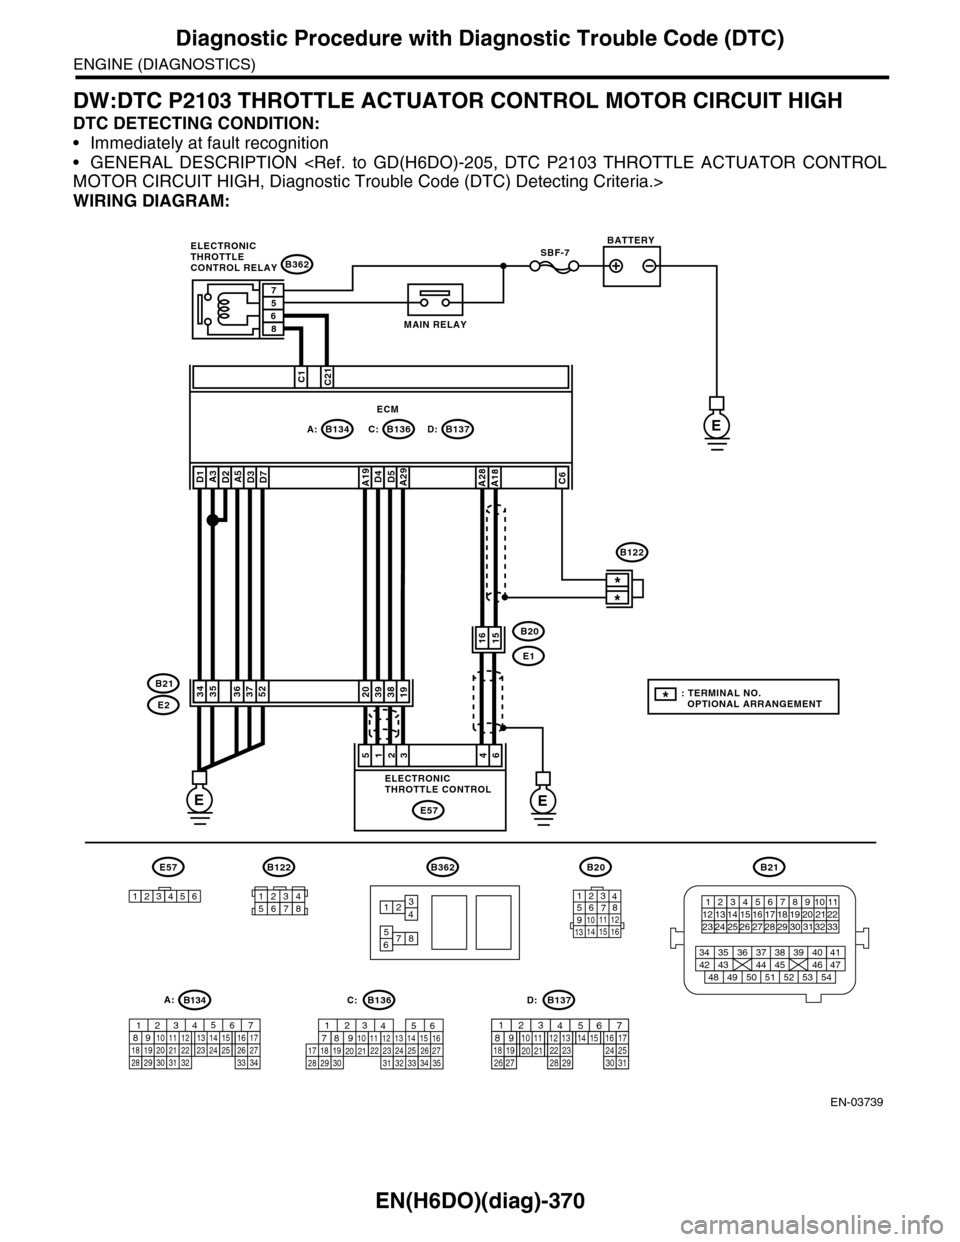
DW:DTC P2103 THROTTLE ACTUATOR CONTROL MOTOR CIRCUIT HIGH
DTC DETECTING CONDITION:
•Immediately at fault recognition
•GENERAL DESCRIPTION
WIRING DIAGRAM:
EN-03739
SBF-7
B134A:B137B136D:
B362
E1
B20
C:E
EE
C1C21
38392019
1615
*
*
E2
B21
E57
461235
D4D5A29A19A5D3D7A3D2D1
3536375234
A28A18C6
ECM
57
86
B362
12
78
34
56
B21
12345678910 1112 1314 1516 1718 1920 21222324 25
34 35 36 37 38 39 40 41
48 49 50 51 52 53 5442 43 44 45 46 47
26 2728 2930 313233
B122
12345678
1289563410 11 121920 2129 3031
13 14 15161727281822 2324 25 267
32 3334 35
B136C:
12789563410 11 121920 2129 30 31
13 14 151617
27 281822 23 24 2526
B137D:
BATTERY
MAIN RELAY
ELECTRONICTHROTTLECONTROL RELAY
ELECTRONICTHROTTLE CONTROL
B20
1234567891011 121314 15 16
E57
123456
B122
*: TERMINAL NO. OPTIONAL ARRANGEMENT
A:B134
85610 11 12 13 14 157213416
3019 20 2228 29
91718252123 24323126 2733 34
Page 1532 of 2453
EN(H6DO)(diag)-371
Diagnostic Procedure with Diagnostic Trouble Code (DTC)
ENGINE (DIAGNOSTICS)
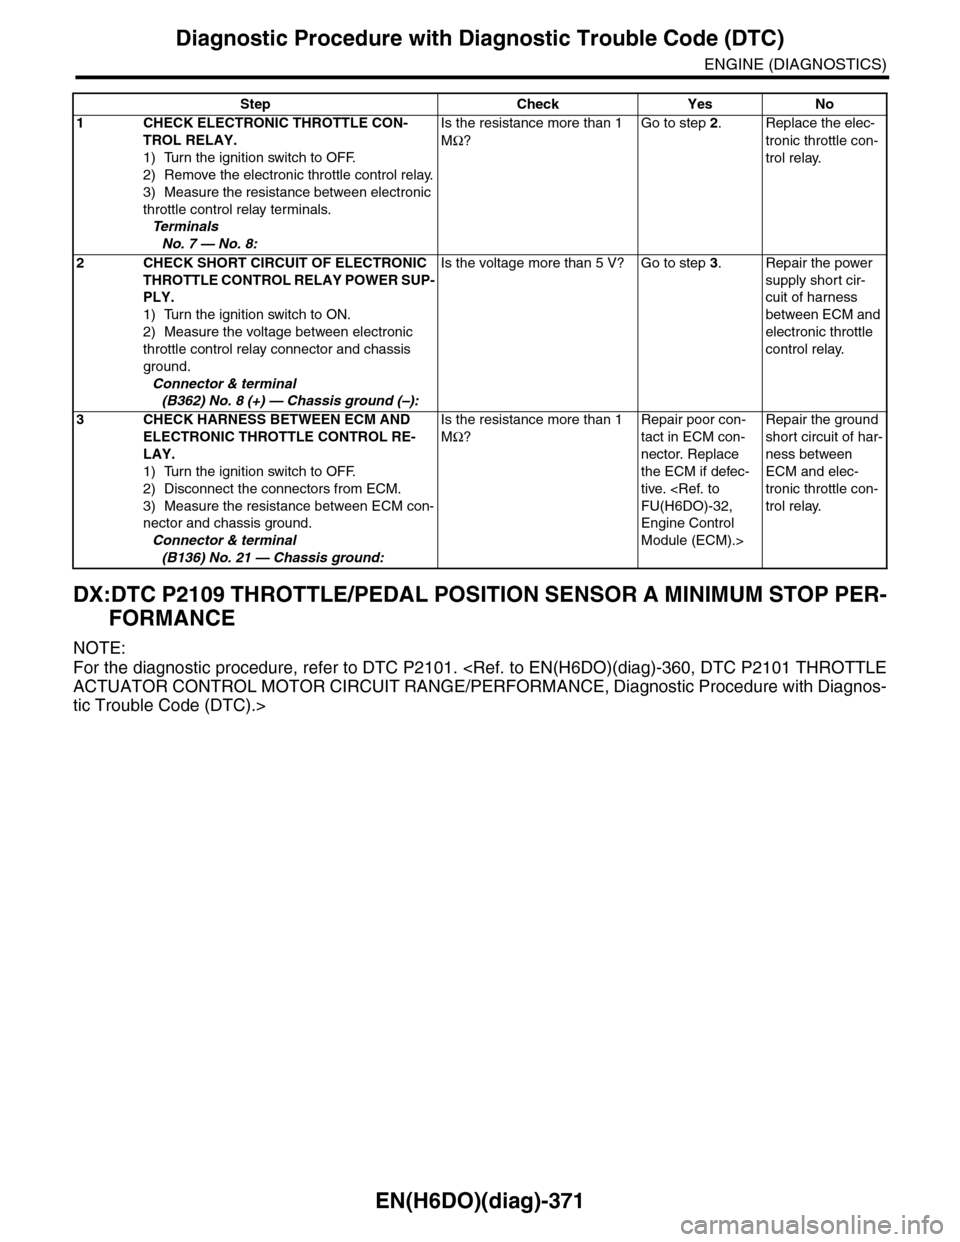
DX:DTC P2109 THROTTLE/PEDAL POSITION SENSOR A MINIMUM STOP PER-
FORMANCE
NOTE:
For the diagnostic procedure, refer to DTC P2101.
tic Trouble Code (DTC).>
Step Check Yes No
1CHECK ELECTRONIC THROTTLE CON-
TROL RELAY.
1) Turn the ignition switch to OFF.
2) Remove the electronic throttle control relay.
3) Measure the resistance between electronic
throttle control relay terminals.
Te r m i n a l s
No. 7 — No. 8:
Is the resistance more than 1
MΩ?
Go to step 2.Replace the elec-
tronic throttle con-
trol relay.
2 CHECK SHORT CIRCUIT OF ELECTRONIC
THROTTLE CONTROL RELAY POWER SUP-
PLY.
1) Turn the ignition switch to ON.
2) Measure the voltage between electronic
throttle control relay connector and chassis
ground.
Connector & terminal
(B362) No. 8 (+) — Chassis ground (–):
Is the voltage more than 5 V? Go to step 3.Repair the power
supply short cir-
cuit of harness
between ECM and
electronic throttle
control relay.
3CHECK HARNESS BETWEEN ECM AND
ELECTRONIC THROTTLE CONTROL RE-
LAY.
1) Turn the ignition switch to OFF.
2) Disconnect the connectors from ECM.
3) Measure the resistance between ECM con-
nector and chassis ground.
Connector & terminal
(B136) No. 21 — Chassis ground:
Is the resistance more than 1
MΩ?
Repair poor con-
tact in ECM con-
nector. Replace
the ECM if defec-
tive.
Engine Control
Module (ECM).>
Repair the ground
short circuit of har-
ness between
ECM and elec-
tronic throttle con-
trol relay.
Page 1543 of 2453
EN(H6DO)(diag)-382
Diagnostic Procedure with Diagnostic Trouble Code (DTC)
ENGINE (DIAGNOSTICS)
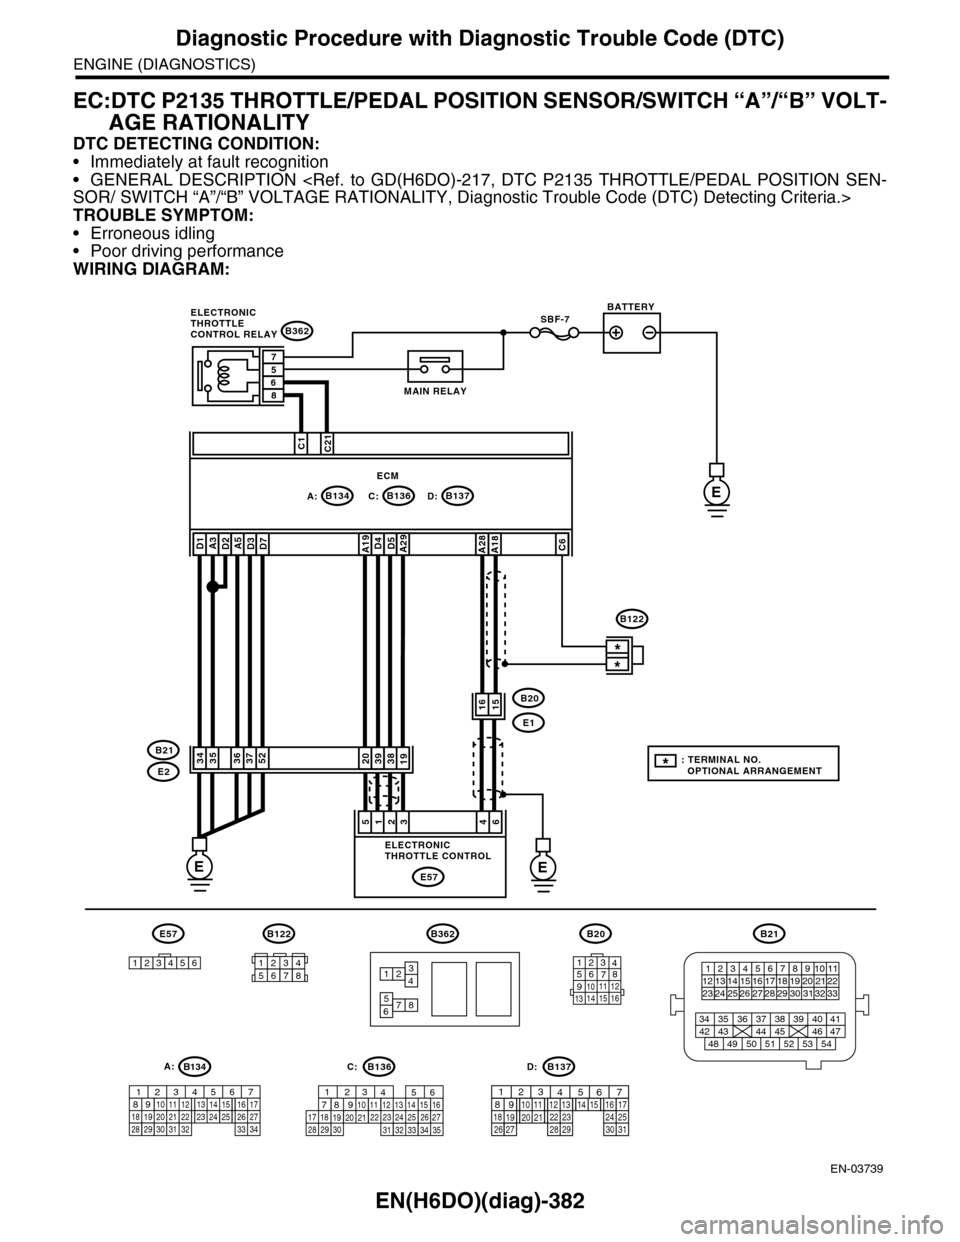
EC:DTC P2135 THROTTLE/PEDAL POSITION SENSOR/SWITCH “A”/“B” VOLT-
AGE RATIONALITY
DTC DETECTING CONDITION:
•Immediately at fault recognition
•GENERAL DESCRIPTION
TROUBLE SYMPTOM:
•Erroneous idling
•Poor driving performance
WIRING DIAGRAM:
EN-03739
SBF-7
B134A:B137B136D:
B362
E1
B20
C:E
EE
C1C21
38392019
1615
*
*
E2
B21
E57
461235
D4D5A29A19A5D3D7A3D2D1
3536375234
A28A18C6
ECM
57
86
B362
12
78
34
56
B21
12345678910 1112 1314 1516 1718 1920 21222324 25
34 35 36 37 38 39 40 41
48 49 50 51 52 53 5442 43 44 45 46 47
26 2728 2930 313233
B122
12345678
1289563410 11 121920 2129 3031
13 14 15161727281822 2324 25 267
32 3334 35
B136C:
12789563410 11 121920 2129 30 31
13 14 151617
27 281822 23 24 2526
B137D:
BATTERY
MAIN RELAY
ELECTRONICTHROTTLECONTROL RELAY
ELECTRONICTHROTTLE CONTROL
B20
1234567891011 121314 15 16
E57
123456
B122
*: TERMINAL NO. OPTIONAL ARRANGEMENT
A:B134
85610 11 12 13 14 157213416
3019 20 2228 29
91718252123 24323126 2733 34
Page 1553 of 2453
EN(H6DO)(diag)-392
General Diagnostic Table
ENGINE (DIAGNOSTICS)
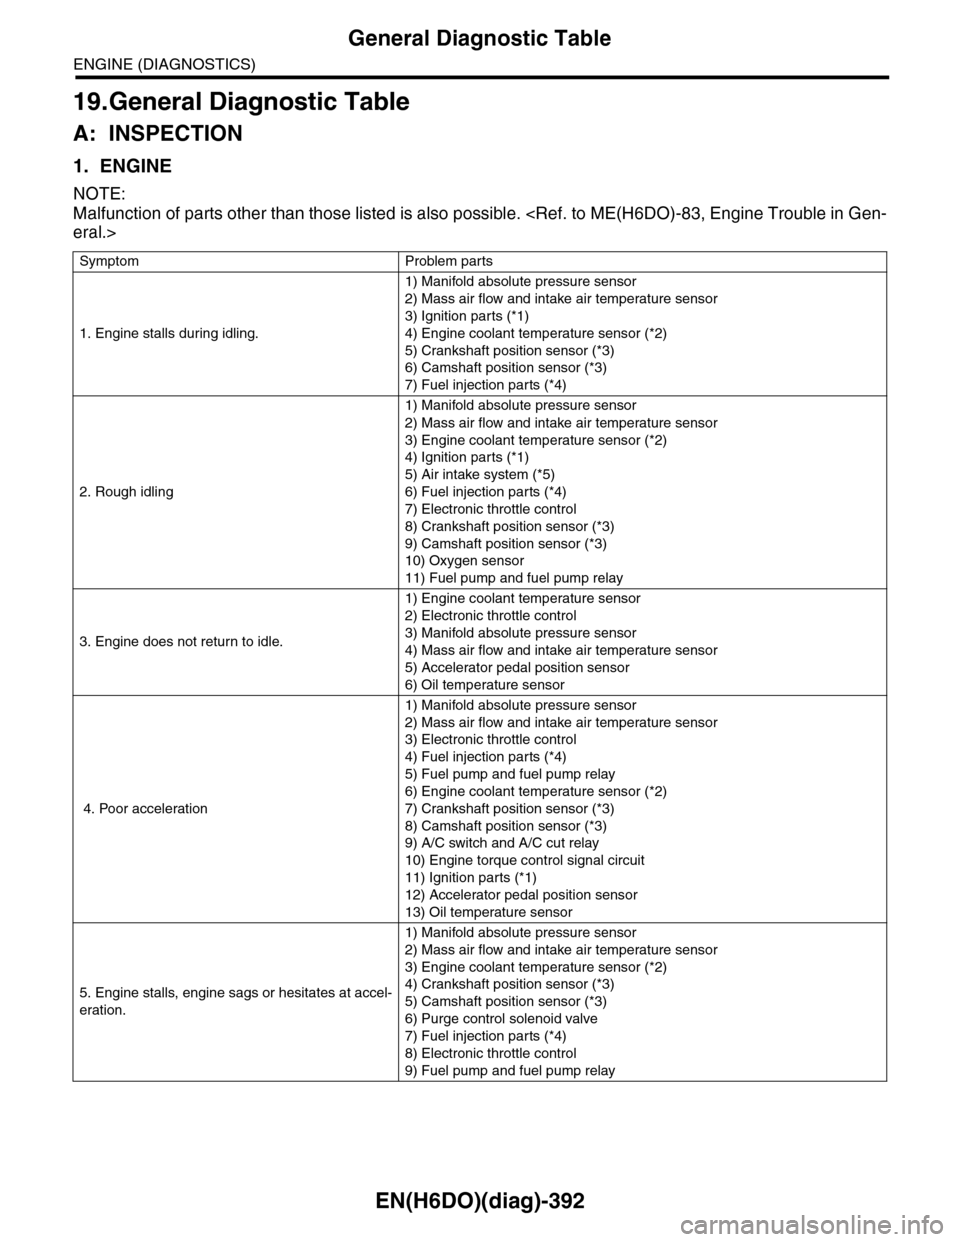
19.General Diagnostic Table
A: INSPECTION
1. ENGINE
NOTE:
Malfunction of parts other than those listed is also possible.
Symptom Problem parts
1. Engine stalls during idling.
1) Manifold absolute pressure sensor
2) Mass air flow and intake air temperature sensor
3) Ignition parts (*1)
4) Engine coolant temperature sensor (*2)
5) Crankshaft position sensor (*3)
6) Camshaft position sensor (*3)
7) Fuel injection parts (*4)
2. Rough idling
1) Manifold absolute pressure sensor
2) Mass air flow and intake air temperature sensor
3) Engine coolant temperature sensor (*2)
4) Ignition parts (*1)
5) Air intake system (*5)
6) Fuel injection parts (*4)
7) Electronic throttle control
8) Crankshaft position sensor (*3)
9) Camshaft position sensor (*3)
10) Oxygen sensor
11) Fuel pump and fuel pump relay
3. Engine does not return to idle.
1) Engine coolant temperature sensor
2) Electronic throttle control
3) Manifold absolute pressure sensor
4) Mass air flow and intake air temperature sensor
5) Accelerator pedal position sensor
6) Oil temperature sensor
4. Poor acceleration
1) Manifold absolute pressure sensor
2) Mass air flow and intake air temperature sensor
3) Electronic throttle control
4) Fuel injection parts (*4)
5) Fuel pump and fuel pump relay
6) Engine coolant temperature sensor (*2)
7) Crankshaft position sensor (*3)
8) Camshaft position sensor (*3)
9) A/C switch and A/C cut relay
10) Engine torque control signal circuit
11) Ignition parts (*1)
12) Accelerator pedal position sensor
13) Oil temperature sensor
5. Engine stalls, engine sags or hesitates at accel-
eration.
1) Manifold absolute pressure sensor
2) Mass air flow and intake air temperature sensor
3) Engine coolant temperature sensor (*2)
4) Crankshaft position sensor (*3)
5) Camshaft position sensor (*3)
6) Purge control solenoid valve
7) Fuel injection parts (*4)
8) Electronic throttle control
9) Fuel pump and fuel pump relay