Page 209 of 241

88A-73
WIRING HARNESS
Passenger's front side door wiring: Removal - Refitting
LEFT-HAND DRIVE
88A
II - OPERATION FOR REMOVAL OF PART
CONCERNED
a
aDisconnect the R 4 front side door connector.
aUnclip the clips (2) using unclipping pliers.
aRemove the front side door wiring.
REFITTING
I - REFITTING PREPARATIONS OPERATION
aIf replacing with more wiring, lock the unused con-
nectors (see Connector: Sealing and locking)
(Technical Note 6015A, 88A, Wiring).II - REFITTING OPERATION FOR PART
CONCERNED
aRefit the front side door wiring.
aAttach the clips (2) .
aConnect the R 4 front side door connector.
III - FINAL OPERATION.
aRefit the front side door lock (see Front side door
lock: Removal - Refitting) (MR 412, 51A, Side ope-
ning element mechanisms).
aRefit the front side door electric window winder me-
chanism (see Front side door electric window
mechanism: Removal - Refitting) (MR 412, 51A,
Side opening element mechanisms).
aRefit the door sealing film (see Door sealing film:
Removal - Refitting) (MR 412, 65A, Opening ele-
ment sealing).
122353
WARNING
To prevent any risk of noise, premature wear,
short circuits, etc. after the refitting operation,
mark the wiring routing and how to connect the
connectors.
WARNING
To prevent any damage during the refitting ope-
ration, check that the wiring is free from its moun-
tings (retaining clip, plastic clip, adhesive tape,
connector, etc.).
122353
DRIVER'S ELECTRIC DOOR + REMOTE CON-
TROL
ELECTRIC FRONT WINDOW or ONE-TOUCH
ELECTRIC PASSENGER WINDOW CONTROL
Page 210 of 241
88A-74
WIRING HARNESS
Passenger's front side door wiring: Removal - Refitting
LEFT-HAND DRIVE
88A
aRefit the front speaker (see 86A, Radio, Front
speakers: Removal - Refitting, page 86A-8) .
aConnect the electric door mirror connector.
aRefit the front side door trim (see Front side door
trim: Removal - Refitting) (MR 412, 72A, Side ope-
ning element trim).
aConnect the battery (see 80A, Battery, Battery: Re-
moval - Refitting, page 80A-2) . WITH 2 SPEAKERS, WITHOUT RADIO or WITH 4
SPEAKERS, WITHOUT RADIO or RADIO NO. 01
or RADIO NO. 03
DOOR MIRRORS 02 or DOOR MIRRORS 03 or
DOOR MIRRORS 04
Page 211 of 241

88A-75
WIRING HARNESS
Passenger's front side door wiring: Removal - Refitting
RIGHT-HAND DRIVE
88A
REMOVAL
I - REMOVAL PREPARATION OPERATION
aFully raise the window winder.
aSwitch off the ignition.
aDisconnect the battery (see 80A, Battery, Battery:
Removal - Refitting, page 80A-2) .
aRemove the front side door trim (see Front side
door trim: Removal - Refitting) (MR 412, 72A,
Side opening element trim).
aDisconnect the electric door mirror connector.
aRemove the front speaker (see 86A, Radio, Front
speakers: Removal - Refitting, page 86A-8) .
aRemove the door sealing film (see Door sealing
film: Removal - Refitting) (MR 412, 65A, Opening
element sealing).aRemove the front side door electric window winder
mechanism (see Front side door electric window
mechanism: Removal - Refitting) (MR 412, 51A,
Side opening element mechanisms).
aRemove the front side door lock (see Front side
door lock: Removal - Refitting) (MR 412, 51A,
Side opening element mechanisms). IMPORTANT
Consult the safety and cleanliness advice and ope-
ration recommendations before carrying out any
repair (see 88A, Wiring harness, Wiring: Precau-
tions for the repair, page 88A-2) .
WARNING
To prevent damaging the connectors, consult the
disconnection procedures (see Connector: Dis-
connection and reconnection) (Technical Note
6015A, 88A, Wiring).
DOOR MIRRORS 02 or DOOR MIRRORS 03 or
DOOR MIRRORS 04
WITH 2 SPEAKERS, WITHOUT RADIO or WITH 4
SPEAKERS, WITHOUT RADIO or RADIO NO. 01
or RADIO NO. 03
ELECTRIC FRONT WINDOW or ONE-TOUCH
ELECTRIC PASSENGER WINDOW CONTROL
DRIVER'S ELECTRIC DOOR + REMOTE CON-
TROL
Page 212 of 241

88A-76
WIRING HARNESS
Passenger's front side door wiring: Removal - Refitting
RIGHT-HAND DRIVE
88A
II - REMOVAL OPERATION FOR PART
CONCERNED
a
aDisconnect the front side door R3 connector.
aUnclip the clips (1) using unclipping pliers.
aRemove the front side door wiring.
REFITTING
I - REFITTING PREPARATIONS OPERATION
aIf replacing with more wiring, immobilise the unused
connectors (see Connector: Sealing and immobi-
lising) (Technical Note 6015A, 88A, Wiring).II - REFITTING OPERATION FOR PART
CONCERNED
aRefit the front side door wiring.
aAttach the clips (1) .
aConnect the front side door R3 connector.
III - FINAL OPERATION.
aRefit the front side door lock (see Front side door
lock: Removal - Refitting) (MR 412, 51A, Side ope-
ning element mechanisms).
aRefit the front side door electric window winder me-
chanism (see Front side door electric window
mechanism: Removal - Refitting) (MR 412, 51A,
Side opening element mechanisms).
aRefit the door sealing film (see Door sealing film:
Removal - Refitting) (MR 412, 65A, Opening ele-
ment sealing).
122352
WARNING
To prevent any risk of noise, premature wear,
short circuits, etc. after the refitting operation,
mark the wiring routing and how to connect the
connectors.
WARNING
To prevent any damage during the refitting ope-
ration, check that the wiring is free from its moun-
tings (retaining clip, plastic clip, adhesive tape,
connector, etc.).
122352
DRIVER'S ELECTRIC DOOR + REMOTE CON-
TROL
ELECTRIC FRONT WINDOW or ONE-TOUCH
ELECTRIC PASSENGER WINDOW CONTROL
Page 213 of 241
88A-77
WIRING HARNESS
Passenger's front side door wiring: Removal - Refitting
RIGHT-HAND DRIVE
88A
aRefit the front speaker (see 86A, Radio, Front
speakers: Removal - Refitting, page 86A-8) .
aConnect the electric door mirror connector.
aRefit the front side door trim (see Front side door
trim: Removal - Refitting) (MR 412, 72A, Side ope-
ning element trim).
aConnect the battery (see 80A, Battery, Battery: Re-
moval - Refitting, page 80A-2) . WITH 2 SPEAKERS, WITHOUT RADIO or WITH 4
SPEAKERS, WITHOUT RADIO or RADIO NO. 01
or RADIO NO. 03
DOOR MIRRORS 02 or DOOR MIRRORS 03 or
DOOR MIRRORS 04
Page 214 of 241

88A-78
WIRING HARNESS
Rear bumper wiring: Removal - Refitting
88A
REMOVAL
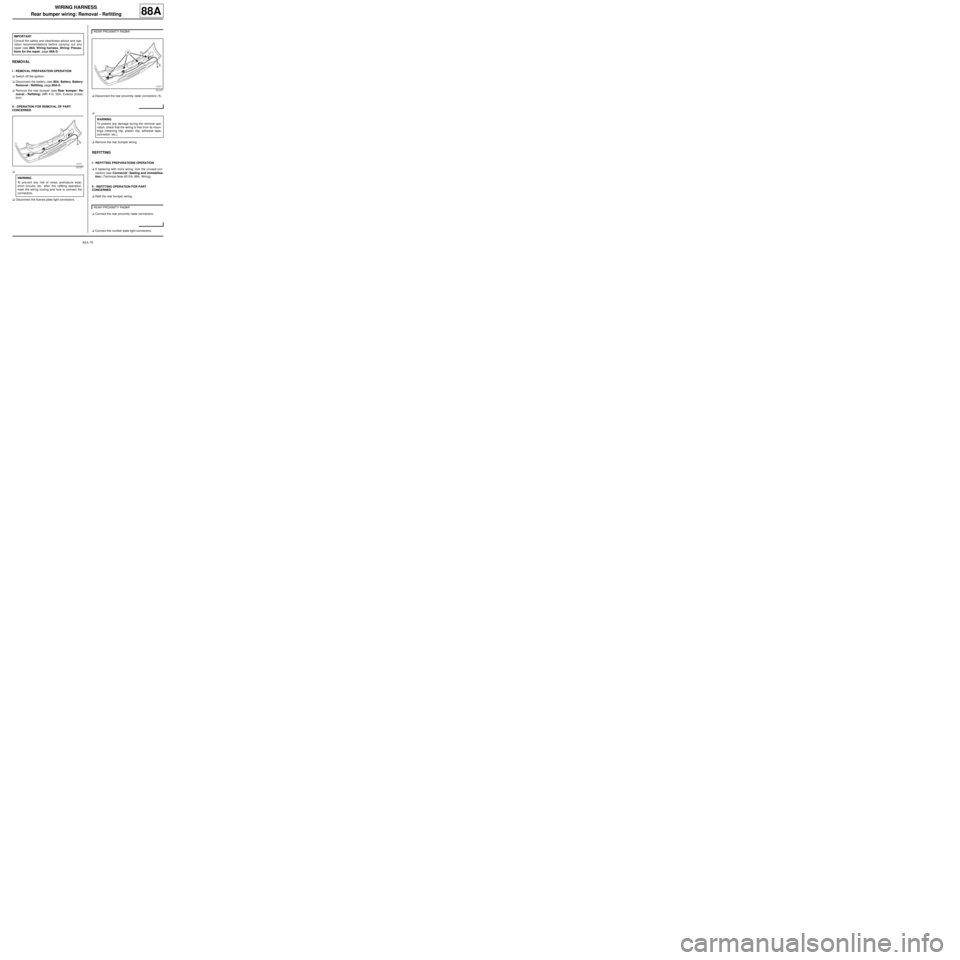
I - REMOVAL PREPARATION OPERATION
aSwitch off the ignition.
aDisconnect the battery (see 80A, Battery, Battery:
Removal - Refitting, page 80A-2) .
aRemove the rear bumper (see Rear bumper: Re-
moval - Refitting) (MR 412, 55A, Exterior protec-
tion).
II - OPERATION FOR REMOVAL OF PART
CONCERNED
a
aDisconnect the license plate light connectors.aDisconnect the rear proximity radar connectors (1) .
a
aRemove the rear bumper wiring.
REFITTING
I - REFITTING PREPARATIONS OPERATION
aIf replacing with more wiring, lock the unused con-
nectors (see Connector: Sealing and immobilisa-
tion) (Technical Note 6015A, 88A, Wiring).
II - REFITTING OPERATION FOR PART
CONCERNED
aRefit the rear bumper wiring.
aConnect the rear proximity radar connectors.
aConnect the number plate light connectors. IMPORTANT
Consult the safety and cleanliness advice and ope-
ration recommendations before carrying out any
repair (see 88A, Wiring harness, Wiring: Precau-
tions for the repair, page 88A-2) .
121371
WARNING
To prevent any risk of noise, premature wear,
short circuits, etc. after the refitting operation,
mark the wiring routing and how to connect the
connectors.
REAR PROXIMITY RADAR
121371
WARNING
To prevent any damage during the removal ope-
ration, check that the wiring is free from its moun-
tings (retaining clip, plastic clip, adhesive tape,
connector, etc.).
REAR PROXIMITY RADAR
Page 215 of 241
88A-79
WIRING HARNESS
Rear bumper wiring: Removal - Refitting
88A
III - FINAL OPERATION.
aRefit the rear bumper (see Rear bumper: Removal
- Refitting) (MR 412, 55A, Exterior protection).
aConnect the battery (see 80A, Battery, Battery: Re-
moval - Refitting, page 80A-2) .
Page 216 of 241

88C-1
AIR BAG AND PRETENSIONERS
Airbag and pretensioners: Precautions for the repair
88C
I - PRECAUTIONS FOR REPAIR
When working underneath the vehicle (on the bo-
dywork, sill panel, etc.) or for certain operations invol-
ving removal or refitting of seat trims, it is essential to
lock the airbag computer using the Diagnostic tool
and to disconnect the battery (see 80A, Battery, Bat-
tery: Removal - Refitting, page 80A-2) .The pyrotechnic systems (pretensioners and airbags)
must be checked using the Diagnostic tool :
-after an accident,
-after theft or attempted theft of the vehicle,
-before selling a used vehicle.
II - TRIGGERING OF THE SAFETY SYSTEMS
After detection of an impact, the airbag computer locks
definitively and the « airbag fault » warning light is illu-
minated on the instrument panel. The airbag computer
and the side impact sensors must always be replaced.
III - DURABILITY OF THE PYROTECHNIC
COMPONENTS
The precautions which recommended that pyrotechnic
components (airbags and pretensioners) were repla-
ced 10 years after the registration of the vehicle have
now been lifted.
Pyrotechnic components (airbags and pretensioners)
do not therefore require any maintenance. Equipment required
Diagnostic tool
IMPORTANT
All operations on airbag and pretensioner systems
must be carried out by qualified trained personnel.
The airbags have a pyrotechnic gas generator, with
an ignition module and bag which must not be
separated.
The pretensioners have a pyrotechnic gas genera-
tor and an igniter which must, under no circumstan-
ces, be separated.
IMPORTANT
Never handle the pyrotechnic systems (pretensio-
ners or airbags) near to a source of heat or naked
flame - they may be triggered.
IMPORTANT
To prevent any accidental triggering whilst w orking
on or near a pyrotechnic component (airbags or
pretensioners), lock the airbag computer using the
Diagnostic tool.
When this function is activated, all the trigger lines
are inhibited and the airbag warning light on the ins-
trument panel lights up contin uously (ignition on).
(see Fault finding - Replacement of compo-
nents) (88C, Airbag and pretensioners).
IMPORTANT
To prevent the pyrotechnic components from being
permanently deactivated or triggered (airbags or
pretensioners), check the airbag computer using
the Diagnostic tool.
IMPORTANT
In order to prevent interference with the deployment
of the airbags:
-do not fit a cover to the front seats,
-do not place objects in the area of deployment.
IMPORTANT
To eliminate the risk of any accident, do not reuse
pyrotechnic components.
It is essential to destroy pretensioners or airbags
before scrapping a vehicle or a part only (see 88C,
Air bag and Pretensioners, Airbags and preten-
sioners: Recycling - Destruction, page 88C-2) .