Page 129 of 241
87D-8
ELECTRIC WINDOWS - SUNROOF
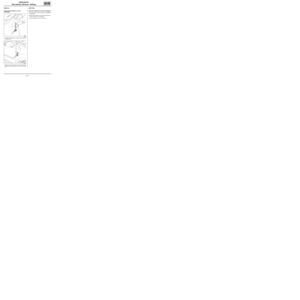
Sunroof opening motor: Removal - Refitting
OPENING ROOF
87D
1 - Sunroof motor
aRemove:
-the bolts (4) from the sunroof motor,
-the sunroof motor (5) .
2 - Sunroof computer
aUnclip the sunroof computer (6) by pressing the clip
(7)
aExtract the sunroof computer (8) .aDisconnect the sunroof computer supply connector
(9) .
REFITTING
I - REFITTING OPERATION FOR PART
CONCERNED
1 - Sunroof computer
aConnect the sunroof computer supply connector.
aClip the sunroof computer onto its mounting.
2 - Sunroof motor
aRefit:
-the sunroof motor,
-the sunroof motor bolts.
aConnect the sunroof motor supply connector to the
sunroof computer.
aRefit:
-the “sunroof computer - computer mounting” as-
sembly,
-the sunroof mounting bolts.
II - FINAL OPERATION.
aRefit:
-the headlining (see Headlining: Removal - Refit-
ting) (MR 412, 71A, Body internal trim),
121393
121394
121395
Page 130 of 241

87D-9
ELECTRIC WINDOWS - SUNROOF
Sunroof opening motor: Removal - Refitting
OPENING ROOF
87D
-the B-pillar upper trims (see B-pillar upper trim:
Removal - Refitting) (MR 412, 71A, Body internal
trim).
-the rear quarter panel trims (see Quarter panel
trim: Removal - Refitting) (MR 412, 71A, Body in-
ternal trim),
-the rear panel trims (see Rear panel lining: Re-
moval - Refitting) (MR 412, 71A, Body internal
trim),
-the rear parcel shelf side trim panels (see Rear
parcel shelf side trim: Removal - Refitting) (MR
412, 71A, Body internal trim),
-the A-pillar trims (see Windscreen pillar trim: Re-
moval - Refitting) (MR 412, 71A, Body internal
trim),
-the interior rear-view mirror covers (see Interior
rear-view mirror: Removal - Refitting) (MR 412,
57A, Interior equipment),
-the sun visors (see Sun visor: Removal - Refit-
ting) (MR 412, 57A, Interior equipment),
-the upper bolt from the rear seat belts (see Rear
seat belt: Removal - Refitting) (MR 412, 59A, Sa-
fety equipment),
-the upper bolt from the front seat belts (see Front
seat belt: Removal - Refitting) (MR 412, 59A, Sa-
fety equipment).
aConnect the battery (see 80A, Battery, Battery: Re-
moval - Refitting, page 80A-2) .
aCarry out the necessary operations (see Electric
sunroof: Initialisation) (MR 413, 87D, Electric win-
dows - Sunroof).
Page 131 of 241
87F-1
PARKING DISTANCE CONTROL
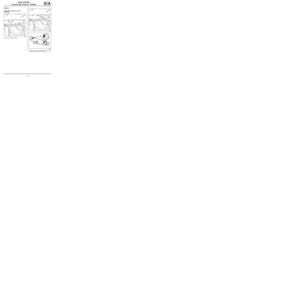
Parking distance control: List and location of components
REAR PROXIMITY RADAR
87F
I - LIST OF COMPONENTS
II - LOCATION OF COMPONENTS
1 - Parking distance control switch
The parking distance control switch (1) is located on
the dashboard lower trim under the steering wheel.2 - Parking distance control buzzer
The parking distance control buzzer (2) is located un-
der the left-hand rear quarter panel trim (see Quarter
panel trim: Removal - Refitting) (MR 412, 71A, Body
internal trim).
3 - Distance control radar No. Description
(1) Parking distance control switch
(2) Parking distance control buzzer
(3) Distance control radar
(4) Parking distance control computer
121372
121367
121374
Page 132 of 241
87F-2
PARKING DISTANCE CONTROL
Parking distance control: List and location of components
REAR PROXIMITY RADAR
87F
4 - Parking distance control computer
The parking distance control computer (4) is located
under the left-hand rear panel (see Rear panel lining:
Removal - Refitting) (MR 412, 71A, Body internal
trim).
121369
Page 133 of 241
87F-3
PARKING DISTANCE CONTROL
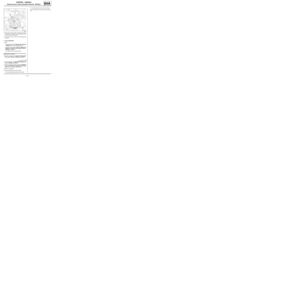
Parking distance control switch: Removal - Refitting
REAR PROXIMITY RADAR
87F
REMOVAL
I - REMOVAL PREPARATION OPERATION
aUnclip the dashboard lower trim (1)
aDisconnect the connectors.
II - OPERATION FOR REMOVAL OF PART
CONCERNED
aUnclip the parking distance control switch from the
dashboard lower trim by pressing the clips (2) .
REFITTING
I - REFITTING OPERATION FOR PART
CONCERNED
aClip the parking distance control switch on the dash-
board lower trim.
II - FINAL OPERATION.
aConnect the connectors.
aClip on the dashboard lower trim.
120278
121373
Page 134 of 241

87F-4
PARKING DISTANCE CONTROL
Parking distance control buzzer: Removal - Refitting
REAR PROXIMITY RADAR
87F
REMOVAL
I - REMOVAL PREPARATION OPERATION
aRemove:
-the upper bolt from the rear left-hand seat belt (see
Rear seat belt: Removal - Refitting) (MR 412,
59A, Safety equipment),
-the left-hand rear parcel shelf trim (see Rear par-
cel shelf side trim: Removal - Refitting) (MR
412, 71A, Body internal trim),
-the left-hand rear panel (see Rear panel lining:
Removal - Refitting) (MR 412, 71A, Body internal
trim),
-the rear left-hand quarter panel trim (see Quarter
panel trim: Removal - Refitting) (MR 412, 71A,
Body internal trim).
II - OPERATION FOR REMOVAL OF PART
CONCERNED
aDisconnect the connector (1) from the parking dis-
tance control buzzer.
aRemove:
-the plastic rivets (2) from the parking distance con-
trol buzzer,
-the parking distance control buzzer (3) .
REFITTING
I - REFITTING OPERATION FOR PART
CONCERNED
aRefit:
-the parking distance control buzzer,
-the parking distance control buzzer plastic rivets.
aConnect the parking distance control buzzer con-
nector.
II - FINAL OPERATION.
aRefit:
-the rear left-hand quarter panel trim (see Quarter
panel trim: Removal - Refitting) (MR 412, 71A,
Body internal trim),
-the left-hand rear panel (see Rear panel lining:
Removal - Refitting) (MR 412, 71A, Body internal
trim),
-the left-hand rear parcel shelf trim (see Rear par-
cel shelf side trim: Removal - Refitting) (MR
412, 71A, Body internal trim),
-the upper bolt from the rear left-hand seat belt (see
Rear seat belt: Removal - Refitting) (MR 412,
59A, Safety equipment).
121367
Page 135 of 241

87F-5
PARKING DISTANCE CONTROL
Proximity radar: Removal - Refitting
REAR PROXIMITY RADAR
87F
REMOVAL
I - REMOVAL PREPARATION OPERATION
aPosition the vehicle on a two-post lift (see Vehicle:
Towing and lifting) (MR 411, 02A, Lifting equip-
ment).
aRemove:
-the rear lights on the wing (see 81A, Rear lighting,
Rear wing light: Removal - Refitting, page 81A-
3) ,
-the rear bumper (see Rear bumper: Removal -
Refitting) (MR 412, 55A, Exterior protection).
II - OPERATION FOR REMOVAL OF PART
CONCERNED
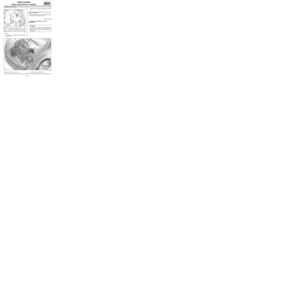
aDisconnect the connectors (1) from the proximity ra-
dar.aUnclip the proximity radars at (2) .
aRemove the proximity radars (3) .
REFITTING
I - REFITTING OPERATION FOR PART
CONCERNED
aClip the proximity radars onto the rear bumper.
aConnect the proximity radar connectors.
II - FINAL OPERATION.
aRefit:
-the rear bumper (see Rear bumper: Removal -
Refitting) (MR 412, 55A, Exterior protection),
-the rear lights on the wing (see 81A, Rear lighting,
Rear wing light: Removal - Refitting, page 81A-
3) . WARNING
The distance control radars are fragile. Handle with
care as the external part cannot withstand impacts.
121371
121370
Page 136 of 241

87F-6
PARKING DISTANCE CONTROL
Parking distance control computer: Removal - Refitting
REAR PROXIMITY RADAR
87F
REMOVAL
I - REMOVAL PREPARATION OPERATION
aDisconnect the battery (see 80A, Battery, Battery:
Removal - Refitting, page 80A-2) .
aRemove:
-the left-hand rear parcel shelf trim (see Rear par-
cel shelf side trim: Removal - Refitting) (MR
412, 71A, Body internal trim),
-the left-hand rear panel (see Rear panel lining:
Removal - Refitting) (MR 412, 71A, Body internal
trim).
II - OPERATION FOR REMOVAL OF PART
CONCERNED
aUndo the parking distance control computer bolts (1)
slightly.
aRemove the parking distance control computer (2)
upwards.aDisconnect the connector (3) from the parking dis-
tance control computer.
REFITTING
I - REFITTING OPERATION FOR PART
CONCERNED
aConnect the parking distance control computer con-
nector.
aRefit the parking distance control computer.
II - FINAL OPERATION.
aRefit:
-the left-hand rear panel (see Rear panel lining:
Removal - Refitting) (MR 412, 71A, Body internal
trim),
-the left-hand rear parcel shelf trim (see Rear par-
cel shelf side trim: Removal - Refitting) (MR
412, 71A, Body internal trim).
aConnect the battery (see 80A, Battery, Battery: Re-
moval - Refitting, page 80A-2) .
aIn the event of a replacement operation, carry out
the necessary operations using the Diagnostic tool
(see Fault finding - Replacement of components)
(MR 413, 87F, Parking distance control). Equipment required
Diagnostic tool
121369
121368