Page 73 of 281
Downloaded from www.Manualslib.com manuals search engine GWFLORID Maintenance Manual66
6. Remove the set bolts and the select lever assembly.
7. Remove the select lever subassembly.
8. Remove the shaft retainer on the shift shaft and the se-
lect lever.
Caution: Use a cord to fasten the shift lever in order to
make the operation convenient.Cord
9. Remove the shift shaft and the shift shaft dust cover.
Page 74 of 281
Downloaded from www.Manualslib.com manuals search engine 67Transmission
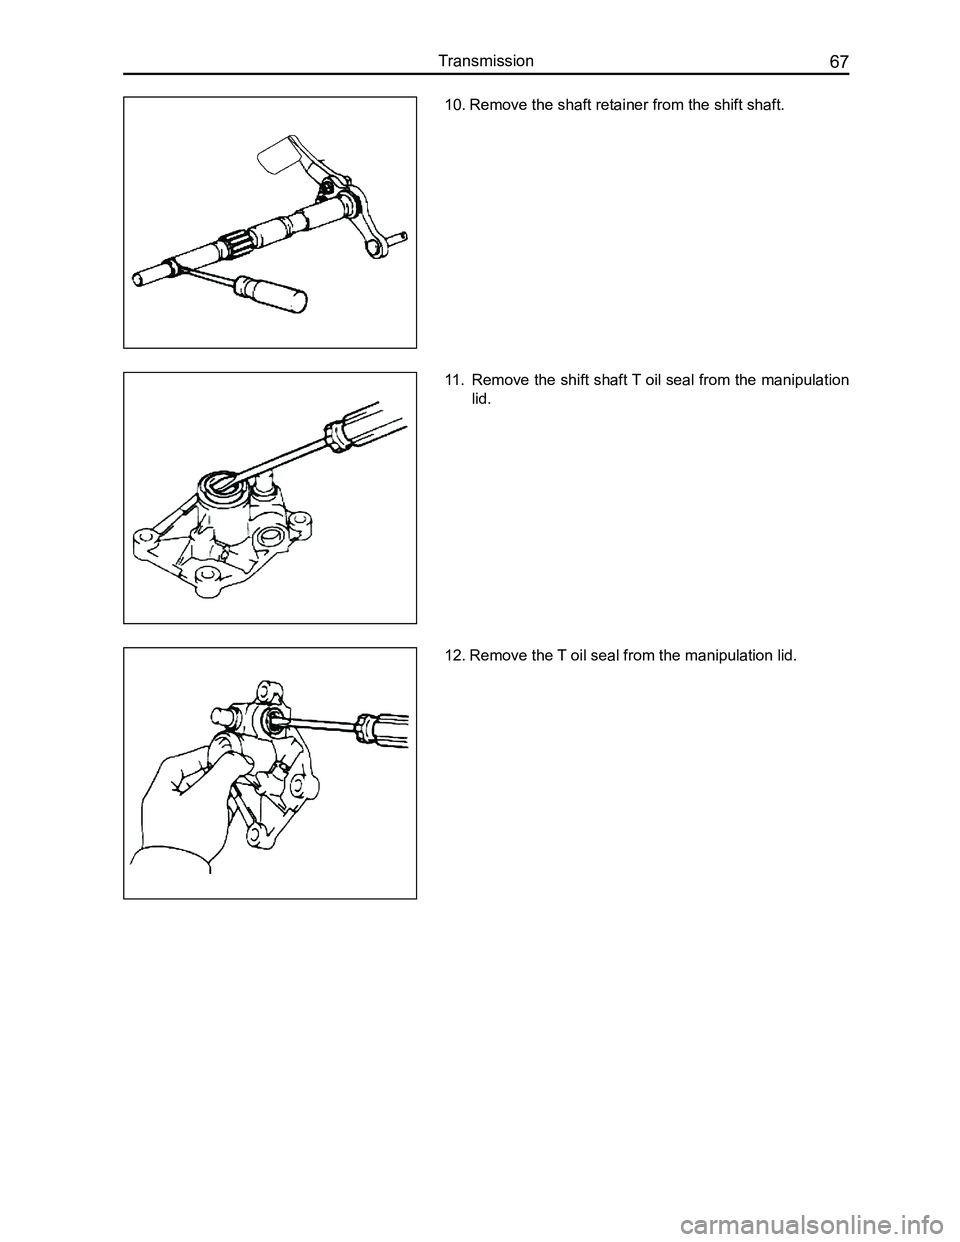
10. Remove the shaft retainer from the shift shaft.
11. Remove the shift shaft T oil seal from the manipulation
lid.
12. Remove the T oil seal from the manipulation lid.
Page 75 of 281
Downloaded from www.Manualslib.com manuals search engine GWFLORID Maintenance Manual68
Disassembling the Differential Subassembly
Components
T oil sealClutch housing
Tapered roller bearings
Elastic cylindrical pin
Odometer drive gear
Differential case
Differential ring gear
Bolt for flange face
Gasket
Planetary gear
Adjusting shim
Axle shaft gear
Planetary gear shaft
Planetary gear
Gasket
Axle shaft gear
Adjusting shim
Tapered roller bearings
Transmission case
Adjusting shim
T oil seal
123.6
: Specified torqueN·m
Page 76 of 281
Downloaded from www.Manualslib.com manuals search engine 69Transmission
1. Remove the tapered roller bearings of the left differen-
tial.
2. Remove the odometer drive gear from the differential.
3. Remove the tapered roller bearings of the right differen-
tial.
4. Remove the bolts for flange face of the differential ring
gear and the differential case.
Page 77 of 281
Downloaded from www.Manualslib.com manuals search engine GWFLORID Maintenance Manual70
5. After removing bolts for flange face from the differential
ring gear and the differential case, gently pound to re-
move the differential ring gear with a soft hammer.
6. Remove the elastic cylindrical pins from the differential
case and the gear shaft.
7. Remove 2 planetary gears, 2 axle shaft gears, 2 ad-
justing shims, and 2 gaskets from the inside of the dif-
ferential case.
Page 78 of 281
Downloaded from www.Manualslib.com manuals search engine 71Suspension System
Suspension System
Suspension System Technical Parameters ........................72
Front Suspension ...............................................................73
Subframe and Front Stabilizer Bar .....................................77
Lower Swing Arm................................................................80
Drive Shaft ........................................................................\
..84
Rear Suspension ................................................................86
Wheel and Tire ...................................................................89
Page 79 of 281

Downloaded from www.Manualslib.com manuals search engine GWFLORID Maintenance Manual72
Suspension System Technical Parameters
Main technical parameters
Suspension type and
composition
Front suspension typeMcPherson independent suspension
Front suspension componentsCoil spring, hydraulic telescopic shock absorber, stabilizer bar, lower swing
arm
Rear suspension typeCompound trailing arm semi-independent suspension
Rear suspension componentsCoil spring, hydraulic cylinder damper, & twist beam welded components
Wheel positional
parameters
(no load)
Front wheel camber-0° 43′ ±30′
Front wheel kingpin angle+10° 21′ ±30′
Front wheel kingpin caster+1° 49′ ±30′
Front wheel toe-in-0° 01′ ±15′
Rear wheel camber-0° 43′ ±30′
Rear wheel toe-in+0° 14′ ±15′
Wheel and tire parameters
Tire specifications: 15 × 6J (For 185/65R15 tires), 16 × 4T (For T125/70R16 tires)
Tire specification: 185/65 R15 88H
Spare tire specification: T125/70R16 96M
Tire pressure must be gauged when the tire is cool: Tire inflation pressure: 200±10 KPa
Spare tir e inflation pressure: 420±10 KPa
Tightening torque
PartCodeAssembly locations for
standard components
Tightening
torque
(N·m)
QuantityGlueGrade
Front
suspen-
sion
Q1861455TF2
(M14×1.5) + Q402
(d2=32 t=5) FD
Subframe & vehicle body (rear)145±15 2Red glue10.9
Q1861275TF2
(M12×1.25) + Q402
(d2=32) FD
Subframe & vehicle body (front)120±102Red glue10.9
Q1401020 (M10×1.25) FDSubframe strut bar mounting bolt49±54Red glue10.9
2904011-S08Swing arm & steering knuckle98±102Red glue
Q1401495 (t=4)
(M14×1.5) FDSwing arm & subframe (front)180±102Red glue10.9
Q1401280 (M12×1.25) FDSwing arm & subframe (rear)120±102Red glue10.9
2904013-S08Swing arm & subframe (rear)/2
2905011-S08Front shock upper assembly loca-
tion40±56
Q32014 (M14×1.5) FDFront shock lower assembly loca-
tion132±104Red glue10.9
Q1400830 (d2=13.5)F r o n t s t a b i l i z e r b a r m o u n t i n g
bracket37±44Red glue
Q32608Front stabilizer bar hanger rod16±24
Rear sus-
pension
Q151B12110TF2+Q402
(d2=35 t=5) FDTwist beam & vehicle body80±102Red glue10.9 grade
with guide
Q32012T13F2
(M12×1.25) FDRear shock absorber & twist beam120±102Red glue10 grade
Q341C10Rear shock absorber & vehicle
body64±54
Wheel3101014-K00Wheel nut (M12×1.25)110±1016
Q30612FD (M12×1.25)Wheel nut cone nut110±1016
Page 80 of 281

Downloaded from www.Manualslib.com manuals search engine 73Suspension System
Steering knuckle assembly removal
1. Preparation
First, remove the front wheel, the front shock absorber with
coil spring assembly, and the steering knuckle coupling
bolt in turn. For detailed steps, please refer to the removal
of the wheel and the front shock absorber with coil spring
assembly.
2. Remove propeller shaft nuts
(a) First, pry the flattened areas of the propeller shaft's nuts
into a circle with a chisel.
(b) Half-insert a long bolt or metal bar into the brake disc
holes to loosen the nuts (shown on the left).
Tightening torque: 225±20 N·m
Front Suspension
Components
(c) Pull out the mount point on the steering knuckle to
separate it from the mounting bracket under the front
shock absorber. Prop a wood stick or metal bar against
the propeller shaft's outer end, and then hammer the
stick or metal bar to get the propeller shaft out of the
hub (shown on the left).
Caution: When hammering, prop it up against the shaft
end's location holes (middle recess). Be sure not to
damage the thread.
Insert into this hole
Press plate on the front shock absorber column
Front shock absorber with coil spring assembly
Front stabilizer bar mounting bracket
Front stabilizer bar bushing
Front stabilizer bar
Lower swing arm assembly RH
Lower swing arm assembly LH
Subframe assembly
Front stabilizer bar hanger rod subassembly
Subframe strut bar