Page 1924 of 3000
U151F AUTOMATIC TRANSAXLE – AUTOMATIC TRANSAXLE UNITAX–183
AX
9. INSPECT TRANSMISSION OIL CLEANER MAGNET
(a) Remove the magnets and use them to collect any
steel chips. Examine the chips and particles in the
pan and on the magnet to determine what type of
wear has occurred in the transaxle:
Result:
Steel (magnetic):
Wear of the bearing, gear and plate
Brass (non-magnetic):
Wear of the bushing
10. DISCONNECT TRANSMISSION WIRE
(a) Remove the 7 connectors from the shift solenoid
valves.
(b) Remove the bolt, lock plate and temperature
sensor.
11. REMOVE TRANSMISSION WIRE
(a) Remove the bolt and transmission wire from the
transaxle case.
12. REMOVE VALVE BODY OIL STRAINER ASSEMBLY
(a) Remove the 3 bolts and oil strainer.
(b) Remove the O-ring from the oil strainer.
AT00103E03
C091927E02
D003547E05
C091931
C091932E01
Page 1925 of 3000
AX–184U151F AUTOMATIC TRANSAXLE – AUTOMATIC TRANSAXLE UNIT
AX
13. REMOVE TRANSMISSION VALVE BODY ASSEMBLY
(a) Support the valve body assembly and remove the
17 bolts and valve body assembly.
14. REMOVE GOVERNOR APPLY GASKET NO.1
(a) Remove the governor apply gasket No.1 from the
transaxle case.
15. REMOVE TRANSAXLE CASE 2ND BRAKE GASKET
(a) Remove the transaxle case 2nd brake gasket from
the transaxle case.
16. REMOVE BRAKE DRUM GASKET
(a) Remove the brake drum gasket from the transaxle
case.
17. REMOVE CHECK BALL BODY
(a) Remove the check ball body and spring from the
transaxle case.
C091933
C083127
C083128
C083129
D003554E01
Page 1948 of 3000
AX–236U151F AUTOMATIC TRANSAXLE – OIL PUMP
AX
TRANSMISSION
U151F AUTOMATIC TRANSAXLE
OIL PUMP
COMPONENTS
C114866E01
Page 1972 of 3000
AX–250U151F AUTOMATIC TRANSAXLE – DIRECT CLUTCH
AX
TRANSMISSION
U151F AUTOMATIC TRANSAXLE
DIRECT CLUTCH
COMPONENTS
C119011E03
Page 1980 of 3000
AX–258U151F AUTOMATIC TRANSAXLE – UNDERDRIVE PLANETARY GEAR
AX
TRANSMISSION
U151F AUTOMATIC TRANSAXLE
UNDERDRIVE PLANETARY GEAR
COMPONENTS
C114868E03
Page 1986 of 3000
AX–264U151F AUTOMATIC TRANSAXLE – UNDERDRIVE CLUTCH
AX
TRANSMISSION
U151F AUTOMATIC TRANSAXLE
UNDERDRIVE CLUTCH
COMPONENTS
C114869E03
Page 2031 of 3000
TF–8TRANSFER – TRANSFER ASSEMBLY
TF
REMOVAL
1. REMOVE ENGINE AND TRANSAXLE
HINT:
(See page EM-26)
2. REMOVE AUTOMATIC TRANSMISSION WITH
TRANSFER
HINT:
(See page AX-164)
3. REMOVE NO. 1 TRANSFER CASE PLUG
(a) Remove the No. 1 transfer case plug.
(b) Remove the No. 1 gasket from the transfer case No.
1 plug.
4. REMOVE NO. 2 TRANSFER CASE PLUG
(a) Remove the No. 2 transfer case plug.
(b) Remove the No. 2 gasket from the No. 2 transfer
case plug.
5. REMOVE TRANSFER DRAIN PLUG
(a) Remove the transfer drain plug and bleed the oil.
(b) Remove the drain gasket from the transfer drain
plug.
6. REMOVE TRANSFER ASSEMBLY
(a) Remove the 2 bolts and 6 bolts.
(b) Using a plastic hammer, remove the transfer
assembly from the transaxle assembly.
NOTICE:
• Remove the transfer assembly from the
transaxle assembly without tilting it.
• When removing the transfer assembly, do not
hold onto the oil seal parts on both sides of
the assembly.
C082977E01
C082785E01
Page 2032 of 3000

TRANSFER – TRANSFER ASSEMBLYTF–9
TF
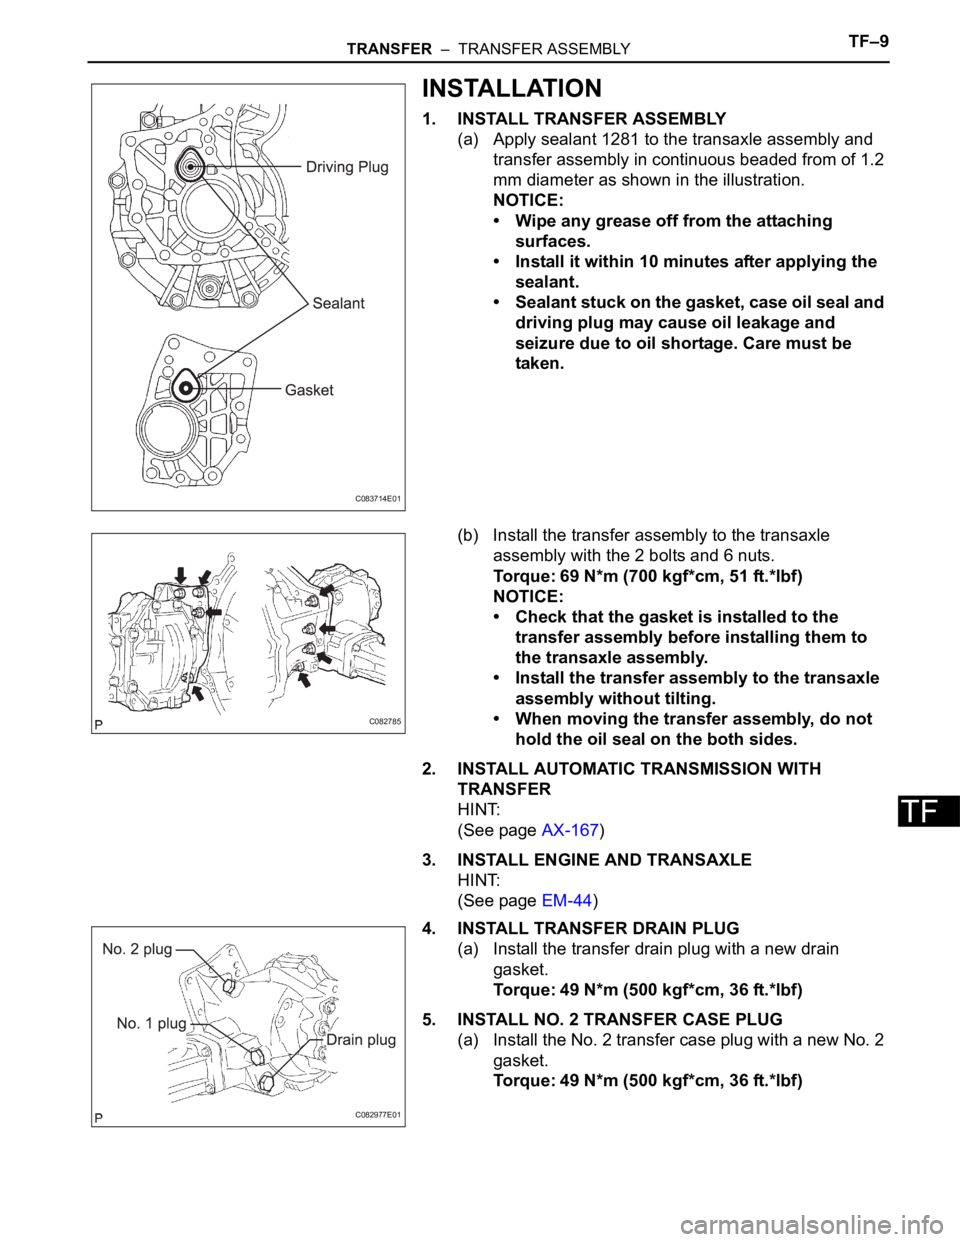
INSTALLATION
1. INSTALL TRANSFER ASSEMBLY
(a) Apply sealant 1281 to the transaxle assembly and
transfer assembly in continuous beaded from of 1.2
mm diameter as shown in the illustration.
NOTICE:
• Wipe any grease off from the attaching
surfaces.
• Install it within 10 minutes after applying the
sealant.
• Sealant stuck on the gasket, case oil seal and
driving plug may cause oil leakage and
seizure due to oil shortage. Care must be
taken.
(b) Install the transfer assembly to the transaxle
assembly with the 2 bolts and 6 nuts.
Torque: 69 N*m (700 kgf*cm, 51 ft.*lbf)
NOTICE:
• Check that the gasket is installed to the
transfer assembly before installing them to
the transaxle assembly.
• Install the transfer assembly to the transaxle
assembly without tilting.
• When moving the transfer assembly, do not
hold the oil seal on the both sides.
2. INSTALL AUTOMATIC TRANSMISSION WITH
TRANSFER
HINT:
(See page AX-167)
3. INSTALL ENGINE AND TRANSAXLE
HINT:
(See page EM-44)
4. INSTALL TRANSFER DRAIN PLUG
(a) Install the transfer drain plug with a new drain
gasket.
Torque: 49 N*m (500 kgf*cm, 36 ft.*lbf)
5. INSTALL NO. 2 TRANSFER CASE PLUG
(a) Install the No. 2 transfer case plug with a new No. 2
gasket.
Torque: 49 N*m (500 kgf*cm, 36 ft.*lbf)
C083714E01
C082785
C082977E01