Page 460 of 1449

ENGINE OVERHAUL -Specifications11B-6
Items Tightening torque N·m
Camshaft sprocket bolt88±10
Fuel system
Throttle body bolt19±3
EGR valve bolt20±2
Fuel pressure regulator bolt8.8±2.0
Delivery pipe and injector bolt11±1
Vacuum hose and pipe bolt11±1
Solenoid assembly bolt9±1
Vacuum tank bracket bolt9±1
Secondary air system, intake manifold
Exhaust manifold heat protector bolt14±1
Vacuum hose and pipe bolt11±1
Air pipe assembly bolt (eye bolt)49±5
Air pipe assembly bolt (M6 flange)11±1
Air pipe assembly bolt (M8 flange)24±3
Air pipe assembly bolt (M8 washer)14±1
Air control valve assembly bolt22±4
Air control valve bracket bolt22±4
MDP sensor bolt5±1
Intake manifold stay bolt31±3
Intake manifold bolt (M8)20±2
Intake manifold bolt nut (M8)36±6
Exhaust manifold
Engine hanger bolt19±3
Turbocharger heat protector bolt14±1
O2sensor44±5
Exhaust fitting bracket bolt47±6
Exhaust fitting bolt nut59±5
Air outlet fitting bolt19±1
Oil return pipe bolt (flange)14±1
Oil return pipe bolt (washer)9±1
Turbocharger assembly and pipe bolt, nut59±5
Oil pipe bolt (M10 eye bolt)17±2
Oil pipe bolt (M12 eye bolt)31±2
Oil pipe bolt (M12 flange)11±1
Water pipe bolt (flange)10±1
Water pipe bolt (eye bolt)42±7
Exhaust manifold nut (M8)33±6
Exhaust manifold nut (M10)55±10
Water pump, water hose
Engine coolant temperature sensor29±10
Engine coolant temperature gauge unit10.8±1.0
Page 461 of 1449

ENGINE OVERHAUL -Specifications11B-7
Items Tightening torque N·m
Water outlet fitting bolt10±1
Thermostat housing bolt23±4
Water inlet pipe bolt (M6)10±1
Water inlet pipe bolt (M8)13±2
Water pump bolt14±1
Knock sensor23±2
Rocker arm, camshaft
Cam position sensor bolt8.8±1.0
Cover bolt10±2
Cam position sensing cylinder bolt22±4
Cam position sensor support bolt14±1
Bearing cap bolt20±1
Oil delivery body bolt11±1
Cylinder head, valve
Cylinder head bolt78±2→Completely loosen→20±2→90_+90_
Oil pump, oil pan
Drain plug39±5
Oil pan bolt9±3
Oil screen bolt19±3
Baffle plate bolt22±4
Oil pressure switch19±3
Oil cooler bypass valve54±5
Relief plug44±5
Oil filter bracket bolt19±3
Plug cap23±3
Flange bolt36±3
Oil pump case bolt23±3
Oil pump cover bolt17±1
Oil pump cover screw10±2
Piston, connecting rod
Connecting rod cap nut20±2+90_-94_
Crankshaft, cylinder block
Flywheel bolt132±5
Rear plate bolt11±1
Bell housing cover bolt9±1
Rear oil seal case bolt11±1
Beam bearing cap bolt25±2+90_- 100_
Check valve32±2
Throttle body
Throttle position sensor bolt2.0±0.5
Turbocharger
Waste gate actuator bolt11.3±1.5
Page 469 of 1449
ENGINE OVERHAUL -Timing Belt11B-15
AE"TIMING BELT B REMOVAL
To ensure that the timing belt is assembled in the same
direction when reused, using chalk, etc., make an arrow
showing the rotation direction on the back surface of the
timing belt.
AF"COUNTER BALANCE SHAFT SPROCKET
REMOVAL
1. Fix the counter balance shaft sprocket with the special
tool.
2. Remove the installation bolt of the counter balance shaft.
AG"CRANKSHAFT SPROCKET B REMOVAL
Use the special tool to remove the sprocket if it is stuck
and hard to remove.
AH"CAMSHAFT SPROCKET BOLT REMOVAL
Hold the hexagon part of the camshaft with a wrench, and
remove the camshaft sprocket bolt.
INSTALLATION SERVICE POINTS
"AACAMSHAFT SPROCKET BOLT INSTALLATION
Hold the hexagon part of the camshaft with a wrench, and
tighten the camshaft sprocket bolt at the specified torque
88±10 N•m.
MD998785
MD998778
Page 471 of 1449

ENGINE OVERHAUL -Timing Belt11B-17
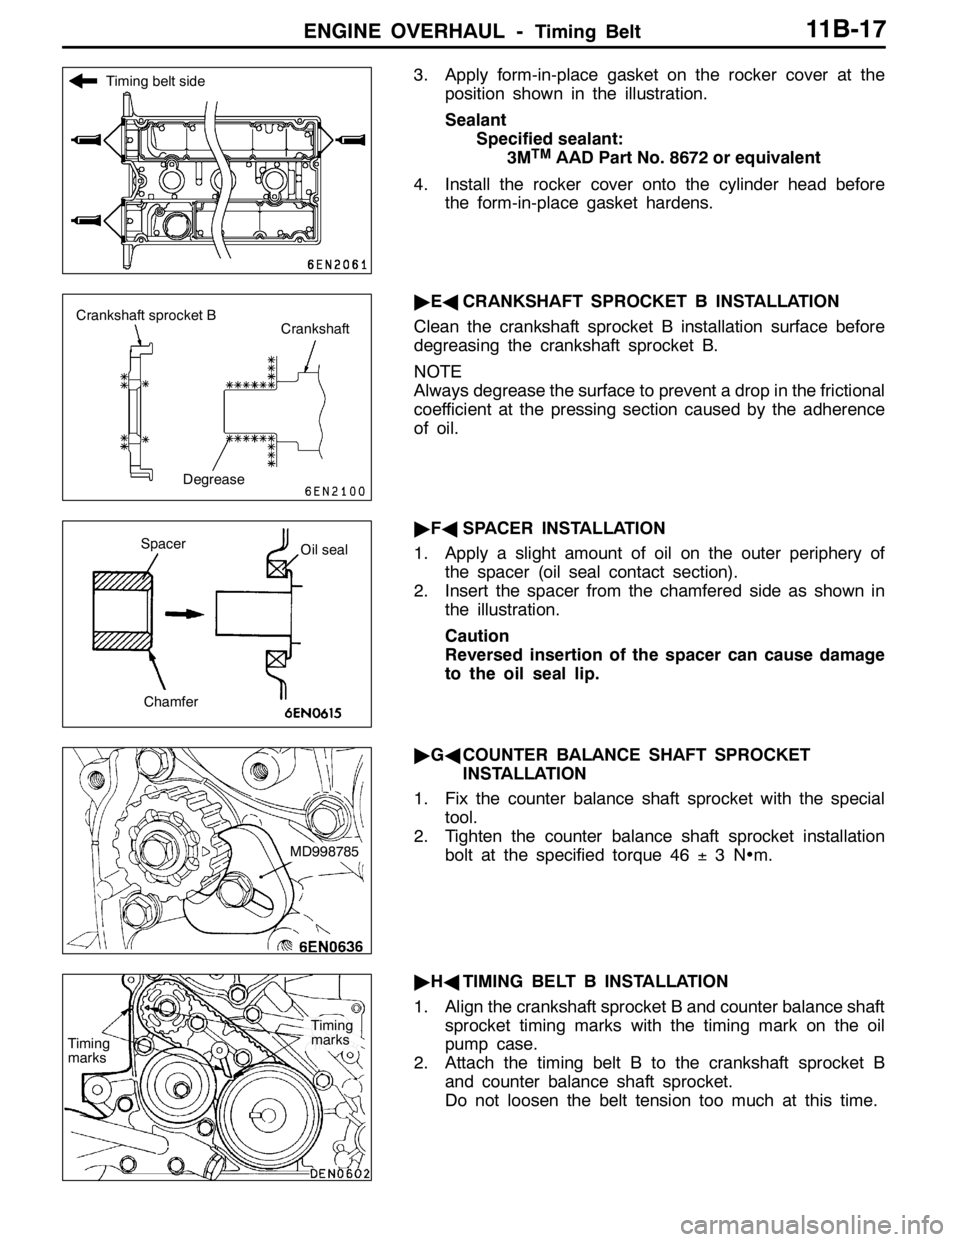
3. Apply form-in-place gasket on the rocker cover at the
position shown in the illustration.
Sealant
Specified sealant:
3M
TMAAD Part No. 8672 or equivalent
4. Install the rocker cover onto the cylinder head before
the form-in-place gasket hardens.
"EACRANKSHAFT SPROCKET B INSTALLATION
Clean the crankshaft sprocket B installation surface before
degreasing the crankshaft sprocket B.
NOTE
Always degrease the surface to prevent a drop in the frictional
coefficient at the pressing section caused by the adherence
of oil.
"FASPACER INSTALLATION
1. Apply a slight amount of oil on the outer periphery of
the spacer (oil seal contact section).
2. Insert the spacer from the chamfered side as shown in
the illustration.
Caution
Reversed insertion of the spacer can cause damage
to the oil seal lip.
"GACOUNTER BALANCE SHAFT SPROCKET
INSTALLATION
1. Fix the counter balance shaft sprocket with the special
tool.
2. Tighten the counter balance shaft sprocket installation
bolt at the specified torque 46±3N•m.
"HATIMING BELT B INSTALLATION
1. Align the crankshaft sprocket B and counter balance shaft
sprocket timing marks with the timing mark on the oil
pump case.
2. Attach the timing belt B to the crankshaft sprocket B
and counter balance shaft sprocket.
Do not loosen the belt tension too much at this time.
Timing belt side
Crankshaft sprocket B
Crankshaft
Degrease
Spacer
Oil seal
Chamfer
MD998785
Timing
marks
Timing
marks
Page 473 of 1449

ENGINE OVERHAUL -Timing Belt11B-19
Caution
(1) Measure when the belt’s surface temperature is
close to room temperature.
(2) Make sure that water or oil, etc., do not get on
the mike.
(3) If strong winds contact the mike or if noise is
generated in the area while measuring, a value
that differs from the actual value may be indicated.
(4) If the measurement is carried out with the mike
contacted against the belt, a value that differs
from the actual value may be indicated.
(5) Do not measure while the engine is running.
11. Disconnect MUT-II.
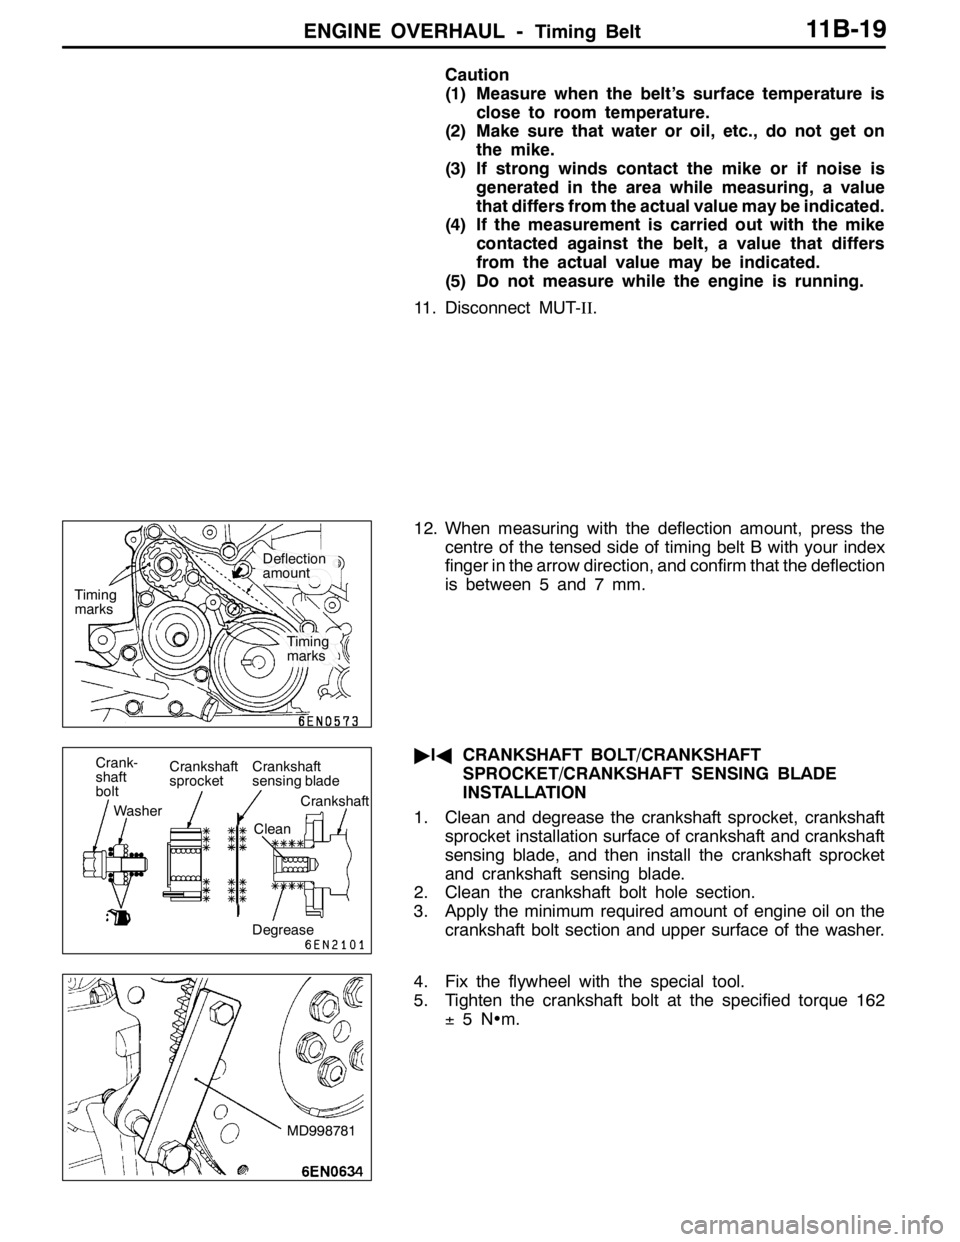
12. When measuring with the deflection amount, press the
centre of the tensed side of timing belt B with your index
finger in the arrow direction, and confirm that the deflection
is between 5 and 7 mm.
"IACRANKSHAFT BOLT/CRANKSHAFT
SPROCKET/CRANKSHAFT SENSING BLADE
INSTALLATION
1. Clean and degrease the crankshaft sprocket, crankshaft
sprocket installation surface of crankshaft and crankshaft
sensing blade, and then install the crankshaft sprocket
and crankshaft sensing blade.
2. Clean the crankshaft bolt hole section.
3. Apply the minimum required amount of engine oil on the
crankshaft bolt section and upper surface of the washer.
4. Fix the flywheel with the special tool.
5. Tighten the crankshaft bolt at the specified torque 162
±5N•m.
Timing
marks
Timing
marks
Deflection
amount
Crank-
shaft
bolt
WasherCrankshaft
sprocketCrankshaft
sensing blade
Crankshaft
Clean
Degrease
MD998781
Page 474 of 1449

ENGINE OVERHAUL -Timing Belt11B-20
"JAOIL PUMP SPROCKET INSTALLATION
1. Stop the rotation of the counter balance shaft in the same
manner as for removal.
2. Install the oil pump sprocket.
3. Apply the minimum required amount of engine oil on the
flange nut seat surface.
4. Tighten the flange nut at the specified torque 54±5
N•m.
"KAAUTO TENSIONER INSTALLATION
1. If the auto tensioner rod is in the extended state, set
it with the following steps.
(1) Set the rod of the auto tensioner into a vice so that
it is straight and not inclined.
(2) Press in the rod gradually with the vice, and align
the rod’s set hole A with the cylinder’s set hole B.
(3) Insert a wire (diameter 1.4 mm) into the set holes.
(4) Remove the auto tensioner from the vice.
2. Install the auto tensioner.
Do not remove the wire until the timing belt has been
installed.
"LATENSIONER PULLEY INSTALLATION
Set the tensioner pulley as shown in the illustration.
"MATIMING BELT INSTALLATION
1. Set the timing mark on the exhaust side camshaft sprocket
so that it is deviated by one tooth in the counterclockwise
direction from the timing mark on the rocker cover.
NOTE
Even if the sprocket and rocker cover timing marks are
aligned, the exhaust camshaft will return in the
counterclockwise direction by the force of the valve spring
and will stabilize at a position deviated by one tooth.
Phillips driver
A
B
Tensioner pulley holes
Timing marks
Page 477 of 1449

ENGINE OVERHAUL -Timing Belt11B-23
14. Using the special tool, rotate the tensioner pulley in the
counterclockwise direction to tense the timing belt, and
then fix by temporarily tightening the tensioner fixing bolt.
NOTE
Remove the deflection of the timing belt between the
intake side and exhaust side camshafts.
15. Rotate the crankshaft in the clockwise direction, and set
the timing mark at the No. 1 cylinder compression top
dead centre.
16. Set the special tool, and screw it in until the wire inserted
when the auto tensioner was installed slightly moves.
17. Loosen the tensioner pulley fixing bolt.
Caution
The timing belt will loosen at this time due to the
rotation of the intake and exhaust camshafts, so make
sure that the timing belt does not deviate.
18. Rotate the special tool and torque wrench in the
counterclockwise direction to remove the timing belt
deflection.
19. From that state, return to the position where the torque
wrench scale reads 3.5 N•m, and then tighten the fixing
bolt.
20. Remove the special tool installed in step 16.
21. Rotate the crankshaft two rotations in the clockwise
direction, and let stand for approx. 15 minutes.
22. Confirm whether the wire inserted when the auto tensioner
was installed can be pulled out easily. If it can be removed
easily, the belt tension is appropriate, so remove the wire.
If the auto tensioner rod’s protrusion amount is at the
standard value, the tension is appropriate.
Standard value: 3.8 - 4.5 mm
23. If the wire cannot be pulled out easily, repeat steps 16
to 21, and tense the belt to the appropriate tension.
Caution
When the crankshaft bolt has been rotated in the
counterclockwise direction, always check the crank-
shaft bolt’s tightening torque. If loosen, re-tighten.
MD998767
MD998738
MD998767
Protru-
sion
amount
Page 483 of 1449

ENGINE OVERHAUL -Secondary Air System and Intake Manifold11B-29
INSTALLATION SERVICE POINTS
"AAINTAKE MANIFOLD STAY INSTALLATION
Check that the intake manifold stay is seated against the
intake manifold and cylinder block boss, and then tighten
at the specified torque 31±3N•m.
"BAMANIFOLD DIFFERENTIAL PRESSURE (MDP)
SENSOR INSTALLATION
Caution
Make sure not to apply impact against the sensor when
installing.
Do not use a sensor that has been dropped.
"CAAIR CONTROL VALVE BRACKET INSTALLATION
1. Temporarily tighten the air control valve bracket and
engine hanger with the bolt for tightening with the intake
manifold.
2. Tighten the bolt 1 shown in the illustration at the specified
torque 23±4N•m.
3. Tighten the bolt 2 shown in the illustration at the specified
torque 36±6N•m.
4. Tighten the bolt 3 shown in the illustration with the engine
hanger at the specified torque 22±4N•m.
"DAAIR PIPE ASSEMBLY INSTALLATION
1. Temporarily tighten air pipe assembly onto the air control
valve.
2. Tighten the bolts 1 and 2 shown in the illustration to
the exhaust manifold at the specified torque 49±5N•m.
3. Tighten the bolt 3 shown in the illustration to the air control
valve at the specified torque 24±3N•m.
4. Tighten the bolt 4 shown in the illustration to the cam
position sensor support at the specified toque 11±1
N•m.
5. Tighten the bolt 5 shown in the illustration to the exhaust
manifold at the specified torque 14±1N•m.
Intake manifold stay
1
23
1
5
23
4