Page 1322 of 1449

54A-2
CHASSIS
ELECTRICAL
CONTENTS
BATTERY 4..............................
SERVICE SPECIFICATION 4....................
ON-VEHICLE SERVICE 4......................
Fluid Level and Specific Gravity Check 4........
Charging 4.................................
Battery Testing Procedure 5...................
IGNITION SWITCH AND IMMOBILIZER
SYSTEM 6...............................
SPECIAL TOOLS 6............................
TROUBLESHOOTING 6........................
IMMOBILIZER-ECU CHECK 10.................
IGNITION SWITCH 11..........................
COMBINATION METER 14................
SERVICE SPECIFICATIONS 14.................
SEALANT 14..................................
SPECIAL TOOLS 15...........................
TROUBLESHOOTING 15.......................
ON-VEHICLE SERVICE 19.....................Speedometer Check 19......................
Tachometer Check 20........................
Fuel Gauge Unit Check 20....................
Engine Coolant Temperature Gauge
Unit Check 21...............................
COMBINATION METER 22.....................
HEADLAMP ASSEMBLY 24...............
SERVICE SPECIFICATIONS 24.................
TROUBLESHOOTING 24.......................
ON-VEHICLE SERVICE 24.....................
Headlamp Aiming 24.........................
Headlamp Intensity Measurement 28...........
Headlamp Bulb(low beam)Replacement28 ....
Headlamp Bulb(high beam)Replacement29 ...
Position Lamp Bulb Replacement29 ...........
Front Turn Signal Lamp Bulb Replacement29 ...
Headlamp Auto Cut Adjustment Procedure29 ...
HeadlampAuto Cut Function Check 29.........
HEADLAMP ASSEMBLY 30....................
CONTINUED ON NEXT PAGE
Page 1323 of 1449

54A-3
SIDE TURN-SIGNAL LAMP 31............
SPECIAL TOOL 31............................
SIDE TURN-SIGNAL LAMP 31..................
ROOM LAMP 31.........................
TROUBLESHOOTING 31.......................
REAR COMBINATION LAMP 32...........
SPECIAL TOOL 32............................
TROUBLESHOOTING 32.......................
REAR COMBINATION LAMP 32................
HIGH-MOUNTED STOP LAMP 34.........
ON-VEHICLE SERVICE 34......................
High-mounted Stop Lamp Bulb Replacement 34.
HIGH-MOUNTED STOP LAMP 34................
LICENCE PLATE LAMP 35...............
ON-VEHICLE SERVICE 35.....................
License Plate Lamp Replacement 35...........
LICENCE PLATE LAMP 35.....................
HAZARD WARNING LAMP SWITCH 36....
SPECIAL TOOL 36............................
HAZARD WARNING LAMP SWITCH 36.........
HORN 37................................
CIGARETTE LIGHTER 37.................
COLUMN SWITCH 38....................
SPECIAL TOOL 38............................
COLUMN SWITCH 38..........................
CLOCK 40...............................
SPECIAL TOOL 40............................
CLOCK 40....................................
POLE ANTENNA 41......................
ROOF ANTENNA 42......................
DEFOGGER 42...........................
TROUBLESHOOTING 42......................
ON-VEHICLE SERVICE 43.....................
Printed Heater Check 43......................
Defogger Relay Continuity Check 43...........
DEFOGGER SWITCH 43.......................
Page 1349 of 1449

CHASSIS ELECTRICAL -Headlamp AssemblyCHASSIS ELECTRICAL -Headlamp AssemblyCHASSIS ELECTRICAL -Headlamp Assembly54A-29
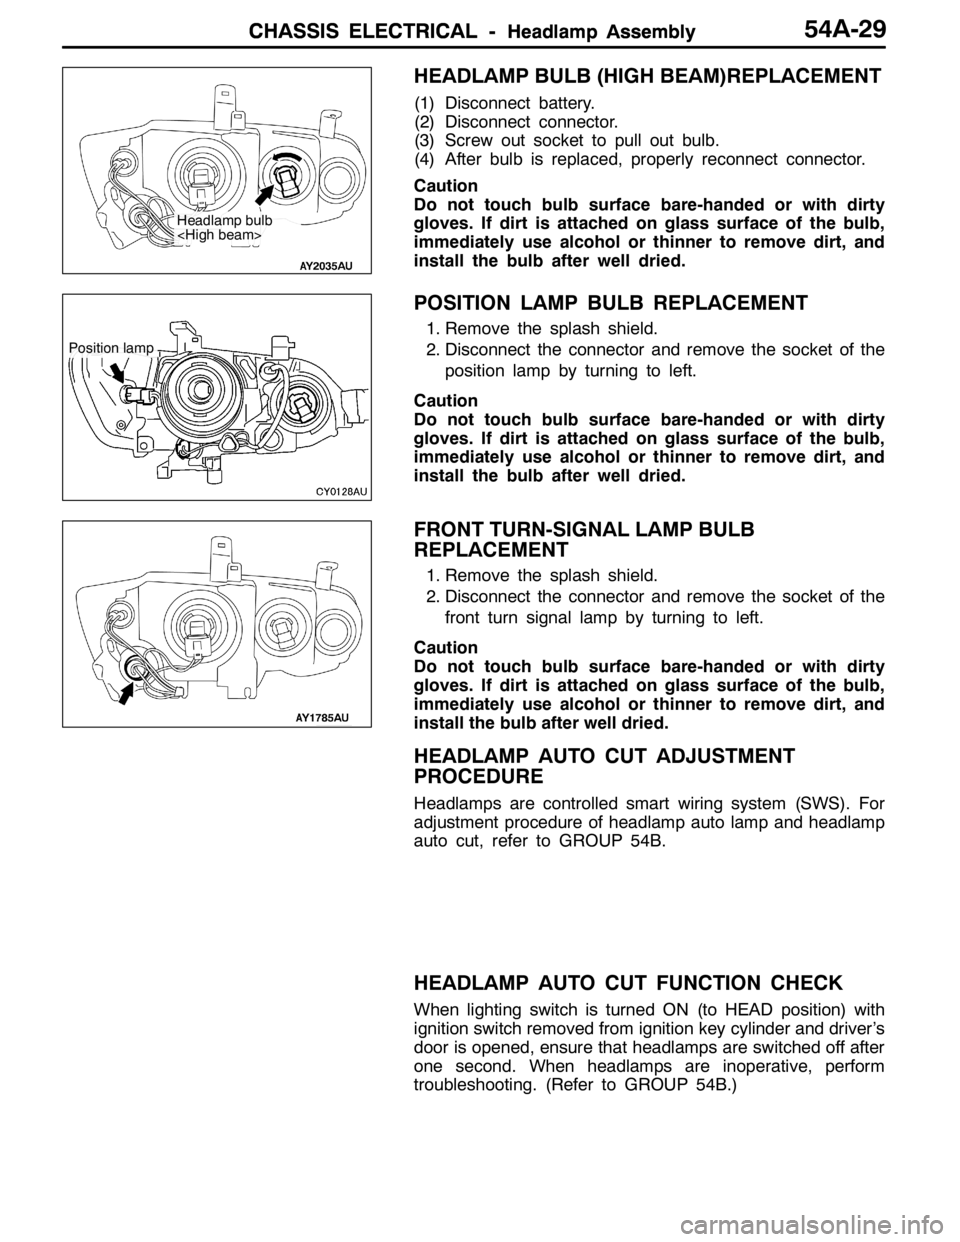
HEADLAMP BULB (HIGH BEAM)REPLACEMENT
(1) Disconnect battery.
(2) Disconnect connector.
(3) Screw out socket to pull out bulb.
(4) After bulb is replaced, properly reconnect connector.
Caution
Do not touch bulb surface bare-handed or with dirty
gloves. If dirt is attached on glass surface of the bulb,
immediately use alcohol or thinner to remove dirt, and
install the bulb after well dried.
POSITION LAMP BULB REPLACEMENT
1. Remove the splash shield.
2. Disconnect the connector and remove the socket of the
position lamp by turning to left.
Caution
Do not touch bulb surface bare-handed or with dirty
gloves. If dirt is attached on glass surface of the bulb,
immediately use alcohol or thinner to remove dirt, and
install the bulb after well dried.
FRONT TURN-SIGNAL LAMP BULB
REPLACEMENT
1. Remove the splash shield.
2. Disconnect the connector and remove the socket of the
front turn signal lamp by turning to left.
Caution
Do not touch bulb surface bare-handed or with dirty
gloves. If dirt is attached on glass surface of the bulb,
immediately use alcohol or thinner to remove dirt, and
install the bulb after well dried.
HEADLAMP AUTO CUT ADJUSTMENT
PROCEDURE
Headlamps are controlled smart wiring system (SWS). For
adjustment procedure of headlamp auto lamp and headlamp
auto cut, refer to GROUP 54B.
HEADLAMP AUTO CUT FUNCTION CHECK
When lighting switch is turned ON (to HEAD position) with
ignition switch removed from ignition key cylinder and driver’s
door is opened, ensure that headlamps are switched off after
one second. When headlamps are inoperative, perform
troubleshooting. (Refer to GROUP 54B.)
Headlamp bulb
Position lamp
Page 1388 of 1449

SWS -TroubleshootingSWS -Troubleshooting54B-24
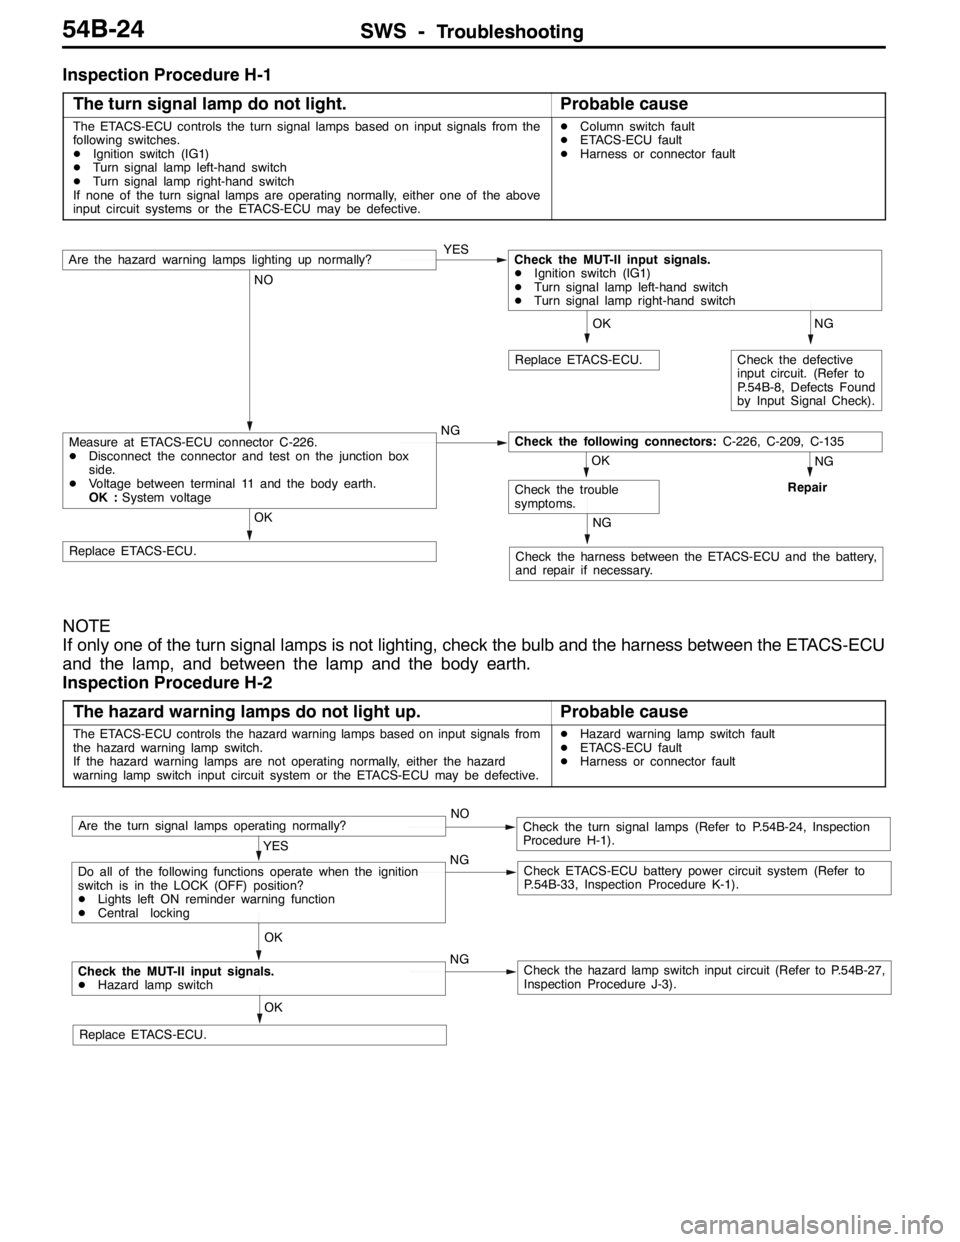
Inspection Procedure H-1
The turn signal lamp do not light.
Probable cause
The ETACS-ECU controls the turn signal lamps based on input signals from the
following switches.
DIgnition switch (IG1)
DTurn signal lamp left-hand switch
DTurn signal lamp right-hand switch
If none of the turn signal lamps are operating normally, either one of the above
input circuit systems or the ETACS-ECU may be defective.DColumn switch fault
DETACS-ECU fault
DHarness or connector fault
NG
Check the defective
input circuit. (Refer to
P.54B-8, Defects Found
by Input Signal Check).
OK
Replace ETACS-ECU.
NG
Repair
NG
Check the harness between the ETACS-ECU and the battery,
and repair if necessary.Replace ETACS-ECU.
OK
OK
Check the trouble
symptoms.
NO
Measure at ETACS-ECU connector C-226.
DDisconnect the connector and test on the junction box
side.
DVoltage between terminal 11 and the body earth.
OK :System voltageNGCheck the following connectors:C-226, C-209, C-135
Are the hazard warning lamps lighting up normally?YESCheck the MUT-II input signals.
DIgnition switch (IG1)
DTurn signal lamp left-hand switch
DTurn signal lamp right-hand switch
NOTE
If only one of the turn signal lamps is not lighting, check the bulb and the harness between the ETACS-ECU
and the lamp, and between the lamp and the body earth.
Inspection Procedure H-2
The hazard warning lamps do not light up.
Probable cause
The ETACS-ECU controls the hazard warning lamps based on input signals from
the hazard warning lamp switch.
If the hazard warning lamps are not operating normally, either the hazard
warning lamp switch input circuit system or the ETACS-ECU may be defective.DHazard warning lamp switch fault
DETACS-ECU fault
DHarness or connector fault
OK
Replace ETACS-ECU.
OK
Check the MUT-II input signals.
DHazard lamp switchNGCheck the hazard lamp switch input circuit (Refer to P.54B-27,
Inspection Procedure J-3).
YES
Do all of the following functions operate when the ignition
switch is in the LOCK (OFF) position?
DLights left ON reminder warning function
DCentral lockingNGCheck ETACS-ECU battery power circuit system (Refer to
P.54B-33, Inspection Procedure K-1).
Are the turn signal lamps operating normally?NOCheck the turn signal lamps (Refer to P.54B-24, Inspection
Procedure H-1).