Page 438 of 1449

ENGINE -Cylinder Head Gasket11A-32
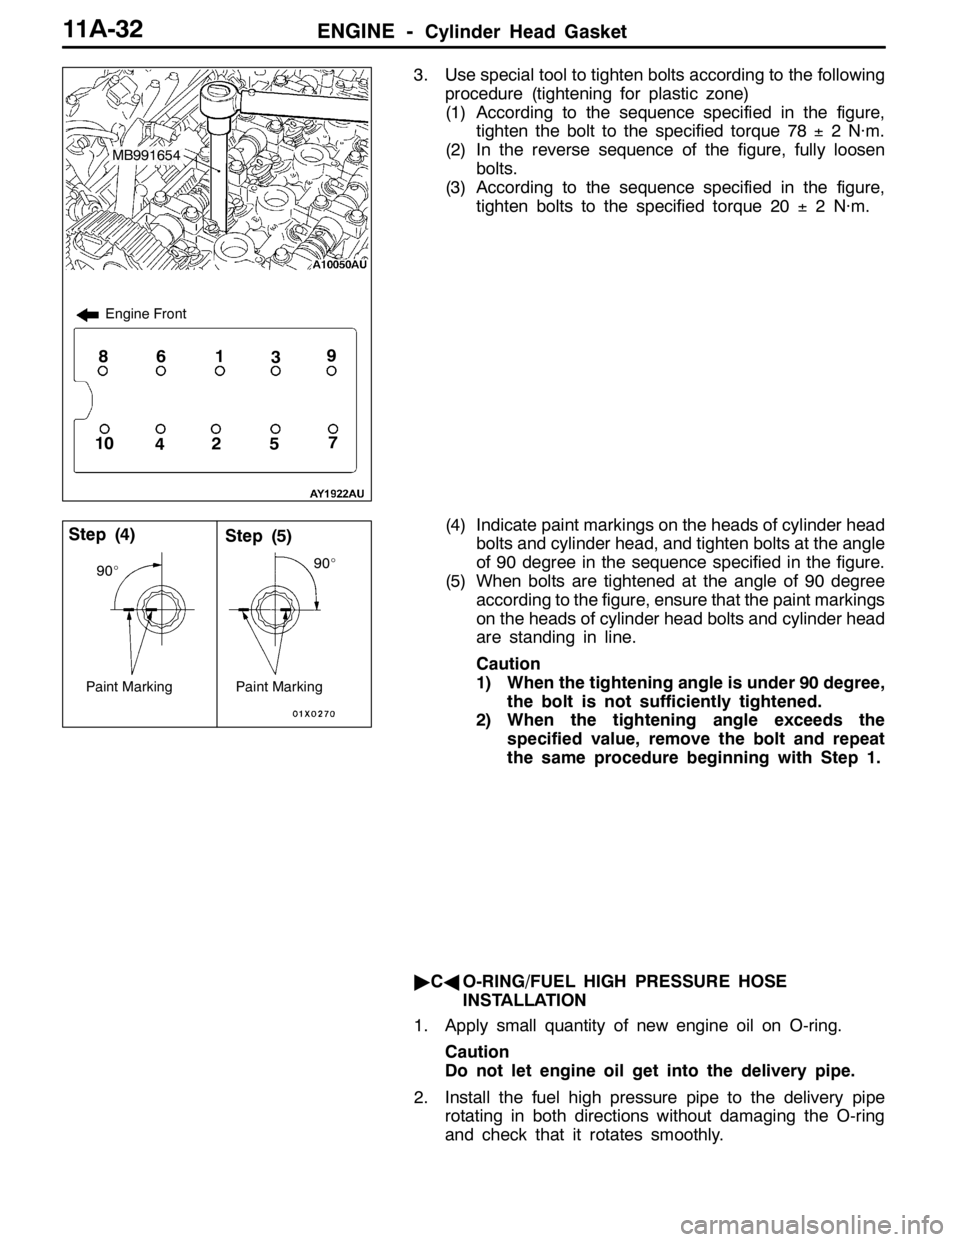
3. Use special tool to tighten bolts according to the following
procedure (tightening for plastic zone)
(1) According to the sequence specified in the figure,
tighten the bolt to the specified torque 78±2 N·m.
(2) In the reverse sequence of the figure, fully loosen
bolts.
(3) According to the sequence specified in the figure,
tighten bolts to the specified torque 20±2 N·m.
(4) Indicate paint markings on the heads of cylinder head
bolts and cylinder head, and tighten bolts at the angle
of 90 degree in the sequence specified in the figure.
(5) When bolts are tightened at the angle of 90 degree
according to the figure, ensure that the paint markings
on the heads of cylinder head bolts and cylinder head
are standing in line.
Caution
1) When the tightening angle is under 90 degree,
the bolt is not sufficiently tightened.
2) When the tightening angle exceeds the
specified value, remove the bolt and repeat
the same procedure beginning with Step 1.
"CAO-RING/FUEL HIGH PRESSURE HOSE
INSTALLATION
1. Apply small quantity of new engine oil on O-ring.
Caution
Do not let engine oil get into the delivery pipe.
2. Install the fuel high pressure pipe to the delivery pipe
rotating in both directions without damaging the O-ring
and check that it rotates smoothly.
1
5427
3869
10
Engine Front
MB991654
Step (4)Step (5)
Paint Marking
90_
Paint Marking
90_
Page 439 of 1449
ENGINE -Cylinder Head Gasket11A-33
3. In case of not rotating smoothly, remove the fuel high
pressure hose and insert it to the delivery pipe again
after checking damage of the O-ring since there is a
possibility of O-ring engagement.
4. Tighten fuel high pressure hose mounting bolts to the
specified torque.
Tightening Torque: 5.0±1.0 N·m
"DAOIL RETURN PIPE GASKET INSTALLATION
Gasket should be replaced with a new one, and set the convex
part to the position as shown in the illustration for installation.
NOTE
There is no specific direction indicated for installing the
turbocharger side of the oil return pipe gasket.
Convex part
Page 442 of 1449

ENGINE -Timing Belt and Timing Belt B11A-36
AC"TIMING BELT B REMOVAL
Caution
When the timing belt B is reused, use a chalk to indicate
an arrow of rotation direction on the back of the belt
so that it can be re-assembled in the same direction as
before.
INSTALLATION SERVICE POINTS
"AATIMING BELT B/TIMING BELT B TENSIONER
INSTALLATION
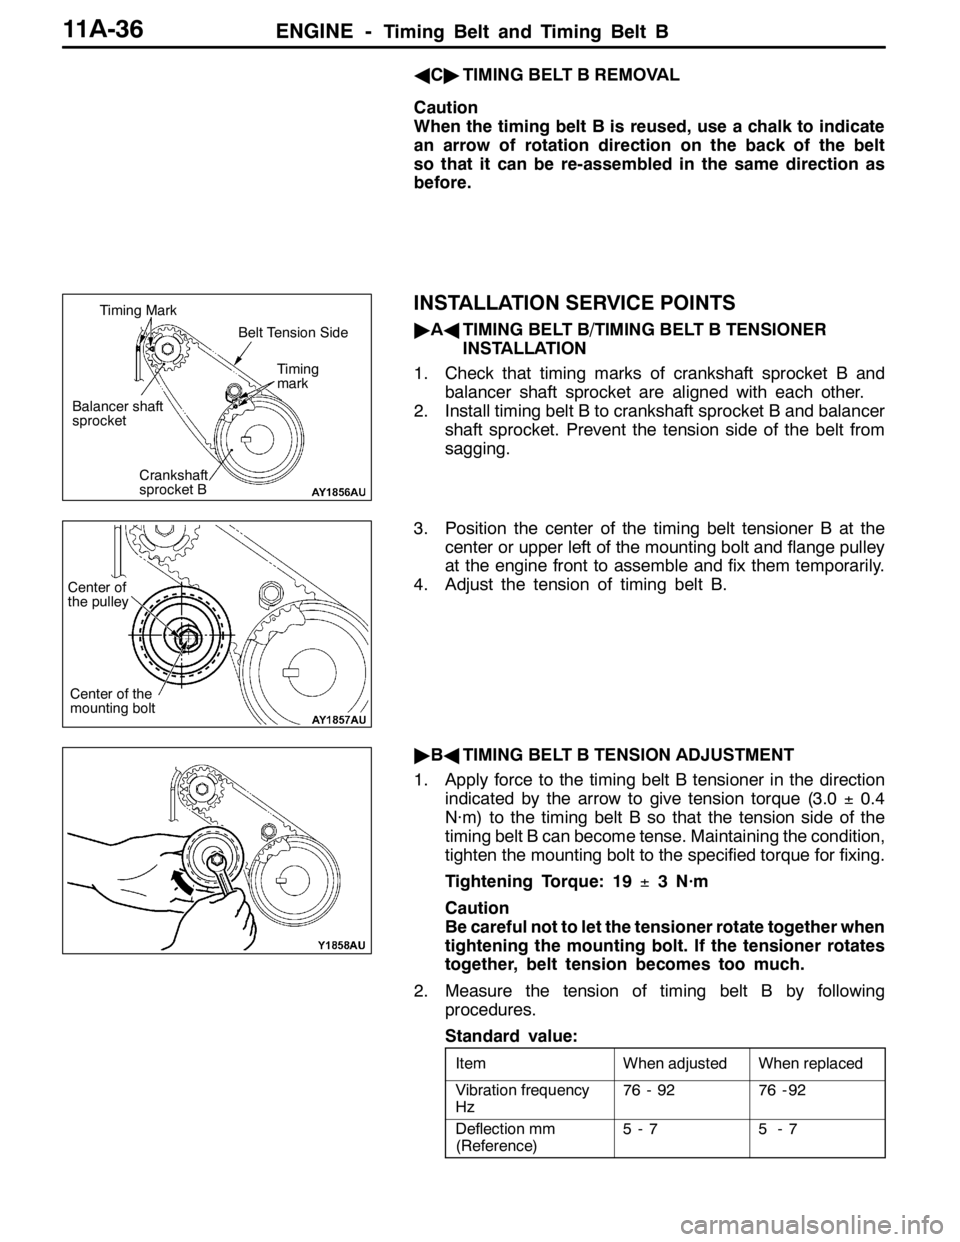
1. Check that timing marks of crankshaft sprocket B and
balancer shaft sprocket are aligned with each other.
2. Install timing belt B to crankshaft sprocket B and balancer
shaft sprocket. Prevent the tension side of the belt from
sagging.
3. Position the center of the timing belt tensioner B at the
center or upper left of the mounting bolt and flange pulley
at the engine front to assemble and fix them temporarily.
4. Adjust the tension of timing belt B.
"BATIMING BELT B TENSION ADJUSTMENT
1. Apply force to the timing belt B tensioner in the direction
indicated by the arrow to give tension torque (3.0±0.4
N·m) to the timing belt B so that the tension side of the
timing belt B can become tense. Maintaining the condition,
tighten the mounting bolt to the specified torque for fixing.
Tightening Torque: 19±3 N·m
Caution
Be careful not to let the tensioner rotate together when
tightening the mounting bolt. If the tensioner rotates
together, belt tension becomes too much.
2. Measure the tension of timing belt B by following
procedures.
Standard value:
ItemWhen adjustedWhen replaced
Vibration frequency
Hz76 - 9276 - 92
Deflection mm
(Reference)5-75-7
Crankshaft
sprocket B
Timing
mark
Timing Mark
Belt Tension Side
Balancer shaft
sprocket
Center of
the pulley
Center of the
mounting bolt
Page 444 of 1449

ENGINE -Timing Belt and Timing Belt B11A-38
"CACRANKSHAFT SENSING BLADE/CRANKSHAFT
SPROCKET INSTALLATION
1. Clean and degrease the crankshaft sensing blade and
the crankshaft sprocket mounting surfaces of the
crankshaft sprocket and the crankshaft.
2. Install the crankshaft sensing blade and crankshaft
sprocket to the direction as shown in the illustration.
3. Clean the tapped hole of the crankshaft.
4. Position the chamfered side of the washer to the direction
as shown in the illustration and install to the crankshaft
bolt.
5. Apply a small quantity of engine oil to the contact surface
and the threads of crankshaft bolts.
6. Use the special tool to hold the crankshaft sprocket and
tighten the the crankshaft bolt to the specified torque
in the same way as that for removal.
Tightening Torque: 162±5 N·m
"DAAUTO-TENSIONER INSTALLATION
1. If the auto-tensioner rod is being extended, set according
to the following procedure.
(1) Use a press or a vise to compress the rod of the
auto-tensioner slowly and align the mounting hole
A of the rod with the mounting hole B of the tensioner
cylinder.
Caution
Ensure that the operation should be done slowly
because quick compression could damage a rod.
(2) Insert a wire or etc. into the mated mounting hole.
NOTE
If the automatic tensioner is replaced with a new one,
the automatic tensioner comes with a new pin.
2. Install the auto-tensioner to the engine and tighten the
mounting bolt to the specified torque. Do not remove
a wire or a pin before completing timing belt tension
adjustment.
Tightening Torque: 23±3 N·m
"EATENSIONER PULLEY INSTALLATION
Secure the tensioner pulley temporarily as shown in the
illustration.
Clean
Engine Front
Degrease
Crankshaft
Crankshaft
sprocket
Washer
Crankshaft boltCrankshaft sensing
blade
AB
Wire
Tensioner pulley hole
Page 447 of 1449

ENGINE -Timing Belt and Timing Belt B11A-41
2. Rotate the crankshaft counterclockwise for 1/4 round.
3. Rotate the crankshaft clockwise and mate timing marks
with each other to position No.1 cylinder at compression
TDC.
4. Loosen the temporarily tightened tensioner pulley
mounting bolt.
5. Use the special tool and torque wrench to apply tension
torque (3.5 N��m) to the timing belt in the direction indicated
in the figure and tighten the tensioner pulley mounting bolt
to the specified torque.
Tightening Torque: 48±5 N·m
Caution
Be careful not to let the tensioner pulley rotate together
when tightening the mounting bolt. If the tensioner
rotates together, belt tension becomes too loose.
6. Remove a wire or a pin inserted during installation of
the automatic tensioner.
7. Remove the special tool installed in the above - mentioned
1 with a hand.
8. Rotate the crankshaft clockwise for two rounds and leave
it alone for approximately 15 minutes.
9. Insert the removed wire or pin in the above - mentioned
6 again to check that it can be removed easily.
If either wire or pin can be removed easily, the timing
belt tension is correct and remove a wire or a pin. Then,
check that projection of the automatic tensioner rod is
within the standard value.
Standard value (A): 3.8 - 4.5 mm
10. If a wire or a pin cannot be easily removed, repeat the
above-mentioned operations 1 - 8 to obtain the correct
timing belt tension.
11. Check that timing marks of each sprocket are aligned
with each other.
Caution
After turning the crankshaft bolt counterclockwise,
always check the tightening torque of the crankshaft
bolt and tighten it again if it becomes loose.
MD998767
A
Page 453 of 1449

ENGINE -Engine Assembly11A-47
AD"ENGINE ASSEMBLY REMOVAL
After checking that all the cables, hoses, and harness
connectors have been disconnected, lift the engine with a
chain block slowly and remove the engine assembly located
at the upper engine room.
INSTALLATION SERVICE POINTS
"AAENGINE ASSEMBLY INSTALLATION
Install the engine assembly while checking that none of cables,
hoses, or harness connectors, etc. has been engaged.
"BAENGINE MOUNTING BRACKET AND STOPPER
ASSEMBLY INSTALLATION
1. Support the engine oil pan with a garage jack via a block
of wood cut adjusting the engine position and install the
engine mounting bracket and stopper assembly. Position
the engine mounting stopper so that a mark indicated
by an arrow can face the direction shown in the illustration.
2. Support engine with garage jack.
3. Remove the chain block and hold the engine assembly
with the special tool.(Tool used for removal of transmission
assembly)
"CAO-RING/FUEL HIGH PRESSURE HOSE
INSTALLATION
1. Apply small quantity of new engine oil on O-ring.
Caution
Do not let engine oil get into the delivery pipe.
2. Install the fuel high pressure pipe to the delivery pipe
rotating in both directions without damaging the O-ring
and check that it rotates smoothly.
3. In case of not rotating smoothly, remove the fuel high
pressure hose and insert it to the delivery pipe again
after checking damage of the O-ring since there is a
possibility of O-ring engagement.
4. Tighten fuel high pressure hose mounting bolt to the
specified torque.
Tightening Torque: 5.0±1.0 N·m
Engine mounting stopper
Engine side
Engine side
Page 455 of 1449
11B-1
ENGINE
OVERHAUL
CONTENTS
GENERAL DESCRIPTION 2...................
SPECIFICATIONS 3..........................
Service Specifications 3.........................
Machining Standards 5.........................
Tightening Torque 5............................
Sealants 8.....................................
Form-In-Place Gasket 8........................
SPECIAL TOOLS 9...........................
ALTERNATOR AND IGNITION SYSTEM 12....
TIMING BELT 13.............................
FUEL SYSTEM 26............................SECONDARY AIR SYSTEM AND INTAKE
MANIFOLD 28...............................
EXHAUST MANIFOLD 30.....................
WATER PUMP AND WATER HOSE 32........
ROCKER ARMS AND CAMSHAFT 34.........
CYLINDER HEAD AND VALVE 40.............
OIL PUMP AND OIL PAN 47.................
PISTON AND CONNECTING ROD 56..........
CRANKSHAFT AND CYLINDER BLOCK 64....
Page 459 of 1449

ENGINE OVERHAUL -Specifications11B-5
MACHINING STANDARDS
Unit: mm
Items
Standard valueLimited value
Cylinder head, valve
Cylinder head
Oversize valve guide hole diameter
0.05 O.S.
0.25 O.S.
0.50 O.S.
Oversize valve seat hole diameter
Intake
0.3 O.S.
0.6 O.S.
Exhaust
0.3 O.S.
0.6 O.S.
12.05 - 12.07
12.25 - 12.27
12.50 - 12.52
35.30 - 35.33
35.60 - 35.63
33.30 - 33.33
33.60 - 33.63-
-
-
-
-
-
-
TIGHTENING TORQUE
ItemsTightening torque N·m
Alternator, ignition system
Oil level gauge guide bolt13±1
Water pump pulley bolt8.8±1.0
Alternator brace bolt (flange)23±3
Alternator brace bolt (washer)22±4
Alternator nut44±10
Crankshaft pulley bolt25±4
Center cover bolt3±0.5
Ignition coil bolt10±2
Spark plug25±5
Connector bracket bolt8.8±1.0
Timing belt
Timing belt cover bolt (flange)11±1
Timing belt cover bolt (washer)9±1
Power steering pump bracket bolt49±9
Tensioner pulley bolt49±6
Tensioner arm bolt21±4
Auto tensioner bolt23±3
Idler pulley bolt35±6
Crank angle sensor bolt8.8±1.0
Oil pump sprocket nut54±5
Crankshaft bolt162±5
Tensioner B bolt19±3
Counter balance shaft sprocket bolt46±3
Rocker cover bolt3.5±0.5
Engine support bracket bolt49±5