2007 MITSUBISHI LANCER EVOLUTION alternator belt
[x] Cancel search: alternator beltPage 450 of 1449

ENGINE -Engine Assembly11A-44
1
2
3 4
5
67
8
910
11 12
13
14
26±5 N·m
14±3 N·m
1516
18
5.0±1.0 N·m
1
5.0±1.0 N·m
11±1 N·m
17
Removal steps
1. Ignition coil connector
2. Crank angle sensor connector
3. Oxygen sensor connector
4. Fuel pressure solenoid valve
connector
5. Detonation sensor connector
6. Purge control solenoid valve
connector
7. Throttle position sensor connector
8. Idle speed control servo connector
9. Injector connector
10. Camshaft position sensor connector11. Engine coolant temperature gauge
unit connector
12. Engine coolant temperature sensor
connector
13. Alternator connector
14. EGR solenoid valve connector
15. Secondary air control solenoid valve
connector
16. Engine oil pressure switch
connector
17. Waste gate actuator mounting bolt
AA"18. Drive belt
Page 455 of 1449

11B-1
ENGINE
OVERHAUL
CONTENTS
GENERAL DESCRIPTION 2...................
SPECIFICATIONS 3..........................
Service Specifications 3.........................
Machining Standards 5.........................
Tightening Torque 5............................
Sealants 8.....................................
Form-In-Place Gasket 8........................
SPECIAL TOOLS 9...........................
ALTERNATOR AND IGNITION SYSTEM 12....
TIMING BELT 13.............................
FUEL SYSTEM 26............................SECONDARY AIR SYSTEM AND INTAKE
MANIFOLD 28...............................
EXHAUST MANIFOLD 30.....................
WATER PUMP AND WATER HOSE 32........
ROCKER ARMS AND CAMSHAFT 34.........
CYLINDER HEAD AND VALVE 40.............
OIL PUMP AND OIL PAN 47.................
PISTON AND CONNECTING ROD 56..........
CRANKSHAFT AND CYLINDER BLOCK 64....
Page 459 of 1449

ENGINE OVERHAUL -Specifications11B-5
MACHINING STANDARDS
Unit: mm
Items
Standard valueLimited value
Cylinder head, valve
Cylinder head
Oversize valve guide hole diameter
0.05 O.S.
0.25 O.S.
0.50 O.S.
Oversize valve seat hole diameter
Intake
0.3 O.S.
0.6 O.S.
Exhaust
0.3 O.S.
0.6 O.S.
12.05 - 12.07
12.25 - 12.27
12.50 - 12.52
35.30 - 35.33
35.60 - 35.63
33.30 - 33.33
33.60 - 33.63-
-
-
-
-
-
-
TIGHTENING TORQUE
ItemsTightening torque N·m
Alternator, ignition system
Oil level gauge guide bolt13±1
Water pump pulley bolt8.8±1.0
Alternator brace bolt (flange)23±3
Alternator brace bolt (washer)22±4
Alternator nut44±10
Crankshaft pulley bolt25±4
Center cover bolt3±0.5
Ignition coil bolt10±2
Spark plug25±5
Connector bracket bolt8.8±1.0
Timing belt
Timing belt cover bolt (flange)11±1
Timing belt cover bolt (washer)9±1
Power steering pump bracket bolt49±9
Tensioner pulley bolt49±6
Tensioner arm bolt21±4
Auto tensioner bolt23±3
Idler pulley bolt35±6
Crank angle sensor bolt8.8±1.0
Oil pump sprocket nut54±5
Crankshaft bolt162±5
Tensioner B bolt19±3
Counter balance shaft sprocket bolt46±3
Rocker cover bolt3.5±0.5
Engine support bracket bolt49±5
Page 701 of 1449

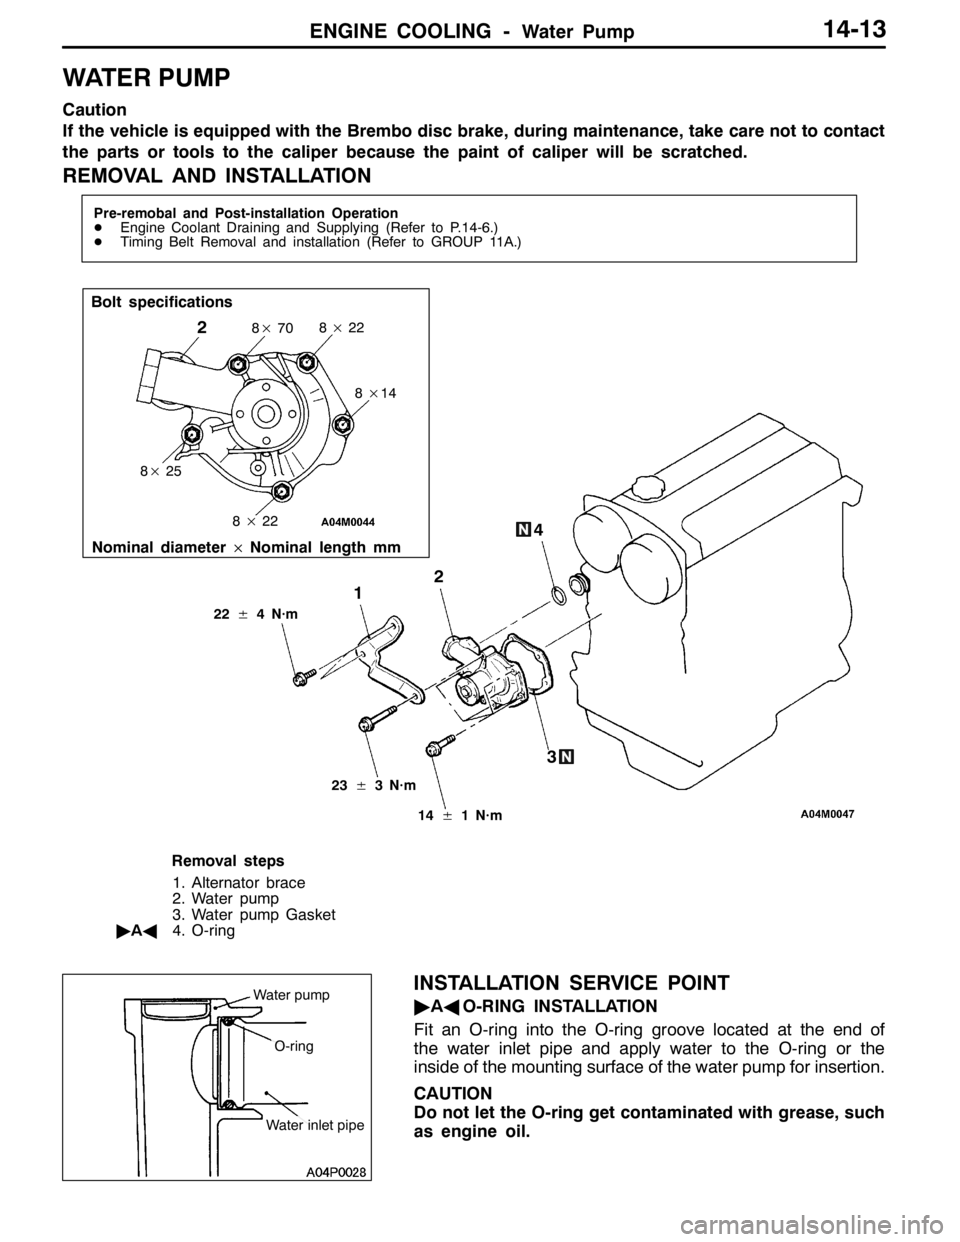
ENGINE COOLING -Water Pump14-13
WATER PUMP
Caution
If the vehicle is equipped with the Brembo disc brake, during maintenance, take care not to contact
the parts or tools to the caliper because the paint of caliper will be scratched.
REMOVAL AND INSTALLATION
Pre-remobal and Post-installation Operation
DEngine Coolant Draining and Supplying (Refer to P.14-6.)
DTiming Belt Removal and installation (Refer to GROUP 11A.)
1
Bolt specifications
28×22
2
23±3 N·m
14±1 N·m
Nominal diameter×Nominal length mm
8×70
8×14
8×22 8×25
3 4
22±4 N·m
Removal steps
1. Alternator brace
2. Water pump
3. Water pump Gasket
"AA4. O-ring
INSTALLATION SERVICE POINT
"AAO-RING INSTALLATION
Fit an O-ring into the O-ring groove located at the end of
the water inlet pipe and apply water to the O-ring or the
inside of the mounting surface of the water pump for insertion.
CAUTION
Do not let the O-ring get contaminated with grease, such
as engine oil.Water pump
O-ring
Water inlet pipe
Page 736 of 1449

ENGINE ELECTRICAL -Charging System16-4
ON-VEHICLE SERVICE
ALTERNATOR OUTPUT LINE VOLTAGE DROP TEST
Alternator
Terminal BVoltmeterAmmeter
Battery
+-
+-
This test determines whether the wiring from the
alternator “B” terminal to the battery (+) terminal
(including the fusible line) is in a good condition
or not.
(1) Always be sure to check the following before
the test.
DAlternator installation
DAlternator drive belt tension
(Refer to GROUP 11 - On-vehicle Service.)
DFusible link
DAbnormal noise from the alternator while
the engine is running
(2) Turn the ignition switch to the “LOCK” (OFF)
position.
(3) Disconnect the negative battery cable.
(4) Disconnect the alternator output wire from the
alternator “B” terminal and connect a DC test
ammeter with a range of 0 - 100 A in seriesbetween the “B” terminal and the disconnected
output wire. (Connect the (+) lead of the
ammeter to the “B” terminal, and then connect
the ( - ) lead of the ammeter to the disconnected
output wire.)
NOTE
An inductive-type ammeter which enables
measurements to be taken without
disconnecting the alternator output wire should
be recommended. Using this equipment will
lessen the possibility of a voltage drop caused
by a loose “B” terminal connection.
(5) Connect a digital-type voltmeter between the
alternator “B” terminal and the battery (+)
terminal. (Connect the (+) lead of the voltmeter
to the “B” terminal and the connect the ( - ) lead
of the voltmeter to the battery (+) cable.)
Page 738 of 1449

ENGINE ELECTRICAL -Charging System16-6
This test determines whether the alternator output
current is normal.
(1) Before the test, always be sure to check the
following.
DAlternator installation
DBattery (Refer to GROUP 54 - Battery.)
NOTE
The battery should be slightly discharged.
The load needed by a fully-charged battery
is insufficient for an accurate test.
DAlternator drive belt tension
(Refer to GROUP 11 - On-vehicle Service.)
DFusible link
DAbnormal noise from the alternator while
the engine is running.
(2) Turn the ignition switch to the “LOCK” (OFF)
position.
(3) Disconnect the negative battery cable.
(4) Disconnect the alternator output wire from the
alternator “B” terminal. Connect a DC test
ammeter with a range of 0 - 100 A in series
between the “B” terminal and the disconnected
output wire. (Connect the (+) lead of the
ammeter to the “B” terminal. Connect the ( - )
lead of the ammeter to the disconnected output
wire.)
Caution
Never use clips but tighten bolts and nuts
to connect the line. Otherwise loose
connections (e.g. using clips) will lead to
a serious accident because of high current.
NOTE
An inductive-type ammeter which enables
measurements to be taken without
disconnecting the alternator output wire should
be recommended.
(5) Connect a voltmeter with a range of 0 - 20 V
between the alternator “B” terminal and the
earth. (Connect the (+) lead of the voltmeter
to the “B” terminal, and then connect the ( - )
lead of the voltmeter to the earth.)
(6) Connect the negative battery cable.
(7) Connect a tachometer or the MUT-II.
(Refer to GROUP 11 - On-vehicle Service.)
(8) Leave the hood open.
(9) Check that the reading on the voltmeter is equal
to the battery voltage.
NOTE
If the voltage is 0 V, the cause is probably
an open circuit in the wire or fusible link between
the alternator “B” terminal and the battery (+)
terminal.(10)Turn the light switch on to turn on headlamps
and then start the engine.
(11) Immediately after setting the headlamps to high
beam and turning the heater blower switch to
the high revolution position, increase the engine
speed to 2,500 r/min and read the maximum
current output value displayed on the ammeter.
Limit: 70 % of normal current output
NOTE
DFor the nominal current output, refer to the
Alternator Specifications.
DBecause the current from the battery will
soon drop after the engine is started, the
above step should be carried out as quickly
as possible in order to obtain the maximum
current output value.
DThe current output value will depend on
the electrical load and the temperature of
the alternator body.
DIf the electrical load is small while testing,
the specified level of current may not be
output even though the alternator is normal.
In such cases, increase the electrical load
by leaving the headlamps turned on for
some time to discharge the battery or by
using the lighting system in another vehicle,
and then test again.
DThe specified level of current also may not
be output if the temperature of the alternator
body or the ambient temperature is too
high. In such cases, cool the alternator and
then test again.
(12)The reading on the ammeter should be above
the limit value. If the reading is below the limit
value and the alternator output wire is normal,
remove the alternator from the engine and
check the alternator.
(13)Run the engine at idle after the test.
(14)Turn the ignition switch to the “LOCK” (OFF)
position.
(15)Remove the tachometer or the MUT-II.
(16)Disconnect the negative battery cable.
(17)Disconnect the ammeter and voltmeter.
(18)Connect the alternator output wire to the
alternator “B” terminal.
(19)Connect the negative battery cable.
Page 739 of 1449

ENGINE ELECTRICAL -Charging System16-7
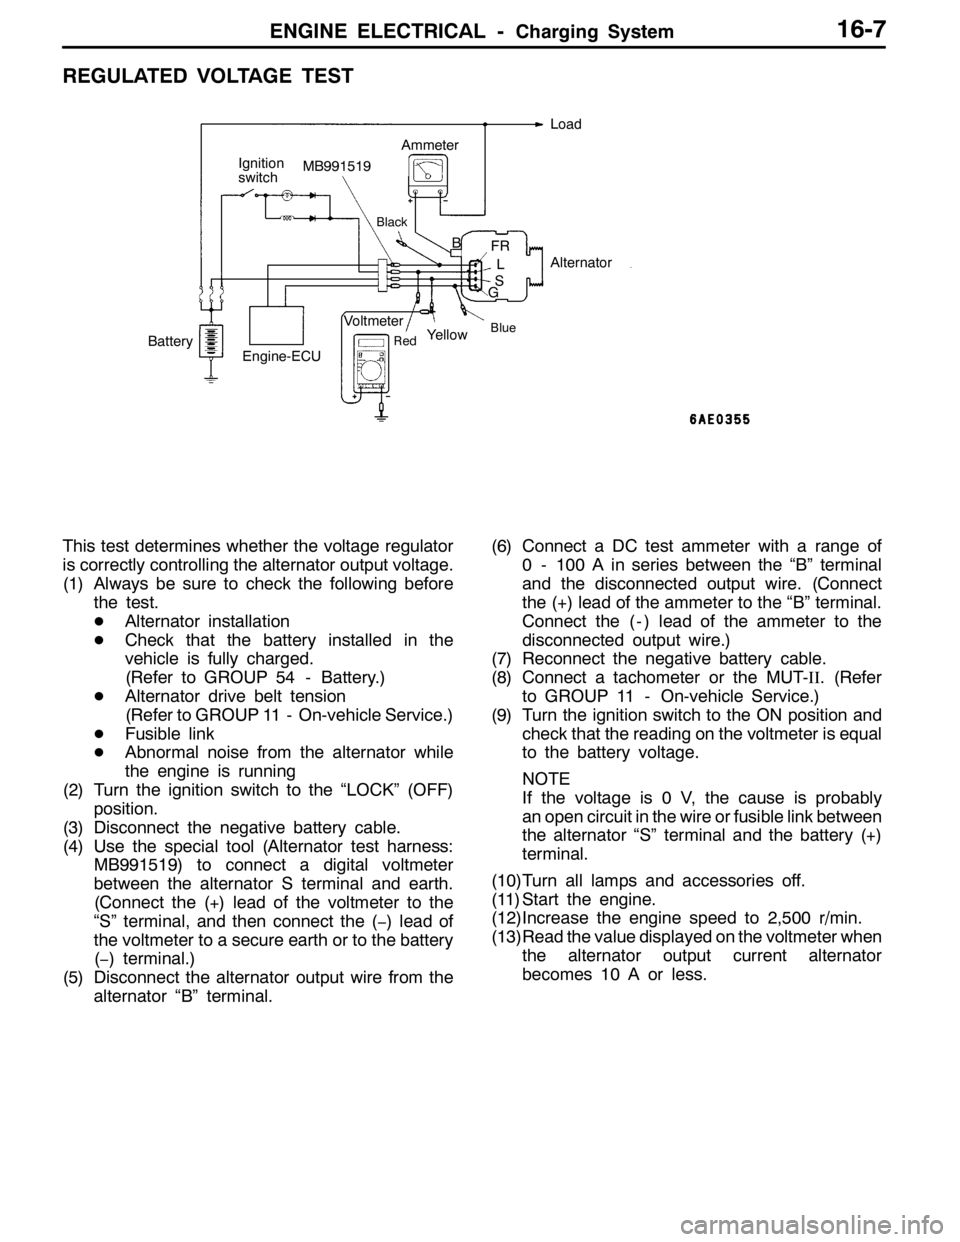
REGULATED VOLTAGE TEST
B
BlueRed
Ignition
switchLoad
FR
L
S
GMB991519
Alternator
BatteryVoltmeterAmmeter
Yellow
Engine-ECU
Black
This test determines whether the voltage regulator
is correctly controlling the alternator output voltage.
(1) Always be sure to check the following before
the test.
DAlternator installation
DCheck that the battery installed in the
vehicle is fully charged.
(Refer to GROUP 54 - Battery.)
DAlternator drive belt tension
(Refer to GROUP 11 - On-vehicle Service.)
DFusible link
DAbnormal noise from the alternator while
the engine is running
(2) Turn the ignition switch to the “LOCK” (OFF)
position.
(3) Disconnect the negative battery cable.
(4) Use the special tool (Alternator test harness:
MB991519) to connect a digital voltmeter
between the alternator S terminal and earth.
(Connect the (+) lead of the voltmeter to the
“S” terminal, and then connect the (−) lead of
the voltmeter to a secure earth or to the battery
(−) terminal.)
(5) Disconnect the alternator output wire from the
alternator “B” terminal.(6) Connect a DC test ammeter with a range of
0 - 100 A in series between the “B” terminal
and the disconnected output wire. (Connect
the (+) lead of the ammeter to the “B” terminal.
Connect the ( - ) lead of the ammeter to the
disconnected output wire.)
(7) Reconnect the negative battery cable.
(8) Connect a tachometer or the MUT-II. (Refer
to GROUP 11 - On-vehicle Service.)
(9) Turn the ignition switch to the ON position and
check that the reading on the voltmeter is equal
to the battery voltage.
NOTE
If the voltage is 0 V, the cause is probably
an open circuit in the wire or fusible link between
the alternator “S” terminal and the battery (+)
terminal.
(10)Turn all lamps and accessories off.
(11) Start the engine.
(12)Increase the engine speed to 2,500 r/min.
(13)Read the value displayed on the voltmeter when
the alternator output current alternator
becomes 10 A or less.
Page 742 of 1449

ENGINE ELECTRICAL -Charging System16-10
EXAMPLES OF ABNORMAL WAVEFORMS
NOTE
1. The size of the waveform patterns differs largely, depending on the adjustment of the variable knob
on the analyzer.
2. Identification of abnormal waveforms is easier when there is a large output current (regulator is not
operating). (Waveforms can be observed when the headlamps are illuminated.)
3. Check the conditions of the charging warning lamp (illuminated/not illuminated). Also, check the charging
system totally.
Abnormal waveformsProblem
causeAbnormal waveformsProblem
cause
Example 1Open diodeExample 4Short in
stator coil
Example 2Short in diodeExample 5Open
supplementa-
ry diode
Example 3Broken wire
in stator coil
At this time, the charging warning lamp
is illuminated.
ALTERNATOR
REMOVAL AND INSTALLATION
Caution
If the vehicle is equipped with the Brembo disc brake, during maintenance, take care not to contact
the parts or tools to the caliper because the paint of caliper will be scratched.
Pre-removal and Post-installation Operation
DUnder Cover Removal and Installation (Refer to GROUP 51 - Front Bumper.)
DDrive Belt Tension Check (Refer to GROUP 11A - On-vehicle Service.)
DStrut Tower Bar Removal and Installation (Refer to GROUP 42.)
DCrossmember Bar Removal and Installation (Refer to GROUP 32 - Engine Roll Stopper, Centermember.)
DFront Exhaust Pipe Assembly Removal and Installation (Refer to GROUP 15.)