2006 LAND ROVER FRELANDER 2 window
[x] Cancel search: windowPage 2352 of 3229
t o the 'Owners Handbook'.
Rear Screen Wiper
On recei vi ng a reques t for rear s creen wi per operat ion the CJB wi ll energize relay RA2 i n t he AJB. W hen energized, relayRA2 provides a feed t o t he rear s creen wiper mot or. The rear s creen wi per operat es int ermi tt entl y, wi th a delay betweenwipes of approximat ely 6 seconds . The CJB cont rol s operati on of rel ay RA2, and consequentl y rear s creen wiper mot oroperati on, accordingly.
The CJB als o provi des a feed t o t he rear s creen wi per mot or park s wit ch. The park s wit ch is i ntegral wi th the rear s creenwiper mot or and ens ures t he wi per returns to the park pos i ti on if t he rear wi per reques t is cancel led mid-st roke. The parks wit ch cont act s are cl osed when the rear wiper is i n any posi ti on except t he park pos it ion. Thi s all ows the CJB to returnt he rear wiper t o t he park pos it ion when relay RA2 i s de-energized.
The CJB wil l als o power the rear screen wiper motor i f revers e gear is s elected whi le the wi nds hiel d wi per funct ion i sact ive. On vehicles fit t ed wit h an aut omat ic trans mi s si on, t he reverse gear s ignal origi nat es in the Transmis si on ControlModule (TCM). The TCM broadcas ts a revers e gear s ignal over the hi gh s peed CAN bus to the CJB, which responds byoperati ng t he rear wiper.
On vehicles fit ted wit h a manual transmis s ion, the revers e gear s i gnal ori ginates at t he revers e gear s wit ch. The reversegear s wi tch i s hardwired t o t he CJB.
Windshield Washers
On recei vi ng a reques t for wi nds hiel d was her operat ion t he CJB wi ll energize t he front washer cont rol relay. Thi s all ows abatt ery volt age feed t o flow to the was her pump. A ground path for t he pump is provided by t he de-energized rear was hercont rol rel ay. Bot h was her control relays are int egral wit h t he CJB.
W hen wi ndshi el d was her operat ion i s reques ted, t he winds hi eld was hers will operat e. The CJB will delay wiper operati onfor 100 ms aft er the was her swi tch i s pres s ed. If t he s wit ch is pres s ed for l ess than 100 ms, t he CJB wil l not operat e t hewipers.
The CJB wil l power t he wi nds hield wipers for as l ong as washer operati on is reques t ed, al though t he washers wil l ti me outaft er 10 s econds. After t he was her s wi tch has been rel eas ed, the CJB wi ll operat e t he winds hi eld wipers t hrough 2 morewipe cycles .
Rear Screen Washer
On recei vi ng a reques t for rear s creen was her operati on the CJB wi ll energize the rear was her cont rol rel ay. This al lows abatt ery volt age feed t o flow to the was her pump. A ground path for t he pump is provided by t he de-energized front was hercont rol rel ay. Revers ing the polarit y of the pump (s ee 'W i nds hield W as hers ' above) allows was her fl uid t o be di rected t ot he rear s creen washer jet rather t han the windshi el d was her jets . The rear s creen was her jet is incorporat ed int o the hi ghmounted s t op lamp.
The rear s creen was her wi ll operat e for up t o 10 seconds if cont inuousl y reques ted. W hen rear s creen was her operati on isreques ted, the rear screen wiper wil l operat e conti nuous ly unt il t he s wit ch is released. After t he swit ch has been released,or fol lowing 10 seconds of conti nuous operat ion, the CJB will operat e t he rear s creen wiper t hrough 2 or 3 more wi pecycles .
Headlamp Washers
W hen t he vehicle ent ers i gni ti on mode 4 (acces s ory) to 7 (engine running) the firs t winds hield was h reques t great er than100 ms will operat e a headlamp power was h s equence. The CJB will t hen s tart a 10 mi nut e t imer. If 5 request s forwinds hield washer operati on are made wit hin this 10 mi nut e wi ndow, t he CJB wil l power t he headl amp was hers uponreceiving the fifth reques t . W hen t his occurs , the 10 minute ti mer is res et t o 0.
If the CJB receives no windshi el d was her reques t s duri ng a 10 mi nute window, the headlamp was hers will operat e on t hefi rs t reques t received aft er the 10 minut e window has el aps ed. Agai n, once t he headlamp was hers have been operati onal ,t he CJB res ets t he t imer t o 0.
The headl amp was hers wi ll only operat e when t he headl amps are on. The CJB receives a 'li ght s on' si gnal from the lightcont rol module over t he LIN bus .
W hen headlamp was her operati on is required, t he CJB energizes rel ay 9 in the BJB, all owing a bat tery vol tage feed t opower the headlamp was her pump. A ground path for t he washer pump i s provided by t he de-energi zed relay 12, which i sals o l ocat ed in the BJB. Thi s s equence of event s provides was her flui d t o the headlamp 1 was her jets .
Aft er thi s s equence the power s uppl y t o t he pump is revers ed. The CJB does t his by de-energi zing rel ay 9 and energi zi ngrel ay 12. Thi s allows the pump to provi de was her flui d to the headlamp 2 was her jets. The s equence of event s runs asfol lows :
Power to headlamp 1 was her - 500 msDelay t o power headl amp 2 was her - 100 msPower to headlamp 2 was her - 500 msDelay (s oak ti me) to power 1 headlamp washer - 700 msPower to 1 headl amp was her - 500 msDelay t o power 2 headl amp was her - 100 msPower to 2 headl amp was her - 500 ms
If there is l ess than 1 l it er (0.26 US gall on) of was her flui d in the was her fl uid reservoi r, t he CJB wil l s us pend headl ampwas her operat ion. The fl uid l evel s wit ch is hardwired to the CJB, which als o t rans mits a low fl ui d s ignal to the i nst rumentclus ter over t he medi um s peed CAN bus. For addit ional i nformati on, refer to:
Ins trument Clus ter (413-01 Ins t rument Clus t er, Descripti on and Operat ion),Informat ion and Mes s age Cent er (413-08 Informati on and Mes sage Cent er, Descripti on and Operat ion).
Page 2356 of 3229
Publi s hed: 11-May-2011
Wipers and Washers - Rear Window Wiper Motor
Removal and Inst all ati on
Removal
• NOTE: Removal s t eps in t his procedure may cont ain i nst all ati on det ail s.
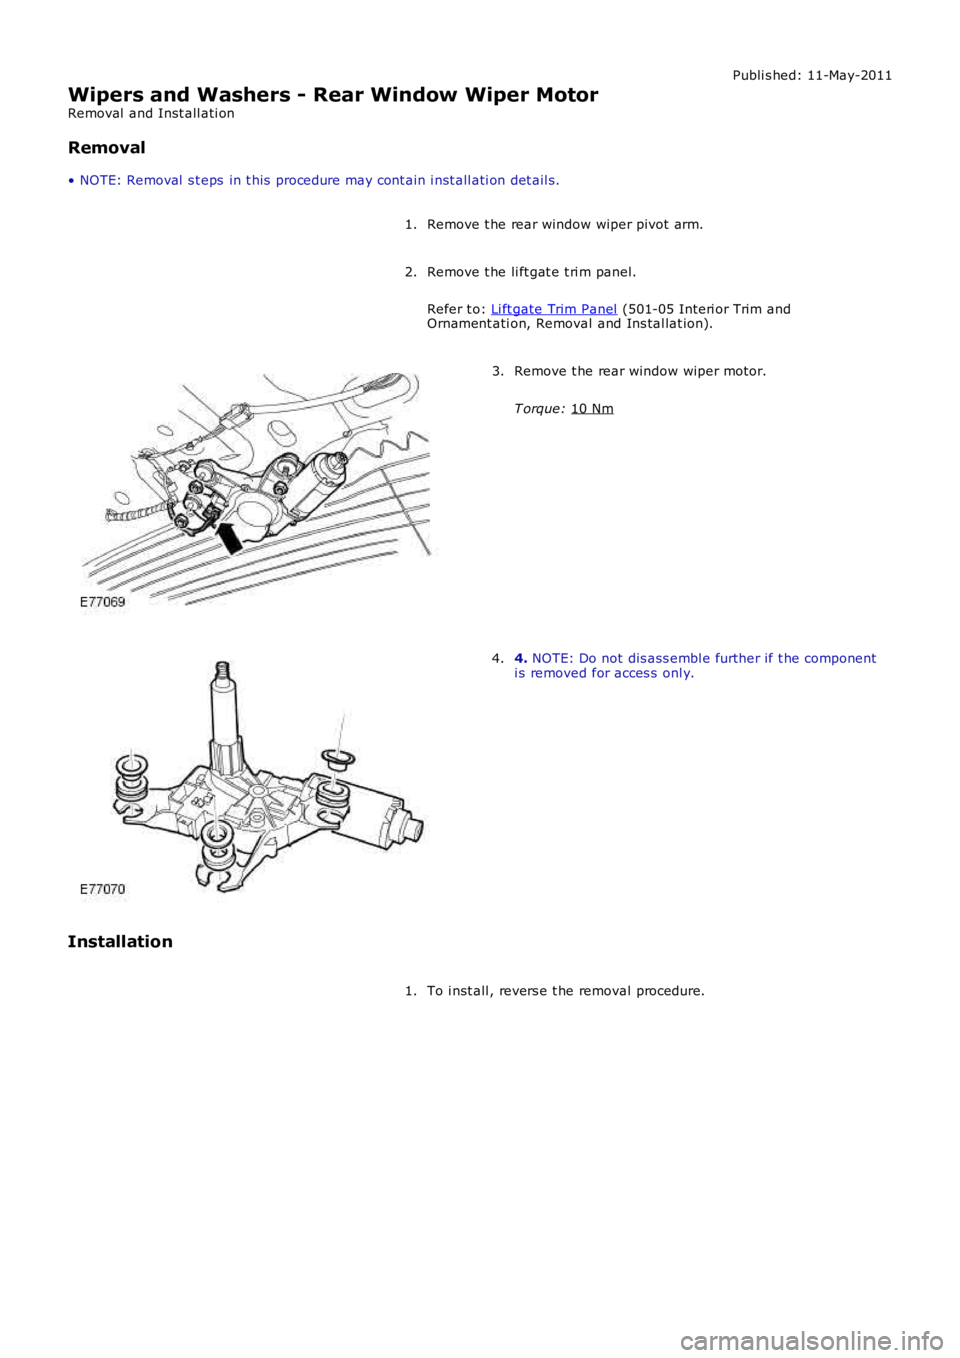
Remove t he rear window wiper pivot arm.
1.
Remove t he li ft gat e t ri m panel.
Refer t o: Li ft gate Trim Panel (501-05 Interi or Trim and
Ornament ati on, Removal and Ins tal lat ion).
2. Remove t he rear window wiper motor.
T orque: 10 Nm 3.
4.
NOTE: Do not dis ass embl e further if t he component
i s removed for acces s onl y.
4.
Installation To i nst all , revers e t he removal procedure.
1.
Page 2364 of 3229
Publi s hed: 11-May-2011
Wipers and Washers - Rear Window Wiper Pivot Arm
Removal and Inst all ati on
Special T ool(s) 303-D121
Pull er, General Purpose
Removal
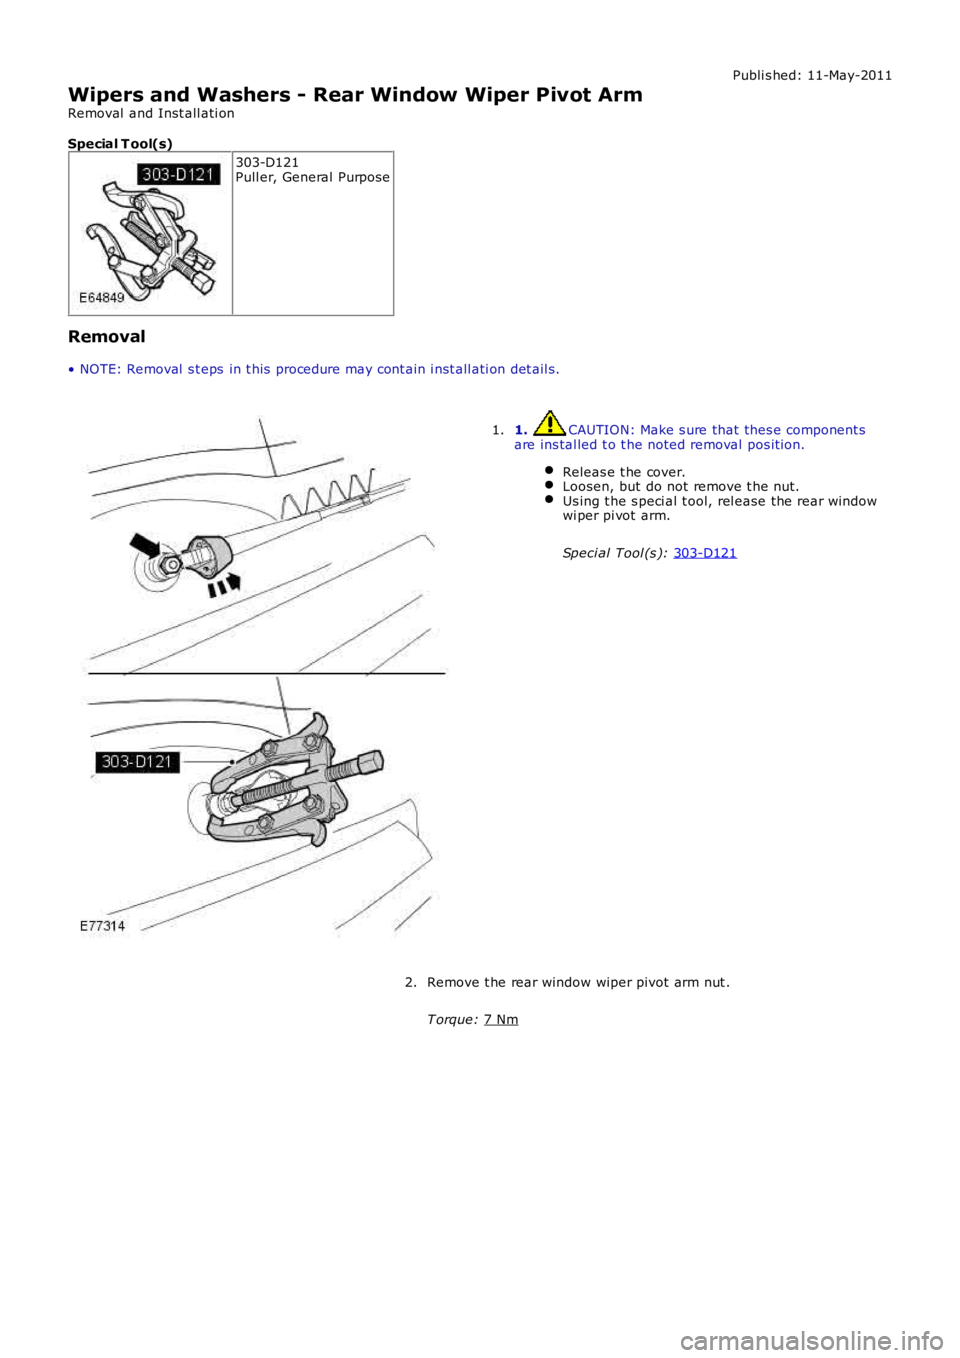
• NOTE: Removal s t eps in t his procedure may cont ain i nst all ati on det ail s. 1. CAUTION: Make s ure that thes e component s
are ins tal led t o t he noted removal pos it ion.
Releas e t he cover. Loosen, but do not remove t he nut.
Us ing t he s peci al t ool, rel ease the rear window
wi per pi vot arm.
Speci al Tool (s ): 303-D121 1.
Remove t he rear window wiper pivot arm nut .
T orque: 7 Nm 2.
Page 2365 of 3229
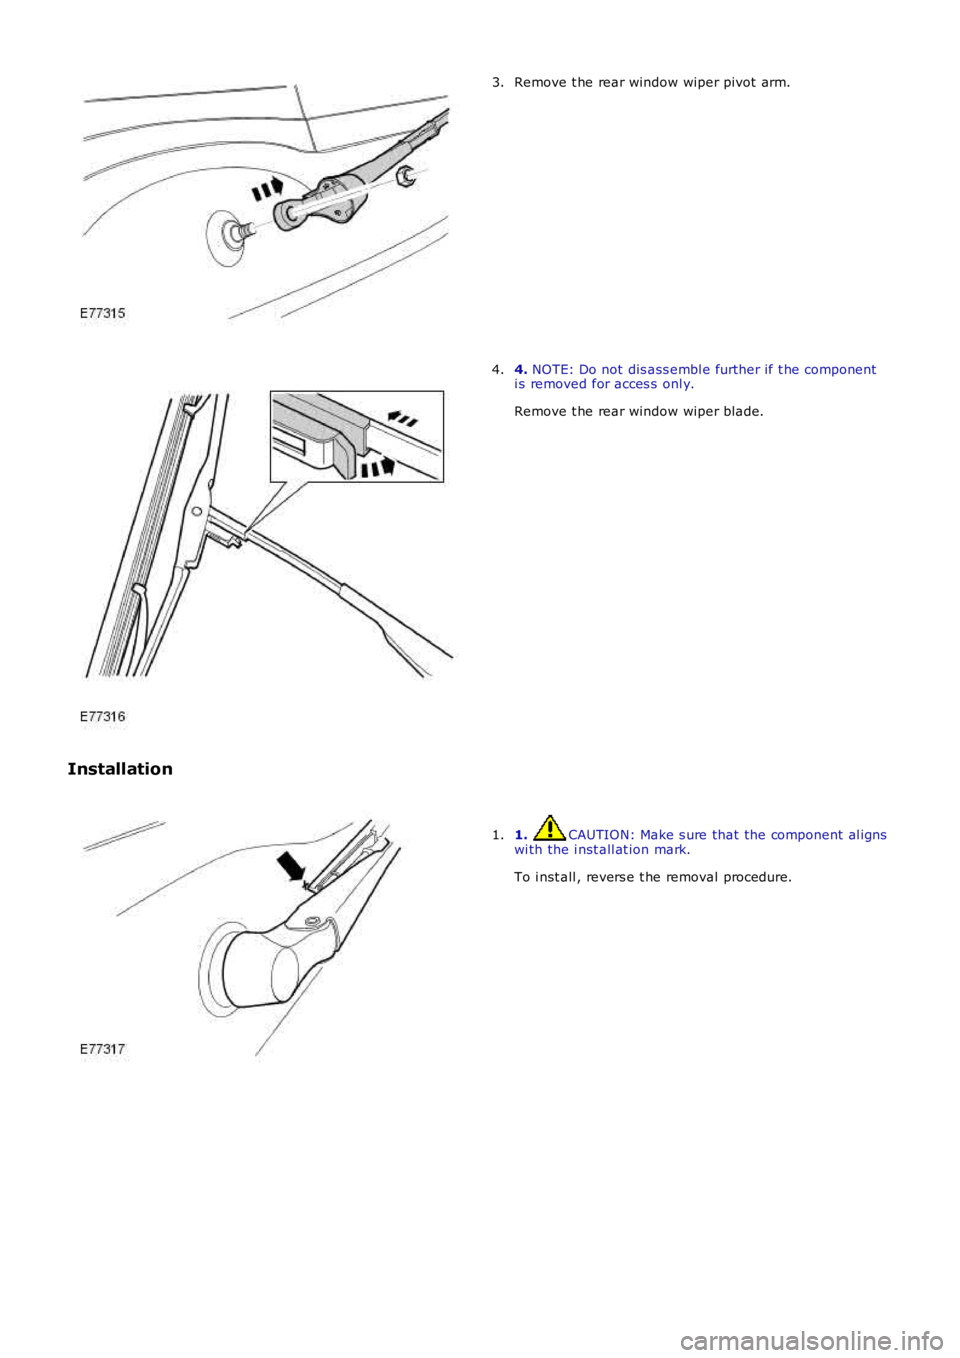
Remove t he rear window wiper pivot arm.3.
4. NOTE: Do not dis ass embl e further if t he componenti s removed for acces s onl y.
Remove t he rear window wiper blade.
4.
Installation
1. CAUTION: Make s ure that the component al ignswi th the i nst all at ion mark.
To i nst all , revers e t he removal procedure.
1.
Page 2498 of 3229
Publi s hed: 11-May-2011
Supplemental Restraint System - Clockspring
Removal and Inst all ati on
Removal
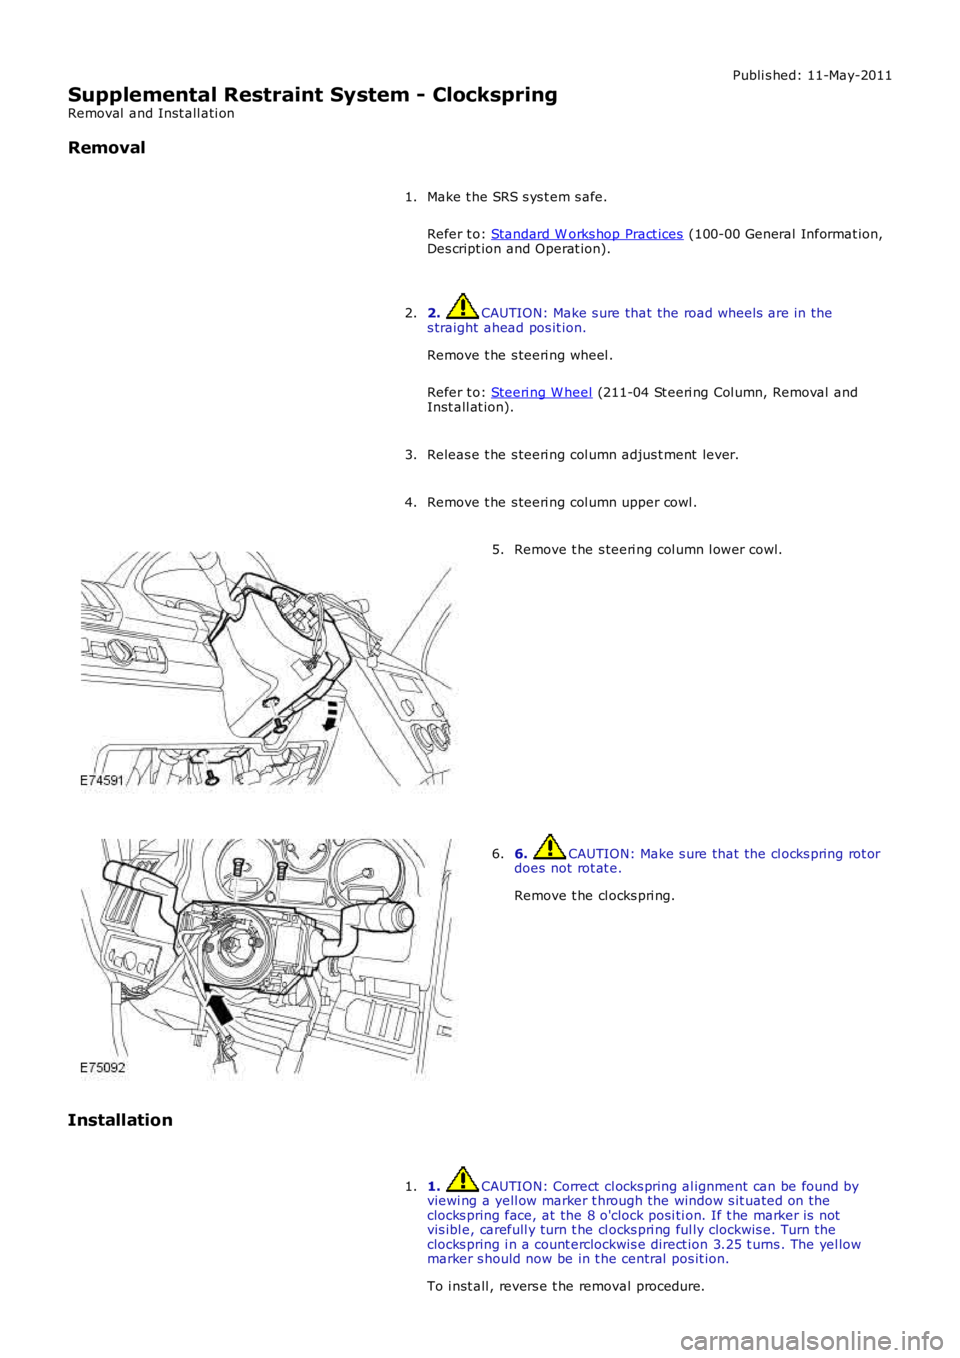
Make t he SRS s ys t em s afe.
Refer t o: Standard W orks hop Pract ices (100-00 General Informat ion,Des cript ion and Operat ion).
1.
2. CAUTION: Make s ure that the road wheels are in thes traight ahead pos it ion.
Remove t he s teeri ng wheel .
Refer t o: Steeri ng W heel (211-04 St eeri ng Col umn, Removal andInst all at ion).
2.
Releas e t he s teeri ng col umn adjus t ment lever.3.
Remove t he s teeri ng col umn upper cowl .4.
Remove t he s teeri ng col umn l ower cowl.5.
6. CAUTION: Make s ure that the cl ocks pring rot ordoes not rot at e.
Remove t he cl ocks pri ng.
6.
Installation
1. CAUTION: Correct cl ocks pring al ignment can be found byviewi ng a yell ow marker t hrough the window s it uated on theclocks pring face, at the 8 o'clock posi ti on. If t he marker is notvis ibl e, carefull y turn t he cl ocks pri ng ful ly clockwis e. Turn t heclocks pring i n a count erclockwis e direct ion 3.25 t urns . The yel lowmarker s hould now be in t he central pos it ion.
To i nst all , revers e t he removal procedure.
1.
Page 2509 of 3229
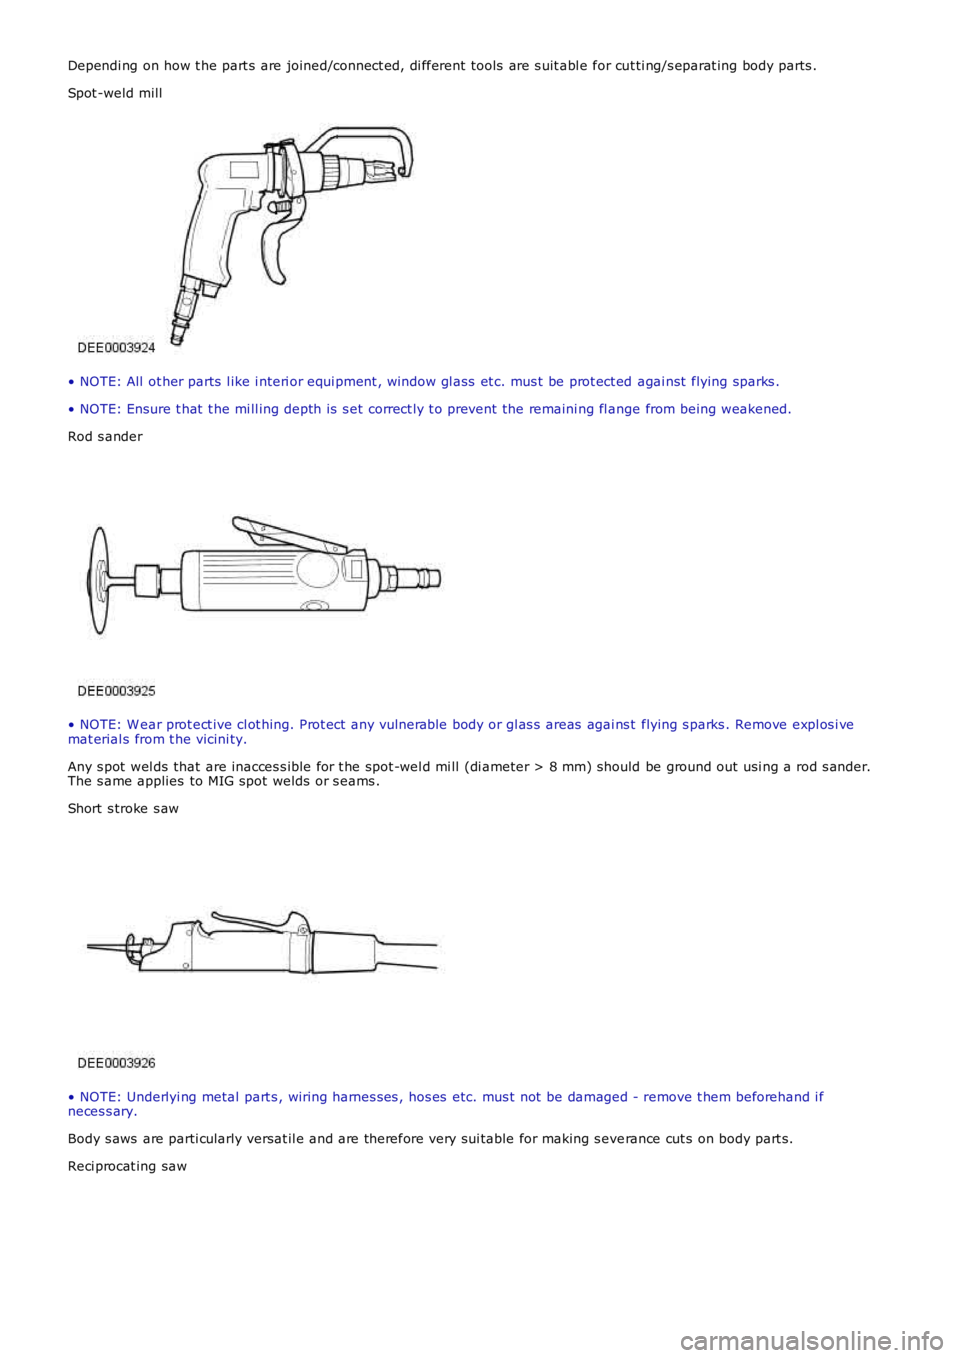
Dependi ng on how t he part s are joined/connect ed, di fferent tools are s uit abl e for cut ti ng/s eparat ing body parts .
Spot -weld mill
• NOTE: All ot her parts l ike i nteri or equi pment , window gl ass et c. mus t be prot ect ed agai nst flying sparks .
• NOTE: Ensure t hat t he mi ll ing depth is s et correct ly t o prevent the remaini ng fl ange from being weakened.
Rod s ander
• NOTE: W ear prot ect ive cl ot hing. Prot ect any vulnerable body or gl as s areas agai ns t flying s parks . Remove expl os i vemat erial s from t he vicini ty.
Any s pot wel ds that are inacces s ible for t he spot -wel d mi ll (di ameter > 8 mm) should be ground out usi ng a rod s ander.The s ame applies to MIG spot welds or s eams .
Short s troke s aw
• NOTE: Underlyi ng metal part s , wiring harnes s es , hos es etc. mus t not be damaged - remove t hem beforehand i fneces s ary.
Body s aws are parti cularly versat il e and are therefore very sui table for making s everance cut s on body part s.
Reci procat ing saw
Page 2514 of 3229
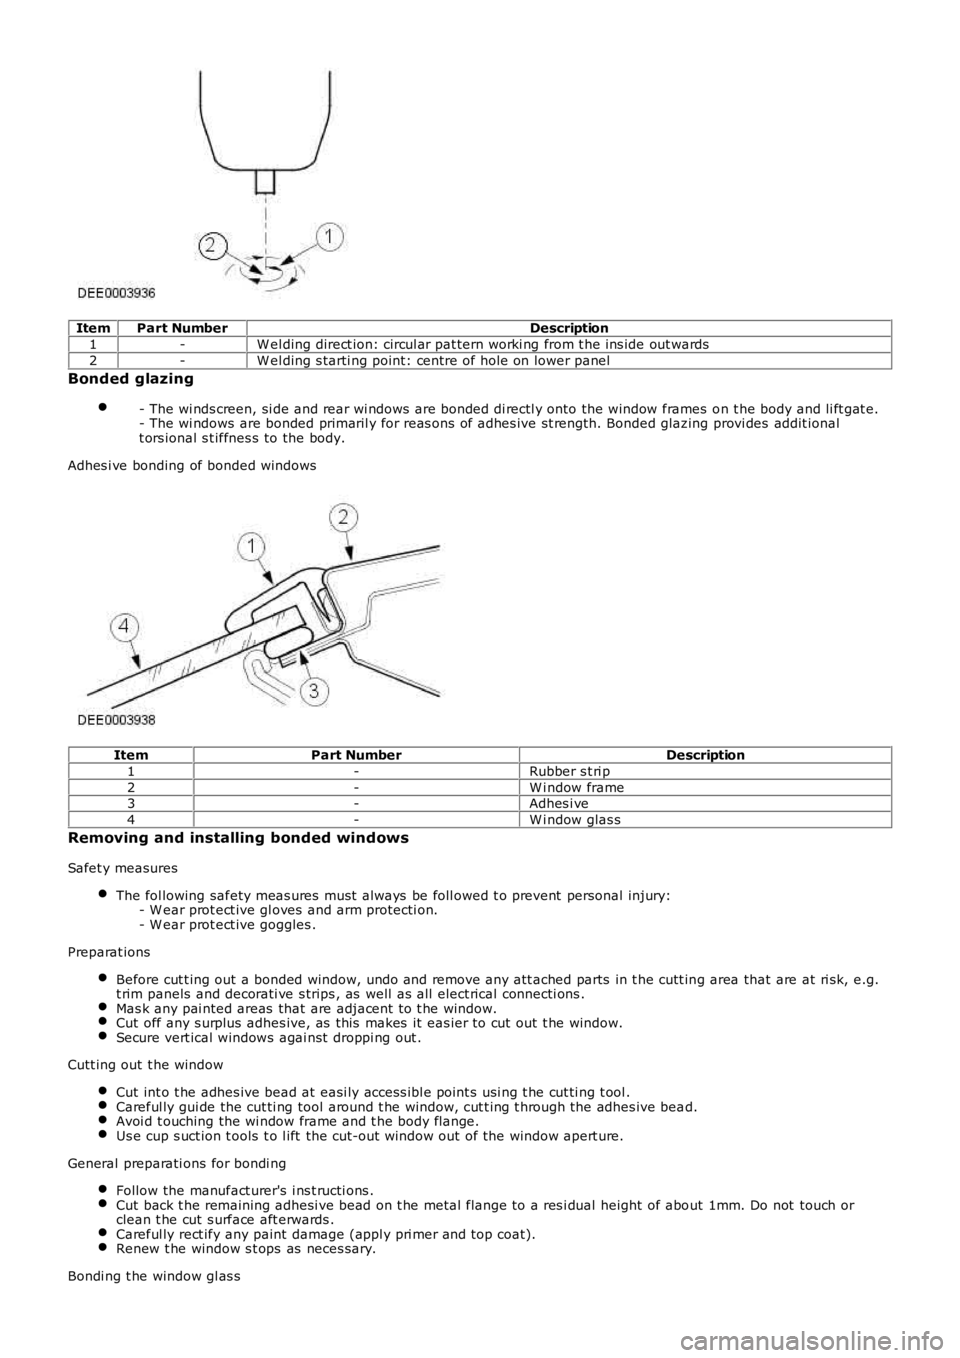
ItemPart NumberDescription
1-W el ding direct ion: circul ar pat tern worki ng from t he ins ide out wards
2-W el ding s tarti ng point: centre of hole on lower panel
Bonded glazing
- The wi nds creen, si de and rear wi ndows are bonded di rectl y onto the window frames on t he body and li ft gat e.- The wi ndows are bonded primaril y for reas ons of adhes ive st rength. Bonded glazing provi des addit ionalt ors ional s t iffnes s to the body.
Adhes i ve bonding of bonded windows
ItemPart NumberDescription
1-Rubber s t ri p
2-W i ndow frame3-Adhes i ve
4-W i ndow glas s
Removing and installing bonded windows
Safet y measures
The fol lowing safety meas ures must al ways be foll owed t o prevent personal injury:- W ear prot ect ive gl oves and arm protecti on.- W ear prot ect ive goggles .
Preparat ions
Before cut t ing out a bonded window, undo and remove any att ached parts in t he cutt ing area that are at ri sk, e.g.t rim panels and decorati ve s trips , as well as all elect rical connecti ons .Mas k any pai nted areas that are adjacent t o t he window.Cut off any s urplus adhes ive, as this makes it eas ier to cut out t he window.Secure vert ical windows agai nst droppi ng out .
Cutt ing out t he window
Cut int o t he adhes ive bead at easi ly access ibl e point s usi ng t he cut ti ng t ool .Careful ly gui de the cut ti ng tool around t he window, cut t ing t hrough the adhes ive bead.Avoi d t ouching the wi ndow frame and t he body fl ange.Us e cup s uct ion t ools t o l ift the cut-out window out of the window apert ure.
General preparati ons for bondi ng
Follow the manufact urer's i ns t ructi ons .Cut back t he remaining adhesi ve bead on t he metal flange to a res i dual height of about 1mm. Do not touch orclean t he cut s urface aft erwards .Careful ly rect ify any paint damage (appl y pri mer and top coat).Renew t he window s t ops as neces sary.
Bondi ng t he window gl as s
Page 2515 of 3229
Apply an even bead of adhes ive t o t he wi ndow or t o t he body fl ange.Ins ert the wi ndow glas s int o t he window apert ure and cent re i t (2 technicians required).Check t he gaps.• NOTE: Open t he windows and doors whi le the wi ndow is left t o dry and do not move the vehi cl e (sl amming doorscreates excess press ure which could cause the window t o become loos e).
Us e adhes i ve tape t o prevent the window from fall ing out or s li ppi ng.
Finis hing operat ions
Reconnect al l el ect ri cal connect ions and check t hat t he component s operate correctl y.Ins t all the at t ached part s and check t hat the fit i s accurat e and s ecure.- Carry out a vis ual ins pect ion t o ensure t hat t he gaps and joi nts are even.Thoroughl y clean t he window gl as s .
Protective equipment and safety at work
Vari ous safet y meas ures and l egal requi rements mus t be met when carryi ng out repairs. Al l regulati ons relat ing t oheal th and s afety at work mus t be followed.
W el di ng s afet y precaut ions
The fol lowing safety precauti ons mus t be observed to prevent t he ri s k of pers onal injury:- Safet y hood (face protecti on).- W el ding s hield.- Safet y gloves.- Safet y s hoes .- Extract ion unit for welding smoke.W el di ng s houl d always be carried out i n well venti lated areas. A fi re ext inguis her must al so always be wi thin reach.
General body repair safety measures
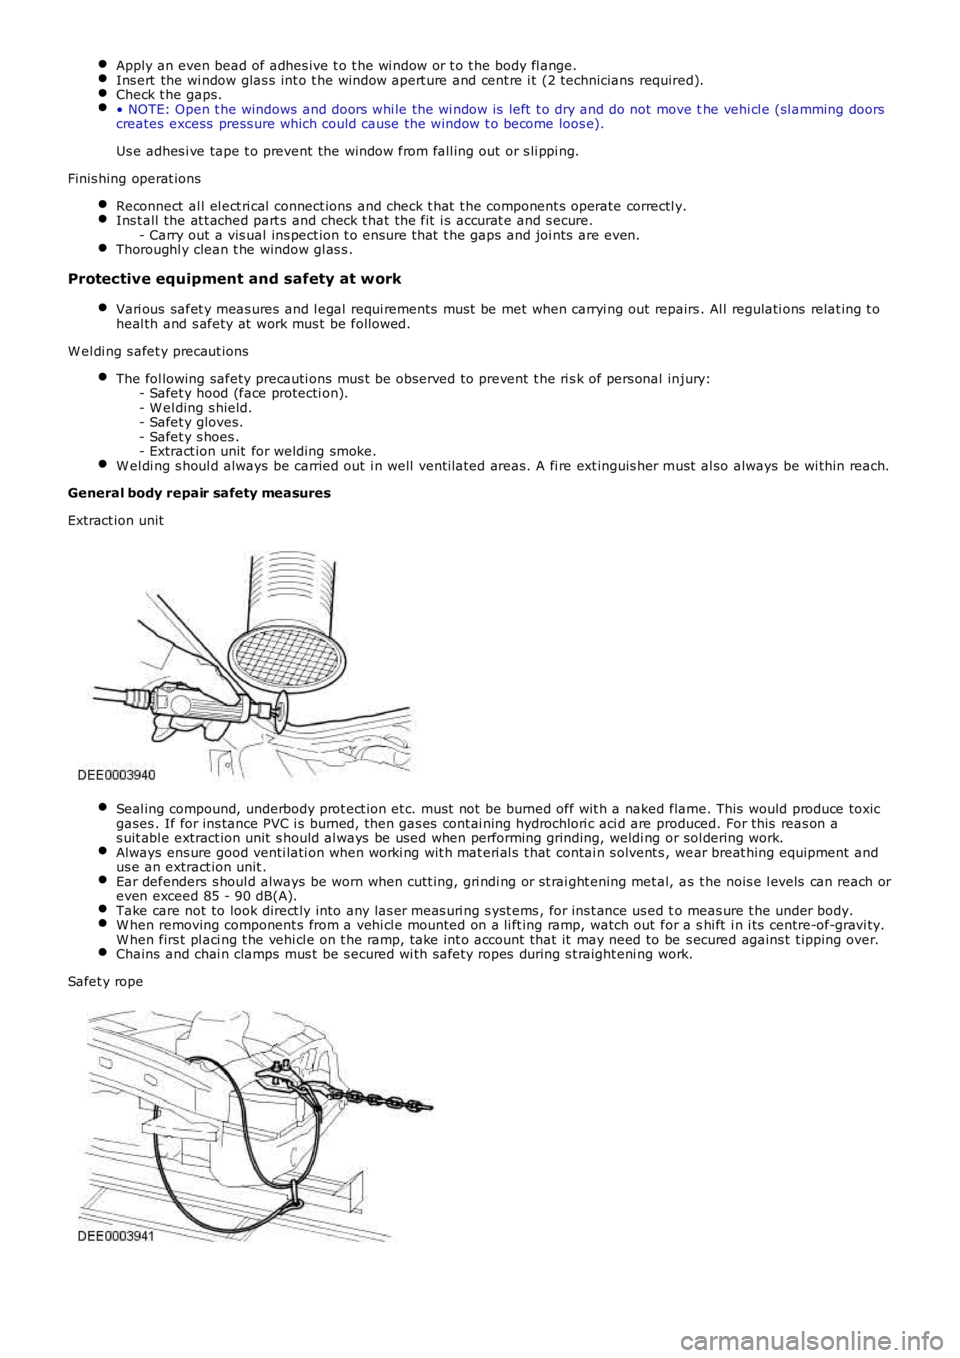
Extract ion unit
Seal ing compound, underbody prot ect ion et c. must not be burned off wit h a naked flame. This would produce toxicgases . If for ins tance PVC i s burned, then gas es cont ai ning hydrochlori c aci d are produced. For this reas on as uit abl e extract ion unit s hould al ways be used when performing grinding, weldi ng or sol dering work.Always ens ure good venti lati on when worki ng wit h mat eri al s t hat contai n s olvent s , wear breat hing equipment andus e an extract ion unit .Ear defenders s houl d always be worn when cutt ing, gri ndi ng or st rai ght ening met al, as t he nois e l evels can reach oreven exceed 85 - 90 dB(A).Take care not to look direct ly into any las er meas uri ng s yst ems , for ins t ance us ed to meas ure t he under body.W hen removing component s from a vehi cl e mounted on a li ft ing ramp, watch out for a shi ft i n i ts centre-of-gravi ty.W hen firs t pl aci ng t he vehi cl e on t he ramp, t ake int o account that it may need to be s ecured agains t t ipping over.Chains and chai n clamps mus t be s ecured wi th safety ropes during s t raight eni ng work.
Safet y rope