2006 LAND ROVER FRELANDER 2 power steering
[x] Cancel search: power steeringPage 2881 of 3229
161
Maintenance
R
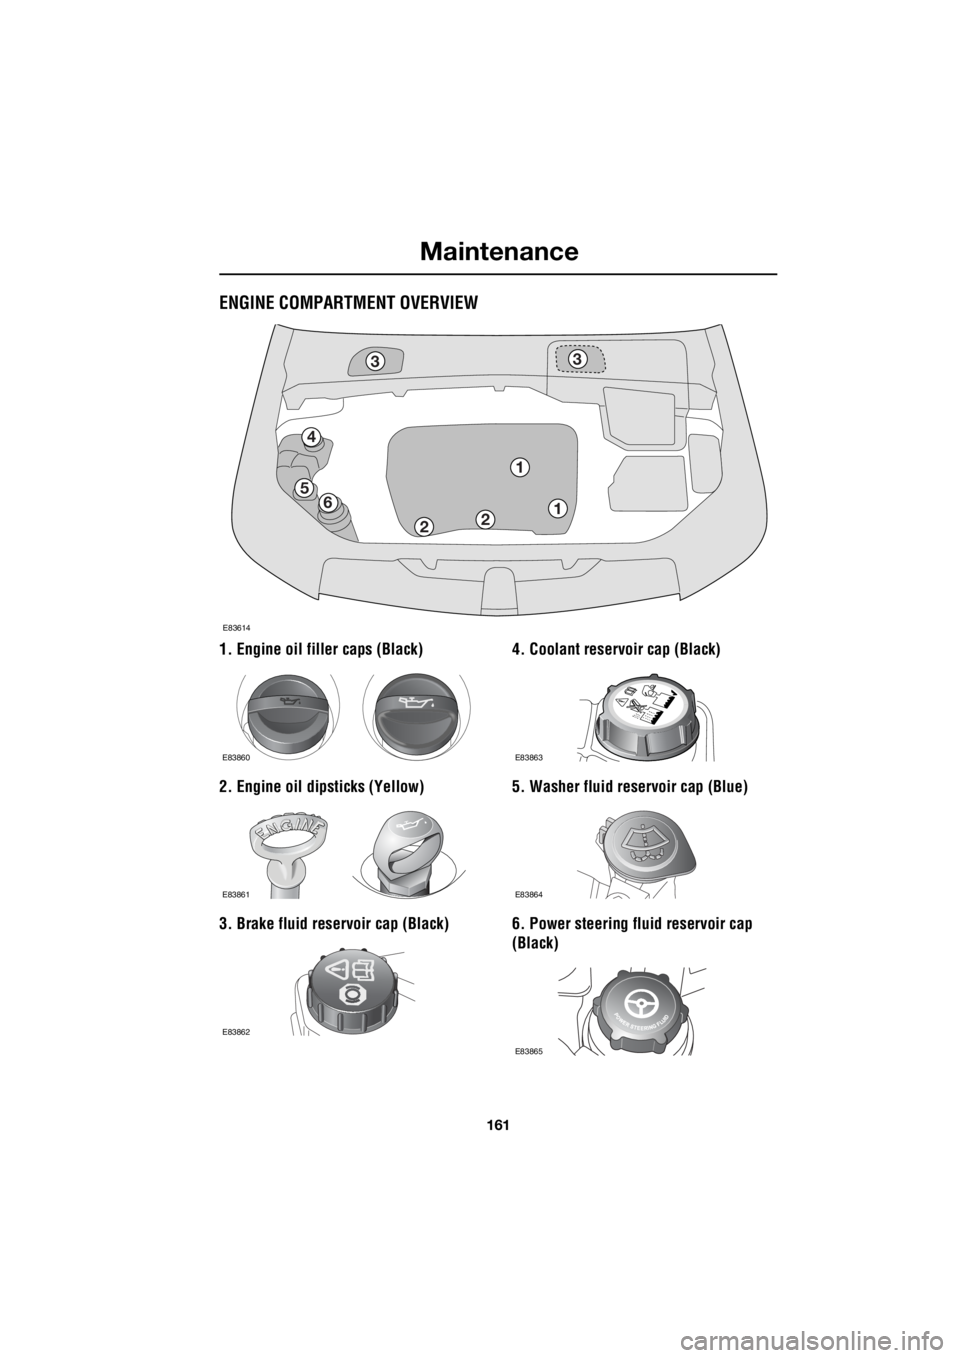
ENGINE COMPARTMENT OVERVIEW
1. Engine oil filler caps (Black)
2. Engine oil dipsticks (Yellow)
3. Brake fluid reservoir cap (Black) 4. Coolant reservoir cap (Black)
5. Washer fluid reservoir cap (Blue)
6. Power steering fluid reservoir cap
(Black)
3
4
56
21
3
1
2
E83614
E83860
E83861
E83862
E83863
E83864
E83865
Page 2886 of 3229
Maintenance
166
L
3. Clean the filler cap before removing to
prevent dirt from entering the reservoir.
4. Remove the filler cap.
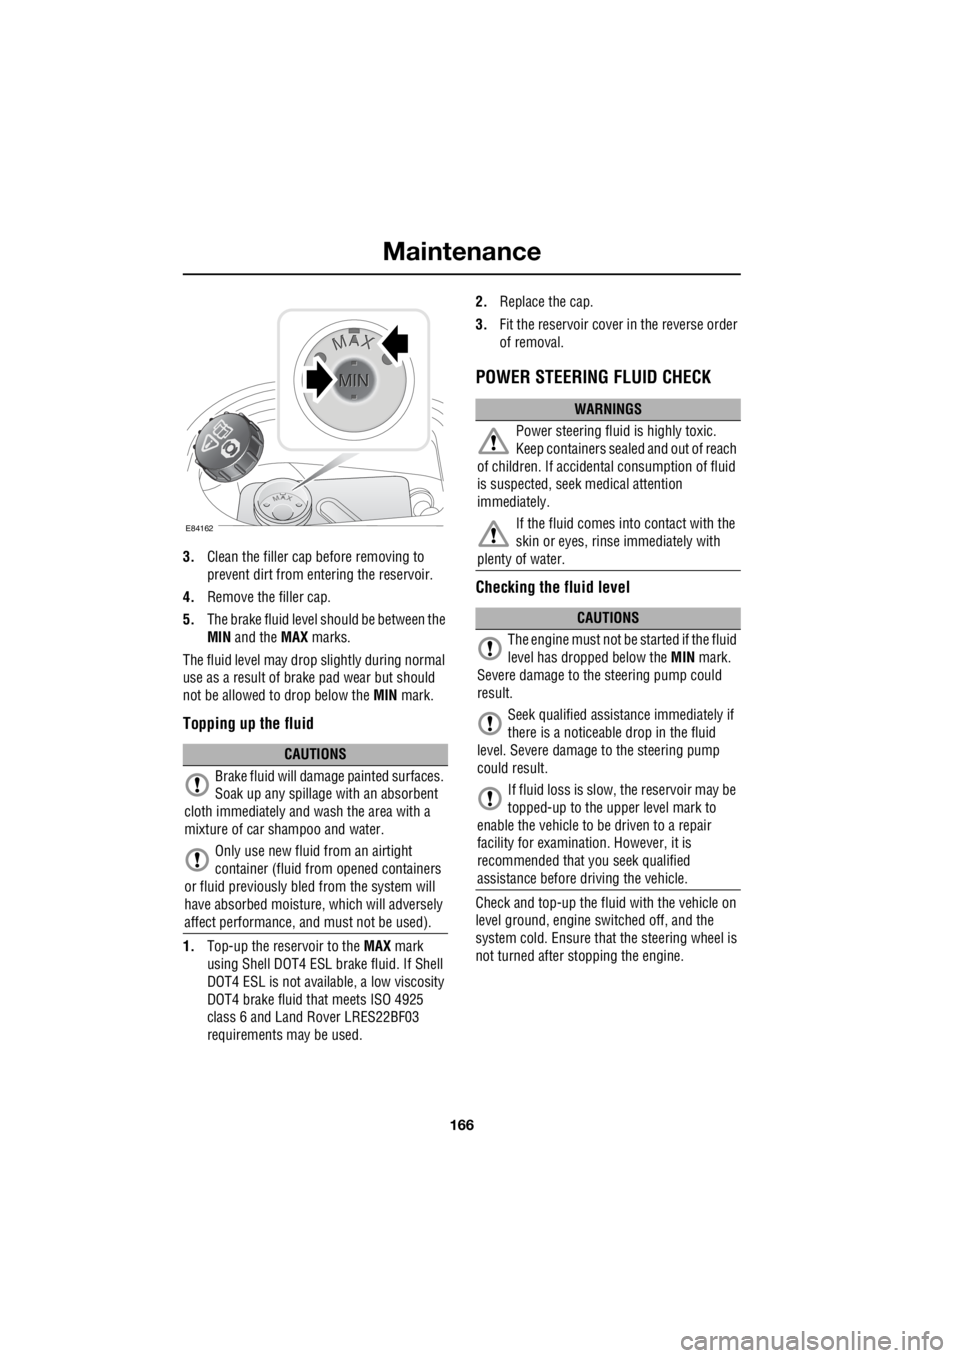
5. The brake fluid level should be between the
MIN and the MAX marks.
The fluid level may drop slightly during normal
use as a result of brake pad wear but should
not be allowed to drop below the MIN mark.
Topping up the fluid
1.Top-up the reservoir to the MAX mark
using Shell DOT4 ESL brake fluid. If Shell
DOT4 ESL is not availa ble, a low viscosity
DOT4 brake fluid that meets ISO 4925
class 6 and Land Rover LRES22BF03
requirements ma y be used. 2.
Replace the cap.
3. Fit the reservoir cover in the reverse order
of removal.
POWER STEERING FLUID CHECK
Checking the fluid level
Check and top-up the fluid with the vehicle on
level ground, engine switched off, and the
system cold. Ensure that the steering wheel is
not turned after stopping the engine.
CAUTIONS
Brake fluid will damage painted surfaces.
Soak up any spillage with an absorbent
cloth immediately and wash the area with a
mixture of car sh ampoo and water.
Only use new fluid from an airtight
container (fluid from opened containers
or fluid previously bled from the system will
have absorbed moisture, which will adversely
affect performance, and must not be used).
E84162
WARNINGS
Power steering fluid is highly toxic.
Keep containers sealed and out of reach
of children. If accidental consumption of fluid
is suspected, seek medical attention
immediately.
If the fluid comes into contact with the
skin or eyes, rinse immediately with
plenty of water.
CAUTIONS
The engine must not be started if the fluid
level has dropped below the MIN mark.
Severe damage to th e steering pump could
result.
Seek qualified assistance immediately if
there is a noticeable drop in the fluid
level. Severe damage to the steering pump
could result.
If fluid loss is slow, the reservoir may be
topped-up to the uppe r level mark to
enable the vehicle to be driven to a repair
facility for examinatio n. However, it is
recommended that you seek qualified
assistance before driving the vehicle.
Page 2887 of 3229
167
Maintenance
R
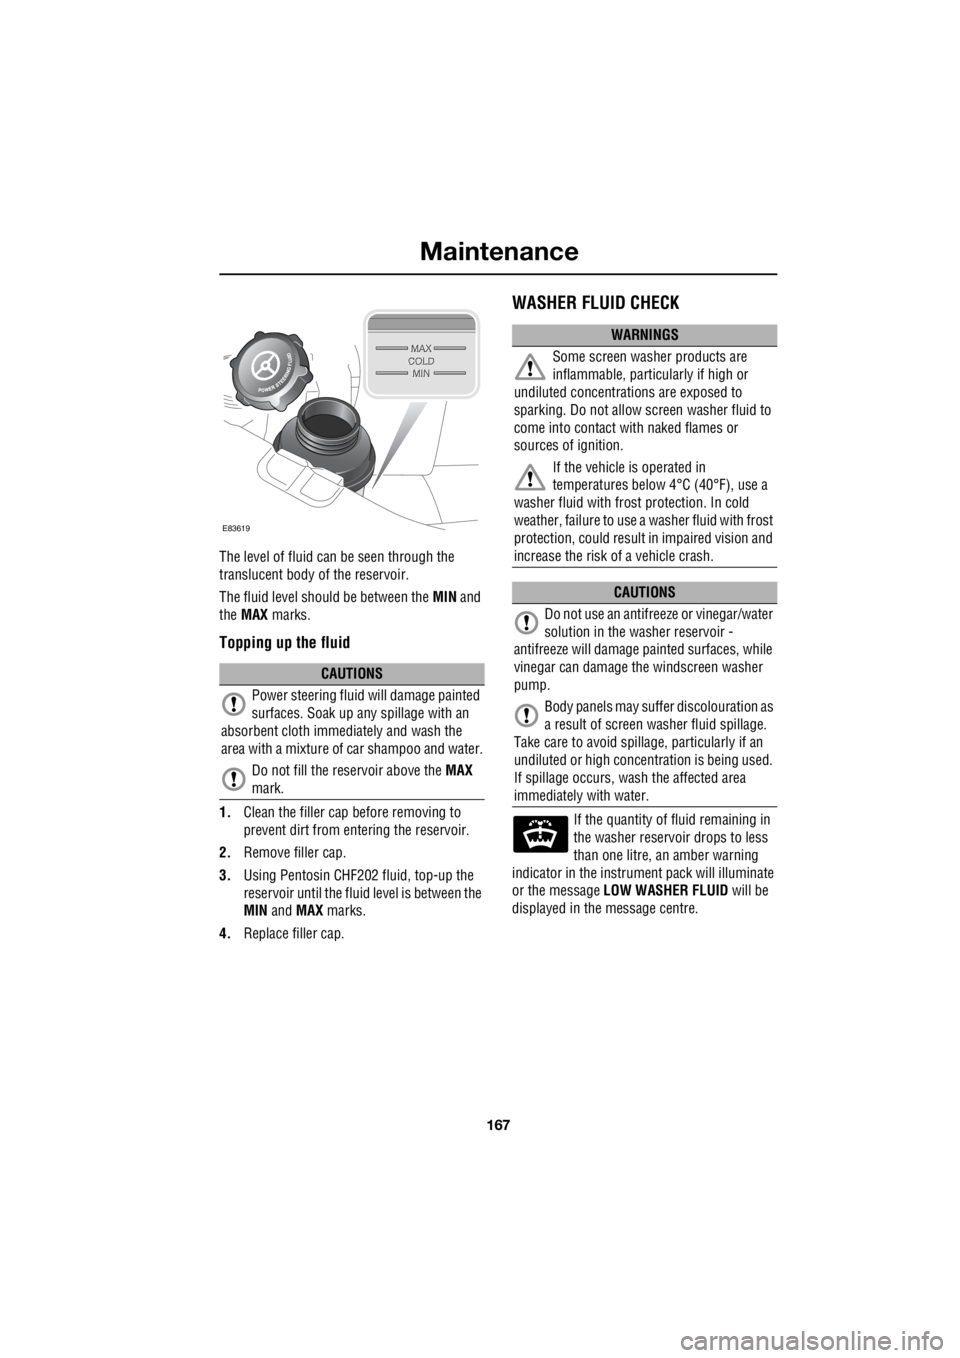
The level of fluid can be seen through the
translucent body of the reservoir.
The fluid level should be between the MIN and
the MAX marks.
Topping up the fluid
1.Clean the filler cap before removing to
prevent dirt from entering the reservoir.
2. Remove filler cap.
3. Using Pentosin CHF202 fluid, top-up the
reservoir until the flui d level is between the
MIN and MAX marks.
4. Replace filler cap.
WASHER FLUID CHECK
If the quantity of fluid remaining in
the washer reservoir drops to less
than one litre, an amber warning
indicator in the instrument pack will illuminate
or the message LOW WASHER FLUID will be
displayed in the message centre.
CAUTIONS
Power steering fluid will damage painted
surfaces. Soak up any spillage with an
absorbent cloth immediately and wash the
area with a mixture of car shampoo and water.
Do not fill the reservoir above the MAX
mark.
E83619
WARNINGS
Some screen washer products are
inflammable, particul arly if high or
undiluted concentrati ons are exposed to
sparking. Do not allow screen washer fluid to
come into contact with naked flames or
sources of ignition.
If the vehicle is operated in
temperatures below 4°C (40°F), use a
washer fluid with frost protection. In cold
weather, failure to use a washer fluid with frost
protection, could result in impaired vision and
increase the risk of a vehicle crash.
CAUTIONS
Do not use an antifree ze or vinegar/water
solution in the washer reservoir -
antifreeze will damage painted surfaces, while
vinegar can damage th e windscreen washer
pump.
Body panels may suff er discolouration as
a result of screen washer fluid spillage.
Take care to avoid spilla ge, particularly if an
undiluted or high concentr ation is being used.
If spillage occurs, wash the affected area
immediately with water.
Page 2889 of 3229

169
Maintenance
R
TECHNICAL SPECIFICATIONS
Lubricants and fluids
¹ If Shell DOT4 ESL is not available, a low
viscosity DOT4 brake fl uid that meets ISO 4925
class 6 and Land Rover LRES22BF03
requirements may be used. Part Variant Specification
Engine oil Diesel vehicles SAE 5W-30 meeting Ford 913-B specification.
Engine oil Petrol vehicles SA E 0W-30 meeting ACEA A5
or B5 specification.
Main gearbox oil Manual tr ansmission Castrol MTF 97309
Main gearbox oil Automatic transmission Esso JWS3309US
Power transfer unit fluid Die sel vehicles Castrol BOT119
Power transfer unit fluid Petrol vehicles Castrol BOT118
Rear differential oil All vehicles Castrol EPX
Rear differential on demand
coupler fluid All vehicles STAT OIL SL01-301
Power steering fluid All vehicl es Pentosin CHF202 PAS fluid
Brake fluid All vehicles Shell DOT4 ESL ¹
Screen washer All vehicles Screen wash with frost protection
Coolant All vehicles 50% mixture of Texaco XLC antifreeze and water.
Page 2911 of 3229
191
Wheels and tyres
R
12. During the inflation, switch the
compressor off briefly to check the tyre
pressure using the gauge mounted on the
compressor.
• It should not take longer than seven
minutes to inflate the tyre. If after seven
minutes the tyre ha s not reached the
minimum pressure, the tyre should not
be used.
13. Once the tyre has been inflated switch off
the compressor. If desired the engine may
be turned off after the compressor has
been turned off.
14. Remove the power connector from the
auxiliary power socket.
15. Remove the inflation hose from the tyre
valve by unscrewing it as quickly as
possible (anti-clockwise).
16. Replace the inflation hose protective cap,
and the tyre valve cap.
17. Do not remove the sealant bottle from the
receiver.
18. Ensure that the tyre repair kit (including
the bottle, and receiver caps) are placed
securely in the vehicle. You will need to
use the kit to check the tyre pressure after
3km (2 miles) so ensure they are easily
accessible.
19. Immediately drive the vehicle for 3 km (2
miles) to allow the sealant to coat the inner
surface of the tyre and form a seal at the
puncture.
†When pumping the sealant through the tyre
valve, the pressure may rise up to 6 bar (87
lb/in²). The pressure will drop again after
approximately 30 seconds.
Checking the tyre pressure after a repair
1. Drive the vehicle for 3 km (2 miles) then
stop in a safe place. Carry out a visual
examination of the tyres condition.
2. Remove the protective cap from the
inflation hose.
3. Screw the inflation hos e connector firmly
onto the tyre valve.
4. Read the tyre pressure from the gauge.
5. If the pressure of the sealant filled tyre is
above 1.3 bar (19 lb/in²) adjust the
pressure to the correct value. See
TECHNICAL SPECIFICATIONS (page 194).
6. Ensure that the compressor switch is in
the off position ( O), and insert the power
cable connector into an auxiliary power
socket. See AUXILIARY POWER
SOCKETS (page 110).
7. If the vehicle is in a well ventilated area,
start the engine.
8. Switch on the compressor ( I), and inflate
the tyre to the correct pressure.
WARNINGS
When driving the vehicle, if you
experience vibr ations, abnormal
steering, or noises, re duce speed immediately.
Drive with extreme caution and reduced speed
to the first safe place to stop the vehicle.
Visually examine the tyre, and check it's
pressure. If there are any signs of damage or
deformity to the tyre, or the tyre pressure is
below 1.3 bar (19 lb/i n²) do not continue
driving.
Consult a tyre repair centre, or your
Land Rover Dealer/Authorised repairer
for advice concerning the replacement of a
tyre after using a tyre repair kit.
Page 2928 of 3229
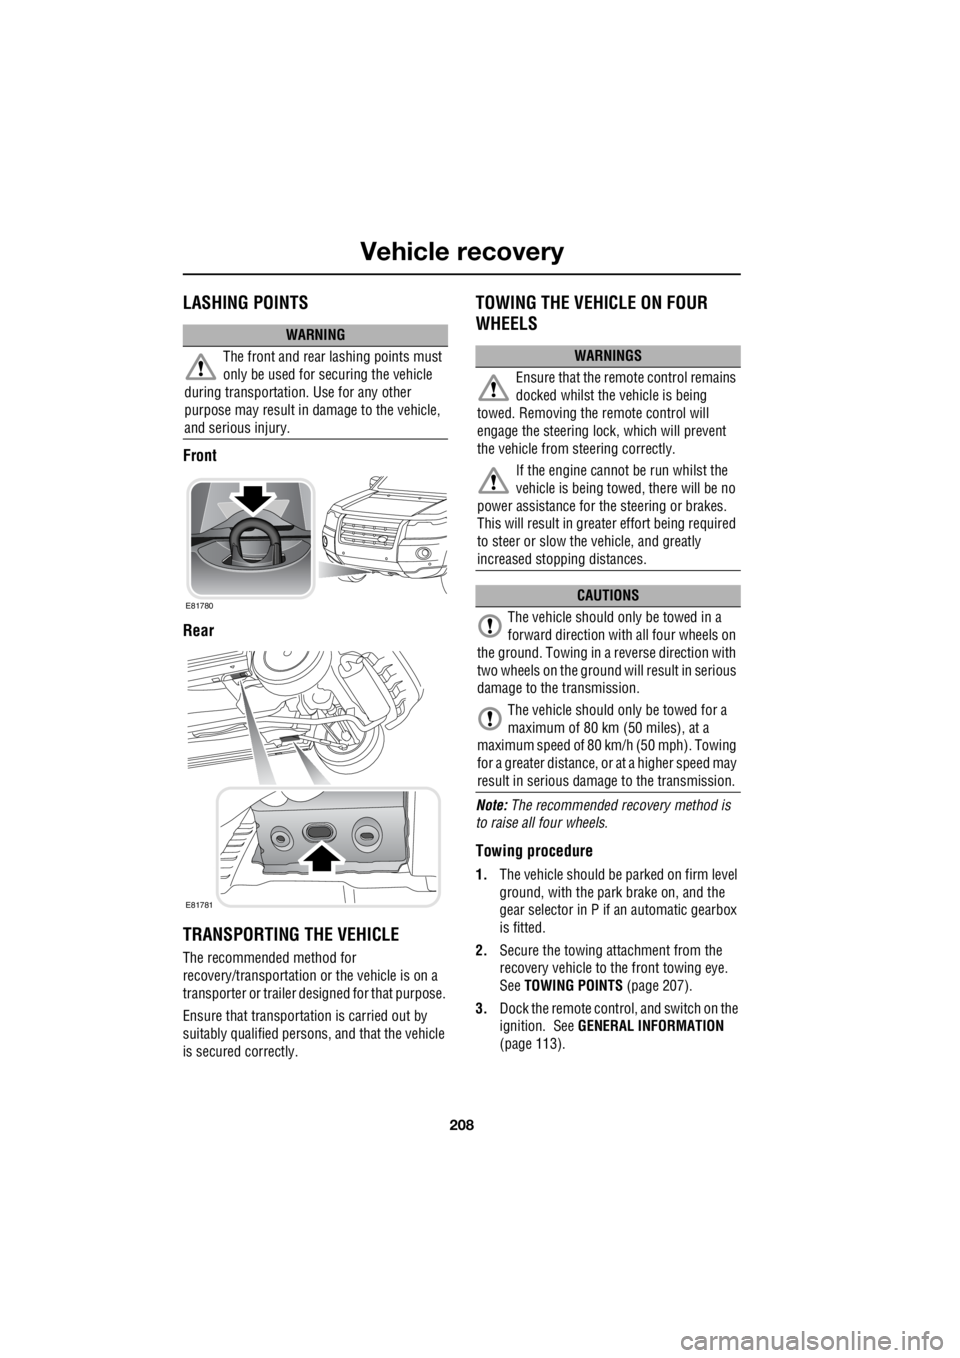
Vehicle recovery
208
L
LASHING POINTS
Front
Rear
TRANSPORTING THE VEHICLE
The recommended method for
recovery/transportation or the vehicle is on a
transporter or trailer de signed for that purpose.
Ensure that transporta tion is carried out by
suitably qualified persons , and that the vehicle
is secured correctly.
TOWING THE VEHICLE ON FOUR
WHEELS
Note: The recommended recovery method is
to raise all four wheels.
Towing procedure
1. The vehicle should be parked on firm level
ground, with the park brake on, and the
gear selector in P if an automatic gearbox
is fitted.
2. Secure the towing attachment from the
recovery vehicle to the front towing eye.
See TOWING POINTS (page 207).
3. Dock the remote control, and switch on the
ignition. See GENERAL INFORMATION
(page 113).
WARNING
The front and rear lashing points must
only be used for securing the vehicle
during transportation. Use for any other
purpose may result in da mage to the vehicle,
and serious injury.
E81780
E81781
WARNINGS
Ensure that the remote control remains
docked whilst the vehicle is being
towed. Removing the remote control will
engage the steering lo ck, which will prevent
the vehicle from steering correctly.
If the engine cannot be run whilst the
vehicle is being towed, there will be no
power assistance for the steering or brakes.
This will result in grea ter effort being required
to steer or slow the vehicle, and greatly
increased stopping distances.
CAUTIONS
The vehicle should only be towed in a
forward direction with all four wheels on
the ground. Towing in a reverse direction with
two wheels on the ground will result in serious
damage to the transmission.
The vehicle should only be towed for a
maximum of 80 km (50 miles), at a
maximum speed of 80 k m/h (50 mph). Towing
for a greater distance, or at a higher speed may
result in serious dama ge to the transmission.
Page 2991 of 3229

Index
271
R
A
ABS driving hints . . . . . . . . . . . . . . . . . . 123
Accessories . . . . . . . . . . . . . . . . . . . . . . . . 37
Adaptive front lighting system (AFS). . . . . 74
Adjusting the headlamps . . . . . . . . . . . . . . 73
Adjusting the steering wheel . . . . . . . . . . . 70
Adjusting the windscreen washer jets . . . . 89 Blocked jets . . . . . . . . . . . . . . . . . . . . . 90
Front . . . . . . . . . . . . . . . . . . . . . . . . . . . 89
Rear . . . . . . . . . . . . . . . . . . . . . . . . . . . 89
AFS . . . . . . . . . . . . . . . . . . . . . . . . . . . . . . 74
Air vents . . . . . . . . . . . . . . . . . . . . . . . . . 101
Airbag service information . . . . . . . . . . . . 63
Airbag warning lamp . . . . . . . . . . . . . . . . . 61
Alternative frequencies . . . . . . . . . . . . . . 229
Alternative Frequency (AF) - Premium audio 230
Alternative Frequency (A F) - Standard audio
230
Approach lamps . . . . . . . . . . . . . . . . . . . . 76
Arming the alarm . . . . . . . . . . . . . . . . . . . 45
Alarm indicator . . . . . . . . . . . . . . . . . . . 45
Full alarm . . . . . . . . . . . . . . . . . . . . . . . 45
Partial alarm . . . . . . . . . . . . . . . . . . . . . 45
Ashtray . . . . . . . . . . . . . . . . . . . . . . . . . . 109
Audio control. . . . . . . . . . . . . . . . . . . 70, 223 Audio control using the telephone buttons .
71
Balance adjustment. . . . . . . . . . . . . . . 224
Bass response adjustment . . . . . . . . . 223
Centre speaker settings . . . . . . . . . . . 224
Fader adjustment . . . . . . . . . . . . . . . . 224
Resetting tone values . . . . . . . . . . . . . 224
Subwoofer settings . . . . . . . . . . . . . . . 224
Surround sound settings . . . . . . . . . . 223
Treble response adjustment . . . . . . . . 223
Audio controls . . . . . . . . . . . . . . . . . . . . . 235
Audio unit overview. . . . . . . . . . . . . . . . . 219 Basic audio functions . . . . . . . . . . . . . 222
Premium audio overview . . . . . . . . . . 219
Standard audio overview . . . . . . . . . . 221
Automatic climate control . . . . . . . . . . . . 103
Controls . . . . . . . . . . . . . . . . . . . . . . . 103 Automatic transmission . . . . . . . . . . . . . . 118
Automatic mode. . . . . . . . . . . . . . . . . . 119
Electronic gear change strategies . . . . 120
Sport mode and CommandShift™ . . . . 120
Autostore control . . . . . . . . . . . . . . . . . . . 225 Autostoring radio stat ions - Premium audio
225
Autostoring radio stati ons - Standard audio
225
Auxiliary heater. . . . . . . . . . . . . . . . . . . . . 104
Auxiliary input (AUX IN) socket . . . . . . . . 250 Auxiliary mode . . . . . . . . . . . . . . . . . . . 251
Auxiliary power sockets . . . . . . . . . . . . . . 110
B
Battery care . . . . . . . . . . . . . . . . . . . . . . . 171
Battery charging . . . . . . . . . . . . . . . . . . . . 174
Battery warning symbols . . . . . . . . . . . . . 171
Bluetooth setup . . . . . . . . . . . . . . . . . . . . 256
Adding or changing a telephone. . . . . . 257
Loss of Bluetooth link . . . . . . . . . . . . . 257
Pairing a telephone to the system . . . . 256
Removing a telephone fr om the system. . .
257
Bonnet lock . . . . . . . . . . . . . . . . . . . . . . . 160
Booster cables . . . . . . . . . . . . . . . . . . . . . 173
Booster cushions . . . . . . . . . . . . . . . . . . . . 66
Brake and clutch fluid check . . . . . . . . . . . 165
Checking the fluid level . . . . . . . . . . . . 165
Topping up the fluid . . . . . . . . . . . . . . . 166
Brakes
Principle of operation . . . . . . . . . . . . . . 123
Bulb changing . . . . . . . . . . . . . . . . . . . . . . 77
Bulb specification chart . . . . . . . . . . . . . . . 86
C
Car wash . . . . . . . . . . . . . . . . . . . . . . . . . 154
Page 2993 of 3229

Index
273
R
Driving after a collision . . . . . . . . . . . . . . 205 Before starting or driving . . . . . . . . . . 205
Resetting the fuel cut-off . . . . . . . . . . 205
When driving . . . . . . . . . . . . . . . . . . . 205
E
Economical driving . . . . . . . . . . . . . . . . . 129
Driving tips for economy . . . . . . . . . . 129
Maintenance and fuel economy . . . . . 129
Ejecting compact discs . . . . . . . . . . . . . . 246
Ejecting multiple compact discs . . . . . . . 246
Electric exterior mirrors . . . . . . . . . . . . . . 95 Adjusting and folding . . . . . . . . . . . . . . 95
Mirror dip when reversing . . . . . . . . . . 96
Electric seats . . . . . . . . . . . . . . . . . . . . . . . 49 Driving position memory . . . . . . . . . . . 50
Electric sunroof . . . . . . . . . . . . . . . . . . . . 105 Anti-trap mechanism . . . . . . . . . . . . . 105
Calibration . . . . . . . . . . . . . . . . . . . . . 106
Operation . . . . . . . . . . . . . . . . . . . . . . 105
Sunroof blinds . . . . . . . . . . . . . . . . . . 106
Electric windows . . . . . . . . . . . . . . . . . . . . 93
One shot operation . . . . . . . . . . . . . . . . 93
Overriding anti-trap protec tion . . . . . . . 93
Window isolator . . . . . . . . . . . . . . . . . . 94
Window reset . . . . . . . . . . . . . . . . . . . . 94
Engine compartment overview . . . . . . . . 161 1. Engine oil filler caps (Black) . . . . . . 161
2. Engine oil dipsticks (Yellow) . . . . . . 161
3. Brake fluid reservoi r cap (Black) . . . 161
4. Coolant reservoir ca p (Black) . . . . . 161
5. Washer fluid reserv oir cap (Blue) . . 161
6. Power steering flui d reservoir cap (Black)
161
Engine coolant check . . . . . . . . . . . . . . . 163 Checking the coolant level . . . . . . . . . 163
Topping up the coolant . . . . . . . . . . . . 164
Engine oil check . . . . . . . . . . . . . . . . . . . 162 Checking the oil level . . . . . . . . . . . . . 162
Engine oil specification . . . . . . . . . . . . 163
Topping up the oil . . . . . . . . . . . . . . . . 163
Engine specifications. . . . . . . . . . . . . . . . 211
Enhanced other network (RDS-EON). . . . 229
Essential towing checks . . . . . . . . . . . . . 151
Event data recording . . . . . . . . . . . . . . . . . 37 Exterior mirrors . . . . . . . . . . . . . . . . . . . . . 94
Proximity mirror (Japan only) . . . . . . . . 94
F
Fast forward/reverse . . . . . . . . . . . . . . . . . 247
Fastening the seat belts . . . . . . . . . . . . . . . 56 Releasing the seat belts . . . . . . . . . . . . . 56
Filling station information . . . . . . . . . . . . . . 33 Engine coolant specification. . . . . . . . . . 34
Engine oil specification . . . . . . . . . . . . . 34
Fuel filler flap . . . . . . . . . . . . . . . . . . . . . 33
Tyre pressures . . . . . . . . . . . . . . . . . . . . 34
Front fog lamps . . . . . . . . . . . . . . . . . . . . . 72
Fuel and refuelling Technical specifications . . . . . . . . . . . . 146
Fuel burning heater. . . . . . . . . . . . . . . . . . 104
Fuel consumption . . . . . . . . . . . . . . . . . . . 146
Fuel cut-off . . . . . . . . . . . . . . . . . . . . . . . . 144 Resetting the fuel cut-off . . . . . . . . . . . 144
Fuel filler flap . . . . . . . . . . . . . . . . . . . . . . 144
Fuel quality . . . . . . . . . . . . . . . . . . . . . . . . 142 Alternative fuels for petrol engines. . . . 143
Diesel engined vehicles . . . . . . . . . . . . 143
Petrol engined vehicles . . . . . . . . . . . . 142
Fuse box locations . . . . . . . . . . . . . . . . . . 195
Fuse specification chart . . . . . . . . . . . . . . 196 Engine compartment fuse box . . . . . . . 196
Luggage compartment fuse box . . . . . 201
Passenger compartment fuse box . . . . 199
G
General driving points . . . . . . . . . . . . . . . 128 Battery charging - red . . . . . . . . . . . . . 128
Low oil pressure - red . . . . . . . . . . . . . 128
General information on ra dio frequencies. . 40
H
Handbrake . . . . . . . . . . . . . . . . . . . . . . . . 124
Hazard warning flashers . . . . . . . . . . . 74, 204
HDC . . . . . . . . . . . . . . . . . . . . . . . . . . . . . 137
Head restraints . . . . . . . . . . . . . . . . . . . . . . 51
Headlamp adjustment . . . . . . . . . . . . . . . . . 73
Headlamp levelling . . . . . . . . . . . . . . . . . . . 73 Halogen headlamps . . . . . . . . . . . . . . . . 73
Xenon headlamps . . . . . . . . . . . . . . . . . 73
Headlamp washers . . . . . . . . . . . . . . . . . . . 88
Headphones . . . . . . . . . . . . . . . . . . . . . . . 253