2006 LAND ROVER FRELANDER 2 brake pads
[x] Cancel search: brake padsPage 441 of 3229
pad cli p mus t be fit ted i n t he upper pos it ion. Fai lure to foll ow t his
i ns t ructi on may resul t in damage t o t he vehi cl e.
Inst all t he brake pad cli ps .
Inst all t he brake pads.
7.
Secure t he brake caliper.
T orque: 35 Nm 8.
Repeat t he above procedure for t he other s ide.
9.
Inst all t he wheel s and t ires .
Refer t o: W heel and Ti re (204-04 W heel s and Tires, Removal and
Inst all at ion).
10.
Depres s t he brake pedal s everal ti mes , check the fl ui d l evel in the
brake flui d res ervoir and t op-up wi th brake fl uid i f neces s ary.
11.
Page 445 of 3229
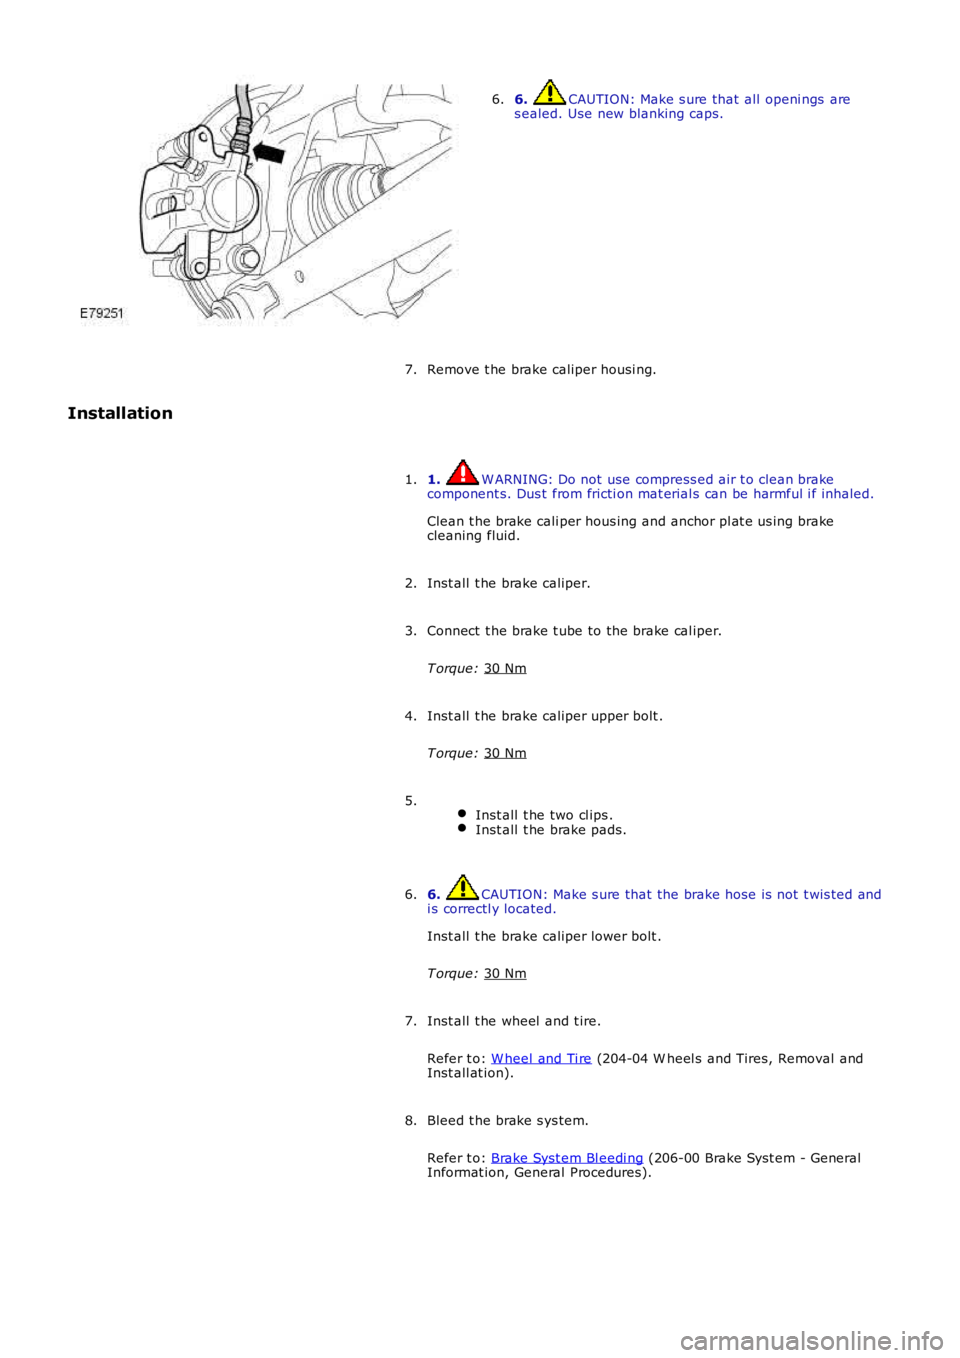
6. CAUTION: Make s ure that all openi ngs are
s ealed. Use new blanking caps.
6.
Remove t he brake caliper housi ng.
7.
Installation
1. W ARNING: Do not use compress ed air t o clean brake
component s. Dus t from fricti on mat erial s can be harmful i f inhaled.
Clean t he brake cali per hous ing and anchor pl at e us ing brake
cleaning fluid.
1.
Inst all t he brake caliper.
2.
Connect t he brake t ube to the brake cal iper.
T orque: 30 Nm 3.
Inst all t he brake caliper upper bolt .
T orque: 30 Nm 4.
Inst all t he two cl ips . Inst all t he brake pads.5.
6. CAUTION: Make s ure that the brake hose is not t wis ted and
i s correctl y located.
Inst all t he brake caliper lower bolt .
T orque: 30 Nm 6.
Inst all t he wheel and t ire.
Refer t o: W heel and Ti re (204-04 W heel s and Tires, Removal and
Inst all at ion).
7.
Bleed t he brake s ys tem.
Refer t o: Brake Syst em Bl eedi ng (206-00 Brake Syst em - General
Informat ion, General Procedures).
8.
Page 447 of 3229
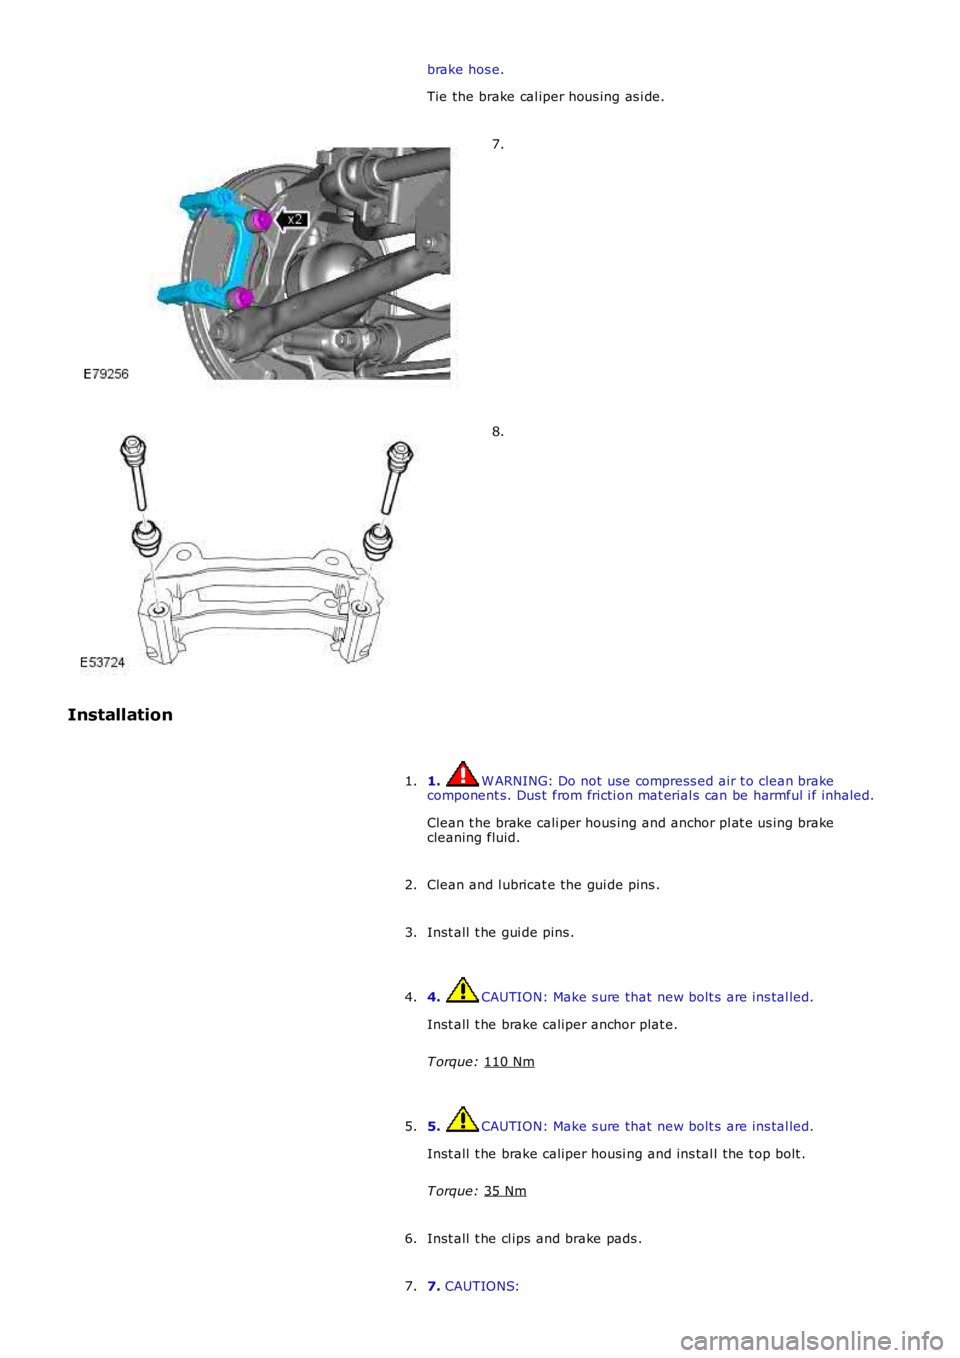
brake hos e.
Tie the brake cal iper hous ing as i de. 7.
8.
Installation 1. W ARNING: Do not use compress ed air t o clean brake
component s. Dus t from fricti on mat erial s can be harmful i f inhaled.
Clean t he brake cali per hous ing and anchor pl at e us ing brake
cleaning fluid.
1.
Clean and l ubricat e the gui de pins .
2.
Inst all t he gui de pins .
3.
4. CAUTION: Make s ure that new bolt s are ins tal led.
Inst all t he brake caliper anchor plat e.
T orque: 110 Nm 4.
5. CAUTION: Make s ure that new bolt s are ins tal led.
Inst all t he brake caliper housi ng and ins tal l the t op bolt .
T orque: 35 Nm 5.
Inst all t he cl ips and brake pads .
6.
7. CAUTIONS:
7.
Page 1582 of 3229
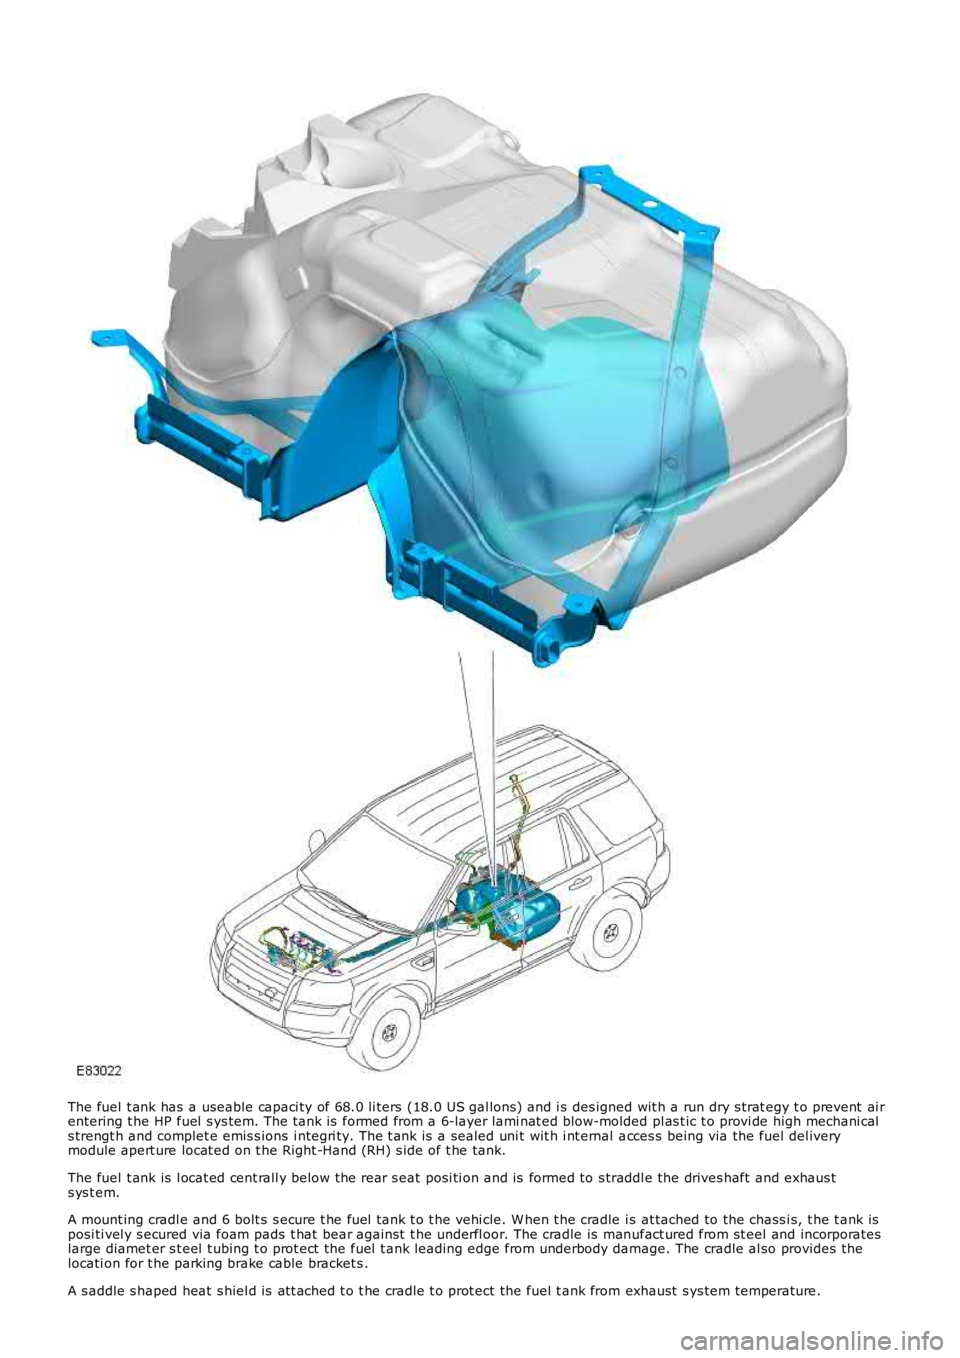
The fuel t ank has a useable capaci ty of 68.0 li ters (18.0 US gal lons) and i s des igned wit h a run dry s trat egy t o prevent ai rentering t he HP fuel s ys tem. The t ank is formed from a 6-layer lami nat ed blow-molded pl as t ic t o provi de high mechani cals trengt h and complet e emis s ions i ntegri ty. The t ank is a sealed uni t wit h i nt ernal acces s being via the fuel del iverymodule apert ure locat ed on t he Right -Hand (RH) s ide of t he tank.
The fuel t ank is l ocat ed cent rall y below the rear s eat posi ti on and is formed to s traddl e the drives haft and exhaus ts ys t em.
A mount ing cradl e and 6 bolt s s ecure t he fuel tank t o t he vehi cle. W hen t he cradle is at tached to the chass i s, t he t ank isposi ti vel y s ecured via foam pads t hat bear agai nst t he underfl oor. The cradle is manufact ured from st eel and incorporateslarge diamet er s t eel t ubing t o prot ect t he fuel t ank leading edge from underbody damage. The cradle al so provides thelocati on for t he parking brake cable bracket s .
A s addle s haped heat s hiel d is at t ached t o t he cradle t o prot ect the fuel t ank from exhaust s ys tem temperature.
Page 1790 of 3229
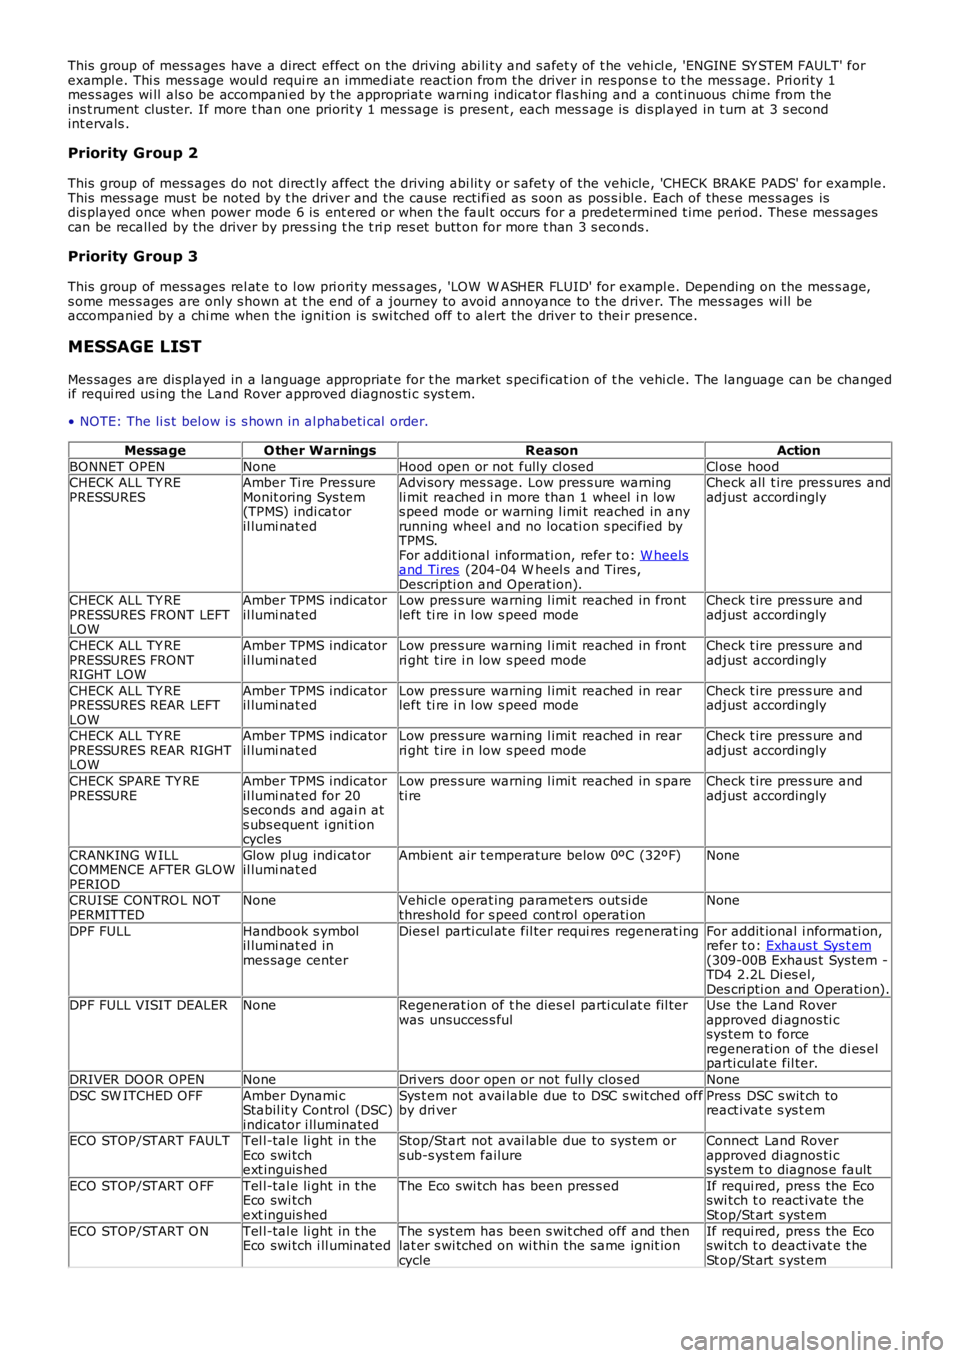
This group of mess ages have a direct effect on the driving abi li ty and s afet y of t he vehi cl e, 'ENGINE SY STEM FAULT' forexampl e. Thi s mes s age woul d requi re an immedi at e react ion from the driver in res ponse t o t he mes s age. Pri ori ty 1mes s ages wi ll als o be accompani ed by t he appropriat e warni ng indicat or flas hing and a cont inuous chime from theins t rument clus ter. If more t han one priorit y 1 mes s age is present , each mes s age is di s pl ayed in t urn at 3 s econdint ervals .
Priority Group 2
This group of mess ages do not direct ly affect the driving abi lit y or s afet y of the vehicle, 'CHECK BRAKE PADS' for example.This mes s age mus t be noted by t he driver and the cause recti fi ed as s oon as pos s ibl e. Each of thes e mes s ages isdis played once when power mode 6 is ent ered or when t he faul t occurs for a predetermined t ime peri od. Thes e mes sagescan be recall ed by the driver by pres s ing t he t ri p res et butt on for more t han 3 s econds .
Priority Group 3
This group of mess ages rel at e t o l ow pri ori ty mes s ages , 'LOW W ASHER FLUID' for exampl e. Depending on the mes s age,s ome mes s ages are only s hown at t he end of a journey to avoid annoyance to t he driver. The mes s ages wi ll beaccompanied by a chi me when t he igni ti on is s wi tched off t o alert the driver to their presence.
MESSAGE LIST
Mes sages are dis played in a language appropriat e for t he market s peci fi cat ion of t he vehi cl e. The language can be changedif requi red us ing the Land Rover approved diagnos ti c sys t em.
• NOTE: The li s t bel ow i s s hown in al phabeti cal order.
MessageO ther WarningsReasonAction
BONNET OPENNoneHood open or not fully cl osedCl ose hoodCHECK ALL TY REPRESSURESAmber Ti re Pres sureMonit oring Sys tem(TPMS) indi cat oril lumi nat ed
Advi sory mes s age. Low pres s ure warningli mit reached i n more than 1 wheel i n lows peed mode or warning l imi t reached in anyrunning wheel and no locati on s pecified byTPMS.For addit ional informati on, refer t o: W heelsand Tires (204-04 W heel s and Tires,Descripti on and Operat ion).
Check all t ire pres s ures andadjust accordingly
CHECK ALL TY REPRESSURES FRONT LEFTLOW
Amber TPMS indicatoril lumi nat edLow pres s ure warning l imi t reached in frontleft ti re i n l ow s peed modeCheck t ire pres s ure andadjust accordingly
CHECK ALL TY REPRESSURES FRONTRIGHT LOW
Amber TPMS indicatoril lumi nat edLow pres s ure warning l imi t reached in frontri ght t ire i n low s peed modeCheck t ire pres s ure andadjust accordingly
CHECK ALL TY REPRESSURES REAR LEFTLOW
Amber TPMS indicatoril lumi nat edLow pres s ure warning l imi t reached in rearleft ti re i n l ow s peed modeCheck t ire pres s ure andadjust accordingly
CHECK ALL TY REPRESSURES REAR RIGHTLOW
Amber TPMS indicatoril lumi nat edLow pres s ure warning l imi t reached in rearri ght t ire i n low s peed modeCheck t ire pres s ure andadjust accordingly
CHECK SPARE TY REPRESSUREAmber TPMS indicatoril lumi nat ed for 20s econds and agai n ats ubs equent i gni ti oncycles
Low pres s ure warning l imi t reached in s pareti reCheck t ire pres s ure andadjust accordingly
CRANKING W ILLCOMMENCE AFTER GLOWPERIOD
Glow pl ug indi cat oril lumi nat edAmbient air t emperature below 0ºC (32ºF)None
CRUISE CONTRO L NOTPERMITTEDNoneVehi cl e operat ing paramet ers out si dethreshold for s peed cont rol operati onNone
DPF FULLHandbook s ymbolil lumi nat ed inmes sage center
Dies el parti cul at e fil ter requi res regenerat ingFor addit ional i nformati on,refer t o: Exhaus t Sys t em(309-00B Exhaus t Sys tem -TD4 2.2L Di es el,Des cri pti on and Operati on).DPF FULL VISIT DEALERNoneRegenerat ion of t he dies el parti cul at e fil terwas unsucces s fulUse the Land Roverapproved di agnos ti csys tem t o forceregenerati on of the di es elparti cul at e fil ter.
DRIVER DOOR OPENNoneDri vers door open or not ful ly clos edNone
DSC SW ITCHED OFFAmber Dynami cStabil it y Control (DSC)indicator i lluminated
Sys t em not avai lable due to DSC s wit ched offby dri verPress DSC s wit ch toreact ivat e s ys t em
ECO STOP/START FAULTTel l-tal e li ght in t heEco swi tchext inguis hed
Stop/St art not avai lable due to sys tem ors ub-s ys t em failureConnect Land Roverapproved di agnos ti csys tem t o diagnos e fault
ECO STOP/START O FFTel l-tal e li ght in t heEco swi tchext inguis hed
The Eco swi tch has been pres s edIf requi red, pres s the Ecoswi tch t o react ivate theSt op/St art s yst em
ECO STOP/START O NTel l-tal e li ght in t heEco swi tch i ll uminatedThe s ys t em has been s wit ched off and thenlat er s wi tched on wi thin the same ignit ioncycle
If requi red, pres s the Ecoswi tch t o deact ivat e t heSt op/St art s yst em
Page 2843 of 3229
123
Brakes
R
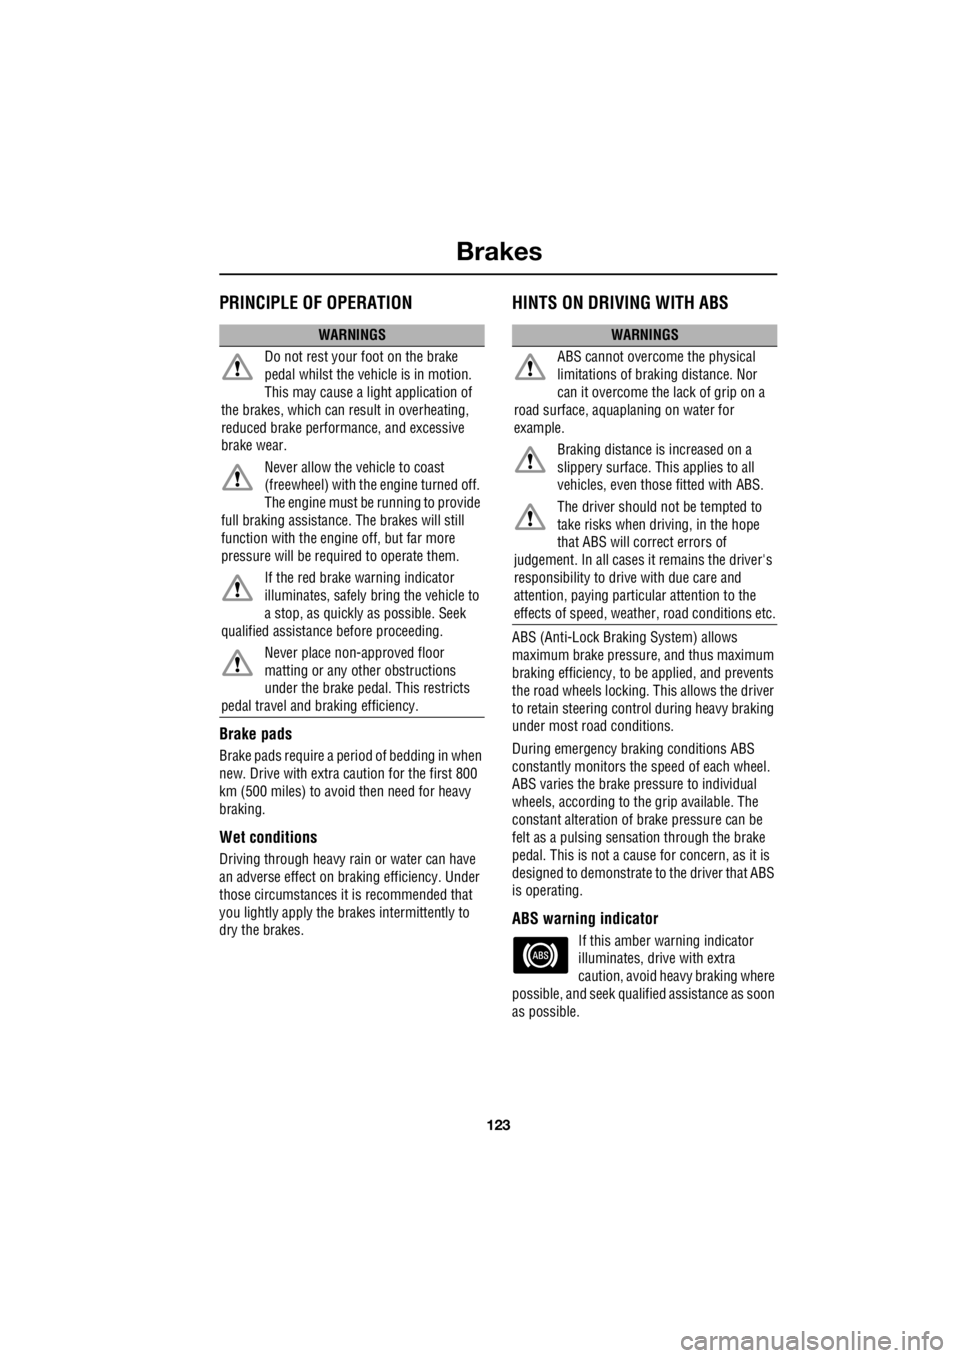
BrakesPRINCIPLE OF OPERATION
Brake pads
Brake pads require a period of bedding in when
new. Drive with extra caution for the first 800
km (500 miles) to avoi d then need for heavy
braking.
Wet conditions
Driving through heavy rain or water can have
an adverse effect on braking efficiency. Under
those circumstances it is recommended that
you lightly apply the brak es intermittently to
dry the brakes.
HINTS ON DRIVING WITH ABS
ABS (Anti-Lock Braki ng System) allows
maximum brake pressure, and thus maximum
braking efficiency, to be applied, and prevents
the road wheels locking. This allows the driver
to retain steering control during heavy braking
under most road conditions.
During emergency brak ing conditions ABS
constantly monitors the speed of each wheel.
ABS varies the brake pressure to individual
wheels, according to the grip available. The
constant alteration of brake pressure can be
felt as a pulsing sensat ion through the brake
pedal. This is not a cause for concern, as it is
designed to demonstrate to the driver that ABS
is operating.
ABS warning indicator
If this amber warning indicator
illuminates, driv e with extra
caution, avoid heavy braking where
possible, and seek qualified assistance as soon
as possible.
WARNINGS
Do not rest your foot on the brake
pedal whilst the vehicle is in motion.
This may cause a light application of
the brakes, which can re sult in overheating,
reduced brake performance, and excessive
brake wear.
Never allow the vehicle to coast
(freewheel) with the engine turned off.
The engine must be running to provide
full braking assistance. The brakes will still
function with the engine off, but far more
pressure will be required to operate them.
If the red brake warning indicator
illuminates, safely bring the vehicle to
a stop, as quickly as possible. Seek
qualified assistance before proceeding.
Never place non-approved floor
matting or any ot her obstructions
under the brake pedal. This restricts
pedal travel and braking efficiency.WARNINGS
ABS cannot overcome the physical
limitations of brak ing distance. Nor
can it overcome the lack of grip on a
road surface, aquaplaning on water for
example.
Braking distance is increased on a
slippery surface. This applies to all
vehicles, even those fitted with ABS.
The driver should not be tempted to
take risks when driving, in the hope
that ABS will correct errors of
judgement. In all cases it remains the driver's
responsibility to driv e with due care and
attention, paying partic ular attention to the
effects of speed, weather, road conditions etc.
Page 2995 of 3229

Index
275
R
Preset buttons . . . . . . . . . . . . . . . . . . . . . 238 Recalling a preset channel . . . . . . . . . 239
Scrolling through presets . . . . . . . . . . 239
Storing channels as presets . . . . . . . . 238
Principle of operation Airbag deployment effects . . . . . . . . . . 61
Airbag operation . . . . . . . . . . . . . . . . . . 60
Airbags . . . . . . . . . . . . . . . . . . . . . . . . . 59
Before driving off-road . . . . . . . . . . . . 136
Brake pads . . . . . . . . . . . . . . . . . . . . . 123
Deployment and deflation . . . . . . . . . . . 60
Dynamic Stability Control (DSC) . . . . . 140
Gradient release control (GRC) . . . . . . 136
Introduction . . . . . . . . . . . . . . . . . . . . . 58
Roll stability control (RSC) . . . . . . . . . 140
Seat belt checks . . . . . . . . . . . . . . . . . . 55
Seat belt safety . . . . . . . . . . . . . . . . . . . 54
Seat belts . . . . . . . . . . . . . . . . . . . . . . . 54
Wet conditions . . . . . . . . . . . . . . . . . . 123
Priority programme type (PTY) . . . . . . . . 231 PTY search - Premium audio . . . . . . . 232
PTY seek - Standard audio . . . . . . . . . 233
PTY selection - Premium audio . . . . . 231Q
Quick start . . . . . . . . . . . . . . . . . . . . . . . . . . 7 Audio system . . . . . . . . . . . . . . . . . . . . . 27
Automatic transmission . . . . . . . . . . . . . 23
Bonnet . . . . . . . . . . . . . . . . . . . . . . . . . . . 9
CD autochanger . . . . . . . . . . . . . . . . . . . 30
CD OPERATION . . . . . . . . . . . . . . . . . . . 30
Clock setting . . . . . . . . . . . . . . . . . . . . . 31
Cruise control . . . . . . . . . . . . . . . . . . . . 24
DAB radio. . . . . . . . . . . . . . . . . . . . . . . . 29
Driving position memory . . . . . . . . . . . . 10
Engine starting . . . . . . . . . . . . . . . . . . . . . 8
Exterior lighting . . . . . . . . . . . . . . . . . . . 22
Facia. . . . . . . . . . . . . . . . . . . . . . . . . . . . 17
Gearshift interlocks . . . . . . . . . . . . . . . . 23
Heating and ventilation. . . . . . . . . . . . . . 14
Hill Descent Control (HDC) . . . . . . . . . . 25
Instrument pack . . . . . . . . . . . . . . . . . . . 19
Manual seat adjustment . . . . . . . . . . . . . 11
Master lock and unlock switches . . . . . . . 9
Overhead console . . . . . . . . . . . . . . . . . 12
Parking aid . . . . . . . . . . . . . . . . . . . . . . . 26
Passenger airbag deactivation . . . . . . . . 13
Power operated seat adjustment . . . . . . 10
Radio operation . . . . . . . . . . . . . . . . . . . 29
Remote control . . . . . . . . . . . . . . . . . . . . 7
Seat belts and Child restraints . . . . . . . . 13
Single CD player. . . . . . . . . . . . . . . . . . . 30
Steering column adjustment . . . . . . . . . 12
Steering column lock . . . . . . . . . . . . . . . 12
Tailgate . . . . . . . . . . . . . . . . . . . . . . . . . . 9
Telephone - Bluetooth system . . . . . . . . 31
Terrain Response system. . . . . . . . . . . . 25
Warning indicators (attention) . . . . . . . . 21
Warning indicators (information) . . . . . . 21
Windows and Door mirrors . . . . . . . . . . 11
Wipers and washers. . . . . . . . . . . . . . . . 22
R
Radio data system (RDS) . . . . . . . . . . . . . 228 Selecting RDS . . . . . . . . . . . . . . . . . . . 228
Radio reception . . . . . . . . . . . . . . . . . . . . 218
Rain sensor . . . . . . . . . . . . . . . . . . . . . . . . 87
Operation . . . . . . . . . . . . . . . . . . . . . . . . 88
Rear fog lamps . . . . . . . . . . . . . . . . . . . . . . 73