Page 223 of 3229
Publi s hed: 11-May-2011
Front Suspension - Front Shock Absorber
Removal and Inst all ati on
Removal
• W ARNINGS:
Ens ure t he s pri ng compress or Safe W orking Load (SW L) meets or exceeds the s pri ng rat ing quot ed in t heSpeci fcati ons s ecti on.
Al ways foll ow t he s pring compres s or manufact urer's i nst ructi ons.
1. W ARNING: Do not work on or under a vehi cle s upported onl yby a jack. Al ways support t he vehi cl e on s afet y s tands .
Rais e and s upport t he vehi cl e.
1.
Remove t he road wheel.
Refer t o: W heel and Ti re (204-04 W heel s and Tires, Removal andInst all at ion).
2.
Remove t he s pring and damper as sembl y.
Refer t o: Shock Abs orber and Spring As s embly (204-01 FrontSus pens ion, Removal and Inst all at ion).
3.
Inst all t he s pring compres s or in a vis e.4.
Inst all t he s hock abs orber and spring as s embl y i n the springcompres s or.5.
6. W ARNING: Make sure t hat a new nut isi ns t alled.6.
Installation
Page 225 of 3229
Publi s hed: 11-May-2011
Front Suspension - Shock Absorber and Spring Assembly
Removal and Inst all ati on
Special T ool(s)
204-159Lever, W heel Knuckle
204-619G-Clamp
Removal
Remove t he plenum chamber panel.
Refer t o: Plenum Chamber (412-01 Cl imat e Control, Removal andInst all at ion).
1.
Releas e t he hood support s t rut s and s ecure the hood i nan upri ght pos it ion.2.
3. W ARNING: Make sure t o s upport the vehicle wit h axles tands .
Rais e and s upport t he vehi cl e.
3.
Remove t he wheel and t ire.
Refer t o: W heel and Ti re (204-04 W heel s and Tires, Removal andInst all at ion).
4.
Page 228 of 3229
Publi s hed: 11-May-2011
Front Suspension - Spring
Removal and Inst all ati on
Removal
• W ARNINGS:
Ens ure t he s pri ng compress or Safe W orking Load (SW L) meets or exceeds the s pri ng rat ing quot ed in t heSpeci fcati ons s ecti on.
Al ways foll ow t he s pring compres s or manufact urer's i nst ructi ons.
1. W ARNING: Do not work on or under a vehi cle s upported onl yby a jack. Al ways support t he vehi cl e on s afet y s tands .
Rais e and s upport t he vehi cl e.
1.
Remove t he road wheel.
Refer t o: W heel and Ti re (204-04 W heel s and Tires, Removal andInst all at ion).
2.
Remove t he s pring and damper as sembl y.
Refer t o: Shock Abs orber and Spring As s embly (204-01 FrontSus pens ion, Removal and Inst all at ion).
3.
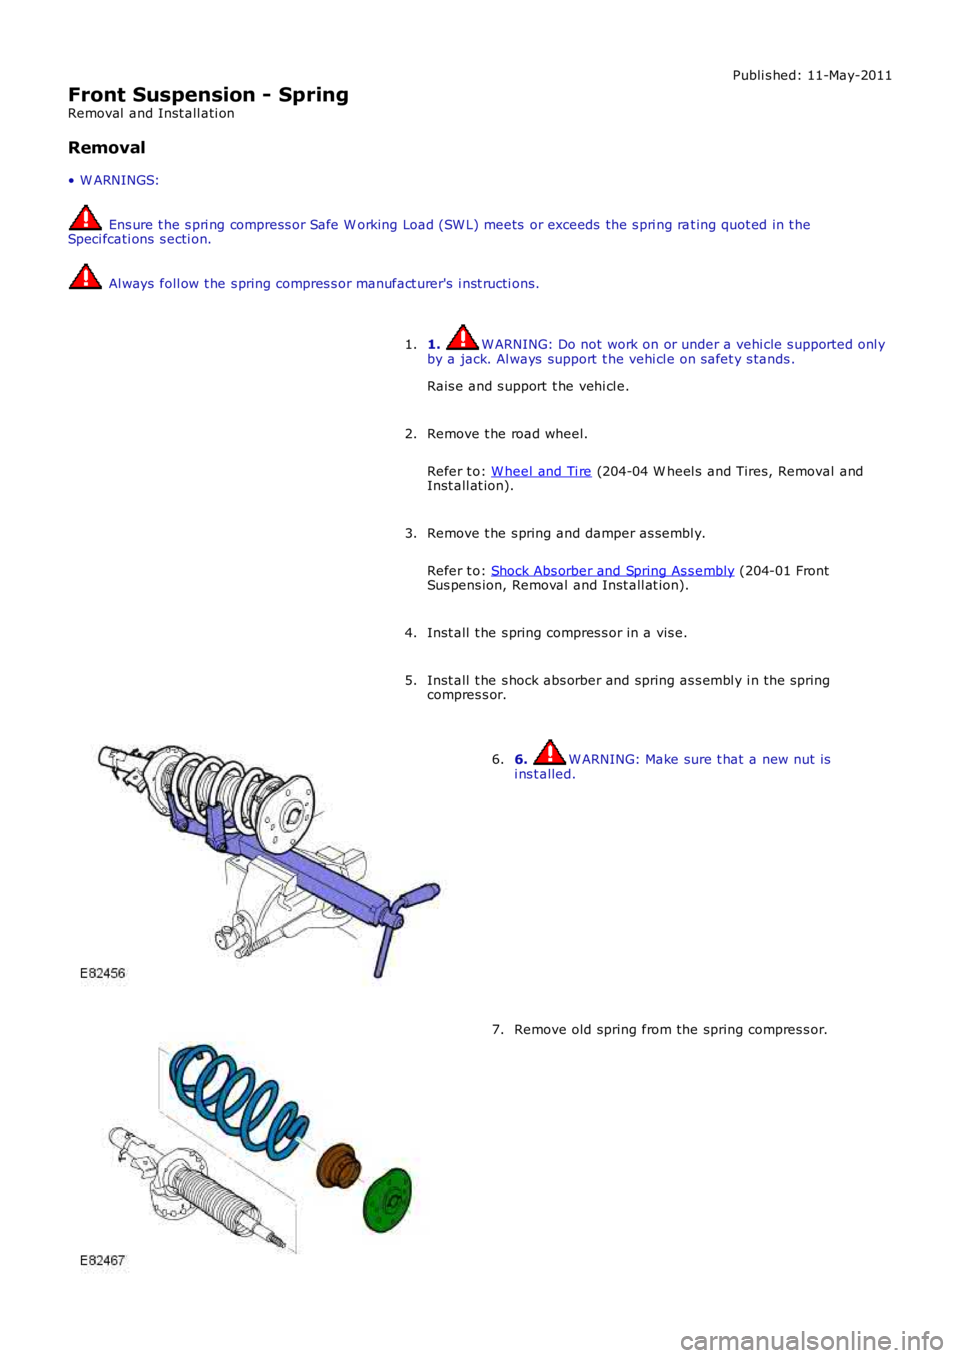
Inst all t he s pring compres s or in a vis e.4.
Inst all t he s hock abs orber and spring as s embl y i n the springcompres s or.5.
6. W ARNING: Make sure t hat a new nut isi ns t alled.6.
Remove old spring from the spring compres s or.7.
Page 230 of 3229
Publi s hed: 11-May-2011
Rear Suspension -
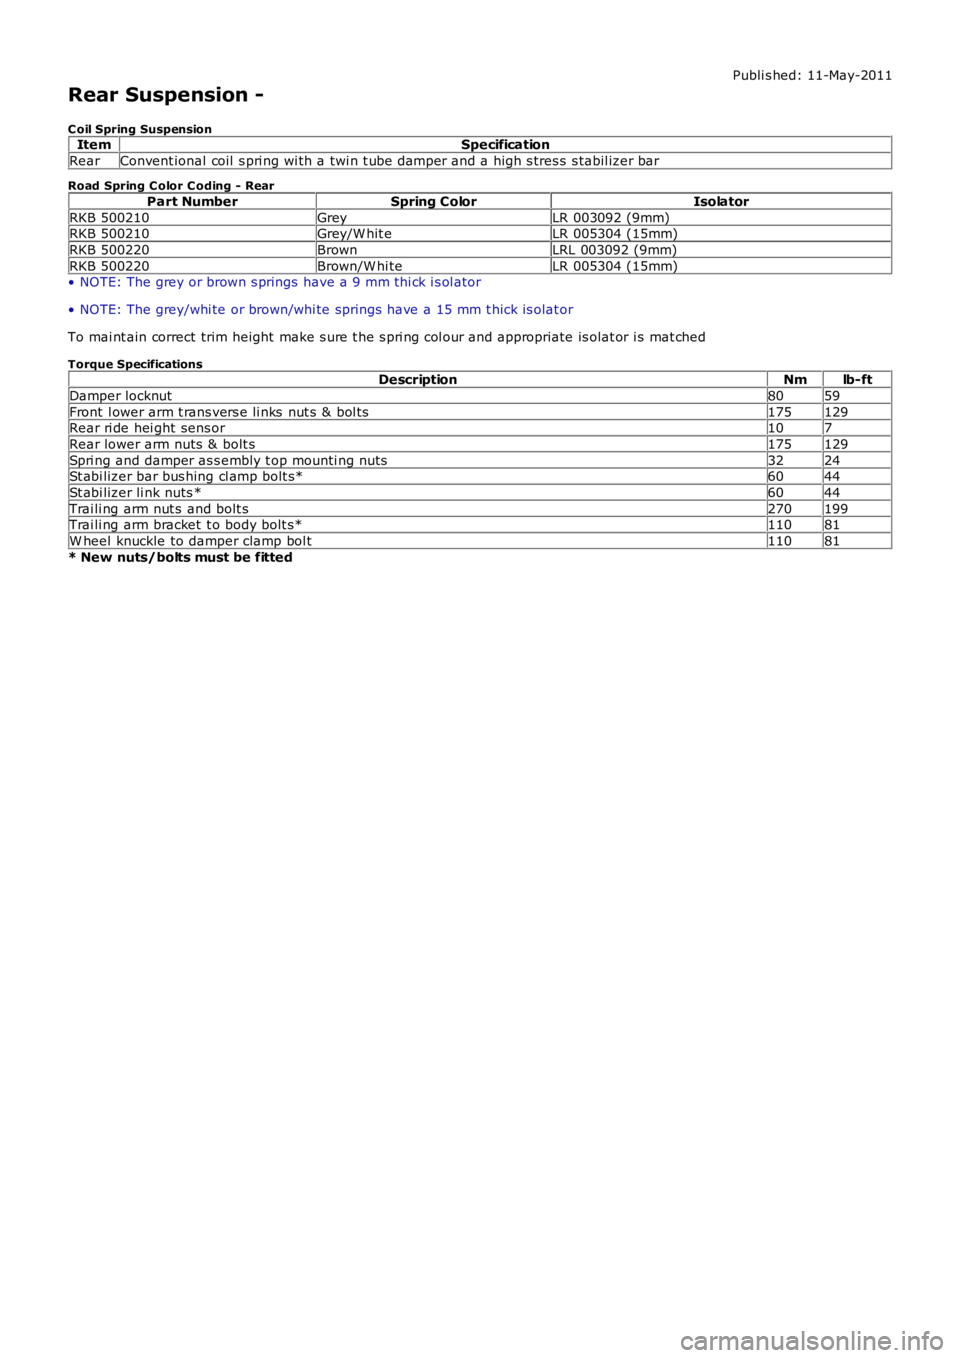
C oil Spring SuspensionItemSpecification
RearConvent ional coil s pri ng wi th a twi n t ube damper and a high s tres s s tabil izer bar
Road Spring C olor C oding - Rear
Part NumberSpring ColorIsolator
RKB 500210GreyLR 003092 (9mm)RKB 500210Grey/W hit eLR 005304 (15mm)
RKB 500220BrownLRL 003092 (9mm)
RKB 500220Brown/W hi teLR 005304 (15mm)• NOTE: The grey or brown s prings have a 9 mm thi ck i s ol ator
• NOTE: The grey/whi te or brown/whi te springs have a 15 mm t hick is olat or
To mai nt ain correct trim height make s ure t he s pri ng col our and appropriate is olat or i s mat ched
Torque SpecificationsDescriptionNmlb-ft
Damper locknut8059
Front l ower arm t rans vers e li nks nut s & bol ts175129Rear ri de hei ght sens or107
Rear lower arm nuts & bolt s175129
Spri ng and damper as s embly t op mounti ng nuts3224St abi lizer bar bus hing cl amp bolt s*6044
St abi lizer li nk nuts *6044
Trai li ng arm nut s and bolt s270199Trai li ng arm bracket t o body bolt s*11081
W heel knuckle to damper clamp bol t11081
* New nuts/bolts must be fitted
Page 231 of 3229
Publi s hed: 11-May-2011
Rear Suspension - Rear Suspension
Des cript ion and Operat ion
COMPONENT LOCATION
ItemPart NumberDescription1-Right Hand (RH) s pring and damper as sembl y
2-St abi lizer li nk
3-St abi lizer bar4-Left Hand (LH) spring and damper as sembl y
5-W heel knuckle
6-Hub7-Longi tudinal li nk
8-Rear trans vers e l ink
9-Front t rans verse li nk10-Subframe
OVERVIEW
The rear s uspens ion feat ures l ong travel McPhers on s truts t o opt imi ze on and off road performance.
The s uspens ion component s are mount ed on a subframe whi ch provides a rigid platform att ached to t he unders ide of t hevehi cl e body. The s ubframe i s mounted t o t he body on 4 bus hes which have differi ng compres si on rat es t o absorb lat eraland longit udinal loadi ng from cornering and braki ng.
Page 237 of 3229
Publi s hed: 11-May-2011
Rear Suspension - Rear Suspension
Diagnosi s and Tes ti ng
For addit ional informat ion.
REFER to: Sus pens ion Sys tem (204-00 Sus pensi on Syst em - General Informati on, Di agnos is and Tes t ing).
Page 238 of 3229
Publi s hed: 11-May-2011
Rear Suspension - Rear Wheel Bearing
Removal and Inst all ati on
Special T ool(s)
204-528/2Remover/Ins t al ler, Bus hing
205-725Remover/Ins t al ler, W heel Hub
205-726Remover/Ins t al ler, W heel Hub Bearing
205-728Remover/Ins t al ler, W heel Hub
205-802/5Remover, W heel Hub/Beari ng
Removal
1. W ARNING: Make sure t o s upport the vehicle wit h axles tands .
Rais e and s upport t he vehi cl e.
1.
Remove t he wheel and t ire.
Refer t o: W heel and Ti re (204-04 W heel s and Tires, Removal andInst all at ion).
2.
Remove t he wheel knuckl e.
Refer t o: W heel Knuckle (204-02 Rear Sus pensi on, Removal and
3.
Page 243 of 3229
Publi s hed: 11-May-2011
Rear Suspension - Front Lower Arm
Removal and Inst all ati on
Removal
1. W ARNING: Make sure t o s upport the vehicle wit h axles tands .
Rais e and s upport t he vehi cl e.
1.
Remove t he wheel and t ire.
Refer t o: W heel and Ti re (204-04 W heel s and Tires, Removal andInst all at ion).
2.
Di scard the bolt .3.
4.
Part ial ly release the bol t for acces s. Cut off the bolt headand wi thdraw in the opposi te direct ion.On ins tall ati on, reverse the orient at ion of t he new bolt .Make s ure the capti ve nut and protecti ve s hi eld from t hes ervice ki t is i nst all ed.
5.


