Page 2731 of 3229
11
Quick start
R
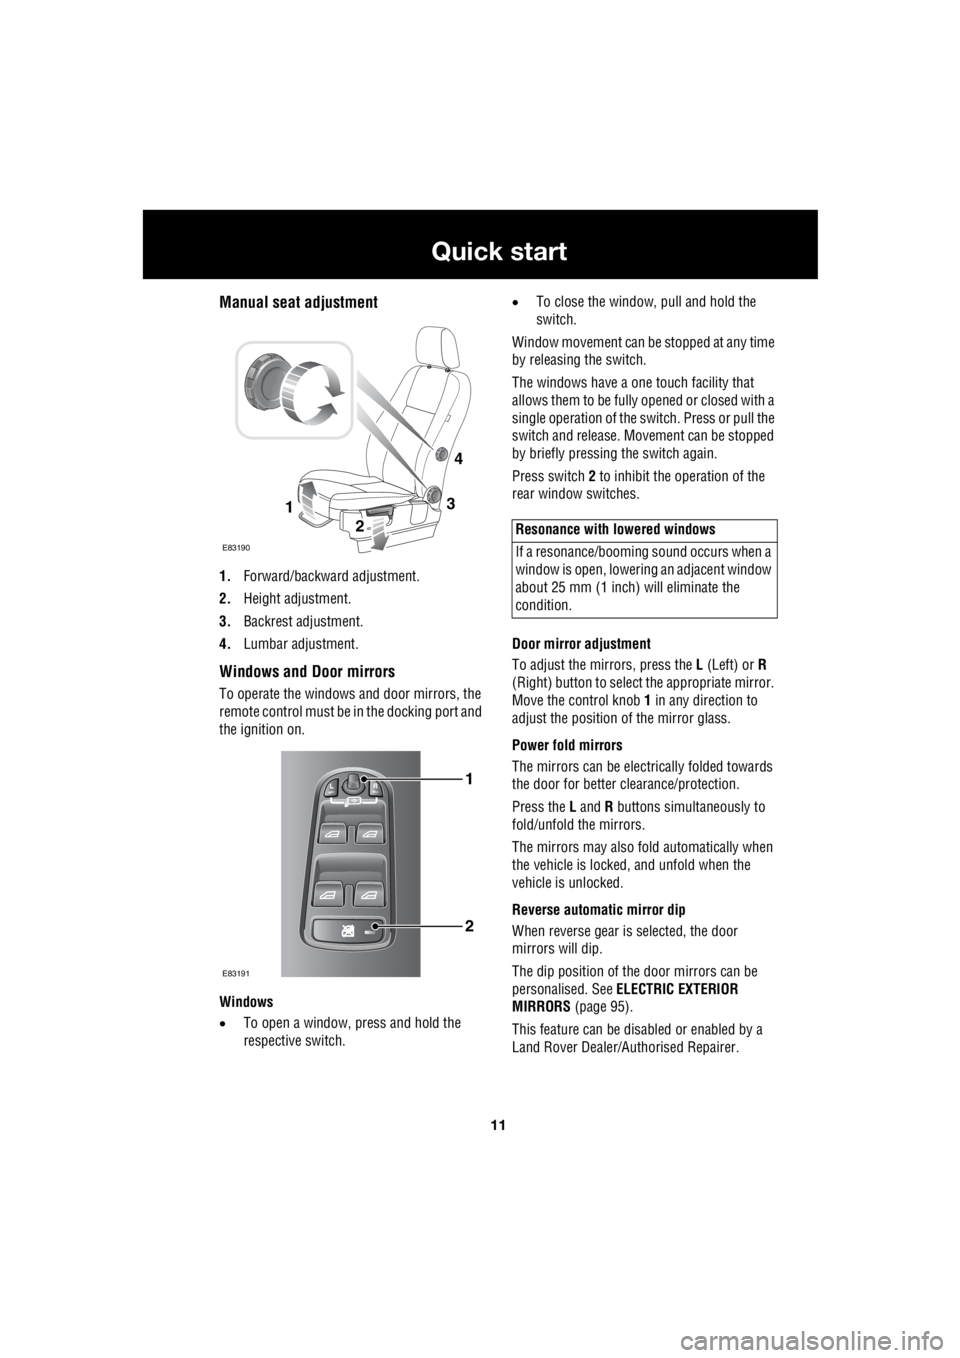
Manual seat adjustment
1. Forward/backward adjustment.
2. Height adjustment.
3. Backrest adjustment.
4. Lumbar adjustment.
Windows and Door mirrors
To operate the windows and door mirrors, the
remote control must be in the docking port and
the ignition on.
Windows
• To open a window, press and hold the
respective switch. •
To close the window, pull and hold the
switch.
Window movement can be stopped at any time
by releasing the switch.
The windows have a one touch facility that
allows them to be fully opened or closed with a
single operation of the switch. Press or pull the
switch and release. Mo vement can be stopped
by briefly pressing the switch again.
Press switch 2 to inhibit the operation of the
rear window switches.
Door mirror adjustment
To adjust the mirrors, press the L (Left) or R
(Right) button to select the appropriate mirror.
Move the control knob 1 in any direction to
adjust the position of the mirror glass.
Power fold mirrors
The mirrors can be electr ically folded towards
the door for better clearance/protection.
Press the L and R buttons simultaneously to
fold/unfold the mirrors.
The mirrors may also fold automatically when
the vehicle is locked, and unfold when the
vehicle is unlocked.
Reverse automatic mirror dip
When reverse gear is selected, the door
mirrors will dip.
The dip position of the door mirrors can be
personalised. See ELECTRIC EXTERIOR
MIRRORS (page 95).
This feature can be disabled or enabled by a
Land Rover Dealer/A uthorised Repairer.
3
2
1
E83190
4
1
2
E83191
Resonance with lowered windows
If a resonance/booming sound occurs when a
window is open, lowering an adjacent window
about 25 mm (1 inch) will eliminate the
condition.
Page 2732 of 3229
12
Quick start
L
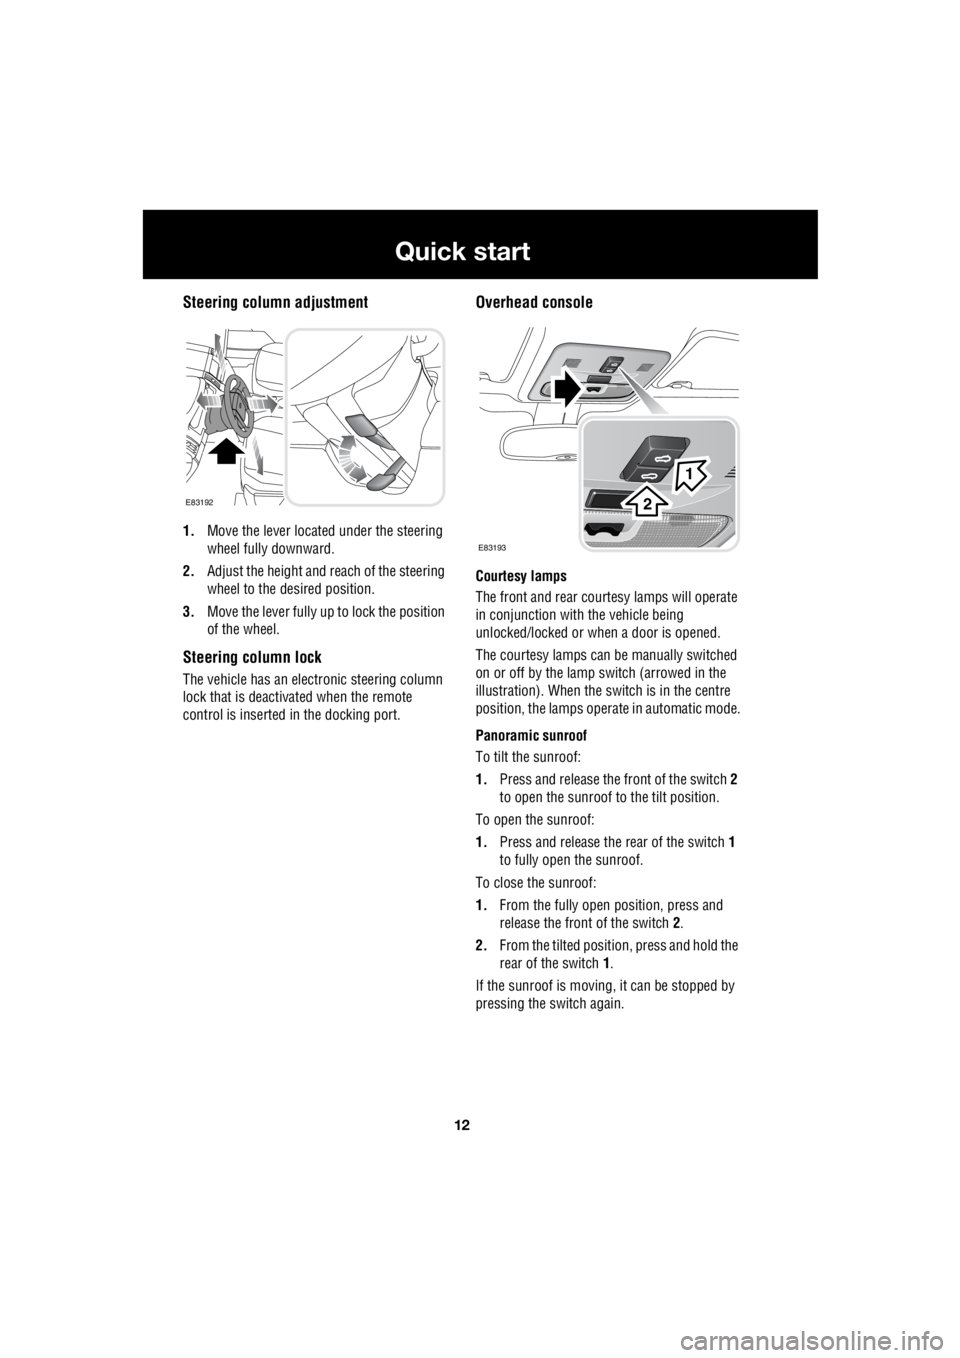
Steering column adjustment
1. Move the lever located under the steering
wheel fully downward.
2. Adjust the height and reach of the steering
wheel to the desired position.
3. Move the lever fully up to lock the position
of the wheel.
Steering column lock
The vehicle has an electronic steering column
lock that is deactivated when the remote
control is inserted in the docking port.
Overhead console
Courtesy lamps
The front and rear cour tesy lamps will operate
in conjunction with the vehicle being
unlocked/locked or when a door is opened.
The courtesy la mps can be manually switched
on or off by the lamp switch (arrowed in the
illustration). When the switch is in the centre
position, the lamps opera te in automatic mode.
Panoramic sunroof
To tilt the sunroof:
1. Press and release the front of the switch 2
to open the sunroof to the tilt position.
To open the sunroof:
1. Press and release the rear of the switch 1
to fully open the sunroof.
To close the sunroof:
1. From the fully open position, press and
release the front of the switch 2.
2. From the tilted positi on, press and hold the
rear of the switch 1.
If the sunroof is moving, it can be stopped by
pressing the switch again.
E83192
E83193
1
2
Page 2743 of 3229
23
Quick start
R
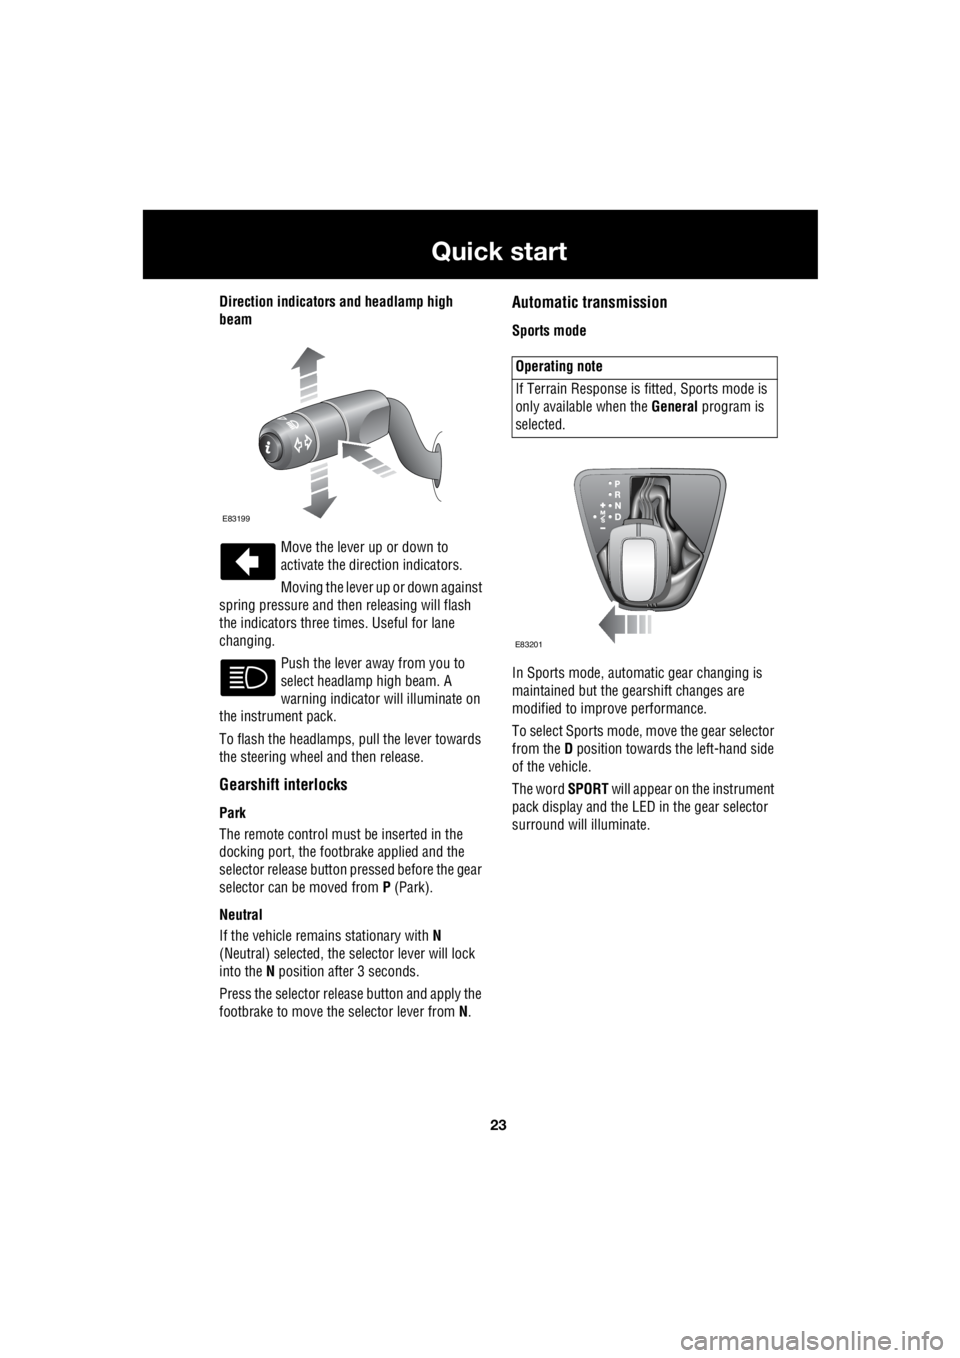
Direction indicators and headlamp high
beam
Move the lever up or down to
activate the direction indicators.
Moving the lever up or down against
spring pressure and then releasing will flash
the indicators three times. Useful for lane
changing.
Push the lever away from you to
select headlamp high beam. A
warning indicator will illuminate on
the instrument pack.
To flash the headlamps, pull the lever towards
the steering wheel and then release.
Gearshift interlocks
Park
The remote control must be inserted in the
docking port, the footbrake applied and the
selector release button pr essed before the gear
selector can be moved from P (Park).
Neutral
If the vehicle remains stationary with N
(Neutral) selected, the selector lever will lock
into the N position after 3 seconds.
Press the selector rele ase button and apply the
footbrake to move the selector lever from N.
Automatic transmission
Sports mode
In Sports mode, automatic gear changing is
maintained but the gearshift changes are
modified to improve performance.
To select Sports mode, move the gear selector
from the D position towards the left-hand side
of the vehicle.
The word SPORT will appear on the instrument
pack display and the LED in the gear selector
surround will illuminate.
E83199
Operating note
If Terrain Response is fi tted, Sports mode is
only available when the General program is
selected.
E83201
Page 2756 of 3229
Introduction
36
L
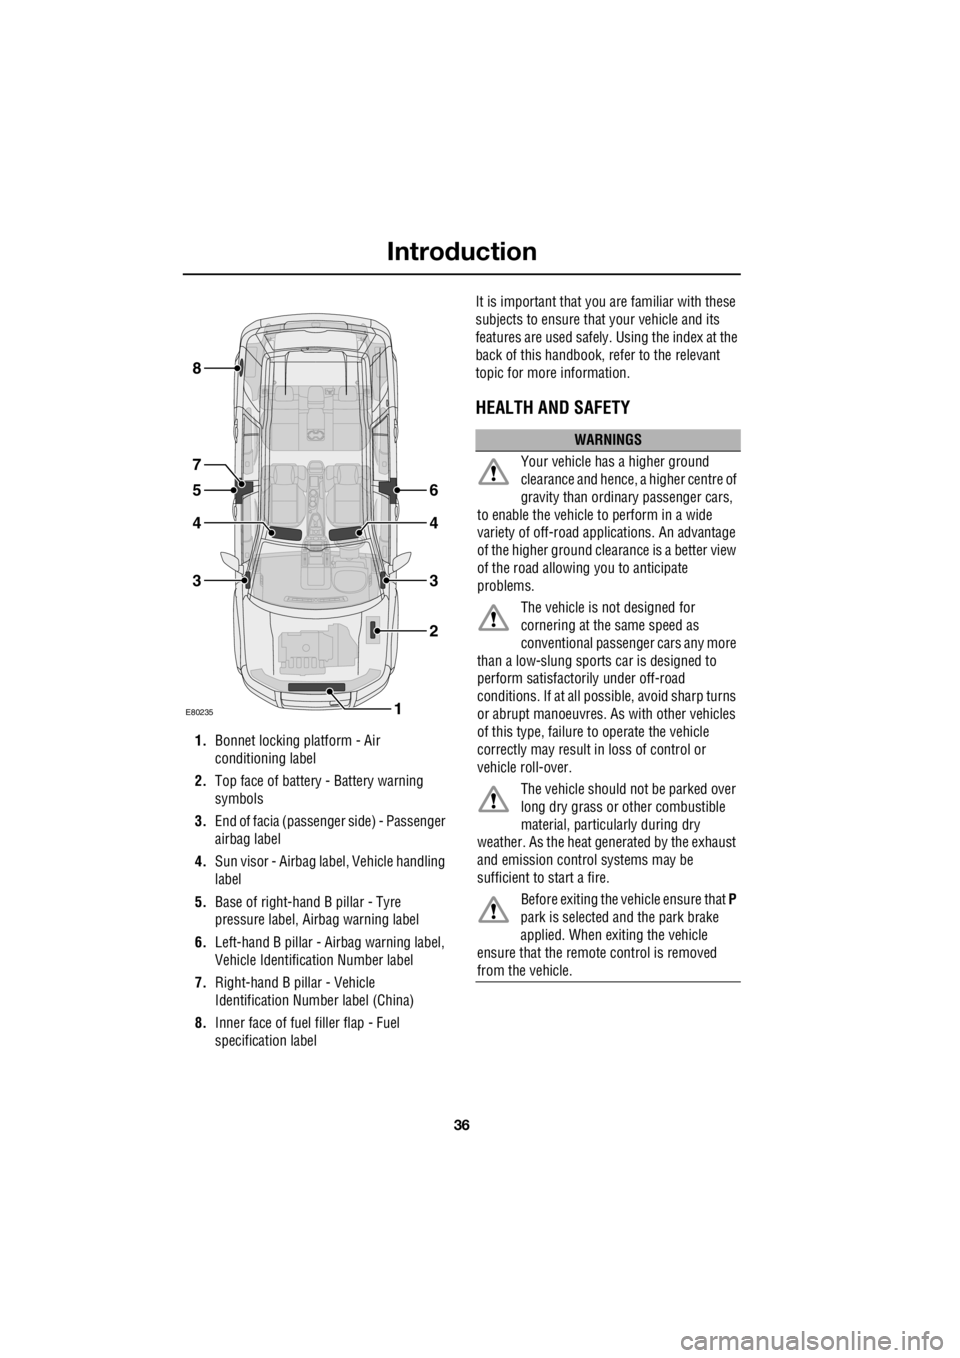
1. Bonnet locking platform - Air
conditioning label
2. Top face of battery - Battery warning
symbols
3. End of facia (passenger side) - Passenger
airbag label
4. Sun visor - Airbag label, Vehicle handling
label
5. Base of right-hand B pillar - Tyre
pressure label, Ai rbag warning label
6. Left-hand B pillar - Airbag warning label,
Vehicle Identification Number label
7. Right-hand B pillar - Vehicle
Identification Number label (China)
8. Inner face of fuel filler flap - Fuel
specification label It is important that you are familiar with these
subjects to ensure that your vehicle and its
features are used safely. Using the index at the
back of this handbook, re fer to the relevant
topic for more information.
HEALTH AND SAFETY
E80235
6
4
3
2
1
5
4
3
8
7
WARNINGS
Your vehicle has a higher ground
clearance and hence, a higher centre of
gravity than ordina ry passenger cars,
to enable the vehicle to perform in a wide
variety of off-road app lications. An advantage
of the higher ground clea rance is a better view
of the road allowing you to anticipate
problems.
The vehicle is not designed for
cornering at the same speed as
conventional passenge r cars any more
than a low-slung sports car is designed to
perform satisfactori ly under off-road
conditions. If at all possible, avoid sharp turns
or abrupt manoeuvres. As with other vehicles
of this type, failure to operate the vehicle
correctly may result in loss of control or
vehicle roll-over.
The vehicle should no t be parked over
long dry grass or other combustible
material, particul arly during dry
weather. As the heat ge nerated by the exhaust
and emission control systems may be
sufficient to start a fire.
Before exiting the vehicle ensure that P
park is selected and the park brake
applied. When exiting the vehicle
ensure that the remote control is removed
from the vehicle.
Page 2760 of 3229
Keys and remote controls
40
L
Keys and remote controlsUSING THE KEY
1. Press the release tab and pull out the key
blade.
2. Use the key blade to remove the door lock
cover.
3. Insert the key into the lock and rotate to
unlock. Note:
When the door is opened the alarm will
begin to sound. To silenc e the alarm, insert the
remote into the start control unit.
GENERAL INFORMATION ON RADIO
FREQUENCIES
Note: The radio frequency used by your remote
control may be used by other devices. For
example: amateur radios , medical equipment,
wireless headphones, or other remote control
devices. This may cause the frequency to be
jammed, and prevent your remote control from
operating correctly.
Environmental conditions can affect the
operation of remote cont rols and the operating
range may vary considerably depending on the
vehicle's location.
1
E80882
2
3
Page 2765 of 3229
45
Alarm
R
AlarmARMING THE ALARM
The engine is automatically
immobilised when the remote
control is removed from the starter
control unit. The alarm system is automatically
armed when the remote lock button is pressed.
The hazard lamps will flash to indicate that the
alarm is armed.
Full alarm
To set full alarm protection ensure that all the
windows and the sunroof are closed. Then
press the lock button twice within three
seconds. The hazard warn ing lights will flash
twice to confirm the alarm state.
Once fully armed the alarm will sound if :-
• the bonnet, tailgate, or a door are opened.
• movement is detected within the vehicle
interior.
• a window, front or rear windscreen, or
sunroof glass are broken.
• the vehicle is raised or tilted.
• the vehicle battery is disconnected.
• an attempt is made to disconnect the alarm
siren.
Note: If the alarm is armed and a window or the
sunroof are left open the alarm will sound due
to movement of air currents.
Partial alarm
To set partial alarm protection, briefly press the
lock button once. The hazard warning lights
will flash once to confirm the alarm state.
Once partially armed the alarm will sound if :-
• the bonnet, tailgate, or a door are opened.
• the vehicle battery is disconnected.
• an attempt is made to disconnect the alarm
siren. Note:
This setting should be used in
circumstances such as travelling on a ferry,
when pets are to be left in the vehicle, when a
window must be left open etc
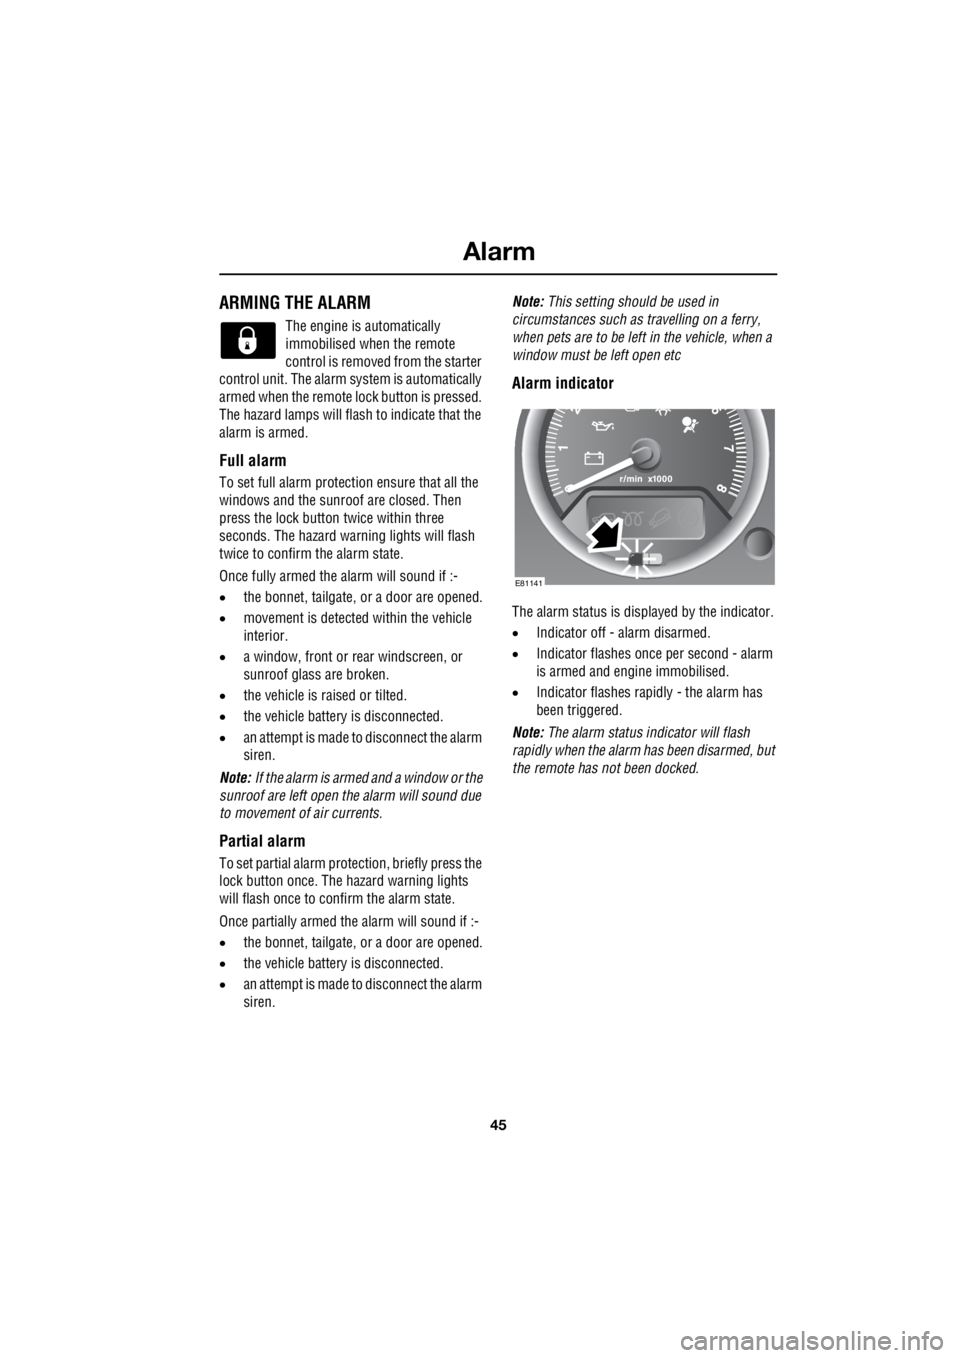
Alarm indicator
The alarm status is disp layed by the indicator.
• Indicator off - alarm disarmed.
• Indicator flashes once per second - alarm
is armed and engine immobilised.
• Indicator flashes rapidly - the alarm has
been triggered.
Note: The alarm status in dicator will flash
rapidly when the alarm has been disarmed, but
the remote has not been docked.
E81141
Page 2770 of 3229
Seats
50
L
To adjust the seats, the remote control must be
inserted in the starter control unit and the
ignition on. On those ve hicles equipped with
the memory driver's seat, the seat has a 10
minute active peri od, initiated when the driver's
door is opened/closed or the remote control is
removed from the starter control unit.
Driving position memory
Once you have adjusted the power operated
driver's seat and exterior mirrors for your ideal
driving position, the vehicle can memorise
these settings for future use.
1. Press the memory stor e button to activate
the memory function.
2. Press one of the preset buttons within five
seconds to memorise the current settings.
MEMORY STORED will be displayed on the
message centre accompanied by an
audible chime to conf irm the settings have
been memorised.
A seat position will only be memorised during
the five second active period.
Any existing settings will be over-written when
programming a memory position.
E83189
12
Page 2833 of 3229
113
Starting the engine
R
Starting the engineGENERAL INFORMATION
Docking the remote
Before the engine can be started, the remote
control will need to be docked.
Start/Stop button
The start/stop button is used to start or stop
the engine, or to turn on the ignition without
starting the engine. Switching on the ignition
To turn on the ignition without starting the
engine press the start/stop button and hold
until the warning indicators illuminate, then
release the button.
EXT C23EXT F72EXT C21EXT C23EXT F72EXT C21
E81335
EXT C23EXT F72EXT C21EXT C23EXT F72EXT C21
E81336