2006 DODGE RAM SRT-10 service reset
[x] Cancel search: service resetPage 3750 of 5267
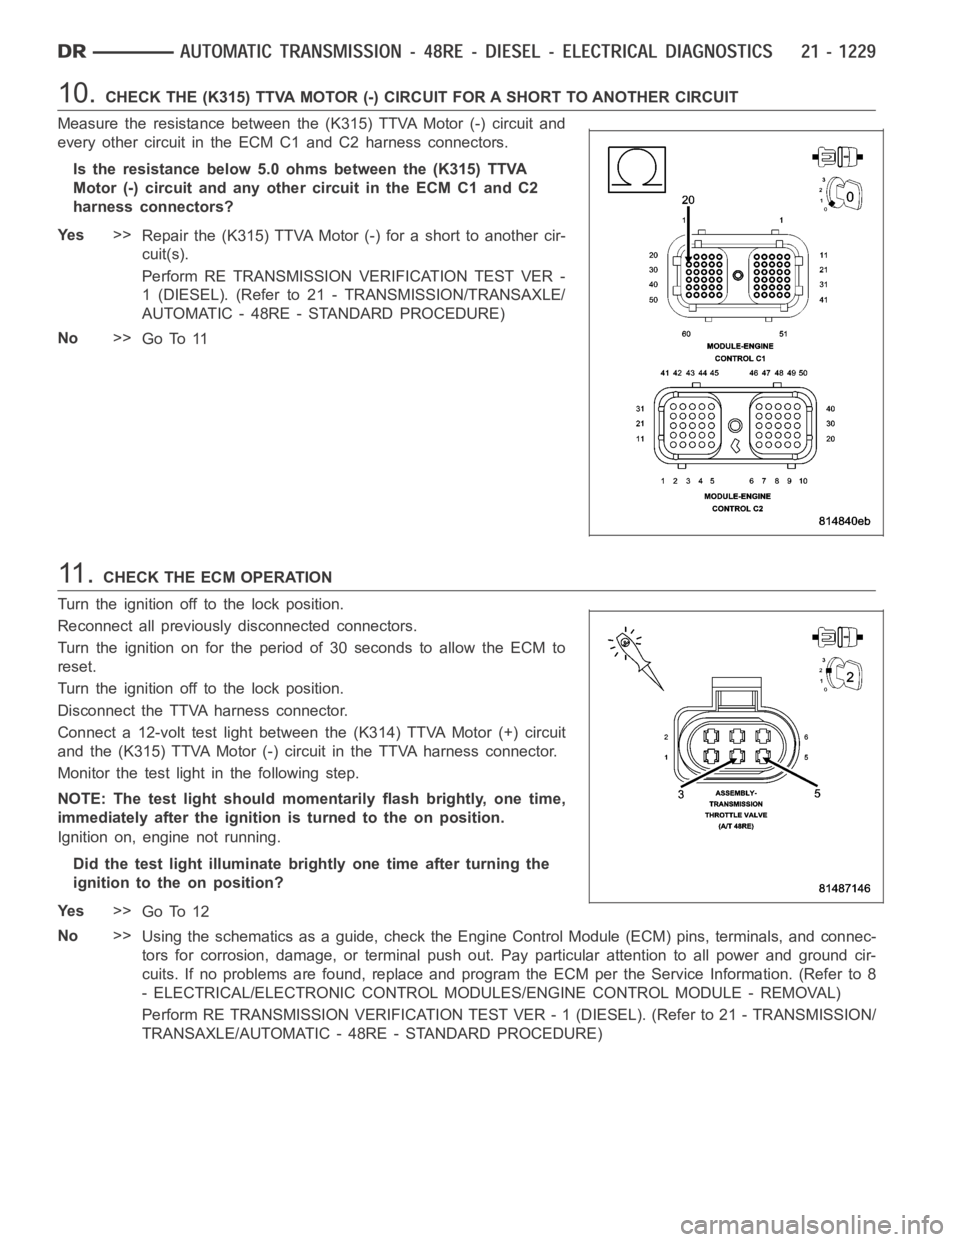
10.CHECK THE (K315) TTVA MOTOR (-) CIRCUIT FOR A SHORT TO ANOTHER CIRCUIT
Measure the resistance between the (K315) TTVA Motor (-) circuit and
every other circuit in the ECM C1 and C2 harness connectors.
Is the resistance below 5.0 ohms between the (K315) TTVA
Motor (-) circuit and any other circuit in the ECM C1 and C2
harness connectors?
Ye s>>
Repair the (K315) TTVA Motor (-) for a short to another cir-
cuit(s).
Perform RE TRANSMISSION VERIFICATION TEST VER -
1 (DIESEL). (Refer to 21 - TRANSMISSION/TRANSAXLE/
AUTOMATIC - 48RE - STANDARD PROCEDURE)
No>>
Go To 11
11 .CHECK THE ECM OPERATION
Turn the ignition off to the lock position.
Reconnect all previously disconnected connectors.
Turntheignitiononfortheperiodof30secondstoallowtheECMto
reset.
Turn the ignition off to the lock position.
Disconnect the TTVA harness connector.
Connect a 12-volt test light between the (K314) TTVA Motor (+) circuit
and the (K315) TTVA Motor (-) circuit in the TTVA harness connector.
Monitor the test light in the following step.
NOTE: The test light should momentarily flash brightly, one time,
immediately after the ignition is turned to the on position.
Ignition on, engine not running.
Did the test light illuminate brightly one time after turning the
ignition to the on position?
Ye s>>
Go To 12
No>>
Using the schematics as a guide, check the Engine Control Module (ECM) pins, terminals, and connec-
tors for corrosion, damage, or terminal push out. Pay particular attentiontoallpowerandgroundcir-
cuits. If no problems are found, replace and program the ECM per the ServiceInformation. (Refer to 8
- ELECTRICAL/ELECTRONIC CONTROL MODULES/ENGINE CONTROL MODULE - REMOVAL)
Perform RE TRANSMISSION VERIFICATION TEST VER - 1 (DIESEL). (Refer to 21 - TRANSMISSION/
TRANSAXLE/AUTOMATIC - 48RE - STANDARD PROCEDURE)
Page 3757 of 5267
10.TRANSMISSION - INTERNAL DAMAGE
Turn the ignition off to the lock position.
Remove the transmission oil pan per the Service Information. (Refer to 21 -TRANSMISSION/TRANSAXLE/AUTO-
MATIC - 48RE/FLUID - STANDARD PROCEDURE)
Inspect the transmission oil pan for burnt transmission fluid and/or excessive debris.
Is the transmission fluid burnt and/or contain excessive debris?
Ye s>>
Repair the internal transmission per the Service Information. (Refer to 21 - TRANSMISSION/TRANS-
AXLE/AUTOMATIC - 48RE - REMOVAL)
Perform RE TRANSMISSION VERIFICATION TEST VER - 1 (DIESEL). (Refer to 21 - TRANSMISSION/
TRANSAXLE/AUTOMATIC - 48RE - STANDARD PROCEDURE)
No>>
Go To 11
11 .CHECK THE VALVE BODY
Replace the Governor Pressure Solenoid per the Service Information. (Refer to 21 - TRANSMISSION/TRANSAXLE/
AUTOMATIC - 48RE/GOVERNOR PRESSURE SENSOR - REMOVAL)
Install a pressure gauge at the governor pressure test port. (Refer to 21 - TRANSMISSION/TRANSAXLE/AUTO-
MATIC - 48RE - DIAGNOSIS AND TESTING)
Start the engine.
Warm the transmission to normal operating temperature.
CAUTION: Apply the brakes.
Place the gear selector in Drive and allow the engine to idle.
Read the governor pressure on the pressure gauge in Drive.
Is the governor pressure on the gauge below 21 kPa (3 psi)?
Ye s>>
Go To 12
No>>
Repair or replace the Valve Body per the Service Information. (Refer to 21 -TRANSMISSION/TRANS-
AXLE/AUTOMATIC - 48RE/VALVE BODY - REMOVAL)
Perform RE TRANSMISSION VERIFICATION TEST VER - 1 (DIESEL). (Refer to 21 - TRANSMISSION/
TRANSAXLE/AUTOMATIC - 48RE - STANDARD PROCEDURE)
12.VERIFY OPERATION - TEST DRIVE
Remove the pressure gauge from the transmission. (Refer to 21 - TRANSMISSION/TRANSAXLE/AUTOMATIC -
48RE - DIAGNOSIS AND TESTING)
Test drive the vehicle.
Be sure to drive the vehicle at a constant speed of 40-48 Km/h or 25-30 MPH during the drive cycle.
With the scan tool, read Engine DTCs.
Did the DTC reset?
Ye s>>
Using the schematics as a guide, check the Engine Control Module (ECM) pins, terminals, and connec-
tors for corrosion, damage, or terminal push out. Pay particular attentiontoallpowerandgroundcir-
cuits. If no problems are found, replace and program the ECM per the ServiceInformation. (Refer to 8
- ELECTRICAL/ELECTRONIC CONTROL MODULES/ENGINE CONTROL MODULE - REMOVAL)
Perform RE TRANSMISSION VERIFICATION TEST VER - 1 (DIESEL). (Refer to 21 - TRANSMISSION/
TRANSAXLE/AUTOMATIC - 48RE - STANDARD PROCEDURE)
No>>
Te s t C o m p l e t e .
Perform RE TRANSMISSION VERIFICATION TEST VER - 1 (DIESEL). (Refer to 21 - TRANSMISSION/
TRANSAXLE/AUTOMATIC - 48RE - STANDARD PROCEDURE)
Page 3762 of 5267
the gear selector in Drive?
Ye s>>
Replace the Valve Body per the Service Information. (Refer to 21 - TRANSMISSION/TRANSAXLE/AU-
TOMATIC - 48RE/VALVE BODY - REMOVAL)
Perform RE TRANSMISSION VERIFICATION TEST VER - 1 (DIESEL). (Refer to 21 - TRANSMISSION/
TRANSAXLE/AUTOMATIC - 48RE - STANDARD PROCEDURE)
No>>
Go To 7
7.ENGINE CONTROL MODULE
Turn the ignition off to the lock position.
Remove pressure gauge from transmission.
Install the Transmission Oil Pan and refill the transmission fluid per theservice information. (Refer to 21 - TRANS-
MISSION/TRANSAXLE/AUTOMATIC - 48RE/FLUID - STANDARD PROCEDURE)
With the scan tool, erase Engine DTCs.
Test drive the vehicle.
Be sure to stop the vehicle, with the vehicle in drive on six separate occurrences for at least 6 seconds each stop.
With the scan tool, read Engine DTCs.
Did the P1757 DTC reset?
Ye s>>
Using the schematics as a guide, check the Engine Control Module (ECM) pins, terminals, and connec-
tors for corrosion, damage, or terminal push out. Pay particular attentiontoallpowerandgroundcir-
cuits. If no problems are found, replace and program the ECM per the ServiceInformation. (Refer to 8
- ELECTRICAL/ELECTRONIC CONTROL MODULES/ENGINE CONTROL MODULE - REMOVAL)
Perform RE TRANSMISSION VERIFICATION TEST VER - 1 (DIESEL). (Refer to 21 - TRANSMISSION/
TRANSAXLE/AUTOMATIC - 48RE - STANDARD PROCEDURE)
No>>
Go To 11
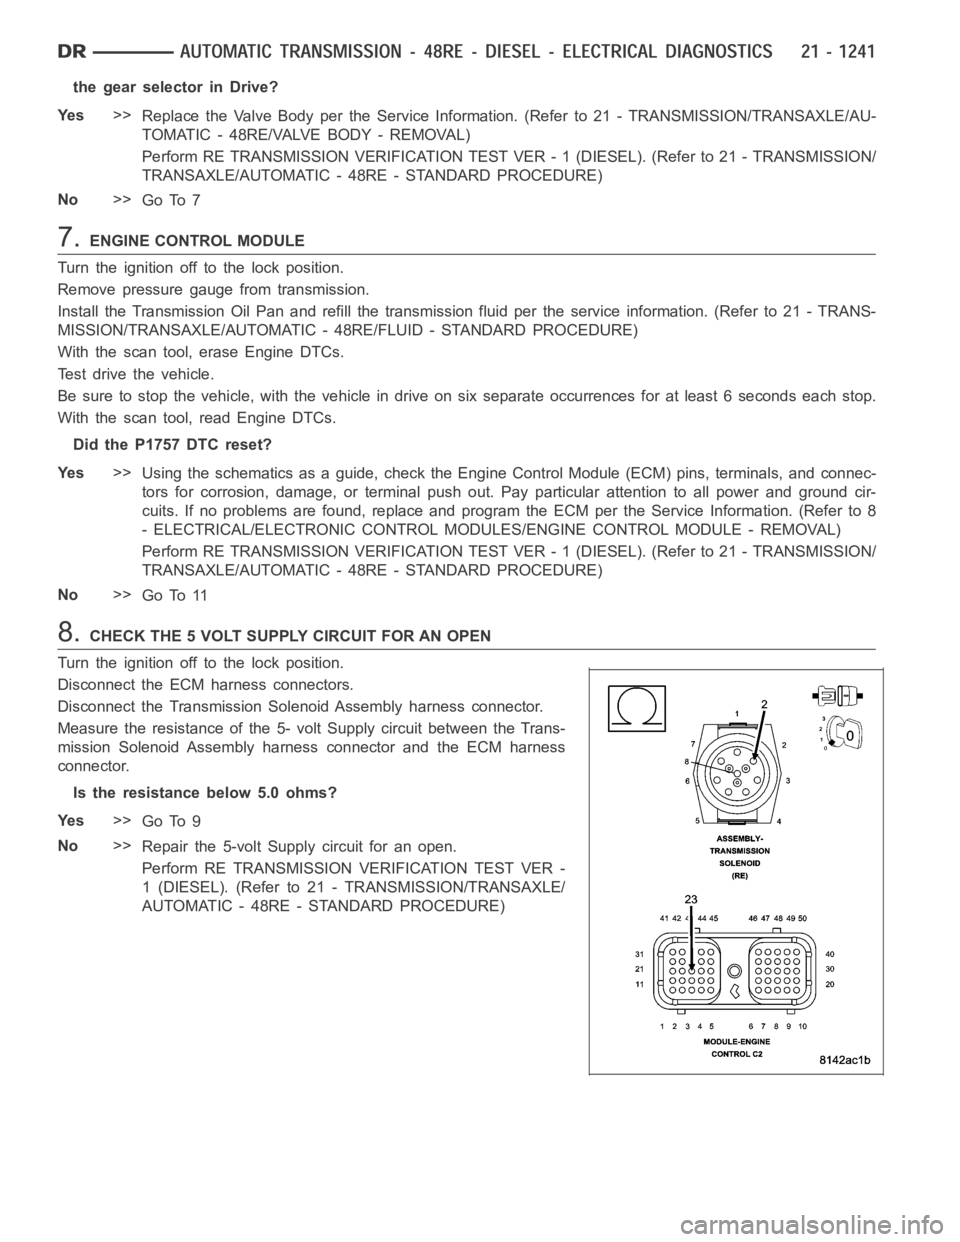
8.CHECK THE 5 VOLT SUPPLY CIRCUIT FOR AN OPEN
Turn the ignition off to the lock position.
Disconnect the ECM harness connectors.
Disconnect the Transmission Solenoid Assembly harness connector.
Measure the resistance of the 5- volt Supply circuit between the Trans-
mission Solenoid Assembly harness connector and the ECM harness
connector.
Is the resistance below 5.0 ohms?
Ye s>>
Go To 9
No>>
Repair the 5-volt Supply circuit for an open.
Perform RE TRANSMISSION VERIFICATION TEST VER -
1 (DIESEL). (Refer to 21 - TRANSMISSION/TRANSAXLE/
AUTOMATIC - 48RE - STANDARD PROCEDURE)
Page 3767 of 5267
3.COMPARE SCAN TOOL GOVERNOR PRESSURE READING TO PRESSURE GAUGE READING
Turn the ignition off to the lock position.
Connect a 700 kPa (100 psi) Pressure Gauge to the Governor Pressure test port. (Refer to 21 - TRANSMISSION/
TRANSAXLE/AUTOMATIC - 48RE - DIAGNOSIS AND TESTING)
Start the engine and allow the engine to idle.
Warm the transmission to a normal operating temperature above 43° C (110° F).
With the scan tool, read the Governor Pressure and compare the scan tool Governor Pressure reading to the Pres-
sure Gauge reading.
Does the scan tool Governor Pressure reading match the Pressure Gauge reading within 6.9 kPa (1
psi)?
Ye s>>
Go To 4
No>>
Go To 7
4.TRANSMISSION - INTERNAL DAMAGE
Turn the ignition off to the lock position.
Remove the transmission oil pan per the Service Information. (Refer to 21 -TRANSMISSION/TRANSAXLE/AUTO-
MATIC - 48RE/FLUID - STANDARD PROCEDURE)
Inspect the transmission oil pan for burnt oil and/or excessive debris.
Does the transmission contain burnt oil and/or excessive debris?
Ye s>>
Repair internal transmission as necessary. (Refer to 21 - TRANSMISSION/TRANSAXLE/AUTOMATIC -
48RE - REMOVAL)
Perform RE TRANSMISSION VERIFICATION TEST VER - 1 (DIESEL). (Refer to 21 - TRANSMISSION/
TRANSAXLE/AUTOMATIC - 48RE - STANDARD PROCEDURE)
No>>
Go To 5
5.CHECK INTERNAL TRANSMISSION FOR A FLUID LEAK
Inspect the transmission for internal fluid leakage in the Valve Body or the Governor Pressure Solenoid. (Refer to 21
- TRANSMISSION/TRANSAXLE/AUTOMATIC - 48RE/VALVE BODY - REMOVAL)
Were there any problems found?
Ye s>>
Repair the internal transmission as necessary per the Service Information. (Refer to 21 - TRANSMIS-
SION/TRANSAXLE/AUTOMATIC - 48RE/VALVE BODY - REMOVAL)
Perform RE TRANSMISSION VERIFICATION TEST VER - 1 (DIESEL). (Refer to 21 - TRANSMISSION/
TRANSAXLE/AUTOMATIC - 48RE - STANDARD PROCEDURE)
No>>
Go To 6
6.VERIFY OPERATION - TEST DRIVE
Remove the pressure gauge from the transmission.
Install the transmission oil pan and refill the transmission per the Service Information. (Refer to 21 - TRANSMIS-
SION/TRANSAXLE/AUTOMATIC - 48RE/FLUID - STANDARD PROCEDURE)
With the scan tool, erase Engine DTCs.
Test drive the vehicle.
Be sure to stop the vehicle and move the gear selector into the park positionfor a minimum of 5 seconds at least
three times during the drive cycle.
With the scan tool, read Engine DTCs.
Did the DTC reset?
Ye s>>
Using the schematics as a guide, check the Engine Control Module (ECM) pins, terminals, and connec-
tors for corrosion, damage, or terminal push out. Pay particular attentiontoallpowerandgroundcir-
Page 4031 of 5267
7.INSTRUMENT CLUSTER
Repair
Replace the Instrument Cluster in accordance with the Service Information.
Perform the BODY VERIFICATION TEST-VER 1 (Refer to 8 - ELECTRICAL/ELECTRONIC CONTROL
MODULES - STANDARD PROCEDURE) and TRANSFER CASE VERIFICATION TEST-VER 1 (Refer to
21 - TRANSMISSION/TRANSAXLE/TRANSFER CASE - STANDARD PROCEDURE).
8.INTERMITTENT WIRING AND CONNECTORS
The conditions necessary to set this DTC are not present at this time.
Using the wiring diagram/schematic as a guide, inspect the wiring and connectors.
While monitoring the scan tool data relative to this circuit, wiggle test the wiring and connectors.
Look for the data to change or for the DTC to reset during the wiggle test.
Were any problems found?
Ye s>>
Repair as necessary.
Perform the TRANSFER CASE VERIFICATION TEST-VER 1. (Refer to 21 - TRANSMISSION/TRANS-
AXLE/TRANSFER CASE - STANDARD PROCEDURE)
No>>
Te s t c o m p l e t e .
Page 4035 of 5267
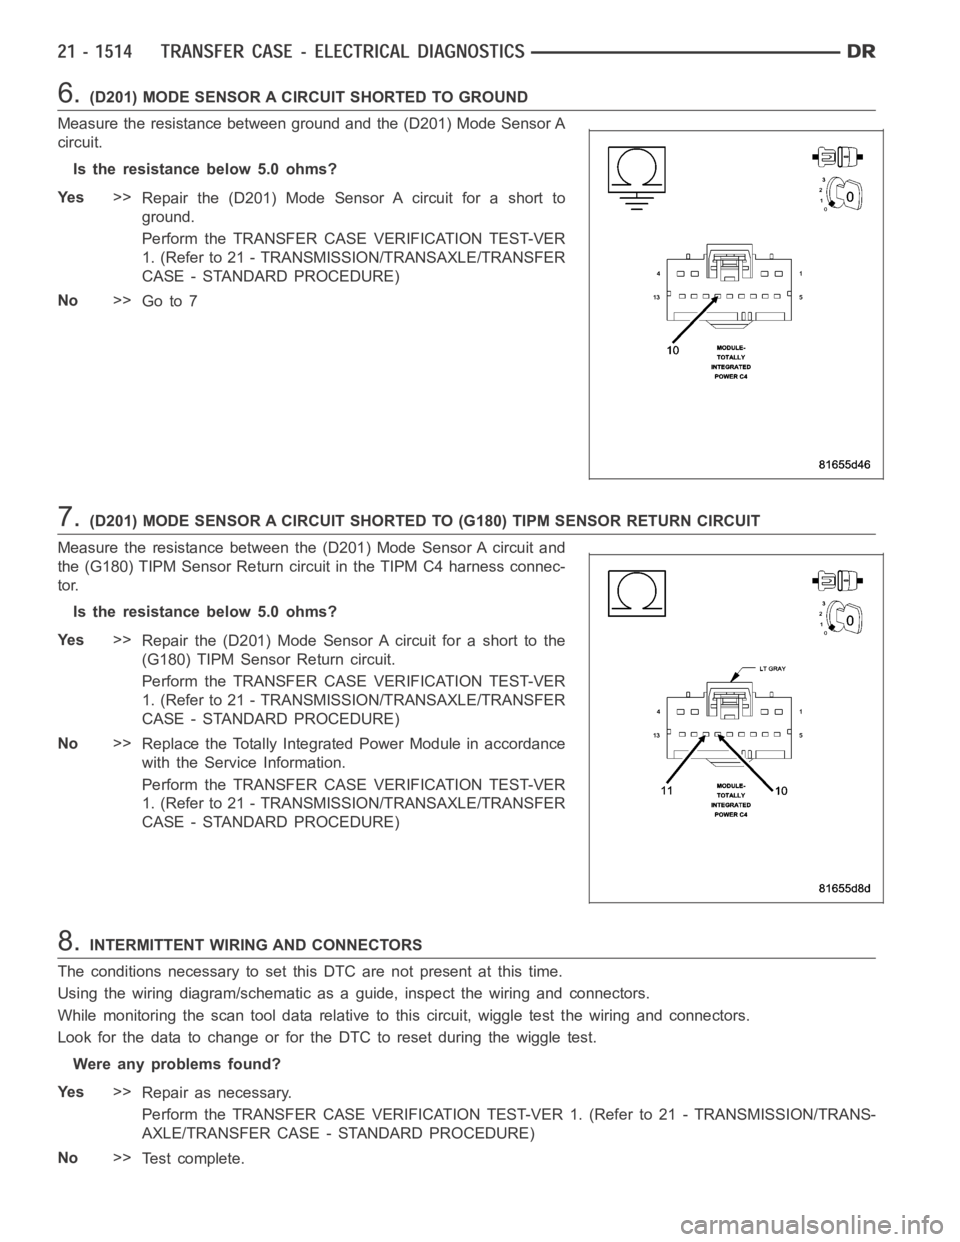
6.(D201) MODE SENSOR A CIRCUIT SHORTED TO GROUND
Measure the resistance between ground and the (D201) Mode Sensor A
circuit.
Is the resistance below 5.0 ohms?
Ye s>>
Repair the (D201) Mode Sensor A circuit for a short to
ground.
Perform the TRANSFER CASE VERIFICATION TEST-VER
1. (Refer to 21 - TRANSMISSION/TRANSAXLE/TRANSFER
CASE - STANDARD PROCEDURE)
No>>
Go to 7
7.(D201) MODE SENSOR A CIRCUIT SHORTED TO (G180) TIPM SENSOR RETURN CIRCUIT
Measure the resistance between the (D201) Mode Sensor A circuit and
the (G180) TIPM Sensor Return circuit in the TIPM C4 harness connec-
tor.
Is the resistance below 5.0 ohms?
Ye s>>
Repair the (D201) Mode Sensor A circuit for a short to the
(G180) TIPM Sensor Return circuit.
Perform the TRANSFER CASE VERIFICATION TEST-VER
1. (Refer to 21 - TRANSMISSION/TRANSAXLE/TRANSFER
CASE - STANDARD PROCEDURE)
No>>
Replace the Totally Integrated Power Module in accordance
with the Service Information.
Perform the TRANSFER CASE VERIFICATION TEST-VER
1. (Refer to 21 - TRANSMISSION/TRANSAXLE/TRANSFER
CASE - STANDARD PROCEDURE)
8.INTERMITTENT WIRING AND CONNECTORS
The conditions necessary to set this DTC are not present at this time.
Using the wiring diagram/schematic as a guide, inspect the wiring and connectors.
While monitoring the scan tool data relative to this circuit, wiggle test the wiring and connectors.
Look for the data to change or for the DTC to reset during the wiggle test.
Were any problems found?
Ye s>>
Repair as necessary.
Perform the TRANSFER CASE VERIFICATION TEST-VER 1. (Refer to 21 - TRANSMISSION/TRANS-
AXLE/TRANSFER CASE - STANDARD PROCEDURE)
No>>
Te s t c o m p l e t e .
Page 4043 of 5267
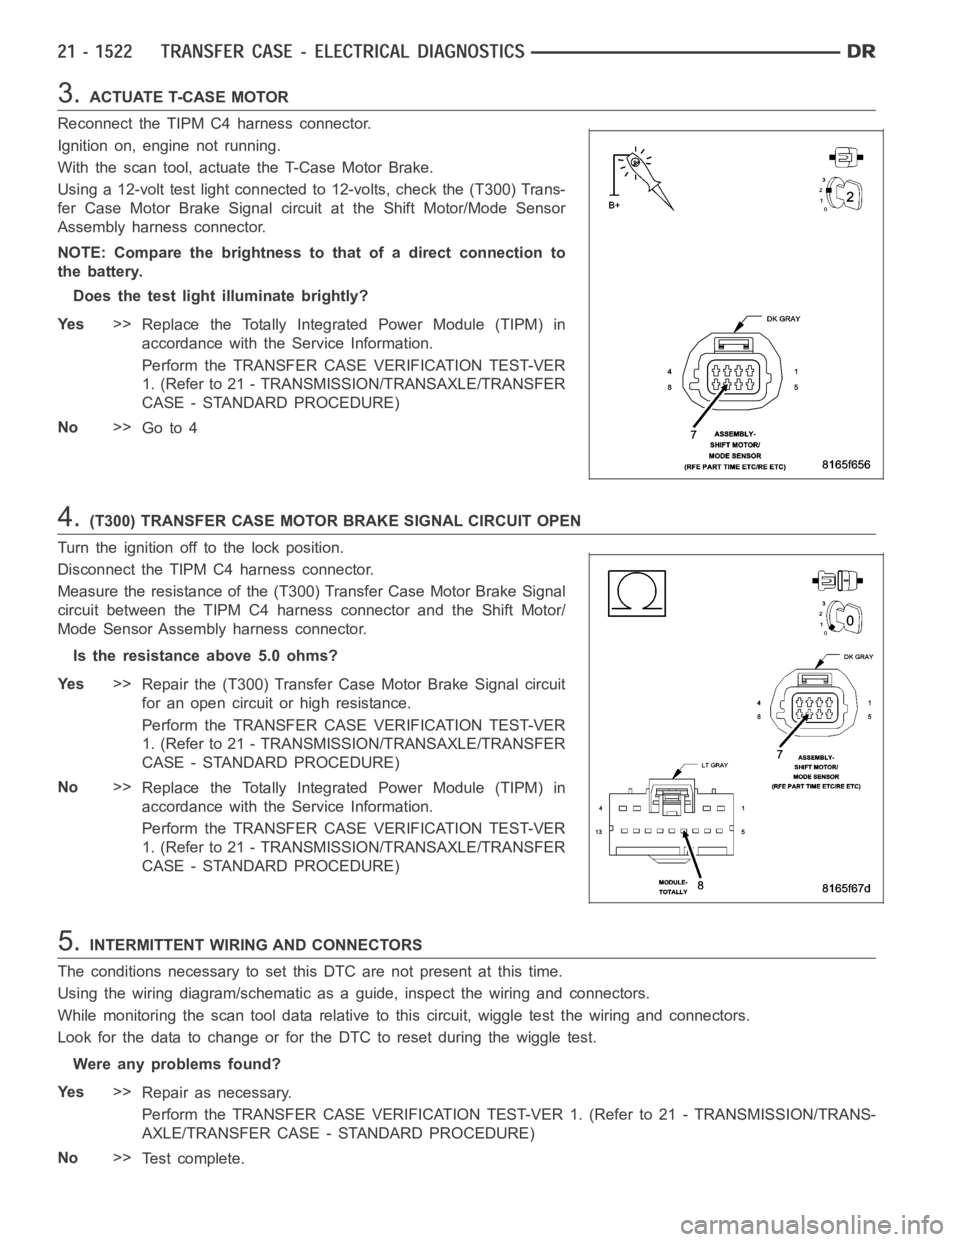
3.ACTUATE T-CASE MOTOR
Reconnect the TIPM C4 harness connector.
Ignition on, engine not running.
With the scan tool, actuate the T-Case Motor Brake.
Using a 12-volt test light connected to 12-volts, check the (T300) Trans-
fer Case Motor Brake Signal circuit at the Shift Motor/Mode Sensor
Assembly harness connector.
NOTE: Compare the brightness to that of a direct connection to
the battery.
Does the test light illuminate brightly?
Ye s>>
Replace the Totally Integrated Power Module (TIPM) in
accordance with the Service Information.
Perform the TRANSFER CASE VERIFICATION TEST-VER
1. (Refer to 21 - TRANSMISSION/TRANSAXLE/TRANSFER
CASE - STANDARD PROCEDURE)
No>>
Go to 4
4.(T300) TRANSFER CASE MOTOR BRAKE SIGNAL CIRCUIT OPEN
Turn the ignition off to the lock position.
Disconnect the TIPM C4 harness connector.
Measure the resistance of the (T300) Transfer Case Motor Brake Signal
circuit between the TIPM C4 harness connector and the Shift Motor/
Mode Sensor Assembly harness connector.
Is the resistance above 5.0 ohms?
Ye s>>
Repair the (T300) Transfer Case Motor Brake Signal circuit
for an open circuit or high resistance.
Perform the TRANSFER CASE VERIFICATION TEST-VER
1. (Refer to 21 - TRANSMISSION/TRANSAXLE/TRANSFER
CASE - STANDARD PROCEDURE)
No>>
Replace the Totally Integrated Power Module (TIPM) in
accordance with the Service Information.
Perform the TRANSFER CASE VERIFICATION TEST-VER
1. (Refer to 21 - TRANSMISSION/TRANSAXLE/TRANSFER
CASE - STANDARD PROCEDURE)
5.INTERMITTENT WIRING AND CONNECTORS
The conditions necessary to set this DTC are not present at this time.
Using the wiring diagram/schematic as a guide, inspect the wiring and connectors.
While monitoring the scan tool data relative to this circuit, wiggle test the wiring and connectors.
Look for the data to change or for the DTC to reset during the wiggle test.
Were any problems found?
Ye s>>
Repair as necessary.
Perform the TRANSFER CASE VERIFICATION TEST-VER 1. (Refer to 21 - TRANSMISSION/TRANS-
AXLE/TRANSFER CASE - STANDARD PROCEDURE)
No>>
Te s t c o m p l e t e .
Page 4046 of 5267
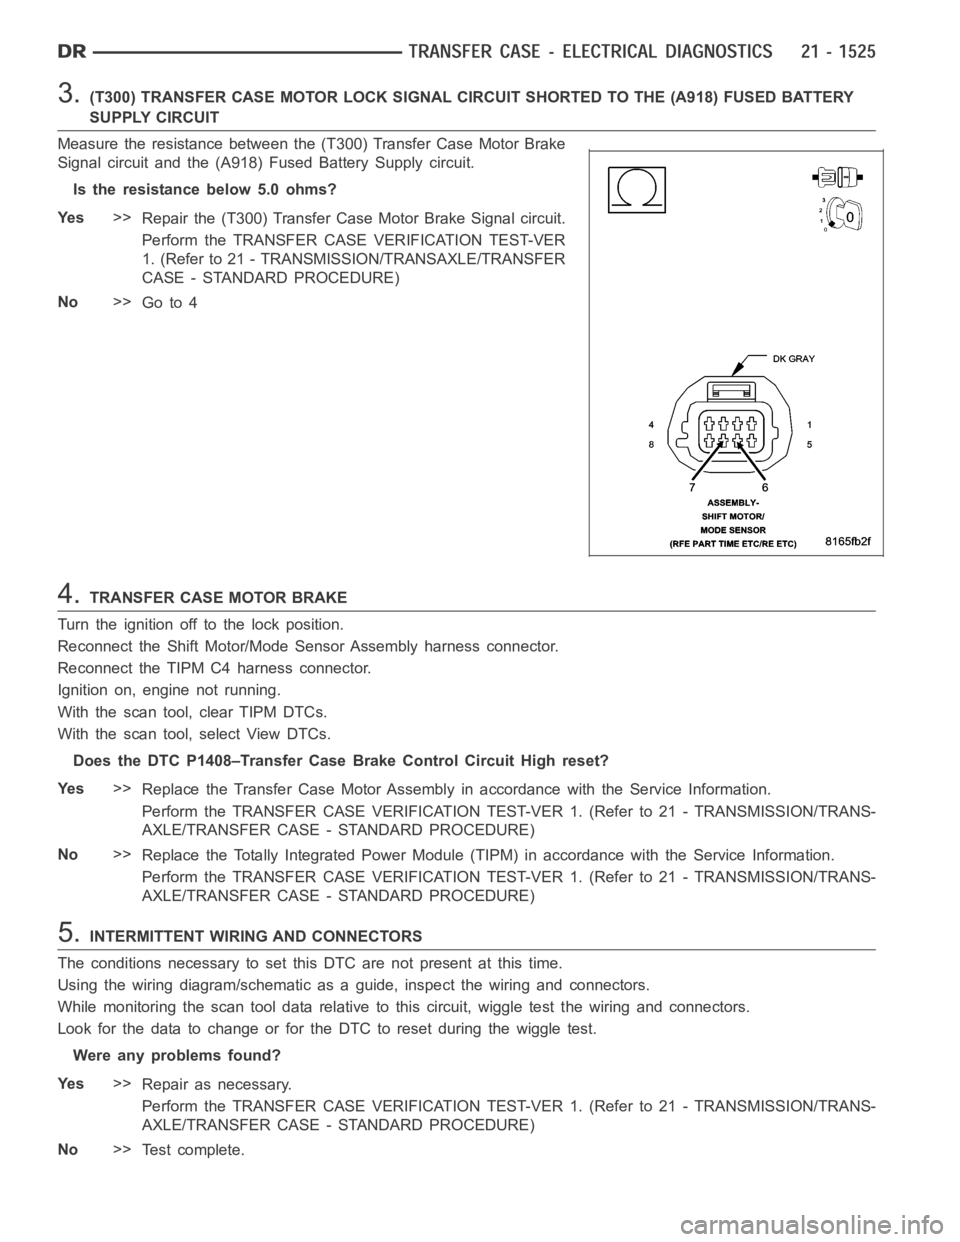
3.(T300) TRANSFER CASE MOTOR LOCK SIGNAL CIRCUIT SHORTED TO THE (A918) FUSEDBATTERY
SUPPLY CIRCUIT
Measure the resistance between the (T300) Transfer Case Motor Brake
Signal circuit and the (A918) Fused Battery Supply circuit.
Is the resistance below 5.0 ohms?
Ye s>>
Repair the (T300) Transfer Case Motor Brake Signal circuit.
Perform the TRANSFER CASE VERIFICATION TEST-VER
1. (Refer to 21 - TRANSMISSION/TRANSAXLE/TRANSFER
CASE - STANDARD PROCEDURE)
No>>
Go to 4
4.TRANSFER CASE MOTOR BRAKE
Turn the ignition off to the lock position.
Reconnect the Shift Motor/Mode Sensor Assembly harness connector.
Reconnect the TIPM C4 harness connector.
Ignition on, engine not running.
With the scan tool, clear TIPM DTCs.
With the scan tool, select View DTCs.
Does the DTC P1408–Transfer Case Brake Control Circuit High reset?
Ye s>>
Replace the Transfer Case Motor Assembly in accordance with the Service Information.
Perform the TRANSFER CASE VERIFICATION TEST-VER 1. (Refer to 21 - TRANSMISSION/TRANS-
AXLE/TRANSFER CASE - STANDARD PROCEDURE)
No>>
Replace the Totally Integrated Power Module (TIPM) in accordance with theService Information.
Perform the TRANSFER CASE VERIFICATION TEST-VER 1. (Refer to 21 - TRANSMISSION/TRANS-
AXLE/TRANSFER CASE - STANDARD PROCEDURE)
5.INTERMITTENT WIRING AND CONNECTORS
The conditions necessary to set this DTC are not present at this time.
Using the wiring diagram/schematic as a guide, inspect the wiring and connectors.
While monitoring the scan tool data relative to this circuit, wiggle test the wiring and connectors.
Look for the data to change or for the DTC to reset during the wiggle test.
Were any problems found?
Ye s>>
Repair as necessary.
Perform the TRANSFER CASE VERIFICATION TEST-VER 1. (Refer to 21 - TRANSMISSION/TRANS-
AXLE/TRANSFER CASE - STANDARD PROCEDURE)
No>>
Te s t c o m p l e t e .