2006 DODGE RAM SRT-10 service
[x] Cancel search: servicePage 3323 of 5267
6.CHECK TO SEE IF DTC P1736 IS CURRENT
With the scan tool, perform the 2nd Prime Gear Clutch Test. Follow the instructions on the scan tool.
Increase the throttle angle, TPS Degree, to 30° for no more than a few seconds.
CAUTION: Do not overheat the transmission.
NOTE: If the 4C clutch is faulty, the overrunning clutch will hold and the slip test will pass. The 2nd Prime
Gear Clutch Test will not detect a faulty 4C clutch. However, it will detectafaultyUDclutch.
Did the clutch test pass, did the Input Speed remain at zero?
Ye s>>
Go To 7
No>>
Go To 9
7.CHECK FOR INTERMITTENT OPERATION
Check the Shifter adjustment per the Service Information.
Intermittent gear ratio DTCs can be set by problems in the Input and Output Speed Sensor circuits and/or Speed
Sensor Ground circuit.
Check the Speed Sensor wiring and connectors for good connection, then performawiggletestusingtheTrans-
mission Simulator, Miller tool #8333.
Were there any problems found?
Ye s>>
Repair as necessary.
Perform 45RFE/545RFE TRANSMISSION VERIFICATION TEST - VER 1. (Refer to 21- TRANSMIS-
SION/TRANSAXLE/AUTOMATIC - 45RFE/545RFE - STANDARD PROCEDURE)
No>>
Go To 8
8.CHECK FOR SLIPPAGE
With the scan tool, erase Transmission DTCs.
Road test the vehicle.
During the road test, operate in 4th gear, and perform kickdown shifts from4th to 2nd (prime) gears.
Is there an obvious slippage noticed in 4th or 2nd prime gears, or runaway onthe 4-2 shift?
Ye s>>
Go To 11
No>>
Go To 14
9.UD CLUTCH HYDRAULIC CIRCUIT
Remove Transmission Oil Pan and check for excessive debris.
Remove the Valve Body and air check the UD clutch hydraulic circuit (in the case) per the Service Information.
NOTE: The UD clutch passage contains a small bleed orifice, a small amount of air leakage is normal.
Were there any problems found, excessive debris and/or excessive air leakage in the UD clutch hydrau-
lic circuit?
Ye s>>
Repair as necessary. Check the UD clutch piston seals and the dribbler assembly, reaction shaft sup-
port seal rings, and the flatness of the pump valve body and pump housing faces. Check main regulator
valve for sticking in the bore.
Perform 45RFE/545RFE TRANSMISSION VERIFICATION TEST - VER 1. (Refer to 21- TRANSMIS-
SION/TRANSAXLE/AUTOMATIC - 45RFE/545RFE - STANDARD PROCEDURE)
No>>
Go To 10
Page 3324 of 5267
10.UD ACCUMULATOR PISTON
Check the UD bleed orifice, accumulator piston, and accumulator piston seal in the main valve body.
Were there any problems found?
Ye s>>
Repair as necessary. Refer to the Service Information for proper repair procedures.
No>>
Replace the Transmission Solenoid/TRS Assembly per the Service Information.
Perform 45RFE/545RFE TRANSMISSION VERIFICATION TEST - VER 1. (Refer to 21- TRANSMIS-
SION/TRANSAXLE/AUTOMATIC - 45RFE/545RFE - STANDARD PROCEDURE)
11 .EXCESSIVE DEBRIS
Remove the Transmission Oil Pan and check for excessive debris.
Remove the valve body and air check the 4C clutch hydraulic circuit per the Service Information.
NOTE: The 4C clutch passage contains a small bleed orifice, a small amount of air leakage is normal.
Were there any problems found, excessive debris, improperly assembled 4Cclutch and/or excessive air
leakage in the 4C clutch hydraulic circuit?
Ye s>>
Repair as necessary. Refer to the Service Information for proper repair procedures. Note: Check the 4C
piston seals and bleed orifice.
Perform 45RFE/545RFE TRANSMISSION VERIFICATION TEST - VER 1. (Refer to 21- TRANSMIS-
SION/TRANSAXLE/AUTOMATIC - 45RFE/545RFE - STANDARD PROCEDURE)
No>>
Go To 12
12.4C ACCUMULATOR
Check the 4C Accumulator piston for cracks or a cut seal.
Check for a cut or missing #7 or #5 check balls.
Check the Solenoid Switch Valve and its plugs for sticking in its bore or excessive wear.
Were there any problems found
Ye s>>
Repair as necessary. Refer to the Service Information for proper repair procedures.
Perform 45RFE/545RFE TRANSMISSION VERIFICATION TEST - VER 1. (Refer to 21- TRANSMIS-
SION/TRANSAXLE/AUTOMATIC - 45RFE/545RFE - STANDARD PROCEDURE)
No>>
Go To 13
13.CHECK FOR BROKEN REVERSE SUN GEAR WELD
Working through the windows in the bottom of the case, check for a broken Reverse Sun gear weld to the reaction
carrier as follows:
(1) Hold the Transmission Output Shaft by holding the Transmission ManualLever in the park position.
(2) Rotate the Input Annulus gear and drive shell, (the drum that encloses the two rearmost carriers).
(3) Check to see if the reaction carrier (the front most carrier, whose outer shell is splined to the 4C clutch) is
rotating faster than the drive shell is being turned.
Is the reaction carrier turning faster than the drive shell?
Ye s>>
Replace the Transmission Solenoid/TRS Assembly per the Service Information.
Perform 45RFE/545RFE TRANSMISSION VERIFICATION TEST - VER 1. (Refer to 21- TRANSMIS-
SION/TRANSAXLE/AUTOMATIC - 45RFE/545RFE - STANDARD PROCEDURE)
No>>
Replace the reaction carrier per the Service Information.
Perform 45RFE/545RFE TRANSMISSION VERIFICATION TEST - VER 1. (Refer to 21- TRANSMIS-
SION/TRANSAXLE/AUTOMATIC - 45RFE/545RFE - STANDARD PROCEDURE)
Page 3325 of 5267
14.CHECK IF DTC RESET
Did the DTC P1736 reset during the road test?
Ye s>>
Go To 15
No>>
Go To 16
15.LIST OF POSSIBLE CAUSES
If any other DTC’s set during the road test, refer to the appropriate symptom in the Transmission category.
If no other DTC’s set during the road test, below is a list of possible causes, but not strictly limited to those:
Check for excessive debris in the Transmission Oil pan, plugged, cracked,or split Primary Transmission Oil Filter
and/or seal.
Check for cuts or missing #7 and #5 check balls in the main valve body.
Check the 4C and UD accumulator pistons and seals, UD bleed orifice, and theSolenoid Switch Valve and Plugs
in the main valve body.
Check the UD clutch piston seals, reaction shaft support seal rings, and the flatness of the pump valve body and
pump housing faces.
Check the 4C clutch piston seals, and bleed orifice.
Check the UD clutch piston seals, reaction shaft support seal rings, and dribbler assemblies, and the flatness of the
pump valve body and pump housing faces.
View repair
Repair
Repair as necessary. Refer to the Service Information for proper repair procedures.
Perform 45RFE/545RFE TRANSMISSION VERIFICATION TEST - VER 1. (Refer to 21- TRANSMIS-
SION/TRANSAXLE/AUTOMATIC - 45RFE/545RFE - STANDARD PROCEDURE)
16.INTERMITTENT DTC
The conditions necessary to set this DTC are not present at this time.
Use the DTC EVENT DATA to help identify the conditions and/or possible causes that may have caused the DTC
to set.
Check for any Service Information Tune-ups or Technical Service Bulletins that may apply.
Where there any problems found?
Ye s>>
Repair as necessary.
Perform 45RFE/545RFE TRANSMISSION VERIFICATION TEST - VER 1. (Refer to 21- TRANSMIS-
SION/TRANSAXLE/AUTOMATIC - 45RFE/545RFE - STANDARD PROCEDURE)
No>>
Te s t C o m p l e t e .
Page 3328 of 5267
3.CHECK THE PCM AND WIRING
Turn the ignition off to the lock position.
Remove the Ignition Switch Feed fuse from the TIPM.
CAUTION: Removal of the Ignition Switch Feed fuse from the TIPM will prevent the vehicle from being
startedingear.
WARNING: The Ignition Switch Feed fuse must be removed from the TIPM. Failure to do so can result in
personal injury or death.
Install the Transmission Simulator, Miller tool #8333.
Ignition on, engine not running.
With the Transmission Simulator, turn the Pressure Switch selector switchtoL/R.
With the scan tool, monitor the L/R Pressure Switch state while pressing thePressureSwitchTestbuttononthe
Transmission Simulator.
Did the state of the L/R Pressure Switch change while pressing the PressureSwitch Test button?
Ye s>>
Go To 4
No>>
Go To 5
4.CHECK IF THE SOLENOID SWITCH VALVE STICKING
Turn the ignition off to the lock position.
Remove the Transmission Oil Pan per the Service Information.
Remove the Transmission Valve body per the Service Information.
Inspect the Solenoid Switch Valve and Plugs for sticking.
Is the Solenoid Switch Valve or Plugs sticking?
Ye s>>
Clean and inspect per the Service Information. Repair as necessary.
Perform 45RFE/545RFE TRANSMISSION VERIFICATION TEST - VER 1. (Refer to 21- TRANSMIS-
SION/TRANSAXLE/AUTOMATIC - 45RFE/545RFE - STANDARD PROCEDURE)
No>>
Replace the Transmission Solenoid/TRS Assembly per the Service Information.
Perform 45RFE/545RFE TRANSMISSION VERIFICATION TEST - VER 1. (Refer to 21- TRANSMIS-
SION/TRANSAXLE/AUTOMATIC - 45RFE/545RFE - STANDARD PROCEDURE)
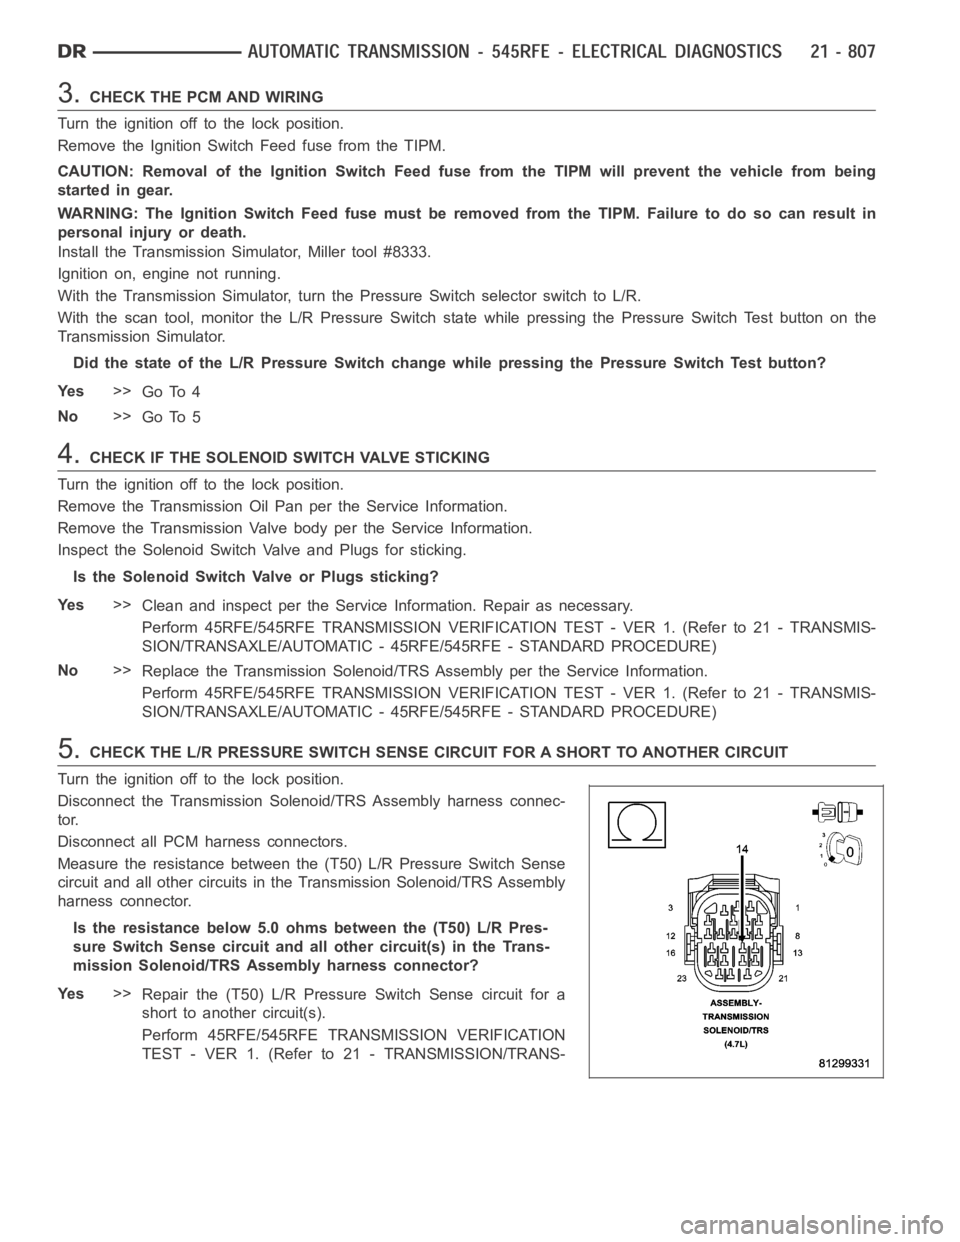
5.CHECK THE L/R PRESSURE SWITCH SENSE CIRCUIT FOR A SHORT TO ANOTHER CIRCUIT
Turn the ignition off to the lock position.
Disconnect the Transmission Solenoid/TRS Assembly harness connec-
tor.
Disconnect all PCM harness connectors.
Measure the resistance between the (T50) L/R Pressure Switch Sense
circuit and all other circuits in the Transmission Solenoid/TRS Assembly
harness connector.
Is the resistance below 5.0 ohms between the (T50) L/R Pres-
sure Switch Sense circuit and all other circuit(s) in the Trans-
mission Solenoid/TRS Assembly harness connector?
Ye s>>
Repair the (T50) L/R PressureSwitch Sense circuit for a
short to another circuit(s).
Perform 45RFE/545RFE TRANSMISSION VERIFICATION
TEST - VER 1. (Refer to 21 - TRANSMISSION/TRANS-
Page 3329 of 5267
AXLE/AUTOMATIC - 45RFE/545RFE - STANDARD PRO-
CEDURE)
No>>
Using the schematics as a guide, check the Powertrain Control Module (PCM)terminals for corrosion,
damage, or terminal push out. Pay particular attention to all power and ground circuits. If no problems
are found, replace the PCM per the Service Information. With the scan tool,perform QUICK LEARN.
Perform 45RFE/545RFE TRANSMISSION VERIFICATION TEST - VER 1. (Refer to 21- TRANSMIS-
SION/TRANSAXLE/AUTOMATIC - 45RFE/545RFE - STANDARD PROCEDURE)
6.CHECK WIRING AND CONNECTORS
The conditions necessary to set this DTC are not present at this time.
Using the schematics as a guide, inspect the wiring and connectors specifictothiscircuit.
Wiggle the wires while checking for shorted and open circuits.
With the scan tool, check the DTC EVENT DATA to help identify the conditionsin which the DTC was set.
Where there any problems found?
Ye s>>
Repair as necessary.
Perform 45RFE/545RFE TRANSMISSION VERIFICATION TEST - VER 1. (Refer to 21- TRANSMIS-
SION/TRANSAXLE/AUTOMATIC - 45RFE/545RFE - STANDARD PROCEDURE)
No>>
Te s t C o m p l e t e .
Page 3332 of 5267
3.CHECK THE PCM AND WIRING
Turn the ignition off to the lock position.
Remove the Ignition Switch Feed fuse from the TIPM.
CAUTION: Removal of the Ignition Switch Feed fuse from the TIPM will prevent the vehicle from being
startedingear.
WARNING: The Ignition Switch Feed fuse must be removed from the TIPM. Failure to do so can result in
personal injury or death.
Install the Transmission Simulator, Miller tool #8333.
Ignition on, engine not running.
With the Transmission Simulator, turn the Pressure Switch selector switchtotheLRposition.
With the scan tool, monitor the LR Pressure Switch state while pressing thePressure Switch Test button on the
Transmission Simulator.
Did the state of the LR Pressure Switch change while pressing the Pressure Switch Test button?
Ye s>>
Go To 4
No>>
Go To 5
4.CHECK THE SOLENOID SWITCH VALVE
Remove the Valve Body per the Service Information.
Inspect the Solenoid Switch Valve and plugs for sticking in the bore and/orwear.
Were there any problems found?
Ye s>>
Clean and repair as necessary per the Service Information.
Perform 45RFE/545RFE TRANSMISSION VERIFICATION TEST - VER 1. (Refer to 21- TRANSMIS-
SION/TRANSAXLE/AUTOMATIC - 45RFE/545RFE - STANDARD PROCEDURE)
No>>
Go To 7
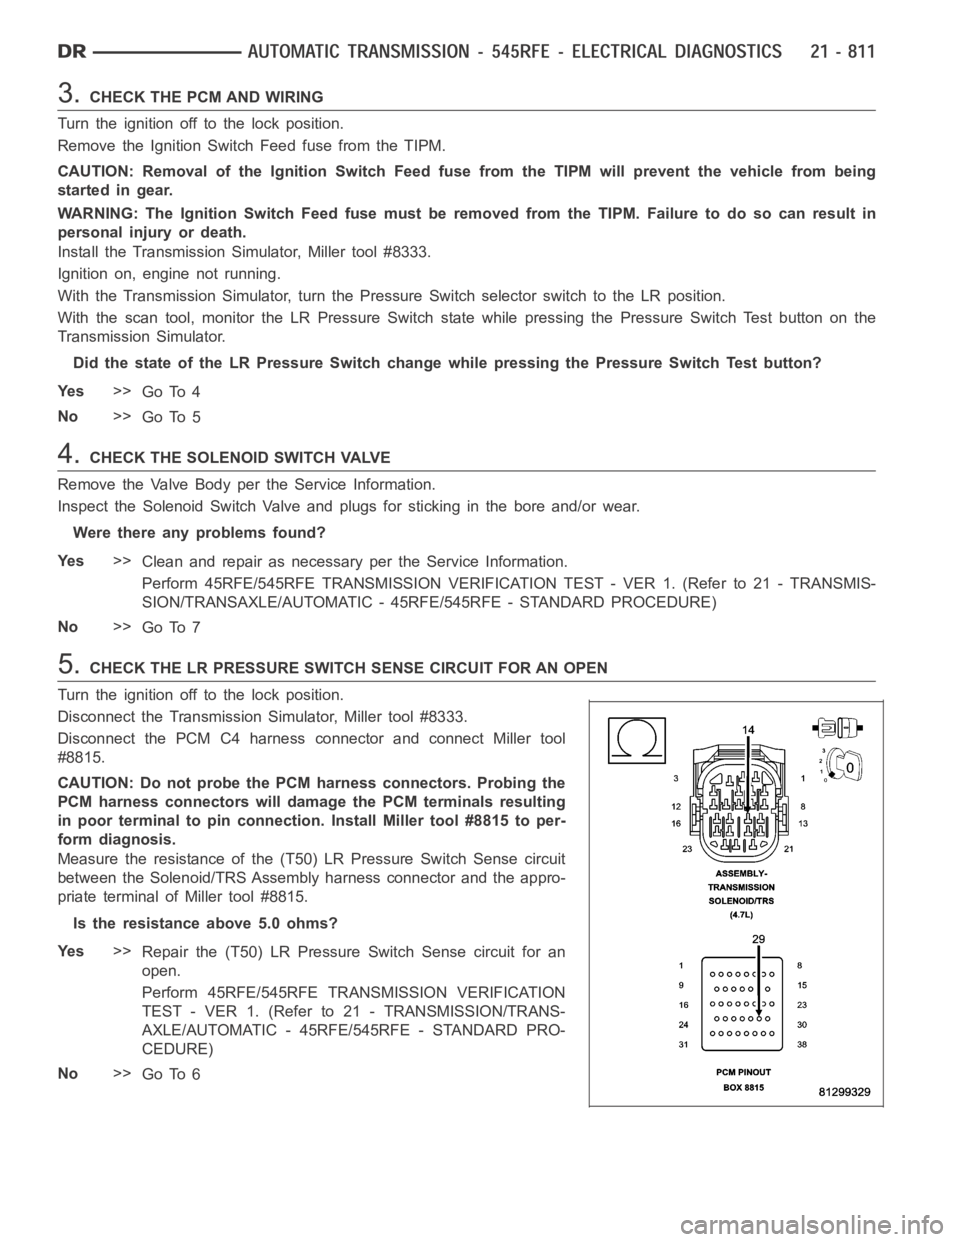
5.CHECK THE LR PRESSURE SWITCH SENSE CIRCUIT FOR AN OPEN
Turn the ignition off to the lock position.
Disconnect the Transmission Simulator, Miller tool #8333.
Disconnect the PCM C4 harness connector and connect Miller tool
#8815.
CAUTION: Do not probe the PCM harness connectors. Probing the
PCM harness connectors will damage the PCM terminals resulting
in poor terminal to pin connection. Install Miller tool #8815 to per-
form diagnosis.
Measure the resistance of the (T50) LR Pressure Switch Sense circuit
between the Solenoid/TRS Assembly harness connector and the appro-
priate terminal of Miller tool #8815.
Is the resistance above 5.0 ohms?
Ye s>>
Repair the (T50) LR Pressure Switch Sense circuit for an
open.
Perform 45RFE/545RFE TRANSMISSION VERIFICATION
TEST - VER 1. (Refer to 21 - TRANSMISSION/TRANS-
AXLE/AUTOMATIC - 45RFE/545RFE - STANDARD PRO-
CEDURE)
No>>
Go To 6
Page 3333 of 5267
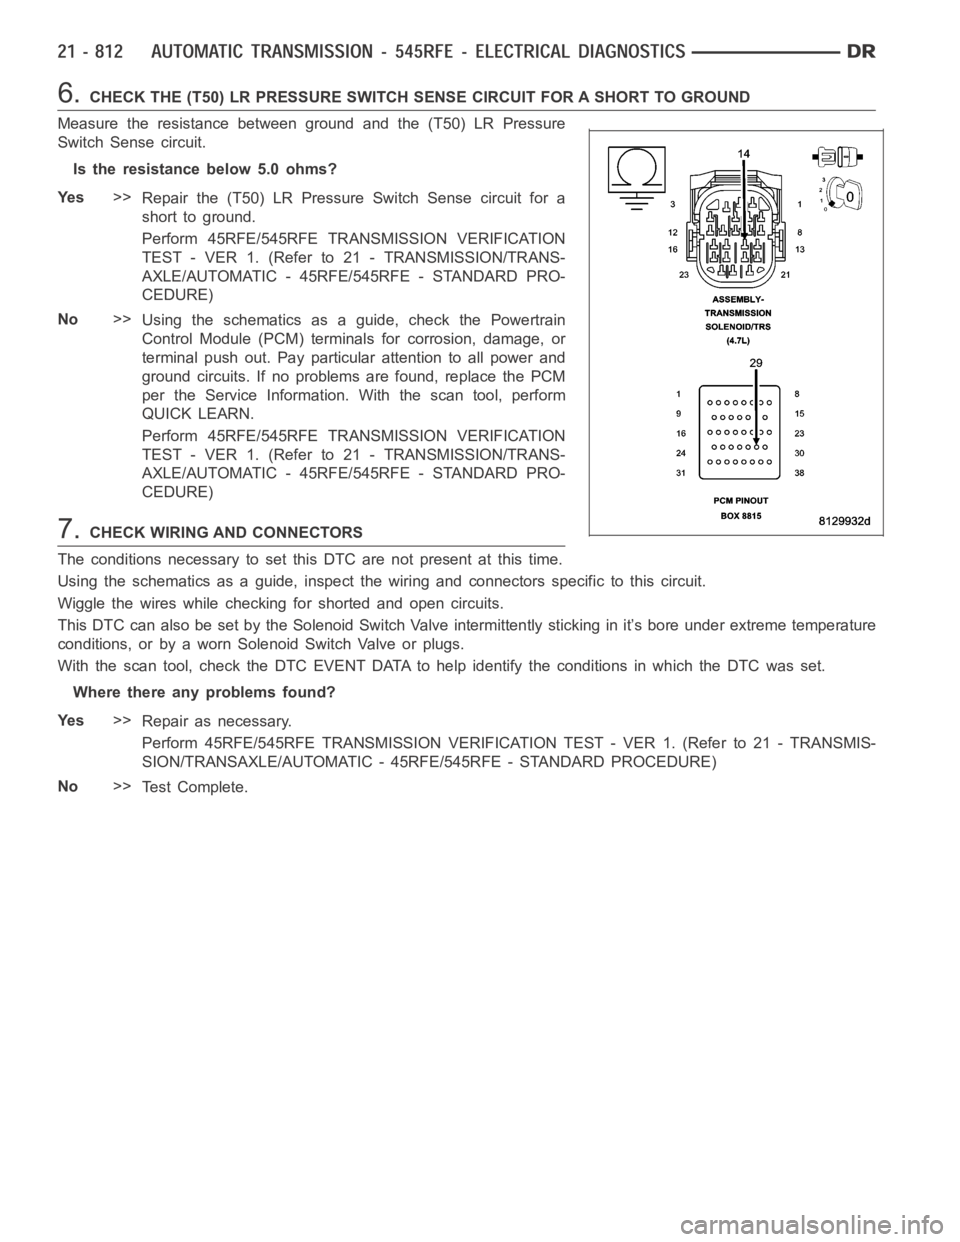
6.CHECK THE (T50) LR PRESSURE SWITCH SENSE CIRCUIT FOR A SHORT TO GROUND
Measure the resistance between ground and the (T50) LR Pressure
Switch Sense circuit.
Is the resistance below 5.0 ohms?
Ye s>>
Repair the (T50) LR Pressure Switch Sense circuit for a
short to ground.
Perform 45RFE/545RFE TRANSMISSION VERIFICATION
TEST - VER 1. (Refer to 21 - TRANSMISSION/TRANS-
AXLE/AUTOMATIC - 45RFE/545RFE - STANDARD PRO-
CEDURE)
No>>
Using the schematics as a guide, check the Powertrain
Control Module (PCM) terminals for corrosion, damage, or
terminal push out. Pay particular attention to all power and
ground circuits. If no problems are found, replace the PCM
per the Service Information.With the scan tool, perform
QUICK LEARN.
Perform 45RFE/545RFE TRANSMISSION VERIFICATION
TEST - VER 1. (Refer to 21 - TRANSMISSION/TRANS-
AXLE/AUTOMATIC - 45RFE/545RFE - STANDARD PRO-
CEDURE)
7.CHECK WIRING AND CONNECTORS
The conditions necessary to set this DTC are not present at this time.
Using the schematics as a guide, inspect the wiring and connectors specifictothiscircuit.
Wiggle the wires while checking for shorted and open circuits.
This DTC can also be set by the Solenoid Switch Valve intermittently sticking in it’s bore under extreme temperature
conditions, or by a worn Solenoid Switch Valve or plugs.
With the scan tool, check the DTC EVENT DATA to help identify the conditionsin which the DTC was set.
Where there any problems found?
Ye s>>
Repair as necessary.
Perform 45RFE/545RFE TRANSMISSION VERIFICATION TEST - VER 1. (Refer to 21- TRANSMIS-
SION/TRANSAXLE/AUTOMATIC - 45RFE/545RFE - STANDARD PROCEDURE)
No>>
Te s t C o m p l e t e .
Page 3338 of 5267
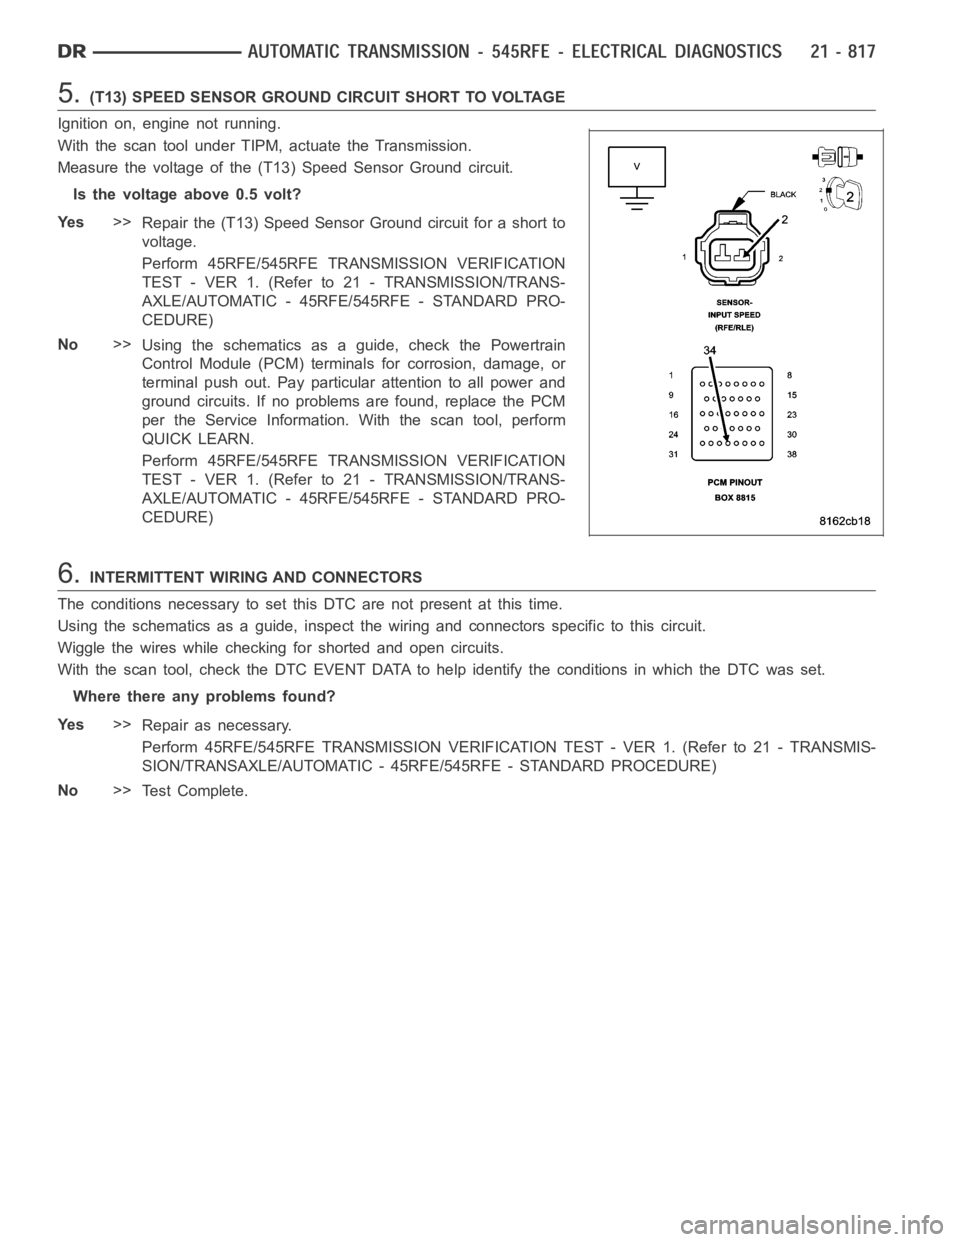
5.(T13) SPEED SENSOR GROUND CIRCUIT SHORT TO VOLTAGE
Ignition on, engine not running.
With the scan tool under TIPM, actuate the Transmission.
Measure the voltage of the (T13) Speed Sensor Ground circuit.
Is the voltage above 0.5 volt?
Ye s>>
Repair the (T13) Speed Sensor Ground circuit for a short to
voltage.
Perform 45RFE/545RFE TRANSMISSION VERIFICATION
TEST - VER 1. (Refer to 21 - TRANSMISSION/TRANS-
AXLE/AUTOMATIC - 45RFE/545RFE - STANDARD PRO-
CEDURE)
No>>
Using the schematics as a guide, check the Powertrain
Control Module (PCM) terminals for corrosion, damage, or
terminal push out. Pay particular attention to all power and
ground circuits. If no problems are found, replace the PCM
per the Service Information.With the scan tool, perform
QUICK LEARN.
Perform 45RFE/545RFE TRANSMISSION VERIFICATION
TEST - VER 1. (Refer to 21 - TRANSMISSION/TRANS-
AXLE/AUTOMATIC - 45RFE/545RFE - STANDARD PRO-
CEDURE)
6.INTERMITTENT WIRING AND CONNECTORS
The conditions necessary to set this DTC are not present at this time.
Using the schematics as a guide, inspect the wiring and connectors specifictothiscircuit.
Wiggle the wires while checking for shorted and open circuits.
With the scan tool, check the DTC EVENT DATA to help identify the conditionsin which the DTC was set.
Where there any problems found?
Ye s>>
Repair as necessary.
Perform 45RFE/545RFE TRANSMISSION VERIFICATION TEST - VER 1. (Refer to 21- TRANSMIS-
SION/TRANSAXLE/AUTOMATIC - 45RFE/545RFE - STANDARD PROCEDURE)
No>>
Te s t C o m p l e t e .