2006 DODGE RAM SRT-10 service
[x] Cancel search: servicePage 3303 of 5267
With the scan tool, monitor the 4C Pressure Switch while pressing the Pressure Switch test button on the Trans-
mission Simulator.
Did the state of the 4C Pressure Switch change while pressing the Pressure Switch Test button?
Ye s>>
Go To 12
No>>
Go To 13
12.CHECK THE TRANSMISSION SOLENOID/TRS ASSEMBLY
Using the schematics as a guide, inspect the wiring and connectors specifictothiscircuit.
Wiggle the wires while checking for shorted and open circuits.
Where there any problems found?
Ye s>>
Repair as necessary.
Perform 45RFE/545RFE TRANSMISSION VERIFICATION TEST - VER 1. (Refer to 21- TRANSMIS-
SION/TRANSAXLE/AUTOMATIC - 45RFE/545RFE - STANDARD PROCEDURE)
No>>
Replace the Transmission Solenoid/TRS Assembly per the Service Information.
Perform 45RFE/545RFE TRANSMISSION VERIFICATION TEST - VER 1. (Refer to 21- TRANSMIS-
SION/TRANSAXLE/AUTOMATIC - 45RFE/545RFE - STANDARD PROCEDURE)
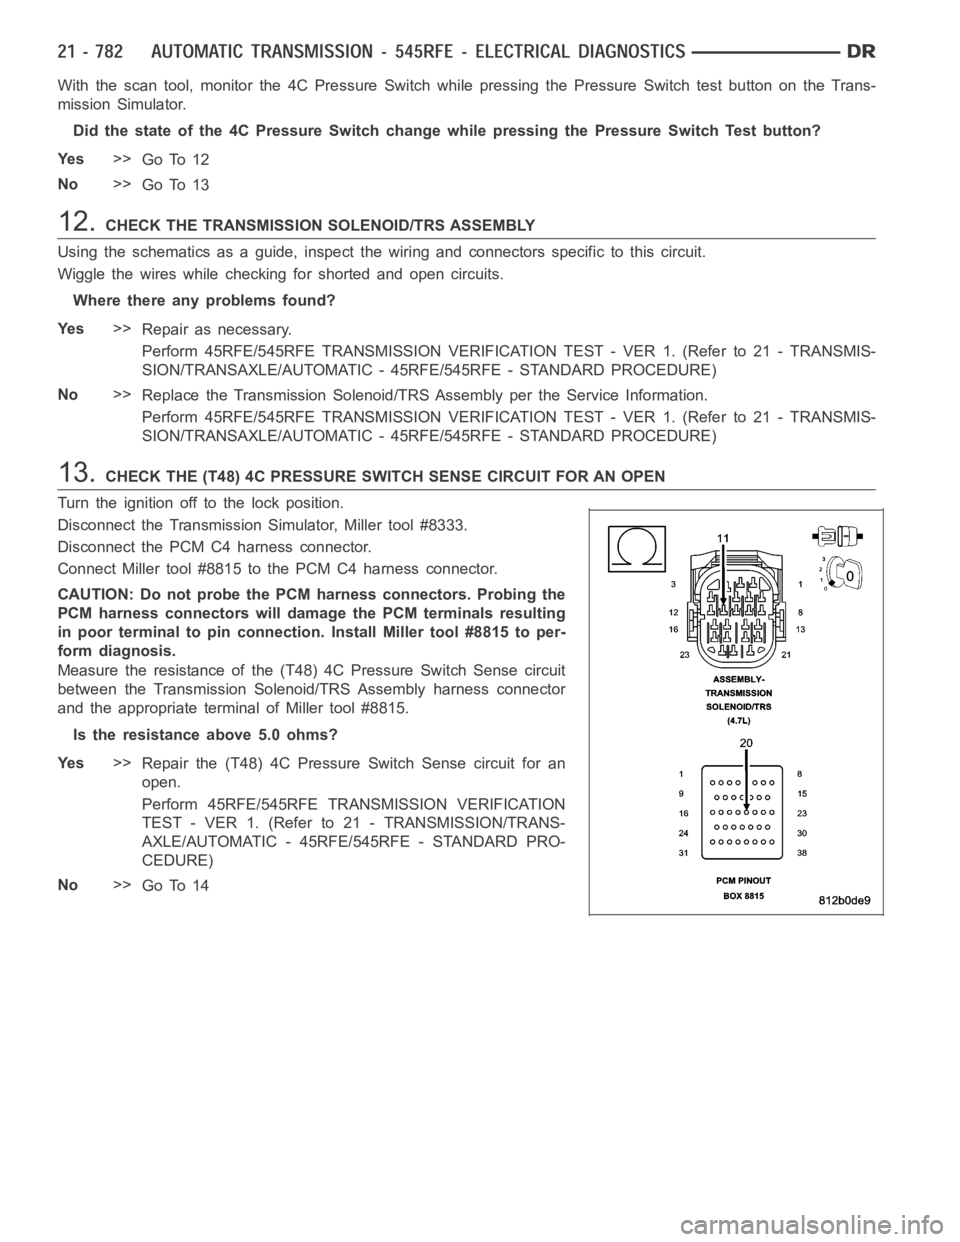
13.CHECK THE (T48) 4C PRESSURE SWITCH SENSE CIRCUIT FOR AN OPEN
Turn the ignition off to the lock position.
Disconnect the Transmission Simulator, Miller tool #8333.
Disconnect the PCM C4 harness connector.
Connect Miller tool #8815 to the PCM C4 harness connector.
CAUTION: Do not probe the PCM harness connectors. Probing the
PCM harness connectors will damage the PCM terminals resulting
in poor terminal to pin connection. Install Miller tool #8815 to per-
form diagnosis.
Measure the resistance of the (T48) 4C Pressure Switch Sense circuit
between the Transmission Solenoid/TRS Assembly harness connector
and the appropriate terminal of Miller tool #8815.
Is the resistance above 5.0 ohms?
Ye s>>
Repair the (T48) 4C Pressure Switch Sense circuit for an
open.
Perform 45RFE/545RFE TRANSMISSION VERIFICATION
TEST - VER 1. (Refer to 21 - TRANSMISSION/TRANS-
AXLE/AUTOMATIC - 45RFE/545RFE - STANDARD PRO-
CEDURE)
No>>
Go To 14
Page 3304 of 5267
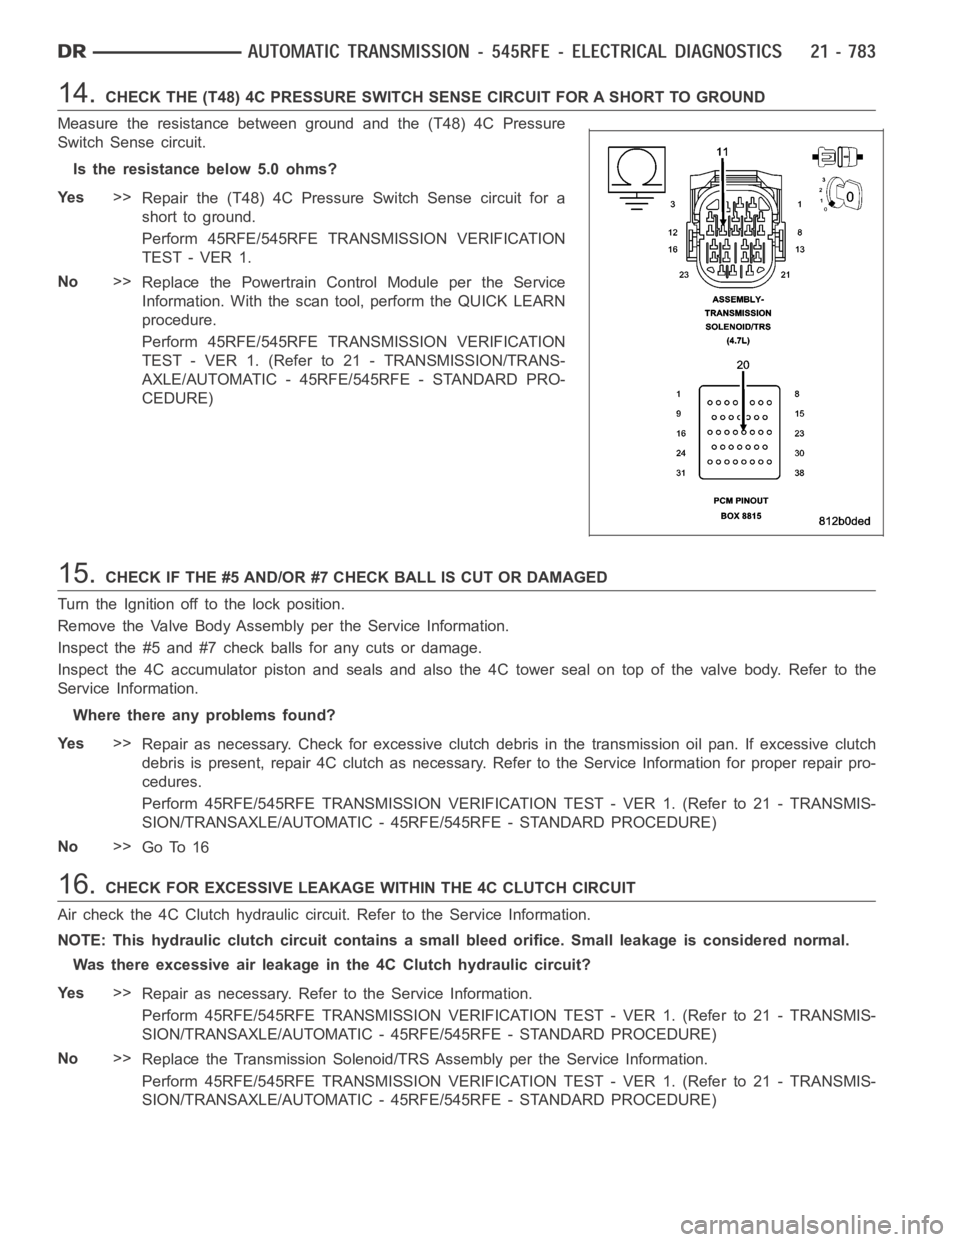
14.CHECK THE (T48) 4C PRESSURE SWITCH SENSE CIRCUIT FOR A SHORT TO GROUND
Measure the resistance between ground and the (T48) 4C Pressure
Switch Sense circuit.
Is the resistance below 5.0 ohms?
Ye s>>
Repair the (T48) 4C Pressure Switch Sense circuit for a
short to ground.
Perform 45RFE/545RFE TRANSMISSION VERIFICATION
TEST - VER 1.
No>>
Replace the Powertrain Control Module per the Service
Information. With the scan tool, perform the QUICK LEARN
procedure.
Perform 45RFE/545RFE TRANSMISSION VERIFICATION
TEST - VER 1. (Refer to 21 - TRANSMISSION/TRANS-
AXLE/AUTOMATIC - 45RFE/545RFE - STANDARD PRO-
CEDURE)
15.CHECK IF THE #5 AND/OR #7 CHECK BALL IS CUT OR DAMAGED
Turn the Ignition off to the lock position.
Remove the Valve Body Assembly per the Service Information.
Inspect the #5 and #7 check balls for any cuts or damage.
Inspect the 4C accumulator piston and seals and also the 4C tower seal on topof the valve body. Refer to the
Service Information.
Where there any problems found?
Ye s>>
Repair as necessary. Check for excessive clutch debris in the transmission oil pan. If excessive clutch
debris is present, repair 4C clutch as necessary. Refer to the Service Information for proper repair pro-
cedures.
Perform 45RFE/545RFE TRANSMISSION VERIFICATION TEST - VER 1. (Refer to 21- TRANSMIS-
SION/TRANSAXLE/AUTOMATIC - 45RFE/545RFE - STANDARD PROCEDURE)
No>>
Go To 16
16.CHECK FOR EXCESSIVE LEAKAGE WITHIN THE 4C CLUTCH CIRCUIT
Air check the 4C Clutch hydraulic circuit. Refer to the Service Information.
NOTE: This hydraulic clutch circuit contains a small bleed orifice. Smallleakage is considered normal.
Was there excessive air leakage in the 4C Clutch hydraulic circuit?
Ye s>>
Repair as necessary. Refer to the Service Information.
Perform 45RFE/545RFE TRANSMISSION VERIFICATION TEST - VER 1. (Refer to 21- TRANSMIS-
SION/TRANSAXLE/AUTOMATIC - 45RFE/545RFE - STANDARD PROCEDURE)
No>>
Replace the Transmission Solenoid/TRS Assembly per the Service Information.
Perform 45RFE/545RFE TRANSMISSION VERIFICATION TEST - VER 1. (Refer to 21- TRANSMIS-
SION/TRANSAXLE/AUTOMATIC - 45RFE/545RFE - STANDARD PROCEDURE)
Page 3307 of 5267
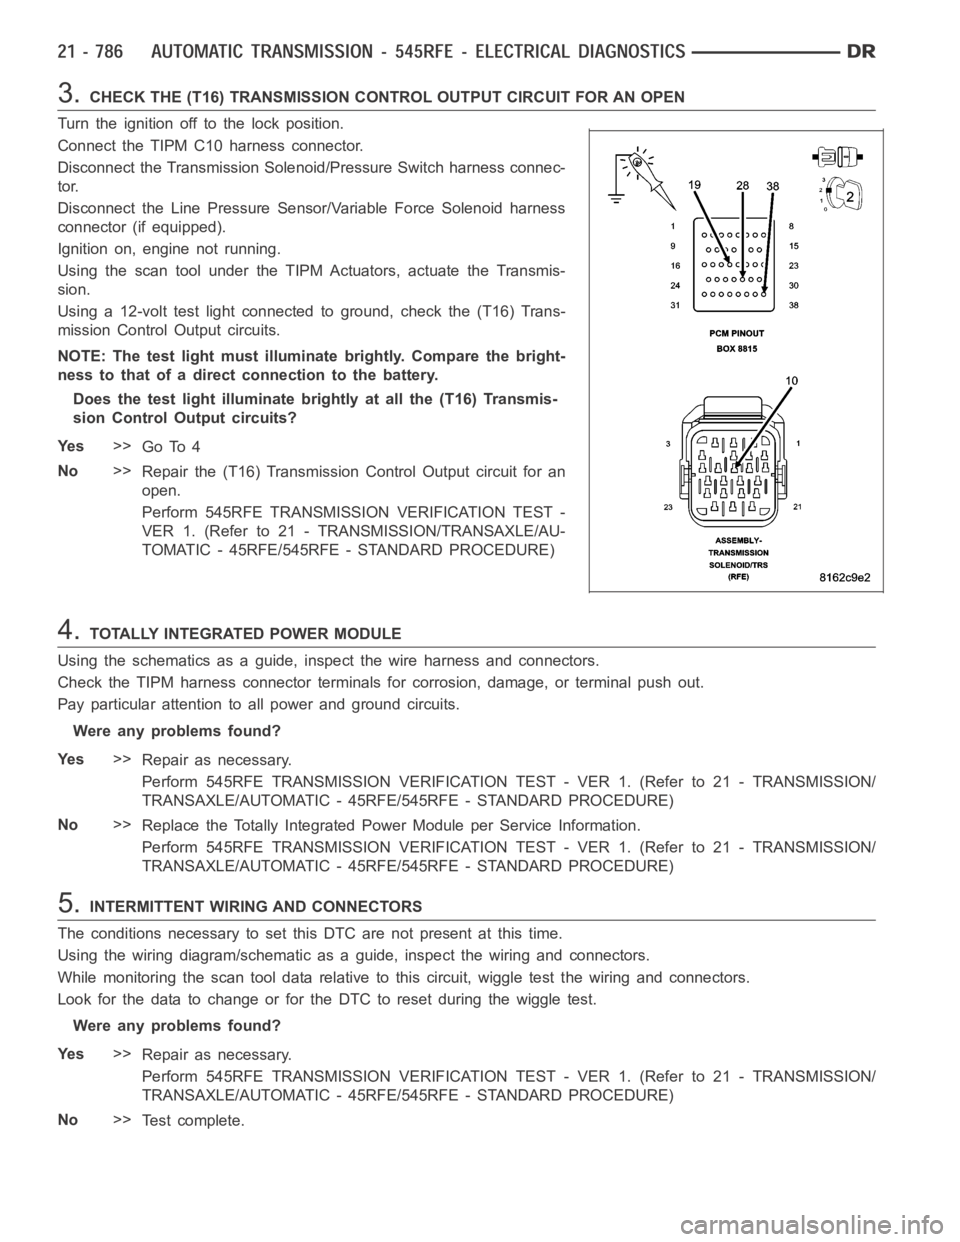
3.CHECK THE (T16) TRANSMISSION CONTROL OUTPUT CIRCUIT FOR AN OPEN
Turn the ignition off to the lock position.
Connect the TIPM C10 harness connector.
Disconnect the Transmission Solenoid/Pressure Switch harness connec-
tor.
Disconnect the Line Pressure Sensor/Variable Force Solenoid harness
connector (if equipped).
Ignition on, engine not running.
Using the scan tool under the TIPM Actuators, actuate the Transmis-
sion.
Using a 12-volt test light connected to ground, check the (T16) Trans-
mission Control Output circuits.
NOTE: The test light must illuminate brightly. Compare the bright-
ness to that of a direct connection to the battery.
Does the test light illuminate brightly at all the (T16) Transmis-
sion Control Output circuits?
Ye s>>
Go To 4
No>>
Repair the (T16) Transmission Control Output circuit for an
open.
Perform 545RFE TRANSMISSION VERIFICATION TEST -
VER 1. (Refer to 21 - TRANSMISSION/TRANSAXLE/AU-
TOMATIC - 45RFE/545RFE - STANDARD PROCEDURE)
4.TOTALLY INTEGRATED POWER MODULE
Using the schematics as a guide, inspect the wire harness and connectors.
Check the TIPM harness connector terminals for corrosion, damage, or terminal push out.
Pay particular attention to all power and ground circuits.
Were any problems found?
Ye s>>
Repair as necessary.
Perform 545RFE TRANSMISSION VERIFICATION TEST - VER 1. (Refer to 21 - TRANSMISSION/
TRANSAXLE/AUTOMATIC - 45RFE/545RFE - STANDARD PROCEDURE)
No>>
Replace the Totally Integrated Power Module per Service Information.
Perform 545RFE TRANSMISSION VERIFICATION TEST - VER 1. (Refer to 21 - TRANSMISSION/
TRANSAXLE/AUTOMATIC - 45RFE/545RFE - STANDARD PROCEDURE)
5.INTERMITTENT WIRING AND CONNECTORS
The conditions necessary to set this DTC are not present at this time.
Using the wiring diagram/schematic as a guide, inspect the wiring and connectors.
While monitoring the scan tool data relative to this circuit, wiggle test the wiring and connectors.
Look for the data to change or for the DTC to reset during the wiggle test.
Were any problems found?
Ye s>>
Repair as necessary.
Perform 545RFE TRANSMISSION VERIFICATION TEST - VER 1. (Refer to 21 - TRANSMISSION/
TRANSAXLE/AUTOMATIC - 45RFE/545RFE - STANDARD PROCEDURE)
No>>
Te s t c o m p l e t e .
Page 3309 of 5267
When Monitored:
With the ignition on. Battery voltage greater than 10 volts.
Set Condition:
A shorted condition is detected in the TIPM Transmission Control Output circuit.
Possible Causes
(T16) TRANSMISSION CONTROL OUTPUT CIRCUIT SHORT TO VOLTAGE
TOTALLY INTEGRATED POWER MODULE (TIPM)
Diagnostic Test
1.CHECK IF THE DTC IS ACTIVE
Ignition on, engine not running.
With the scan tool, read TIPM DTCs.
Is the status Active for this DTC?
Ye s>>
Go to 2
No>>
Go to 4
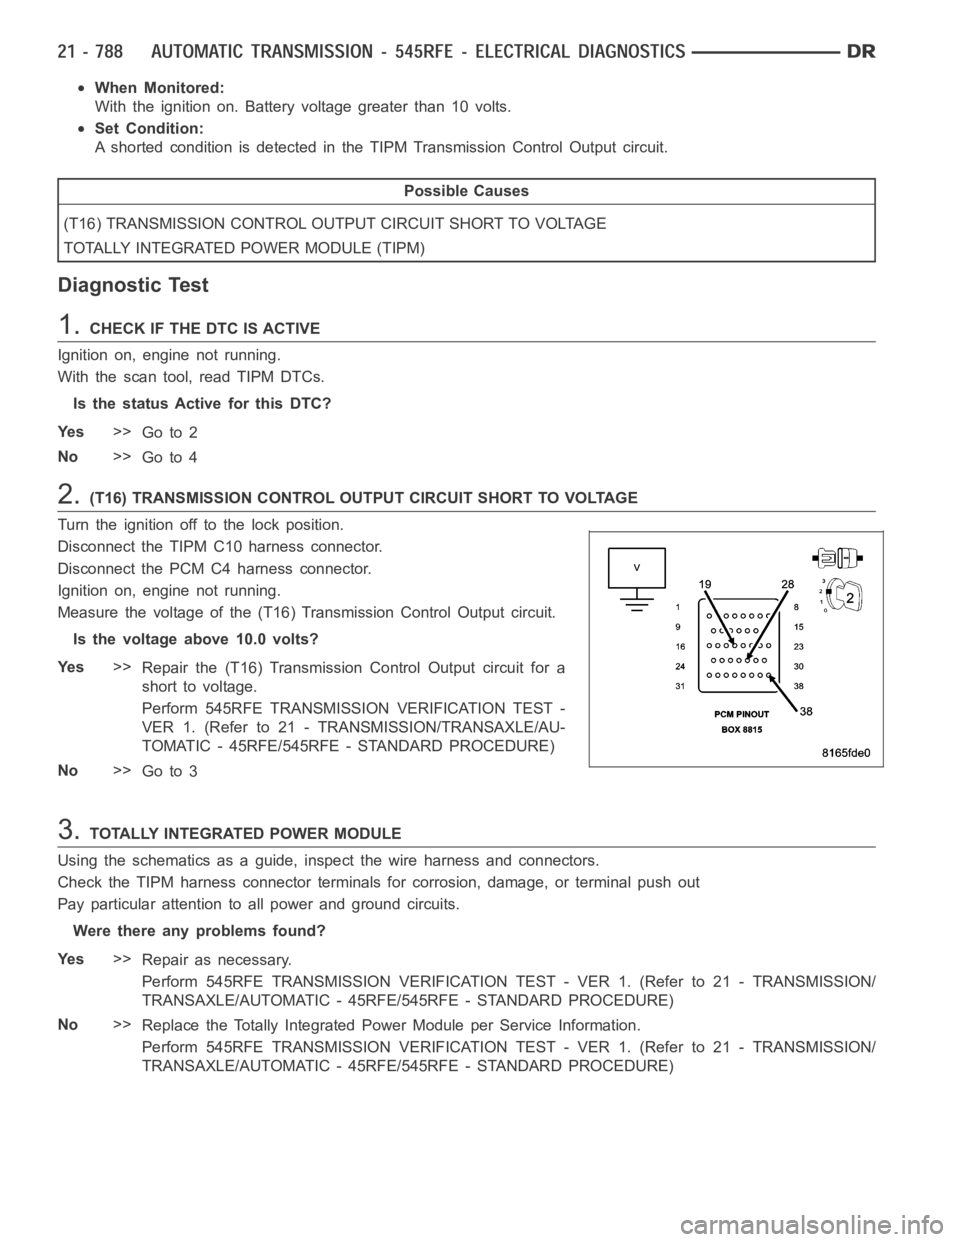
2.(T16) TRANSMISSION CONTROL OUTPUT CIRCUIT SHORT TO VOLTAGE
Turn the ignition off to the lock position.
Disconnect the TIPM C10 harness connector.
Disconnect the PCM C4 harness connector.
Ignition on, engine not running.
Measure the voltage of the (T16) Transmission Control Output circuit.
Is the voltage above 10.0 volts?
Ye s>>
Repair the (T16) Transmission Control Output circuit for a
short to voltage.
Perform 545RFE TRANSMISSION VERIFICATION TEST -
VER 1. (Refer to 21 - TRANSMISSION/TRANSAXLE/AU-
TOMATIC - 45RFE/545RFE - STANDARD PROCEDURE)
No>>
Go to 3
3.TOTALLY INTEGRATED POWER MODULE
Using the schematics as a guide, inspect the wire harness and connectors.
Check the TIPM harness connector terminals for corrosion, damage, or terminal push out
Pay particular attention to all power and ground circuits.
Were there any problems found?
Ye s>>
Repair as necessary.
Perform 545RFE TRANSMISSION VERIFICATION TEST - VER 1. (Refer to 21 - TRANSMISSION/
TRANSAXLE/AUTOMATIC - 45RFE/545RFE - STANDARD PROCEDURE)
No>>
Replace the Totally Integrated Power Module per Service Information.
Perform 545RFE TRANSMISSION VERIFICATION TEST - VER 1. (Refer to 21 - TRANSMISSION/
TRANSAXLE/AUTOMATIC - 45RFE/545RFE - STANDARD PROCEDURE)
Page 3313 of 5267
3.TOTALLY INTEGRATED POWER MODULE
Using the schematics as a guide, inspect the wire harness and connectors.
Check the TIPM harness connector terminals for corrosion, damage, or terminal push out.
Pay particular attention to all power and ground circuits.
Were any problems found?
Ye s>>
Repair as necessary.
Perform 545RFE TRANSMISSION VERIFICATION TEST - VER 1. (Refer to 21 - TRANSMISSION/
TRANSAXLE/AUTOMATIC - 45RFE/545RFE - STANDARD PROCEDURE)
No>>
Replace the Totally Integrated Power Module per Service Information.
Perform 545RFE TRANSMISSION VERIFICATION TEST - VER 1. (Refer to 21 - TRANSMISSION/
TRANSAXLE/AUTOMATIC - 45RFE/545RFE - STANDARD PROCEDURE)
4.INTERMITTENT WIRING AND CONNECTORS
The conditions necessary to set this DTC are not present at this time.
Using the wiring diagram/schematic as a guide, inspect the wiring and connectors.
While monitoring the scan tool data relative to this circuit, wiggle test the wiring and connectors.
Look for the data to change or for the DTC to reset during the wiggle test.
Were any problems found?
Ye s>>
Repair as necessary.
Perform 545RFE TRANSMISSION VERIFICATION TEST - VER 1. (Refer to 21 - TRANSMISSION/
TRANSAXLE/AUTOMATIC - 45RFE/545RFE - STANDARD PROCEDURE)
No>>
Te s t c o m p l e t e .
Page 3316 of 5267
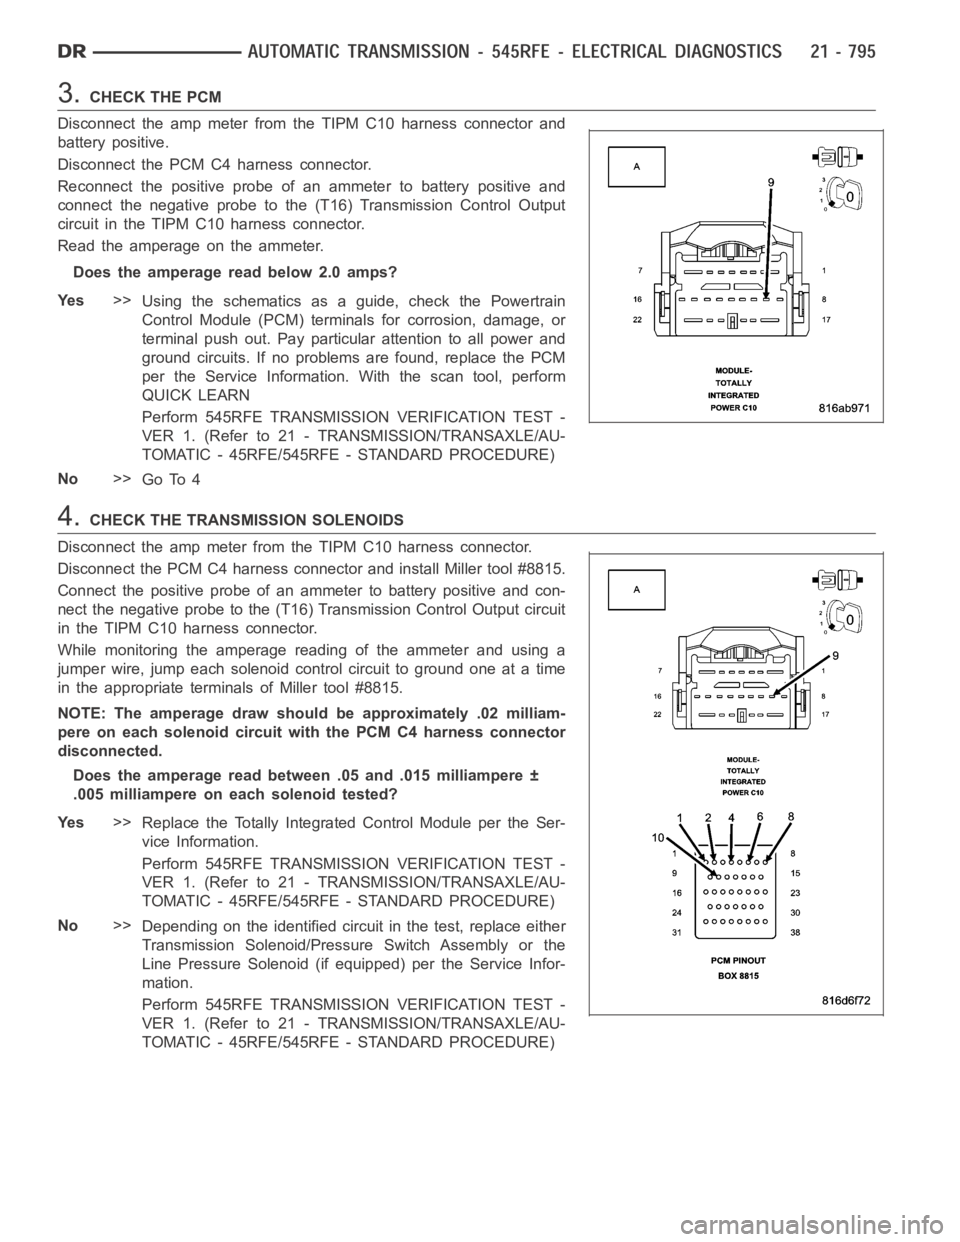
3.CHECK THE PCM
Disconnect the amp meter from the TIPM C10 harness connector and
battery positive.
Disconnect the PCM C4 harness connector.
Reconnect the positive probe of an ammeter to battery positive and
connect the negative probe to the (T16) Transmission Control Output
circuit in the TIPM C10 harness connector.
Read the amperage on the ammeter.
Does the amperage read below 2.0 amps?
Ye s>>
Using the schematics as a guide, check the Powertrain
Control Module (PCM) terminals for corrosion, damage, or
terminal push out. Pay particular attention to all power and
ground circuits. If no problems are found, replace the PCM
per the Service Information.With the scan tool, perform
QUICK LEARN
Perform 545RFE TRANSMISSION VERIFICATION TEST -
VER 1. (Refer to 21 - TRANSMISSION/TRANSAXLE/AU-
TOMATIC - 45RFE/545RFE - STANDARD PROCEDURE)
No>>
Go To 4
4.CHECK THE TRANSMISSION SOLENOIDS
Disconnect the amp meter from theTIPM C10 harness connector.
Disconnect the PCM C4 harness connector and install Miller tool #8815.
Connect the positive probe of an ammeter to battery positive and con-
nect the negative probe to the (T16) Transmission Control Output circuit
in the TIPM C10 harness connector.
While monitoring the amperage reading of the ammeter and using a
jumper wire, jump each solenoid control circuit to ground one at a time
in the appropriate terminals of Miller tool #8815.
NOTE: The amperage draw should be approximately .02 milliam-
pere on each solenoid circuit with the PCM C4 harness connector
disconnected.
Does the amperage read between .05 and .015 milliampere ±
.005 milliampere on each solenoid tested?
Ye s>>
Replace the Totally Integrated Control Module per the Ser-
vice Information.
Perform 545RFE TRANSMISSION VERIFICATION TEST -
VER 1. (Refer to 21 - TRANSMISSION/TRANSAXLE/AU-
TOMATIC - 45RFE/545RFE - STANDARD PROCEDURE)
No>>
Depending on the identified circuit in the test, replace either
Transmission Solenoid/Pressure Switch Assembly or the
Line Pressure Solenoid (if equipped) per the Service Infor-
mation.
Perform 545RFE TRANSMISSION VERIFICATION TEST -
VER 1. (Refer to 21 - TRANSMISSION/TRANSAXLE/AU-
TOMATIC - 45RFE/545RFE - STANDARD PROCEDURE)
Page 3320 of 5267
P1715-RESTRICTED MANUAL VALVE IN T3 RANGE
For a complete wiring diagramRefer to Section 8W
When Monitored:
Whenever the PRNDL code indicates Temp 3.
Set Condition:
This DTC sets when conditions for the DTC P1776 are satisfied or 3 unsuccessful attempts to engage 1st gear
while the shifter is in the temp 3 zone. This indicates a restricted port at the manual valve because the shifter
is not fully engaged in the drive position.
Possible Causes
RELATED TRANSMISSION DTC’S PRESENT
CUSTOMER DRIVING HABITS
MISADJUSTED SHIFTER
Always perform the 45RFE/545RFE Pre-Diagnostic Troubleshooting Procedure before proceeding. (Refer to
21 - TRANSMISSION/TRANSAXLE/AUTOMATIC - 45RFE/545RFE - STANDARD PROCEDURE)
Diagnostic Test
1.DETERMINING IF RELATED DTC’S ARE PRESENT
With the scan tool, check for other transmission DTC’s
Are any of the following DTC’s P0731, P0732, P0733, P0734, P1736 or P0715 present?
Ye s>>
Refer to the Transmission category and perform the appropriate symptom.
No>>
Go To 2
2.CHECK SHIFTER ADJUSTMENT
Check Shifter adjustment per the Service Information.
Is the shifter properly adjusted?
Ye s>>
Go To 3
No>>
Adjust the Shifter Assembly per the Service Information.
Perform 45RFE/545RFE TRANSMISSION VERIFICATION TEST - VER 1. (Refer to 21- TRANSMIS-
SION/TRANSAXLE/AUTOMATIC - 45RFE/545RFE - STANDARD PROCEDURE)
3.CHECK CUSTOMER DRIVING HABIT
This DTC can be set if the customer rests their hand on the shift lever while they are driving. The transmission can
be put in the T3 position if just enough forward pressure is exerted on the shift lever.
When this occurs, the feed port to the clutch is restricted, the transmission will declare neutral, and this DTC will be
set. The customer should be informed not to rest their hand on the shifter while driving.
This DTC can also be set by simply bumping the shift lever toward neutral while accelerating.
With the scan tool, check the DTC EVENT DATA to help identify the conditionsin which the DTC was set.
If there are no possible causes remaining, view repair.
Repair
This DTC can be set by putting too much forward pressure on the shift lever while it is in the OD posi-
tion. Make sure the customer is informed.
Perform 45RFE/545RFE TRANSMISSION VERIFICATION TEST - VER 1. (Refer to 21- TRANSMIS-
SION/TRANSAXLE/AUTOMATIC - 45RFE/545RFE - STANDARD PROCEDURE)
Page 3322 of 5267

Diagnostic Test
1.DETERMINING IF RELATED DTC’S ARE PRESENT
With the scan tool, check for other transmission DTCs.
Are any Transmission: solenoid, line pressure, speed sensor, or loss of primeDTCspresent?
Ye s>>
Refer to appropriate symptom in the Transmission category. Perform the test for P0944-LOSS OF
PRIME first if it is present.
No>>
Go To 2
2.CHECK DTC EVENT DATA
With the scan tool, read and record the DTC EVENT DATA.
NOTE: Make sure to record all DTC EVENT DATA stored in the scan tool for future reference in this test
procedure.
Does the DTC EVENT DATA display information for the DTC P1736?
Ye s>>
Go To 3
No>>
Go To 6
3.CHECK RPM IN DTC EVENT DATA
Refer to the DTC EVENT DATA recorded earlier.
Does the Input RPM read zero?
Ye s>>
Check the input speed sensor and wiring. Refer to test P0715 and diagnose asif the DTC is current.
No>>
Go To 4
4.CHECK LINE PRESSURE READING
Refer to the DTC EVENT DATA recorded earlier.
Isthelinepressurereadingmorethan10 psi below the desired line pressure?
Ye s>>
Go To 5
No>>
Go To 6
5.PLUGGED TRANSMISSION OIL FILTER
Turn the ignition off to the lock position.
Remove and inspect the Transmission Oil Pan for excessive debris per the Service Information.
Remove and inspect the Primary Oil Filter per the Service Information.
NOTE: Make sure the Primary Transmission Oil Filter and/or seal is not cracked or split.
Does the Oil Pan contain excessive debris and/or is the Primary Oil Filter cracked or plugged?
Ye s>>
Repair the plugged, cracked, or split Primary Transmission Oil Filter and/or seal. If the Primary Trans-
mission Oil Filter is plugged, refer to the Service Information for the proper hydraulic clutch repair pro-
cedure.
Perform 45RFE/545RFE TRANSMISSION VERIFICATION TEST - VER 1. (Refer to 21- TRANSMIS-
SION/TRANSAXLE/AUTOMATIC - 45RFE/545RFE - STANDARD PROCEDURE)
No>>
Remove the Transmission Oil Pump per the Service Information. Check the main Regulator Valve for
sticking in its bore, scoring, and/or damage and clean and repair as necessary. If no problem is found,
replace the Transmission Solenoid/TRS Assembly.
Perform 45RFE/545RFE TRANSMISSION VERIFICATION TEST - VER 1. (Refer to 21- TRANSMIS-
SION/TRANSAXLE/AUTOMATIC - 45RFE/545RFE - STANDARD PROCEDURE)