2006 DODGE RAM SRT-10 lock
[x] Cancel search: lockPage 1748 of 5267
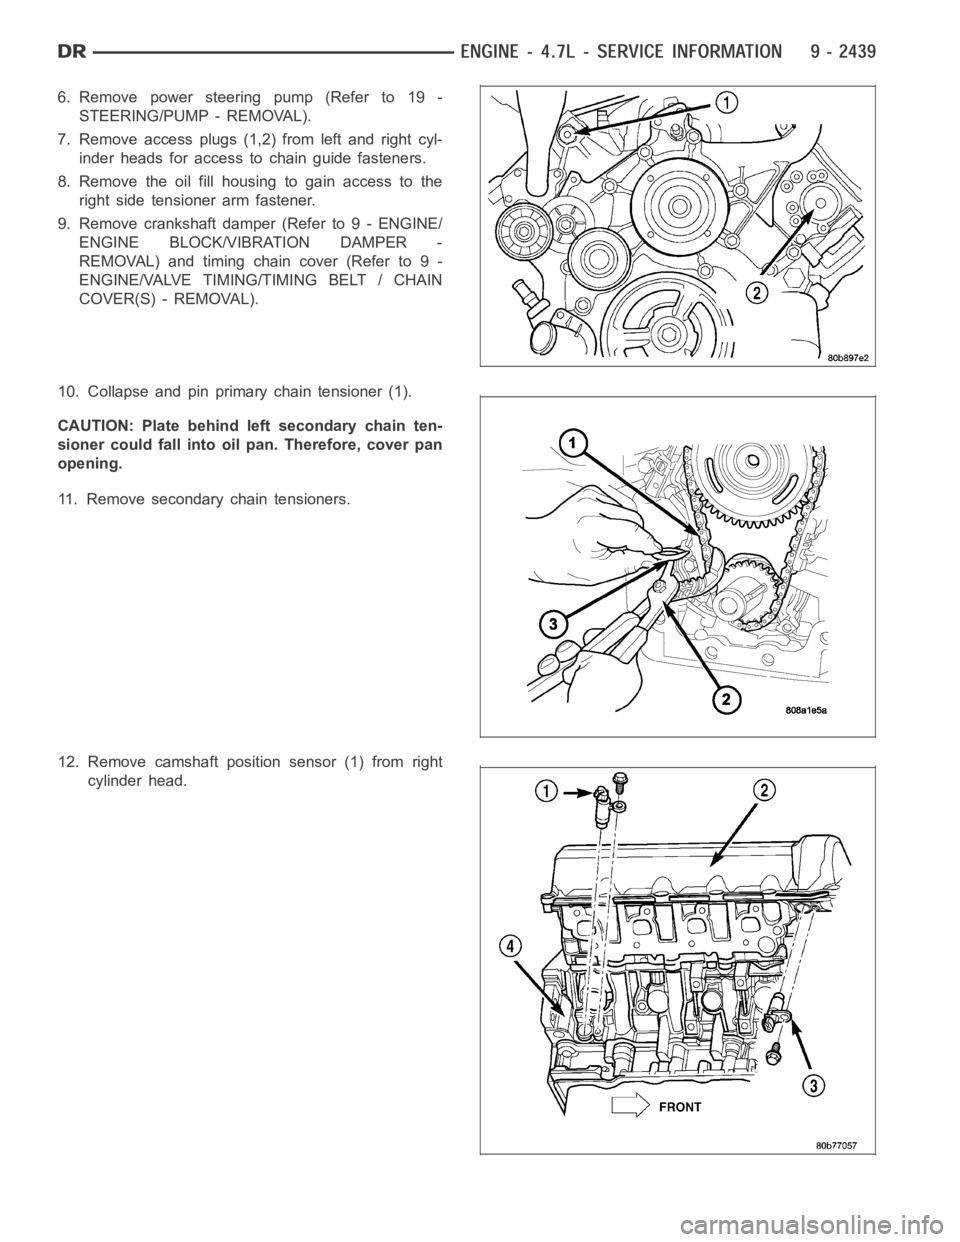
6. Remove power steering pump (Refer to 19 -
STEERING/PUMP - REMOVAL).
7. Remove access plugs (1,2) from left and right cyl-
inder heads for access to chain guide fasteners.
8. Remove the oil fill housing to gain access to the
right side tensioner arm fastener.
9. Remove crankshaft damper (Refer to 9 - ENGINE/
ENGINE BLOCK/VIBRATION DAMPER -
REMOVAL) and timing chain cover (Refer to 9 -
ENGINE/VALVE TIMING/TIMING BELT / CHAIN
COVER(S) - REMOVAL).
10. Collapse and pin primary chain tensioner (1).
CAUTION: Plate behind left secondary chain ten-
sioner could fall into oil pan. Therefore, cover pan
opening.
11. Remove secondary chain tensioners.
12. Remove camshaft position sensor (1) from right
cylinder head.
Page 1749 of 5267
CAUTION: Care should be taken not to damage
camshaft target wheel. Do not hold target wheel
while loosening or tightening camshaft sprocket.
Do not place the target wheel near a magnetic
source of any kind. A damaged or magnetized tar-
get wheel could cause a vehicle no start condition.
CAUTION: Do not forcefully rotate the camshafts
or crankshaft independently of each other. Damag-
ing intake valve to piston contact will occur.
Ensure negative battery cable is disconnected to
guard against accidental starter engagement.
13. Remove left and right camshaft sprocket bolts.
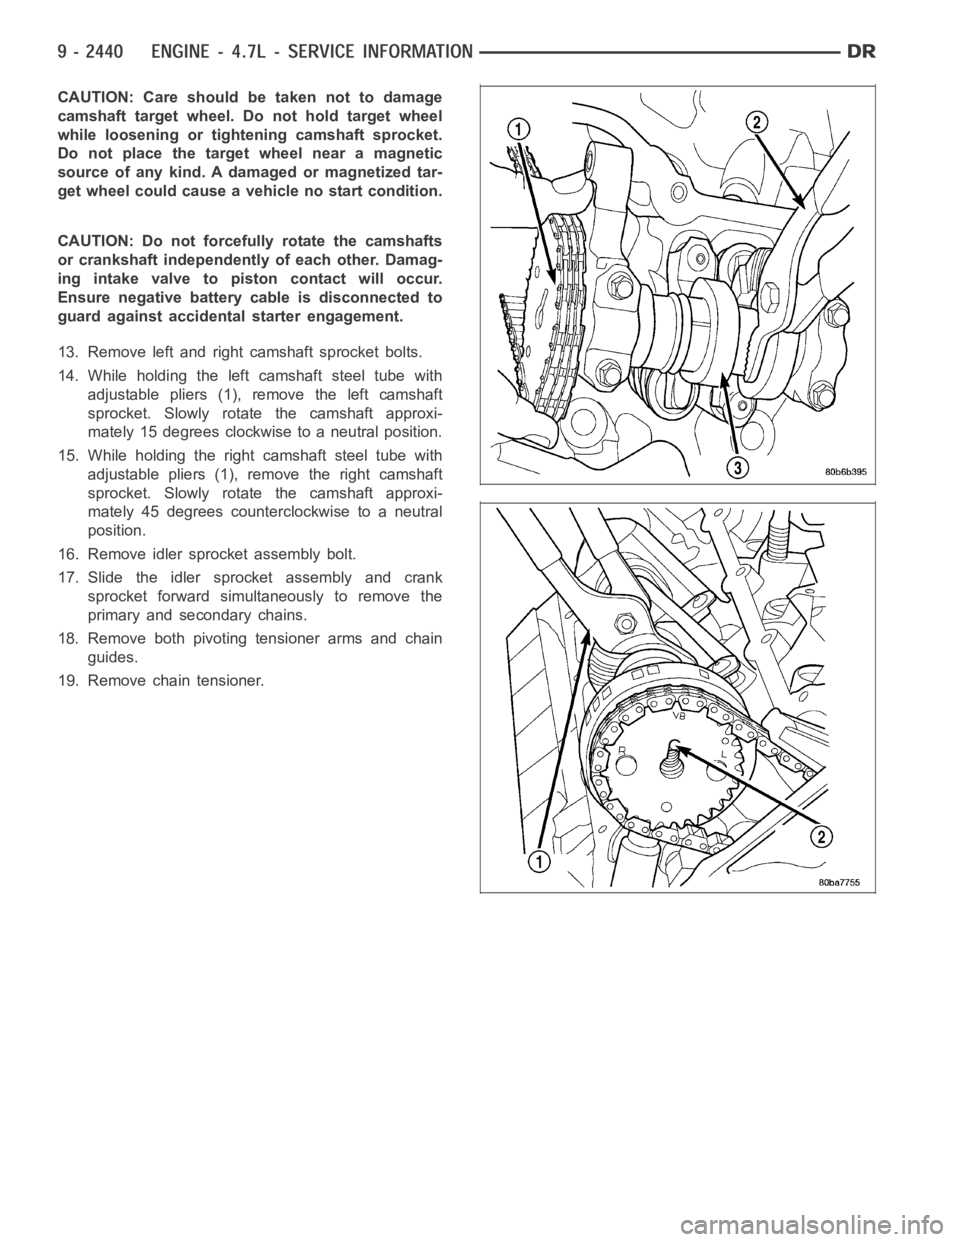
14. While holding the left camshaft steel tube with
adjustable pliers (1), remove the left camshaft
sprocket. Slowly rotate the camshaft approxi-
mately 15 degrees clockwise to a neutral position.
15. While holding the right camshaft steel tube with
adjustable pliers (1), remove the right camshaft
sprocket. Slowly rotate the camshaft approxi-
mately 45 degrees counterclockwise to a neutral
position.
16. Remove idler sprocket assembly bolt.
17. Slide the idler sprocket assembly and crank
sprocket forward simultaneously to remove the
primary and secondary chains.
18. Remove both pivoting tensioner arms and chain
guides.
19. Remove chain tensioner.
Page 1751 of 5267
INSTALLATION
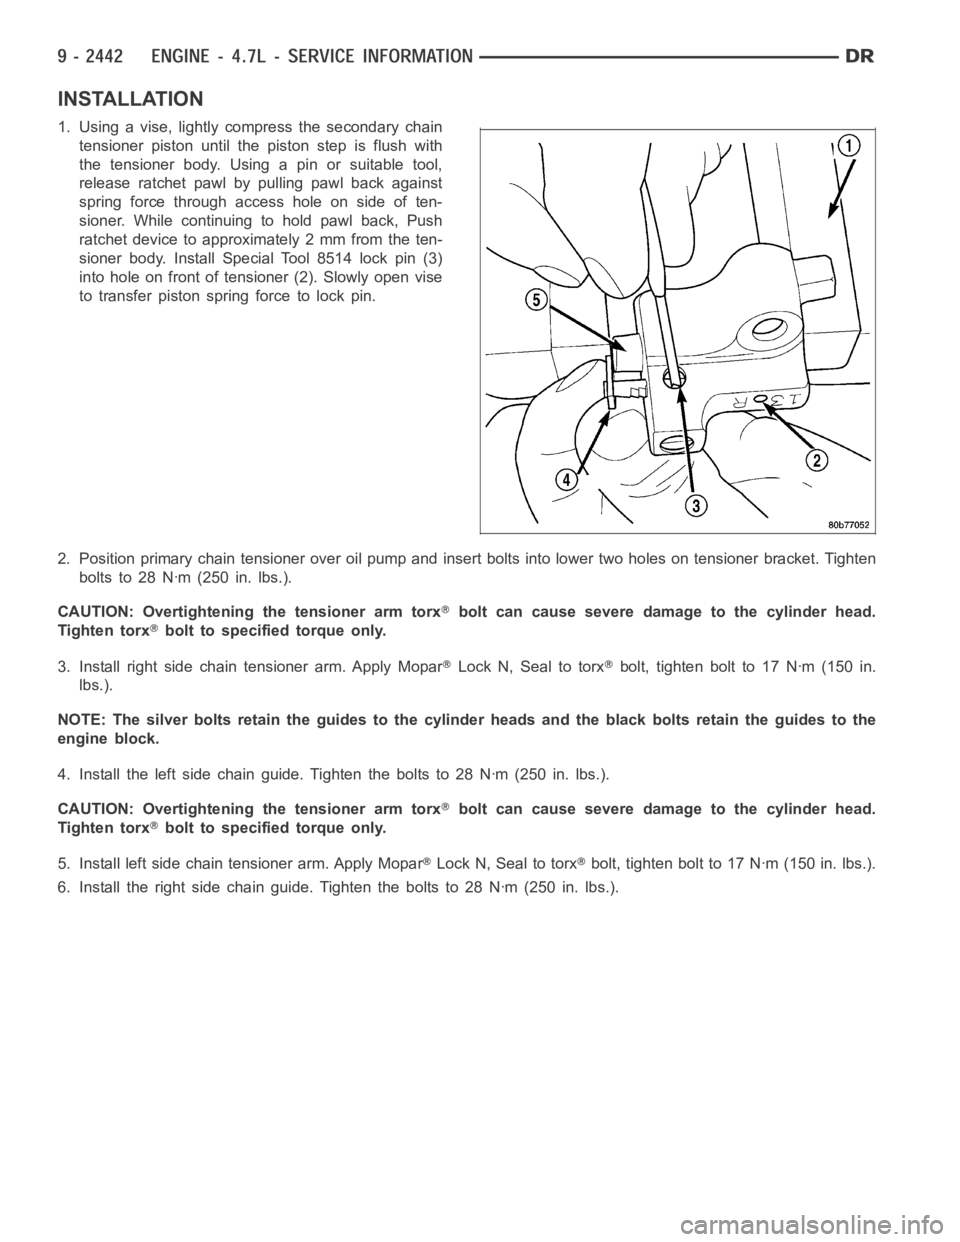
1. Using a vise, lightly compress the secondary chain
tensioner piston until the piston step is flush with
the tensioner body. Using a pin or suitable tool,
release ratchet pawl by pulling pawl back against
spring force through access hole on side of ten-
sioner. While continuing to hold pawl back, Push
ratchet device to approximately 2 mm from the ten-
sioner body. Install Special Tool 8514 lock pin (3)
into hole on front of tensioner (2). Slowly open vise
to transfer piston spring force to lock pin.
2. Position primary chain tensioner over oil pump and insert bolts into lower two holes on tensioner bracket. Tighten
bolts to 28 Nꞏm (250 in. lbs.).
CAUTION: Overtightening the tensioner arm torx
bolt can cause severe damage to the cylinder head.
Tighten torx
bolt to specified torque only.
3. Install right side chain tensioner arm. Apply Mopar
Lock N, Seal to torxbolt, tighten bolt to 17 Nꞏm (150 in.
lbs.).
NOTE: The silver bolts retain the guides to the cylinder heads and the blackbolts retain the guides to the
engine block.
4. Install the left side chain guide. Tighten the bolts to 28 Nꞏm (250 in. lbs.).
CAUTION: Overtightening the tensioner arm torx
bolt can cause severe damage to the cylinder head.
Tighten torx
bolt to specified torque only.
5. Install left side chain tensioner arm. Apply Mopar
Lock N, Seal to torxbolt, tighten bolt to 17 Nꞏm (150 in. lbs.).
6. Install the right side chain guide. Tighten the bolts to 28 Nꞏm (250 in. lbs.).
Page 1752 of 5267
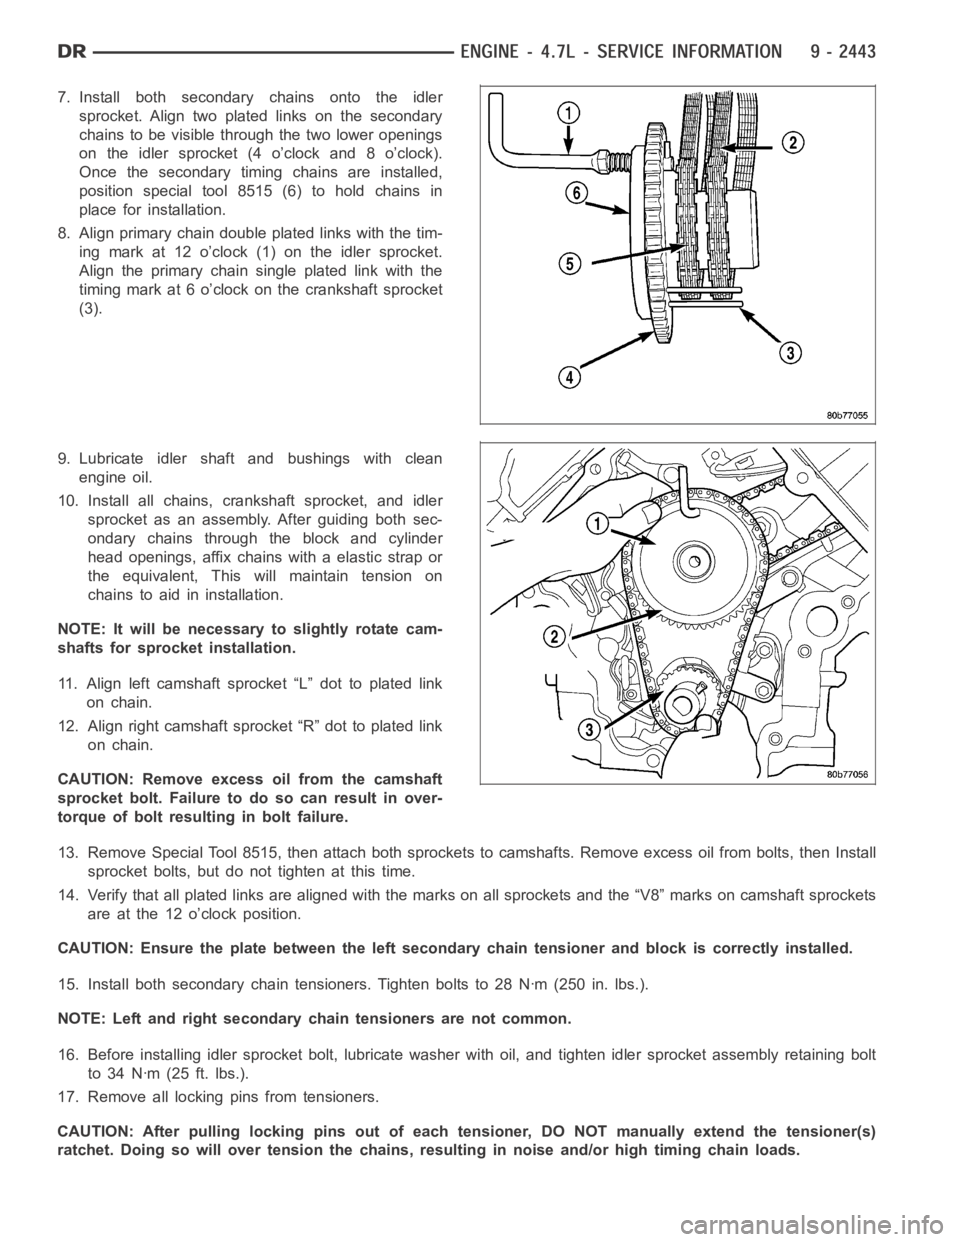
7. Install both secondary chains onto the idler
sprocket. Align two plated links on the secondary
chains to be visible through the two lower openings
on the idler sprocket (4 o’clock and 8 o’clock).
Once the secondary timing chains are installed,
position special tool 8515 (6) to hold chains in
place for installation.
8. Align primary chain double plated links with the tim-
ingmarkat12o’clock(1)ontheidlersprocket.
Align the primary chain single plated link with the
timing mark at 6 o’clock on the crankshaft sprocket
(3).
9. Lubricate idler shaft and bushings with clean
engine oil.
10. Install all chains, crankshaft sprocket, and idler
sprocket as an assembly. After guiding both sec-
ondary chains through the block and cylinder
head openings, affix chains with a elastic strap or
the equivalent, This will maintain tension on
chains to aid in installation.
NOTE: It will be necessary to slightly rotate cam-
shafts for sprocket installation.
11. Align left camshaft sprocket “L” dot to plated link
on chain.
12. Align right camshaft sprocket “R” dot to plated link
on chain.
CAUTION: Remove excess oil from the camshaft
sprocket bolt. Failure to do so can result in over-
torque of bolt resulting in bolt failure.
13. Remove Special Tool 8515, then attach both sprockets to camshafts. Remove excess oil from bolts, then Install
sprocket bolts, but do not tighten at this time.
14. Verify that all plated links are aligned with the marks on all sprocketsand the “V8” marks on camshaft sprockets
are at the 12 o’clock position.
CAUTION: Ensure the plate between the left secondary chain tensioner and block is correctly installed.
15. Install both secondary chain tensioners. Tighten bolts to 28 Nꞏm (250 in. lbs.).
NOTE: Left and right secondary chain tensioners are not common.
16. Before installing idler sprocketbolt, lubricate washer with oil, andtighten idler sprocket assembly retaining bolt
to 34 Nꞏm (25 ft. lbs.).
17. Remove all locking pins from tensioners.
CAUTION: After pulling locking pins out of each tensioner, DO NOT manuallyextend the tensioner(s)
ratchet. Doing so will over tension thechains, resulting in noise and/or high timing chain loads.
Page 1753 of 5267
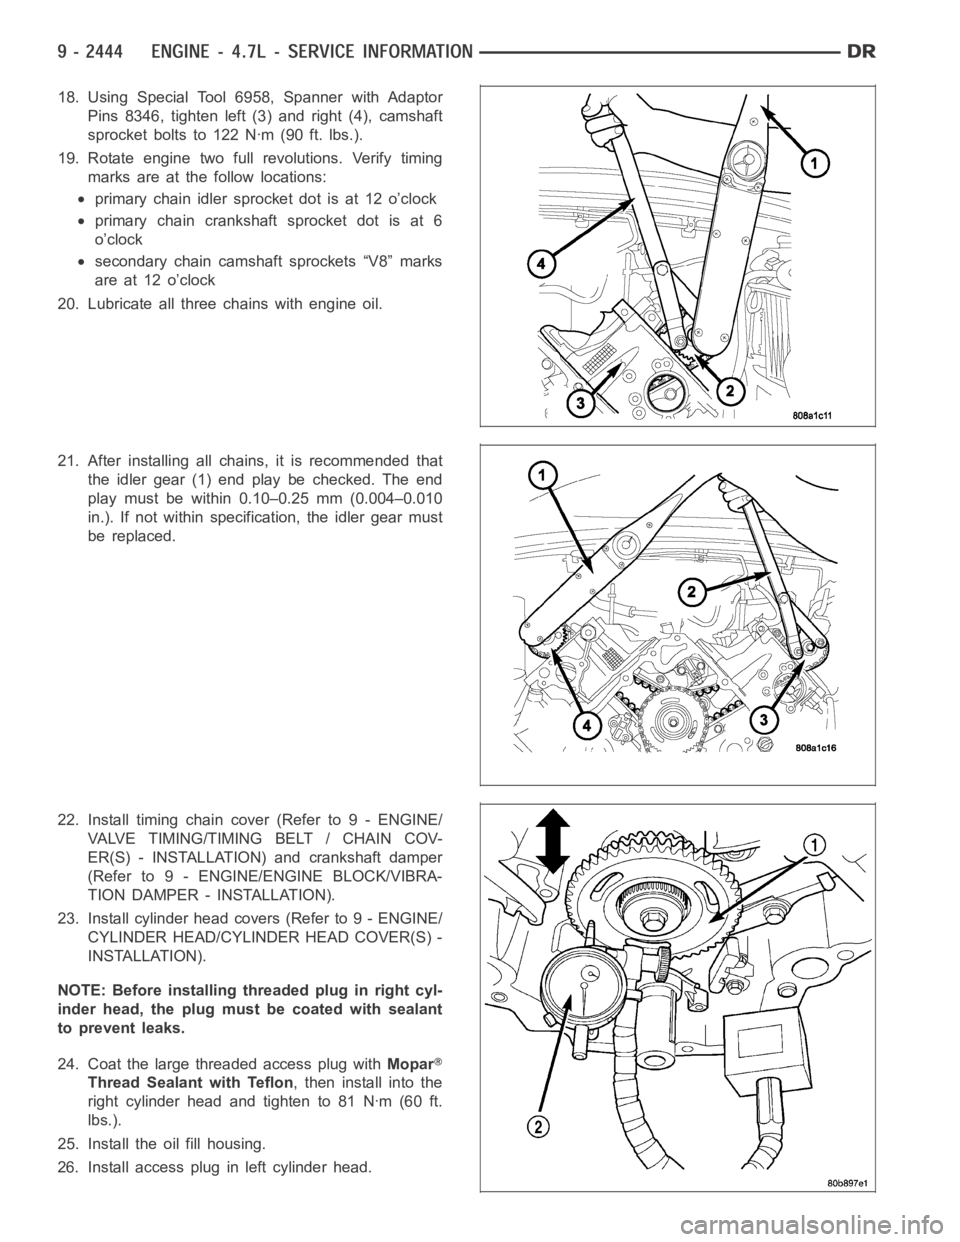
18. Using Special Tool 6958, Spanner with Adaptor
Pins 8346, tighten left (3) and right (4), camshaft
sprocket bolts to 122 Nꞏm (90 ft. lbs.).
19. Rotate engine two full revolutions. Verify timing
marks are at the follow locations:
primary chain idler sprocket dot is at 12 o’clock
primary chain crankshaft sprocket dot is at 6
o’clock
secondary chain camshaft sprockets “V8” marks
are at 12 o’clock
20. Lubricate all three chains with engine oil.
21. After installing all chains, it is recommended that
the idler gear (1) end play be checked. The end
play must be within 0.10–0.25 mm (0.004–0.010
in.). If not within specification, the idler gear must
be replaced.
22. Install timing chain cover (Refer to 9 - ENGINE/
VALVE TIMING/TIMING BELT / CHAIN COV-
ER(S) - INSTALLATION) and crankshaft damper
(Refer to 9 - ENGINE/ENGINE BLOCK/VIBRA-
TION DAMPER - INSTALLATION).
23. Install cylinder head covers (Refer to 9 - ENGINE/
CYLINDER HEAD/CYLINDER HEAD COVER(S) -
INSTALLATION).
NOTE: Before installing threaded plug in right cyl-
inder head, the plug mustbecoatedwithsealant
to prevent leaks.
24. Coat the large threaded access plug withMopar
Thread Sealant with Teflon, then install into the
right cylinder head and tighten to 81 Nꞏm (60 ft.
lbs.).
25. Install the oil fill housing.
26. Install access plug in left cylinder head.
Page 1756 of 5267
page page
ENGINE - 5.7L - SERVICE INFORMATION
DESCRIPTION ............................. 2449
DIAGNOSIS AND TESTING
DIAGNOSIS AND TESTING - ENGINE
DIAGNOSIS - INTRODUCTION............. 2449
DIAGNOSIS AND TESTING - ENGINE
DIAGNOSIS - PERFORMANCE............. 2449
DIAGNOSIS AND TESTING - ENGINE
DIAGNOSIS - MECHANICAL............... 2451
DIAGNOSIS AND TESTING - CYLINDER
COMPRESSION PRESSURE............... 2451
DIAGNOSIS AND TESTING - CYLINDER
COMBUSTION PRESSURE LEAKAGE...... 2452
DIAGNOSIS AND TESTING - ENGINE
DIAGNOSIS - LUBRICATION............... 2453
DIAGNOSIS AND TESTING - ENGINE
DIAGNOSIS - MECHANICAL............... 2453
STANDARD PROCEDURE
STANDARD PROCEDURE - REPAIR
DAMAGED OR WORN THREADS.......... 2456
STANDARD PROCEDURE—HYDROSTATIC
LOCK.................................... 2456
REMOVAL ................................. 2457
INSTALLATION ............................. 2462
SPECIFICATIONS
5.7L ENGINE ............................. 2467
TORQUE ................................. 2472
SPECIAL TOOLS
5.7L ENGINE ............................. 2475
ELEMENT - AIR CLEANER
REMOVAL ................................. 2478
INSTALLATION ............................. 2479
CYLINDER HEAD
OPERATION—CYLINDER HEAD ............. 2481
DIAGNOSIS AND TESTING—CYLINDER HEAD
GASKET FAILURE........................ 2481
REMOVAL ................................. 2482
CLEANING ................................. 2484
INSPECTION ............................... 2484
INSTALLATION ............................. 2485
COVER - CYLINDER HEAD
REMOVAL ................................. 2490
INSTALLATION ............................. 2493
VALVES & SEATS - INTAKE/EXHAUST
DESCRIPTION
DESCRIPTION - VALVE GUIDES ........... 2496
DESCRIPTION ........................... 2496
STANDARD PROCEDURE - REFACING ....... 2496
REMOVAL ................................. 2497
INSTALLATION ............................. 2497ROCKER ARM
REMOVAL ................................. 2498
INSTALLATION ............................. 2500
SEALS - VALVE GUIDE
DESCRIPTION ............................. 2503
SPRINGS - VALVE
REMOVAL ................................. 2504
INSTALLATION ............................. 2510
ENGINE BLOCK
CLEANING ................................. 2515
INSPECTION............................... 2515
CAMSHAFT
REMOVAL
REMOVAL - CAMSHAFT CORE HOLE PLUG . 2516
REMOVAL - CAMSHAFT ................... 2516
INSPECTION............................... 2520
INSTALLATION
INSTALLATION - CAMSHAFT CORE HOLE
PLUG.................................... 2520
INSTALLATION - CAMSHAFT .............. 2521
CRANKSHAFT
REMOVAL ................................. 2527
INSTALLATION ............................. 2531
BEARINGS - CRANKSHAFT MAIN
STANDARD PROCEDURE - CRANKSHAFT
MAIN BEARING - FITTING ................. 2536
INSPECTION............................... 2536
SEAL - CRANKSHAFT OIL - FRONT
REMOVAL ................................. 2537
INSTALLATION ............................. 2538
SEAL - CRANKSHAFT OIL - REAR
DIAGNOSIS AND TESTING - REAR SEAL
AREA LEAKS . ............................ 2539
REMOVAL ................................. 2539
INSTALLATION ............................. 2540
RETAINER - CRANK REAR OIL - SEAL
REMOVAL ................................. 2541
INSTALLATION ............................. 2541
FLEX PLATE
REMOVAL ................................. 2542
INSTALLATION ............................. 2542
TAPPETS - HYDRAULIC ROLLER
DIAGNOSIS AND TESTING - HYDRAULIC
TAPPETS ................................ 2543
REMOVAL ................................. 2543
INSTALLATION ............................. 2544
PISTON & CONNECTING ROD
DESCRIPTION ............................. 2546
STANDARD PROCEDURE - PISTON FITTING . 2546
REMOVAL ................................. 2547
CLEANING ................................. 2548
Page 1758 of 5267
ENGINE - 5.7L - SERVICE INFORMATION
DESCRIPTION
The 5.7L engine (345 CID) eight-cylinder engine is a 90° V-Type lightweight, deep skirt cast iron block, aluminum
heads, single cam, overhead valve engine with hydraulic roller tappets. The heads incorporate splayed valves with
a hemispherical style combustion chamber and dual spark plugs. The cylinders are numbered from front to rear; 1,
3, 5, 7 on the left bank and 2, 4, 6, 8 on the right bank. The firing order is 1-8-4-3-6-5-7-2.
DIAGNOSIS AND TESTING
DIAGNOSIS AND TESTING - ENGINE DIAGNOSIS - INTRODUCTION
Engine diagnosis is helpful in determining the causes of malfunctions notdetected and remedied by routine main-
tenance.
These malfunctions may be classified as either performance (e.g., engineidles rough and stalls) or mechanical
(e.g., a strange noise).
(Refer to 9 - ENGINE - DIAGNOSIS AND TESTING) - PERFORMANCE and (Refer to 9 - ENGINE - DIAGNOSIS
AND TESTING)—MECHANICAL for possible causes and corrections of malfunctions. (Refer to 14 - FUEL SYSTEM/
FUEL DELIVERY - DIAGNOSIS AND TESTING) and (Refer to 14 - FUEL SYSTEM/FUEL INJECTION - DIAGNO-
SIS AND TESTING) for the fuel system diagnosis.
Additional tests and diagnostic procedures may be necessary for specificengine malfunctions that can not be iso-
lated with the Service Diagnosis charts. Information concerning additional tests and diagnosis is provided within the
following diagnosis:
Cylinder Compression Pressure Test (Refer to 9 - ENGINE - DIAGNOSIS AND TESTING).
Cylinder Combustion Pressure LeakageTest (Refer to 9 - ENGINE - DIAGNOSISAND TESTING).
Engine Cylinder Head Gasket Failure Diagnosis (Refer to 9 - ENGINE/CYLINDER HEAD - DIAGNOSIS AND
TESTING).
Intake Manifold Leakage Diagnosis (Refer to 9 - ENGINE/MANIFOLDS/INTAKEMANIFOLD - DIAGNOSIS
AND TESTING).
DIAGNOSIS AND TESTING - ENGINE DIAGNOSIS - PERFORMANCE
CONDITION POSSIBLE CAUSE CORRECTION
ENGINE WILL NOT START 1. Weak battery 1. Charge or replace as necessary.
2. Corroded or loose battery
connections.2. Clean and tighten battery
connections. Apply a coat of light
mineral grease to the terminals.
3. Faulty starter. 3. (Refer to 8 - ELECTRICAL/
STARTING - DIAGNOSIS AND
TESTING).
4. Faulty coil or control unit. 4. (Refer to 8 - ELECTRICAL/
IGNITION CONTROL/IGNITION
COIL - REMOVAL).
5. Incorrect spark plug gap. 5. (Refer to 8 - ELECTRICAL/
IGNITION CONTROL/SPARK PLUG
- CLEANING).
6. Dirt or water in fuel system. 6. Clean system and replace fuel
filter.
7. Faulty fuel pump, relay or wiring. 7. Repair or replace as necessary.
Page 1761 of 5267
Ensurethebatteryiscompletelychargedandtheenginestartermotorisingood operating condition. Otherwise the
indicated compression pressures may not be valid for diagnosis purposes.
1. Clean the spark plug recesses with compressed air.
2. Remove the spark plugs.
3. Disable the fuel system (Refer to 14 - FUEL SYSTEM/FUEL DELIVERY - DESCRIPTION).
4. Remove the ASD relay (Refer to 8 - ELECTRICAL/IGNITION CONTROL/AUTO SHUTDOWNRELAY-
REMOVAL).
5. Insert a compression pressure gauge and rotate the engine with the engine starter motor for three revolutions.
6. Record the compression pressure on the 3rd revolution. Continue the test for the remaining cylinders.
7. (Refer to 9 - ENGINE - SPECIFICATIONS) for the correct engine compression pressures.
DIAGNOSIS AND TESTING - CYLINDERCOMBUSTION PRESSURE LEAKAGE
The combustion pressure leakage test provides an accurate means for determining engine condition.
Combustion pressure leakage testing will detect:
Exhaust and intake valve leaks (improper seating).
Leaks between adjacent cylinders or into water jacket.
Any causes for combustion/compression pressure loss.
1. Check the coolant level and fill as required. DO NOT install the radiatorcap.
2. Start and operate the engine until it attains normal operating temperature, then turn the engine OFF.
3. Remove the spark plugs.
4. Remove the oil filler cap.
5. Remove the air cleaner hose.
6. Calibrate the tester according to the manufacturer’s instructions. The shop air source for testing should maintain
483 kPa (70 psi) minimum, 1,379 kPa (200 psi) maximum and 552 kPa (80 psi) recommended.
7. Perform the test procedures on each cylinder according to the tester manufacturer’s instructions. Set piston of
cylinder to be tested at TDC compression,While testing, listen for pressurized air escaping through the throttle
body, tailpipe and oil filler cap opening. Check for bubbles in the radiator coolant.
All gauge pressure indications should be equal, with no more than 25% leakage.
FOR EXAMPLE:At 552 kPa (80 psi) input pressure, a minimum of 414 kPa (60 psi) should be maintained in the
cylinder.
Refer to CYLINDER COMBUSTION PRESSURE LEAKAGE DIAGNOSIS CHART .
CYLINDER COMBUSTION PRESSURE LEAKAGE DIAGNOSIS CHART
CONDITION POSSIBLE CAUSE CORRECTION
AIR ESCAPES THROUGH
THROTTLE BODYIntake valve bent, burnt, or not
seated properlyInspect valve and valve seat.
Reface or replace, as necessary.
Inspect valve springs. Replace as
necessary.
AIR ESCAPES THROUGH
TAILPIPEExhaust valve bent, burnt, or not
seated properlyInspect valve and valve seat.
Reface or replace, as necessary.
Inspect valve springs. Replace as
necessary.
AIR ESCAPES THROUGH
RADIATORHead gasket leaking or cracked
cylinder head or blockRemove cylinder head and inspect.
Replace defective part
MORE THAN 50% LEAKAGE
FROM ADJACENT CYLINDERSHead gasket leaking or crack in
cylinder head or block between
adjacent cylindersRemove cylinder head and inspect.
Replace gasket, head, or block as
necessary