Page 1505 of 5267
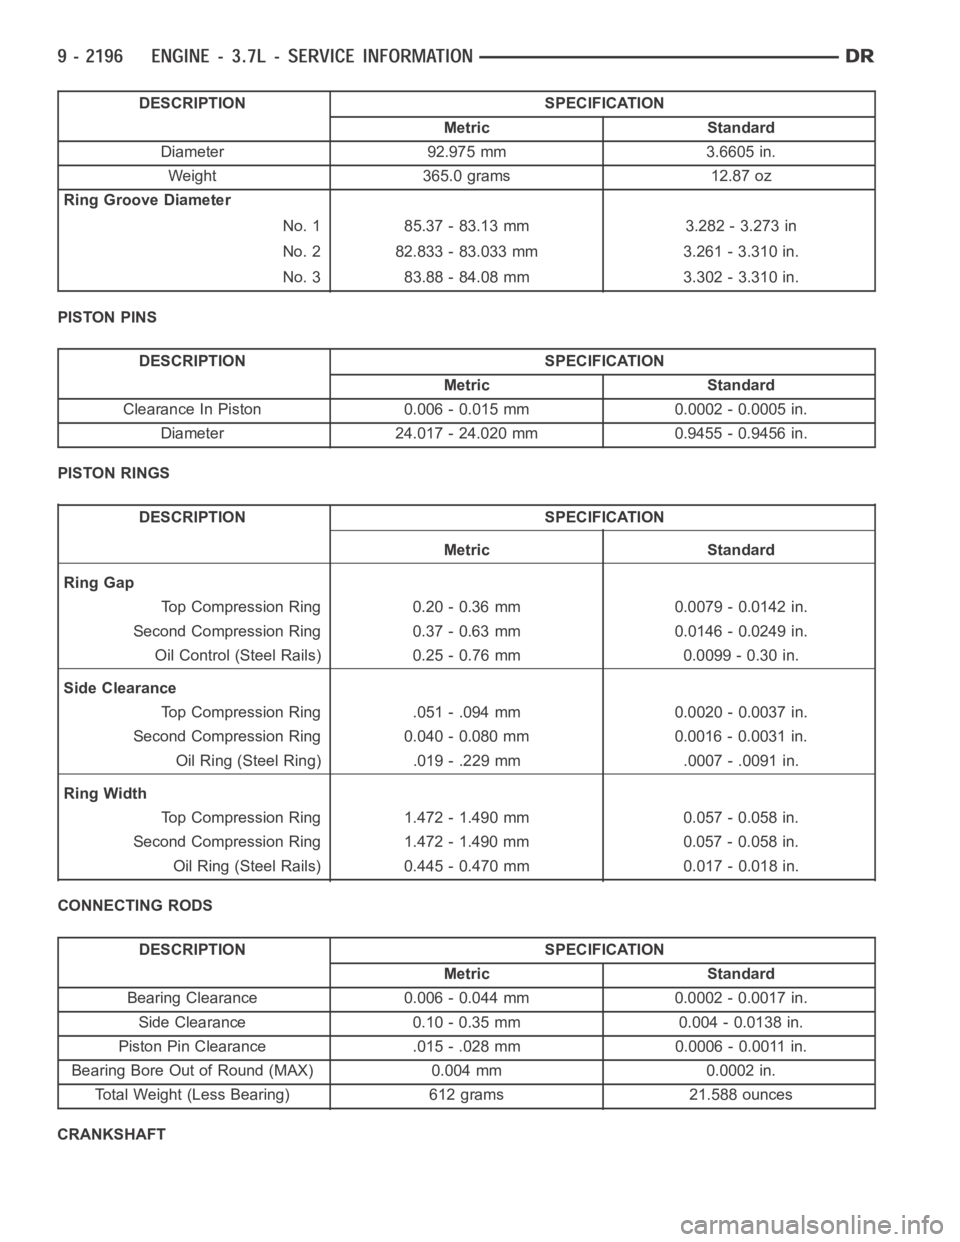
DESCRIPTION SPECIFICATION
Metric Standard
Diameter 92.975 mm 3.6605 in.
Weight 365.0 grams 12.87 oz
Ring Groove Diameter
No. 1 85.37 - 83.13 mm 3.282 - 3.273 in
No. 2 82.833 - 83.033 mm 3.261 - 3.310 in.
No. 3 83.88 - 84.08 mm 3.302 - 3.310 in.
PISTON PINS
DESCRIPTION SPECIFICATION
Metric Standard
Clearance In Piston 0.006 - 0.015 mm 0.0002 - 0.0005 in.
Diameter 24.017 - 24.020 mm 0.9455 - 0.9456 in.
PISTON RINGS
DESCRIPTION SPECIFICATION
Metric Standard
Ring Gap
Top Compression Ring 0.20 - 0.36 mm 0.0079 - 0.0142 in.
Second Compression Ring 0.37 - 0.63 mm 0.0146 - 0.0249 in.
Oil Control (Steel Rails) 0.25 - 0.76 mm 0.0099 - 0.30 in.
Side Clearance
Top Compression Ring .051 - .094 mm 0.0020 - 0.0037 in.
Second Compression Ring 0.040 - 0.080 mm 0.0016 - 0.0031 in.
Oil Ring (Steel Ring) .019 - .229 mm .0007 - .0091 in.
Ring Width
Top Compression Ring 1.472 - 1.490 mm 0.057 - 0.058 in.
Second Compression Ring 1.472 - 1.490 mm 0.057 - 0.058 in.
Oil Ring (Steel Rails) 0.445 - 0.470 mm 0.017 - 0.018 in.
CONNECTING RODS
DESCRIPTION SPECIFICATION
Metric Standard
Bearing Clearance 0.006 - 0.044 mm 0.0002 - 0.0017 in.
Side Clearance 0.10 - 0.35 mm 0.004 - 0.0138 in.
Piston Pin Clearance .015 - .028 mm 0.0006 - 0.0011 in.
Bearing Bore Out of Round (MAX) 0.004 mm 0.0002 in.
Total Weight (Less Bearing) 612 grams 21.588 ounces
CRANKSHAFT
Page 1507 of 5267
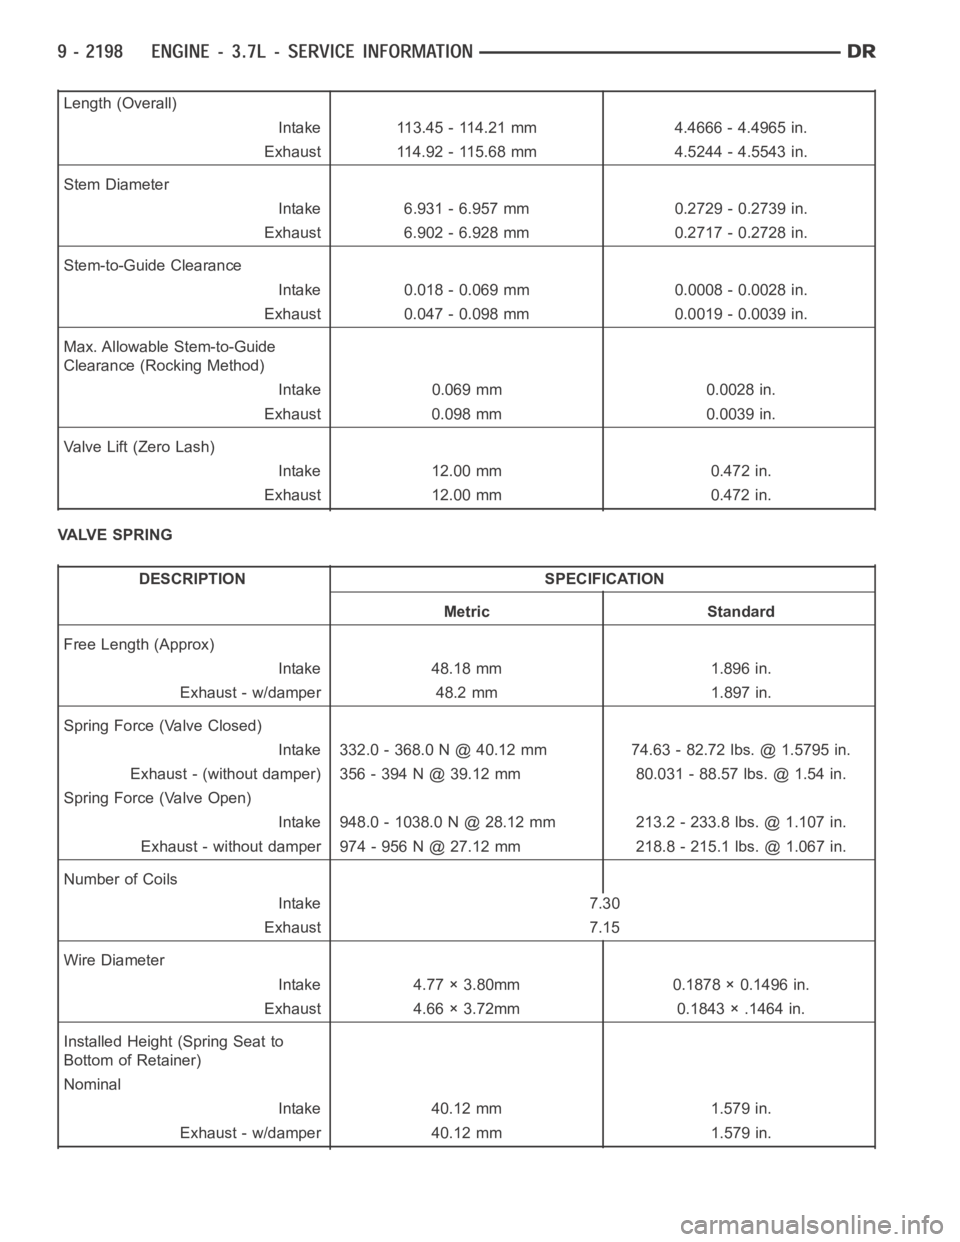
Length (Overall)
Intake 113.45 - 114.21 mm 4.4666 - 4.4965 in.
Exhaust 114.92 - 115.68 mm 4.5244 - 4.5543 in.
Stem Diameter
Intake 6.931 - 6.957 mm 0.2729 - 0.2739 in.
Exhaust 6.902 - 6.928 mm 0.2717 - 0.2728 in.
Stem-to-Guide Clearance
Intake 0.018 - 0.069 mm 0.0008 - 0.0028 in.
Exhaust 0.047 - 0.098 mm 0.0019 - 0.0039 in.
Max. Allowable Stem-to-Guide
Clearance (Rocking Method)
Intake 0.069 mm 0.0028 in.
Exhaust 0.098 mm 0.0039 in.
Valve Lift (Zero Lash)
Intake 12.00 mm 0.472 in.
Exhaust 12.00 mm 0.472 in.
VALVE SPRING
DESCRIPTION SPECIFICATION
Metric Standard
Free Length (Approx)
Intake 48.18 mm 1.896 in.
Exhaust - w/damper 48.2 mm 1.897 in.
Spring Force (Valve Closed)
Intake 332.0 - 368.0 N @ 40.12 mm 74.63 - 82.72 lbs. @ 1.5795 in.
Exhaust - (without damper) 356 - 394 N @ 39.12 mm 80.031 - 88.57 lbs. @ 1.54 in.
Spring Force (Valve Open)
Intake 948.0 - 1038.0 N @ 28.12 mm 213.2 - 233.8 lbs. @ 1.107 in.
Exhaust - without damper 974 - 956 N @ 27.12 mm 218.8 - 215.1 lbs. @ 1.067 in.
Number of Coils
Intake 7.30
Exhaust 7.15
Wire Diameter
Intake 4.77 × 3.80mm 0.1878 × 0.1496 in.
Exhaust 4.66 × 3.72mm 0.1843 × .1464 in.
Installed Height (Spring Seat to
Bottom of Retainer)
Nominal
Intake 40.12 mm 1.579 in.
Exhaust - w/damper 40.12 mm 1.579 in.
Page 1508 of 5267
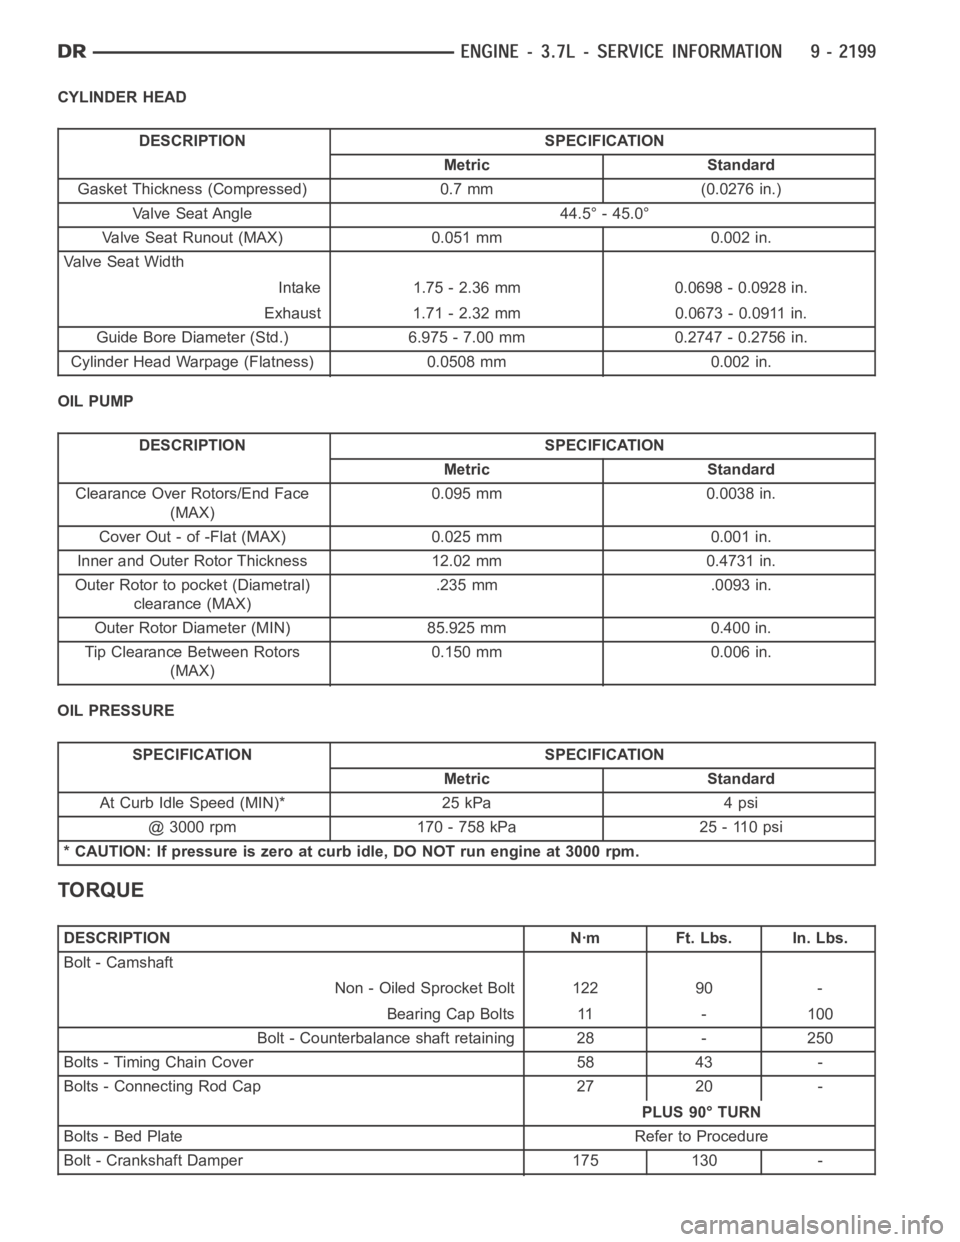
CYLINDER HEAD
DESCRIPTION SPECIFICATION
Metric Standard
Gasket Thickness (Compressed) 0.7 mm (0.0276 in.)
Valve Seat Angle 44.5° - 45.0°
Valve Seat Runout (MAX) 0.051 mm 0.002 in.
Va l v e S e a t W i d t h
Intake 1.75 - 2.36 mm 0.0698 - 0.0928 in.
Exhaust 1.71 - 2.32 mm 0.0673 - 0.0911 in.
Guide Bore Diameter (Std.) 6.975 - 7.00 mm 0.2747 - 0.2756 in.
Cylinder Head Warpage (Flatness) 0.0508 mm 0.002 in.
OIL PUMP
DESCRIPTION SPECIFICATION
Metric Standard
Clearance Over Rotors/End Face
(MAX)0.095 mm 0.0038 in.
Cover Out - of -Flat (MAX) 0.025 mm 0.001 in.
Inner and Outer Rotor Thickness 12.02 mm 0.4731 in.
Outer Rotor to pocket (Diametral)
clearance (MAX).235 mm .0093 in.
Outer Rotor Diameter (MIN) 85.925 mm 0.400 in.
Tip Clearance Between Rotors
(MAX)0.150 mm 0.006 in.
OIL PRESSURE
SPECIFICATION SPECIFICATION
Metric Standard
At Curb Idle Speed (MIN)* 25 kPa 4 psi
@ 3000 rpm 170 - 758 kPa 25 - 110 psi
* CAUTION: If pressure is zero at curb idle, DO NOT run engine at 3000 rpm.
TORQUE
DESCRIPTION Nꞏm Ft. Lbs. In. Lbs.
Bolt - Camshaft
Non - Oiled Sprocket Bolt 122 90 -
Bearing Cap Bolts 11 - 100
Bolt - Counterbalance shaft retaining 28 - 250
Bolts - Timing Chain Cover 58 43 -
Bolts - Connecting Rod Cap 27 20 -
PLUS 90° TURN
Bolts - Bed Plate Refer to Procedure
Bolt - Crankshaft Damper 175 130 -
Page 1509 of 5267
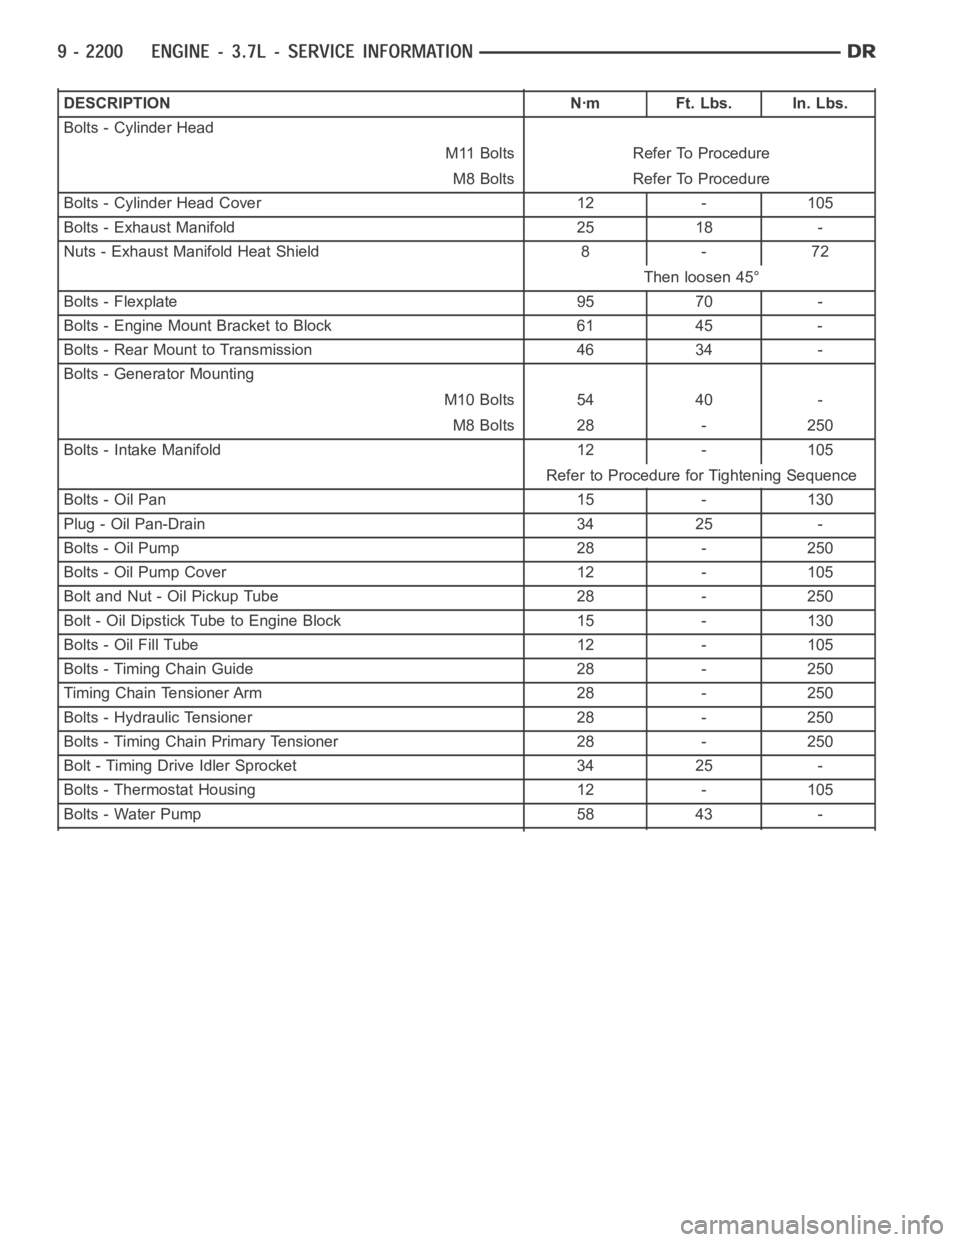
DESCRIPTION Nꞏm Ft. Lbs. In. Lbs.
Bolts - Cylinder Head
M11 Bolts Refer To Procedure
M8 Bolts Refer To Procedure
Bolts - Cylinder Head Cover 12 - 105
Bolts - Exhaust Manifold 25 18 -
Nuts - Exhaust Manifold Heat Shield 8 - 72
Then loosen 45°
Bolts - Flexplate 95 70 -
Bolts - Engine Mount Bracket to Block 61 45 -
Bolts - Rear Mount to Transmission 46 34 -
Bolts - Generator Mounting
M10 Bolts 54 40 -
M8 Bolts 28 - 250
Bolts - Intake Manifold 12 - 105
Refer to Procedure for Tightening Sequence
Bolts - Oil Pan 15 - 130
Plug - Oil Pan-Drain 34 25 -
Bolts - Oil Pump 28 - 250
Bolts - Oil Pump Cover 12 - 105
Bolt and Nut - Oil Pickup Tube 28 - 250
Bolt - Oil Dipstick Tube to Engine Block 15 - 130
Bolts - Oil Fill Tube 12 - 105
Bolts - Timing Chain Guide 28 - 250
Timing Chain Tensioner Arm 28 - 250
Bolts - Hydraulic Tensioner 28 - 250
Bolts - Timing Chain Primary Tensioner 28 - 250
Bolt - Timing Drive Idler Sprocket 34 25 -
Bolts - Thermostat Housing 12 - 105
Bolts - Water Pump 58 43 -
Page 1514 of 5267
Oil Pressure Gauge C-3292
Piston Ring Compressor C-385
Pressure Tester Kit 7700
Bloc–Chek–Kit C-3685–A
ENGINE SUPPORT FIXTURE 8534
Page 1521 of 5267
2. Position the new cylinder head gasket on the locat-
ing dowels.
CAUTION: When installing cylinder head, use care
not damage the tensioner arm or the guide arm.
3. Position the cylinder head onto the cylinder block.
Make sure the cylinder head seats fully over the
locating dowels.
NOTE: The four smaller cylinder head mounting
bolts require sealant to be added to them before
installing. Failure to do so may cause leaks.
4. Lubricate the cylinder head bolt threads with clean
engine oil and install the eight M11 bolts.
5. Coat the four M8 cylinder head bolts withMopar
Lock and Seal Adhesivethen install the bolts.
NOTE: The cylinder head bolts are tightened using
an angle torque procedure, however, the bolts are
not a torque-to-yield design.
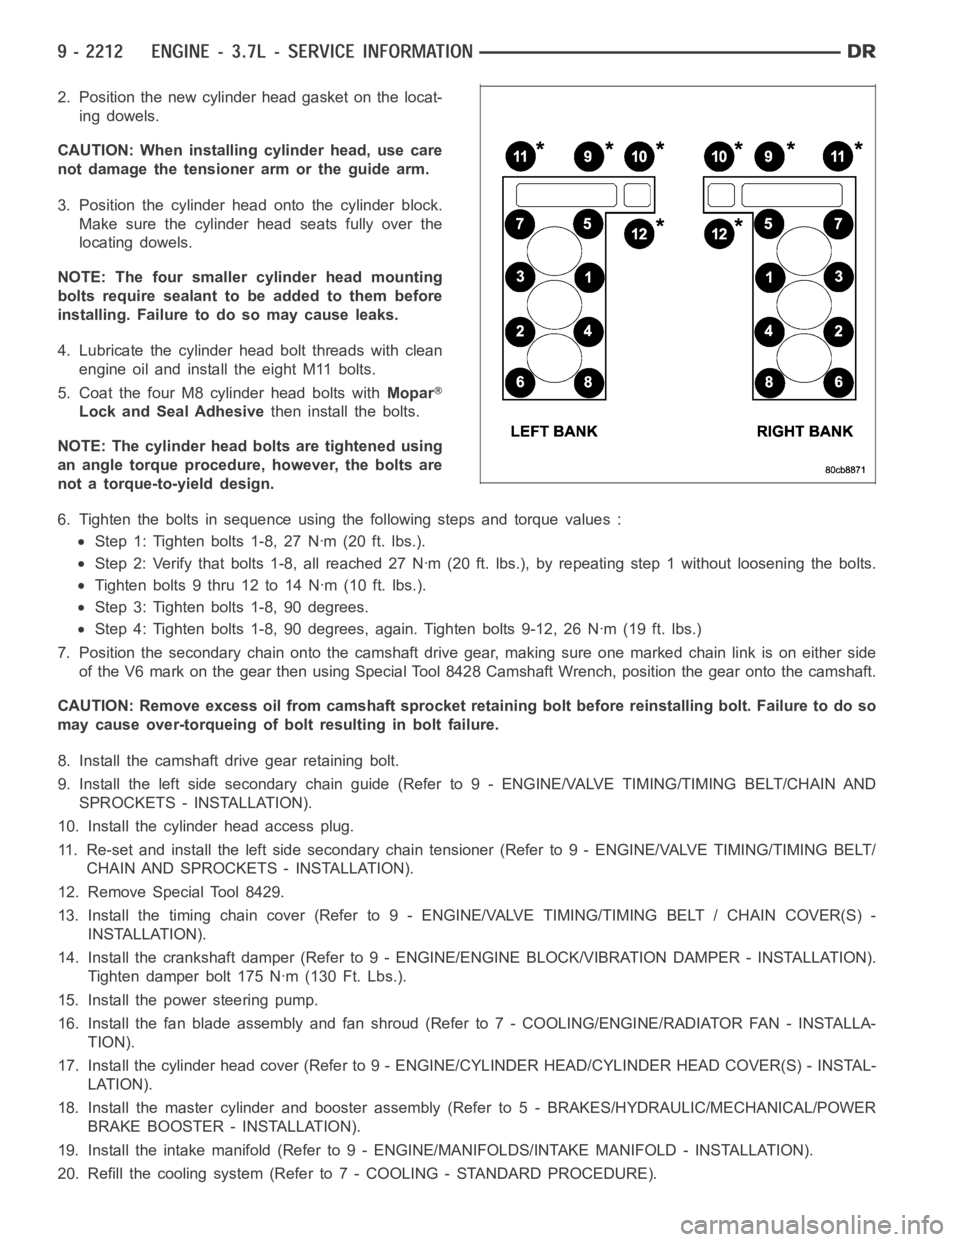
6. Tighten the bolts in sequence using the following steps and torque values:
Step 1: Tighten bolts 1-8, 27 Nꞏm (20 ft. lbs.).
Step 2: Verify that bolts 1-8, all reached 27 Nꞏm (20 ft. lbs.), by repeatingstep 1 without loosening the bolts.
Tightenbolts9thru12to14Nꞏm(10ft.lbs.).
Step 3: Tighten bolts 1-8, 90 degrees.
Step 4: Tighten bolts 1-8, 90 degrees, again. Tighten bolts 9-12, 26 Nꞏm (19ft. lbs.)
7. Position the secondary chain onto the camshaft drive gear, making sure one marked chain link is on either side
of the V6 mark on the gear then using Special Tool 8428 Camshaft Wrench, position the gear onto the camshaft.
CAUTION: Remove excess oil from camshaft sprocket retaining bolt before reinstalling bolt. Failure to do so
may cause over-torqueing of bolt resulting in bolt failure.
8. Install the camshaft drive gear retaining bolt.
9. Install the left side secondary chain guide (Refer to 9 - ENGINE/VALVE TIMING/TIMING BELT/CHAIN AND
SPROCKETS - INSTALLATION).
10. Install the cylinder head access plug.
11. Re-set and install the left side secondary chain tensioner (Refer to 9 -ENGINE/VALVE TIMING/TIMING BELT/
CHAIN AND SPROCKETS - INSTALLATION).
12. Remove Special Tool 8429.
13. Install the timing chain cover (Refer to 9 - ENGINE/VALVE TIMING/TIMING BELT / CHAIN COVER(S) -
INSTALLATION).
14. Install the crankshaft damper (Refer to 9 - ENGINE/ENGINE BLOCK/VIBRATION DAMPER - INSTALLATION).
Tighten damper bolt 175 Nꞏm (130 Ft. Lbs.).
15. Install the power steering pump.
16. Install the fan blade assembly and fan shroud (Refer to 7 - COOLING/ENGINE/RADIATOR FAN - INSTALLA-
TION).
17. Install the cylinder head cover (Refer to 9 - ENGINE/CYLINDER HEAD/CYLINDER HEAD COVER(S) - INSTAL-
LATION).
18. Install the master cylinder and booster assembly (Refer to 5 - BRAKES/HYDRAULIC/MECHANICAL/POWER
BRAKE BOOSTER - INSTALLATION).
19. Install the intake manifold (Refer to 9 - ENGINE/MANIFOLDS/INTAKE MANIFOLD - INSTALLATION).
20. Refill the cooling system (Refer to 7 - COOLING - STANDARD PROCEDURE).
Page 1524 of 5267
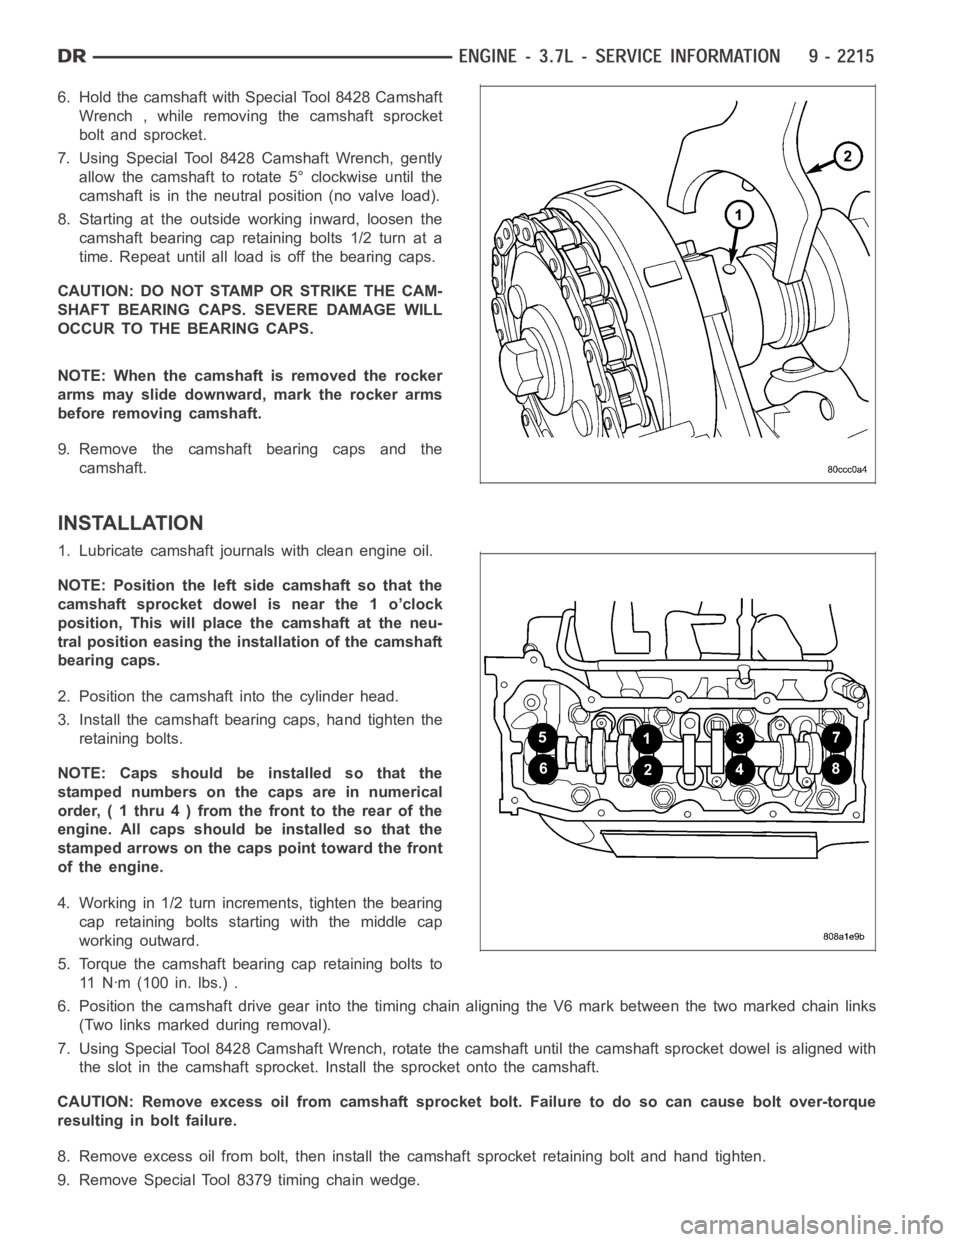
6. Hold the camshaft with Special Tool 8428 Camshaft
Wrench , while removing the camshaft sprocket
bolt and sprocket.
7. Using Special Tool 8428 Camshaft Wrench, gently
allow the camshaft to rotate 5° clockwise until the
camshaft is in the neutral position (no valve load).
8. Starting at the outside working inward, loosen the
camshaft bearing cap retaining bolts 1/2 turn at a
time. Repeat until all load is off the bearing caps.
CAUTION: DO NOT STAMP OR STRIKE THE CAM-
SHAFT BEARING CAPS. SEVERE DAMAGE WILL
OCCUR TO THE BEARING CAPS.
NOTE: When the camshaft is removed the rocker
arms may slide downward, mark the rocker arms
before removing camshaft.
9. Remove the camshaft bearing caps and the
camshaft.
INSTALLATION
1. Lubricate camshaft journals with clean engine oil.
NOTE: Position the left side camshaft so that the
camshaft sprocket dowel is near the 1 o’clock
position, This will place the camshaft at the neu-
tral position easing the installation of the camshaft
bearing caps.
2. Position the camshaft into the cylinder head.
3. Install the camshaft bearing caps, hand tighten the
retaining bolts.
NOTE: Caps should be installed so that the
stamped numbers on the caps are in numerical
order, ( 1 thru 4 ) from the front to the rear of the
engine. All caps should be installed so that the
stamped arrows on the caps point toward the front
of the engine.
4. Working in 1/2 turn increments, tighten the bearing
cap retaining bolts starting with the middle cap
working outward.
5. Torque the camshaft bearing cap retaining bolts to
11 N ꞏm ( 1 0 0 i n . l b s . ) .
6. Position the camshaft drive gear into the timing chain aligning the V6 mark between the two marked chain links
(Two links marked during removal).
7. Using Special Tool 8428 Camshaft Wrench, rotate the camshaft until the camshaft sprocket dowel is aligned with
the slot in the camshaft sprocket. Install the sprocket onto the camshaft.
CAUTION: Remove excess oil from camshaft sprocket bolt. Failure to do so can cause bolt over-torque
resulting in bolt failure.
8. Remove excess oil from bolt, then install the camshaft sprocket retaining bolt and hand tighten.
9. Remove Special Tool 8379 timing chain wedge.
Page 1530 of 5267
INSTALLATION
1. coat the valve stem with clean engine oil and insert
it into the cylinder head.
2. Install the valve stem seal. make sure the seal is
fully seated and that the garter spring at the top of
the seal is intact.
3. Install the spring and the spring retainer.
4. Using the valve spring compressor, compress the
spring and install the two valve spring retainer
halves.
5. Release the valve spring compressor and make
sure the two spring retainer halves and the spring
retainer are fully seated.
6. lubricate the camshaft journal with clean engine oil
then Position the camshaft (with the sprocket dowel
on the left camshaft at 11 o’clock and the right
camshaft at 12 o’clock), then position the camshaft
bearing caps.
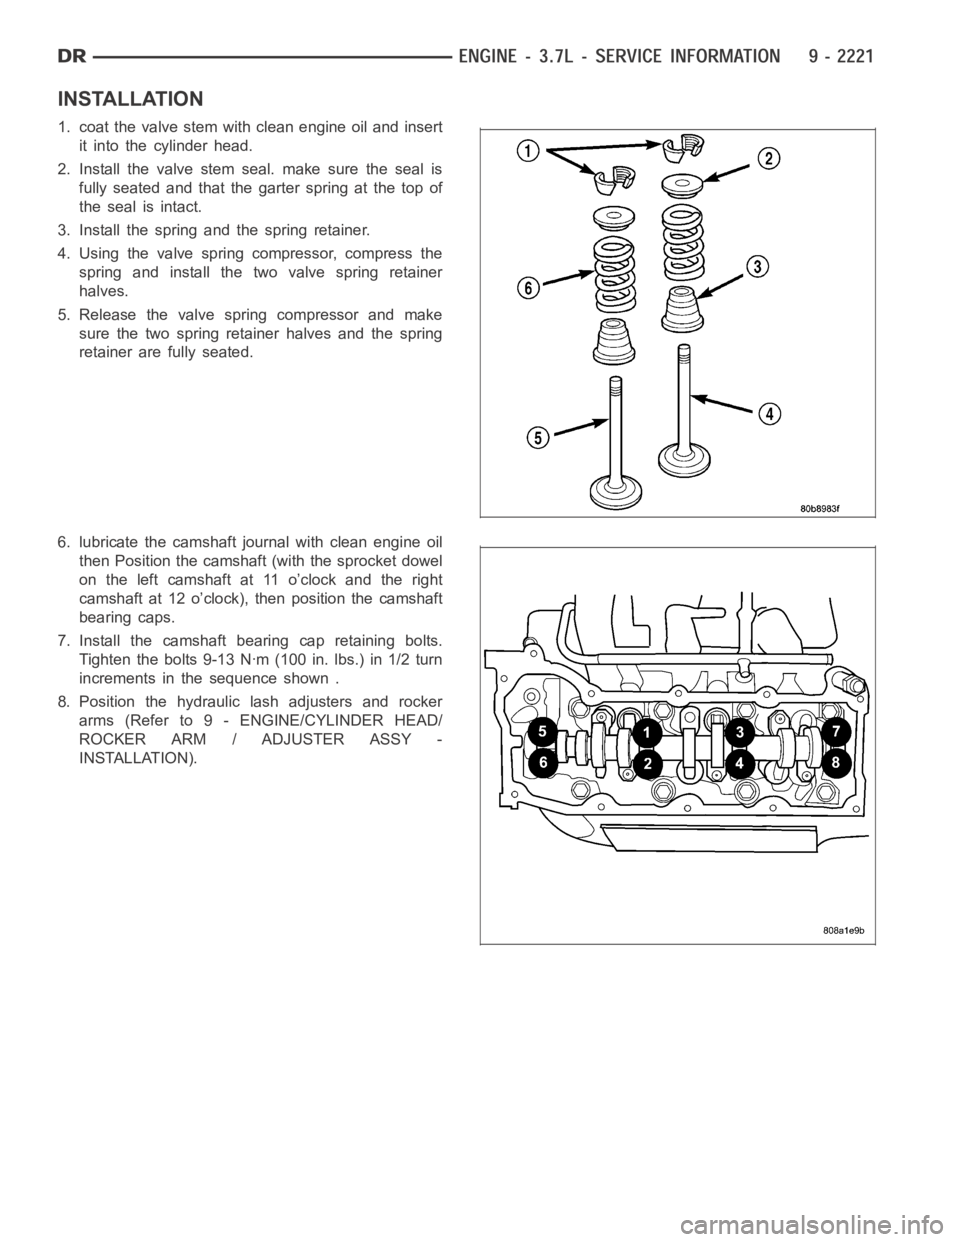
7. Install the camshaft bearing cap retaining bolts.
Tighten the bolts 9-13 Nꞏm (100 in. lbs.) in 1/2 turn
increments in the sequence shown .
8. Position the hydraulic lash adjusters and rocker
arms (Refer to 9 - ENGINE/CYLINDER HEAD/
ROCKER ARM / ADJUSTER ASSY -
INSTALLATION).