2006 DODGE RAM SRT-10 transmission
[x] Cancel search: transmissionPage 21 of 5267

P0700-TRANSMISSION CONTROL SYSTEM (MIL REQUEST)
For a complete wiring diagramRefer to Section 8W.
When Monitored:
Ignition on and battery voltage greater than 10 volts.
Set Condition:
An active DTC is stored in the TCM. One Trip Fault. Three good trips to turn offtheMIL.
Possible Causes
DTC PRESENT IN THE TRANSMISSION CONTROL MODULE
Always perform the Pre-Diagnostic Troubleshooting procedure before proceeding. (Refer to 9 - ENGINE -
DIAGNOSIS AND TESTING).
Diagnostic Test
1.DTC PRESENT IN EATX CONTROLLER
This is an informational DTC letting you know that a DTC(s) is stored in the Transmission Control Module.
Erase this DTC from the PCM after all Transmission DTC(s) have been repaired.
Using a scan tool, read the Transmission Controller DTC and refer to the Transmission Category and perform the
appropriate symptom.
PCM Diagnostic Information complete.
Continue
Te s t C o m p l e t e .
Page 28 of 5267

Theory of Operation
The Park Neutral switch rationality test is enabled only for vehicles equipped with a 4/5 speed automatic transmis-
sion. This diagnostic checks if the park/neutral switch is incorrectly stuck in the neutral position during driving con-
ditions by comparing Vehicle Speed, Engine Speed, Throttle Position, andPressure Ratio to the fail thresholds and
by looking at the state of the Park/Neutral Switch. The stuck in drive condition is not explicitly checked as the starter
relay does not energize and therefore render the vehicle inoperable.
When Monitored:
Continuously with the transmission in Park, Neutral, or Drive and NOT in Limp-in mode.
Set Condition:
This code will set if the PCM detects an incorrect Park/Neutral switch state for a given mode of vehicle oper-
ation. One trip fault. Three good trips to turn off the MIL.
Possible Causes
TRS (T41) SENSE (P/N SENSE) CIRCUIT OPEN
TRS (T41) SENSE (P/N SENSE) CIRCUIT SHORTED TO GROUND
TRANSMISSION RANGE SENSOR
PCM
Always perform the Pre-Diagnostic Troubleshooting procedure before proceeding. (Refer to 9 - ENGINE -
DIAGNOSIS AND TESTING).
Diagnostic Test
1.P/N AND D/R NOT IN CORRECT POSITION
NOTE: Check the TCM for DTCs, if P0706 is set in the TCM diagnose the TCM code before continuing.
Ignition on, engine not running.
With the scan tool, read the Park/Neutral Position Switch input state.
While moving the gear selector through all gear positions (Park to 1 and back to Park), monitor the scan tool dis-
play.
Did the scan tool display show P/N and D/R in the correct gear positions?
Ye s>>
Refer to the INTERMITTENT CONDITION Diagnostic Procedure.
Perform the POWERTRAIN VERIFICATION TEST. (Refer to 9 - ENGINE - STANDARD PROCEDURE)
No>>
Go To 2
Page 29 of 5267

2.TRS (T41) SENSE (P/N SENSE) CIRCUIT OPEN
Turn the ignition off.
Disconnect the C3 PCM harness connector.
Disconnect the Transmission Range Sensor harness connector.
CAUTION: Do not probe the PCM harness connectors. Probing the
PCM harness connectors will damage the PCM terminals resulting
in poor terminal to pin connection. Install Miller Special Tool #8815
to perform diagnosis.
Measure the resistance of the TRS (T41) Sense (P/N Sense) circuit
from the TRS harness connector to the appropriate terminal of special
tool #8815.
Is the resistance below 5.0 ohms?
Ye s>>
Go To 3
No>>
Repair the open in the TRS (T41) Sense (P/N Sense) cir-
cuit.
Perform the POWERTRAIN VERIFICATION TEST. (Refer to
9 - ENGINE - STANDARD PROCEDURE)
3.TRS (T41) SIGNAL CIRCUIT SHORTED TO GROUND
Measure the resistance between ground and the TRS (T41) Sense (P/N
Sense) circuit at the TRS harness connector.
Is the resistance above 100k ohms?
Ye s>>
Go To 4
No>>
Repair the short to ground in the TRS (T41) Sense (P/N
Sense) circuit.
Perform the POWERTRAIN VERIFICATION TEST. (Refer to
9 - ENGINE - STANDARD PROCEDURE)
Page 30 of 5267

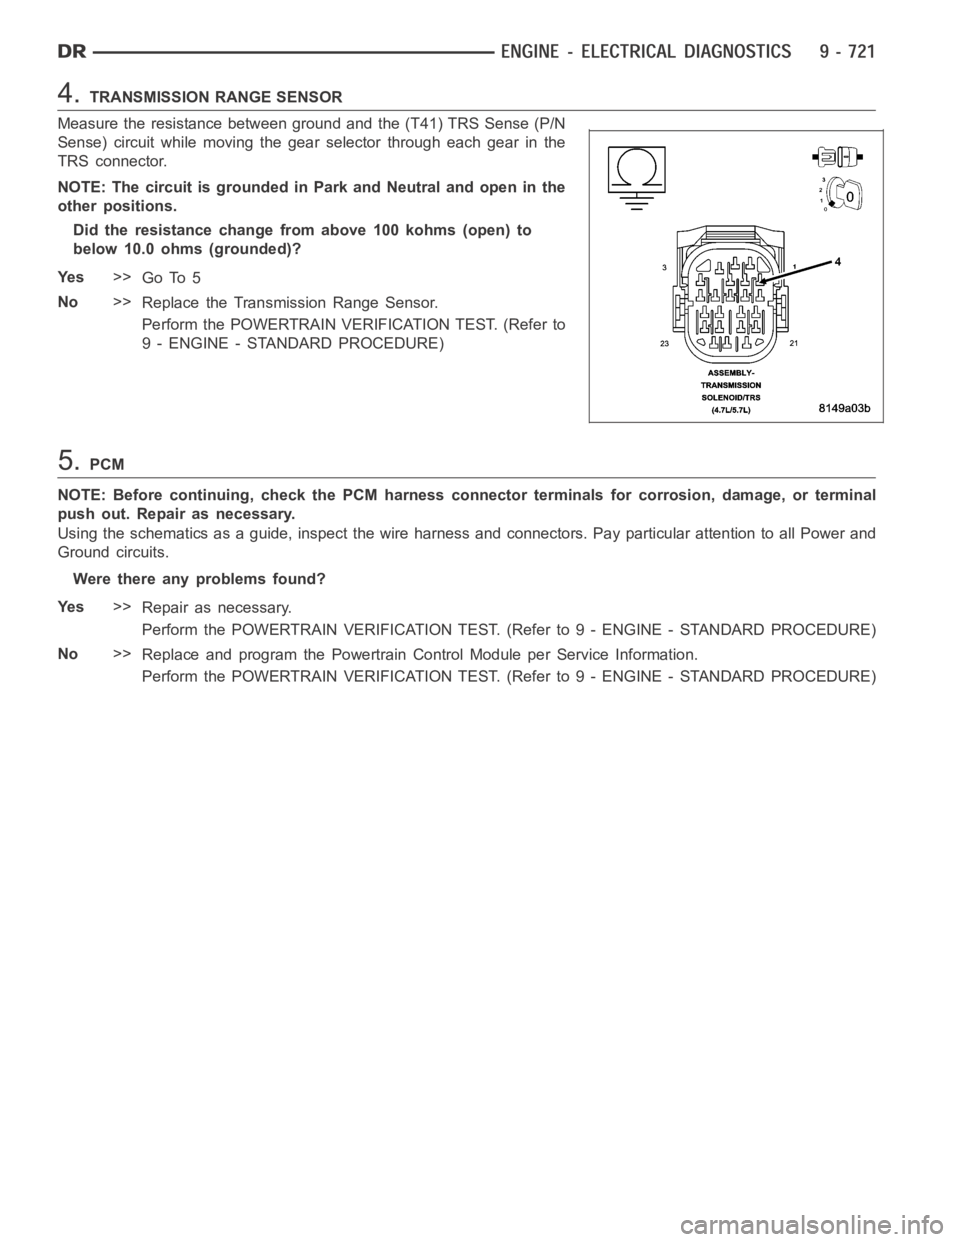
4.TRANSMISSION RANGE SENSOR
Measure the resistance between ground and the (T41) TRS Sense (P/N
Sense) circuit while moving the gear selector through each gear in the
TRS connector.
NOTE: The circuit is grounded in Park and Neutral and open in the
other positions.
Did the resistance change from above 100 kohms (open) to
below 10.0 ohms (grounded)?
Ye s>>
Go To 5
No>>
Replace the Transmission Range Sensor.
Perform the POWERTRAIN VERIFICATION TEST. (Refer to
9 - ENGINE - STANDARD PROCEDURE)
5.PCM
NOTE: Before continuing, check the PCM harness connector terminals for corrosion, damage, or terminal
push out. Repair as necessary.
Using the schematics as a guide, inspect the wire harness and connectors. Pay particular attention to all Power and
Ground circuits.
Were there any problems found?
Ye s>>
Repair as necessary.
Perform the POWERTRAIN VERIFICATION TEST. (Refer to 9 - ENGINE - STANDARD PROCEDURE)
No>>
Replace and program the Powertrain Control Module per Service Information.
Perform the POWERTRAIN VERIFICATION TEST. (Refer to 9 - ENGINE - STANDARD PROCEDURE)
Page 395 of 5267

U0101-LOST COMMUNICATION WITH TCM
For a complete wiring diagramRefer to Section 8W.
When Monitored:
Ignition run time is greater than 1 second. Battery voltage between 9 and 16volts. Engine run time greater
than 3 seconds.
Set Condition:
The PCM doesn’t receive a Bus Message from the Transmission Control Modulefor 7 consecutive seconds.
One trip failure. The circuit is continuously monitored.
Possible Causes
PCM FUSED IGNITION SWITCH OUTPUT CIRCUIT CHECK
BUS FAILURE OPEN OR SHORTED CONDITION
PCI BUS UNABLE TO COMMUNICATE WITH THE SCAN TOOL
PCM
Refer to 8 - ELECTRICAL/ELECTRONIC CONTROL MODULES - DIAGNOSIS AND TESTING for diagnostic
procedures and for further possible causes.
Diagnostic Test
1.ACTIVE DTC
Ignition on, engine not running.
With the scan tool, erase DTCs.
Cycle the ignition key on and off several times. Leaving the ignition on forat least 20 seconds.
With the scan tool, read DTCs.
Does the DTC reset?
Ye s>>
Go To 2
No>>
Refer to the INTERMITTENT CONDITIONSymptom (Diagnostic Procedure).
Perform the POWERTRAIN VERIFICATION TEST. (Refer to 9 - ENGINE - STANDARD PROCEDURE)
2.PCM FUSED IGNITION SWITCH OUTPUT CIRCUIT
Turn the ignition off.
Disconnect the C1 PCM harness connector.
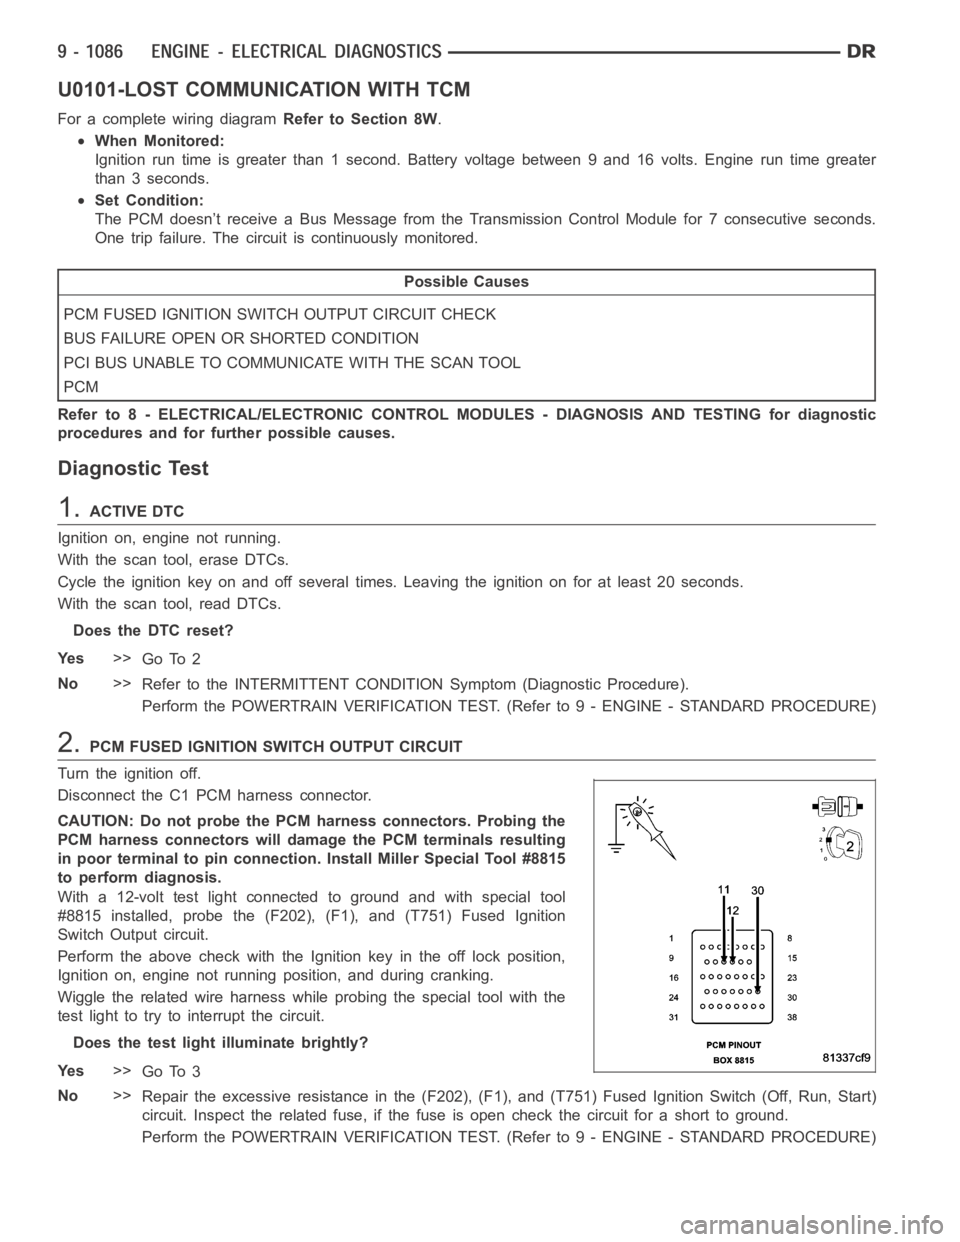
CAUTION: Do not probe the PCM harness connectors. Probing the
PCM harness connectors will damage the PCM terminals resulting
in poor terminal to pin connection. Install Miller Special Tool #8815
to perform diagnosis.
With a 12-volt test light connected to ground and with special tool
#8815 installed, probe the (F202), (F1), and (T751) Fused Ignition
Switch Output circuit.
Perform the above check with the Ignition key in the off lock position,
Ignition on, engine not running position, and during cranking.
Wiggle the related wire harness while probing the special tool with the
test light to try to interrupt the circuit.
Does the test light illuminate brightly?
Ye s>>
Go To 3
No>>
Repair the excessive resistance in the (F202), (F1), and (T751) Fused Ignition Switch (Off, Run, Start)
circuit. Inspect the related fuse, if the fuse is open check the circuit fora short to ground.
Perform the POWERTRAIN VERIFICATION TEST. (Refer to 9 - ENGINE - STANDARD PROCEDURE)
Page 438 of 5267

Possible Causes
MECHANICAL CONDITION
BATTERY CIRCUIT RESISTANCE TOO HIGH
FUSED IGNITION SWITCH OUTPUT CIRCUITS
FUSED B+ CIRCUIT OPEN
(T752) STARTER RELAY CONTROL CIRCUIT OPEN
(T750) STARTER RELAY OUTPUT CIRCUIT OPEN
TRANSMISSION RANGE SENSOR
STARTER RELAY
STARTER
Diagnostic Test
1.MECHANICAL CONDITION
NOTE: Verify the battery is fully charged and capable of passing a load testbefore continuing.
WARNING: Make sure the battery is disconnected, then wait two minutes before proceeding. Failure to do
so may result in personal injury or possible death.
Turn the engine over by hand to make sure the engine is not seized.
Is the engine able to turn over?
Ye s>>
Go To 2
No>>
Repair the mechanical condition preventing the starter motor from cranking.
Perform the POWERTRAIN VERIFICATION TEST. (Refer to 9 - ENGINE - STANDARD PROCEDURE)
2.TRANSMISSION RANGE SENSOR
Turn the ignition off.
Disconnect the TRS harness connectors.
Move the Gear selector through all gear positions, from Park to 1st and
back.
While moving the gear selector through each gear, measure the resis-
tance between ground and the TRS (T41) Sense (P/N Position Switch
Sense) circuit at the TRS connector.
NOTE: The circuit is grounded in Park and Neutral and open in the
other positions.
Did the resistance change from above 100 kohms (open) to
below 10.0 ohms (grounded) ?
Ye s>>
Go To 3
No>>
Replace the Transmission Range Sensor.
Perform the POWERTRAIN VERIFICATION TEST. (Refer to
9 - ENGINE - STANDARD PROCEDURE)
Page 439 of 5267

3.EXCESSIVE RESISTANCE IN THE BATTERY CIRCUIT
Turn the ignition off.
Check the Battery Cables for excessive resistance using the service information procedure.
Did either Battery Cable have a voltage drop greater than 0.2 of a volt?
Ye s>>
Repair the excessive resistance in the Battery circuit.
Perform the POWERTRAIN VERIFICATION TEST. (Refer to 9 - ENGINE - STANDARD PROCEDURE)
No>>
Go To 4
4.STARTER RELAY
Turn ignition off.
Remove the Starter Relay from IPM.
CAUTION: The Parking Brake must be on and the Transmission must be in park for a vehicle equipped with
an automatic transmission.
WARNING: When the engine is operating, do not stand in direct line with the fan. Do not put your hands
near the pulleys, belts, or fan. Do notwear loose clothing. Failure to follow these instructions can result in
personal injury or death.
Briefly connect a jumper wire from the Internal Fused B+ circuit to the (T750) Starter Relay Output circuit.
Did the Starter Motor crank the engine?
Ye s>>
Go To 5
No>>
Go To 7
5.(T751) FUSED IGNITION SWITCH OUTPUT CIRCUIT
Ignition on, engine not running.
Using a 12-volt test light, probe the (T751) Fused Ignition Switch Output circuit in the Starter Relay connector.
While observing 12-volt test light, hold ignition key in the start position.
Does the test light illuminate brightly?
Ye s>>
Go To 6
No>>
Repair the excessive resistance in the(T751)FusedIgnitionSwitchOutput circuit. Inspect related fuses
and repair as necessary.
Perform the POWERTRAIN VERIFICATION TEST. (Refer to 9 - ENGINE - STANDARD PROCEDURE)
Page 451 of 5267

POWERTRAIN VERIFICATION TEST
For a complete wiring diagramRefer to Section 8W.
Diagnostic Test
1.SELECTING THE PROPER VERIFICATION TEST
The following verification test are for different repairs. Select the appropriate Verification test for the
repair that has been completed.
Speed Control repair
Go To 2
Charging System repair
Go To 3
NVLD System repair
Go To 4
All other repairs
Go To 5
2.POWERTRAIN VERIFICATION TEST 1
NOTE: 1. If this vehicle is equipped with an Electronic Throttle Control system, and the APP Sensors, PCM,
or Throttle Body Assembly have been replaced, use the scan tool to perform the ETC RELEARN function.
NOTE: 2. After completing the Powertrain Verification Test the Transmission Verification Test must be per-
formed.
NOTE: 3. If the PCM has been replaced and the correct VIN and mileage have notbeen programmed, a DTC
will set in the ABS Module, Airbag Module and the SKIM/SKREEM.
NOTE: 4. If the vehicle is equipped with a Sentry Key Remote Entry, Secret Key data must be updated. Refer
to the Service Information for the PCM, SKIM/SKREEM and the Transponder (ignition key) for programming
information. Using the scan tool, program the Secret Key information intothe PCM using the PCM replaced
function under the WCM menu.
5. Inspect the vehicle to make sure that all engine components are properlyinstalled and connected.
6. Connect the scan tool to the data link connector and erase all codes.
7. Turn the speed control ON (if equipped, cruise light will be on).
8. Depress and release the SET Switch when the vehicle speed is greater than35 MPH. The speed control should
engage and hold the selected speed.
9. Press and hold the RESUME/ACCEL Switch. The vehicle speed should increase by at least 2 MPH.
10. Press and hold the COAST switch. The vehicle speed should decrease.
11. Using caution, press and release the brake pedal. The speed control should disengage.
12. Bring the vehicle speed back up to 35 MPH.
13. Press the RESUME/ACCEL switch. The speed control should resume the previously set speed.
14. Hold down the SET switch. The vehicle should decelerate.
15. Make sure vehicle speed is greater than 35 mph and release the SET Switch. The vehicle should adjust and set
a new vehicle speed.
16. Press and release the CANCEL switch. The speed control should disengage.
17. Bring the vehicle speed back up above 35 mph and engage speed control.
18. Turn the Speed Control Off. (Cruise light will be off). The speed control should disengage.
NOTE: OVERSHOOT/UNDERSHOOT FOLLOWING SPEED CONTROL SET.
19. If the vehicle operator repeatedly presses and releases the SET buttonwith their foot off of the accelerator
(referred to as
lift foot set), the vehicle may accelerate and exceed the desired set speed by up to 5 mph (8km/h).
20. It may also decelerate to less than the desired set speed, before finally achieving the desired set speed.
21. The Speed Control System has an adaptive strategy that compensates forvehicle-to-vehicle variations in speed
control cable lengths.
22. When the speed control is set with the vehicles operators foot off of theaccelerator pedal, the speed control
thinks there is excessive speed control cable slack and adapts accordingly.