Page 724 of 5267

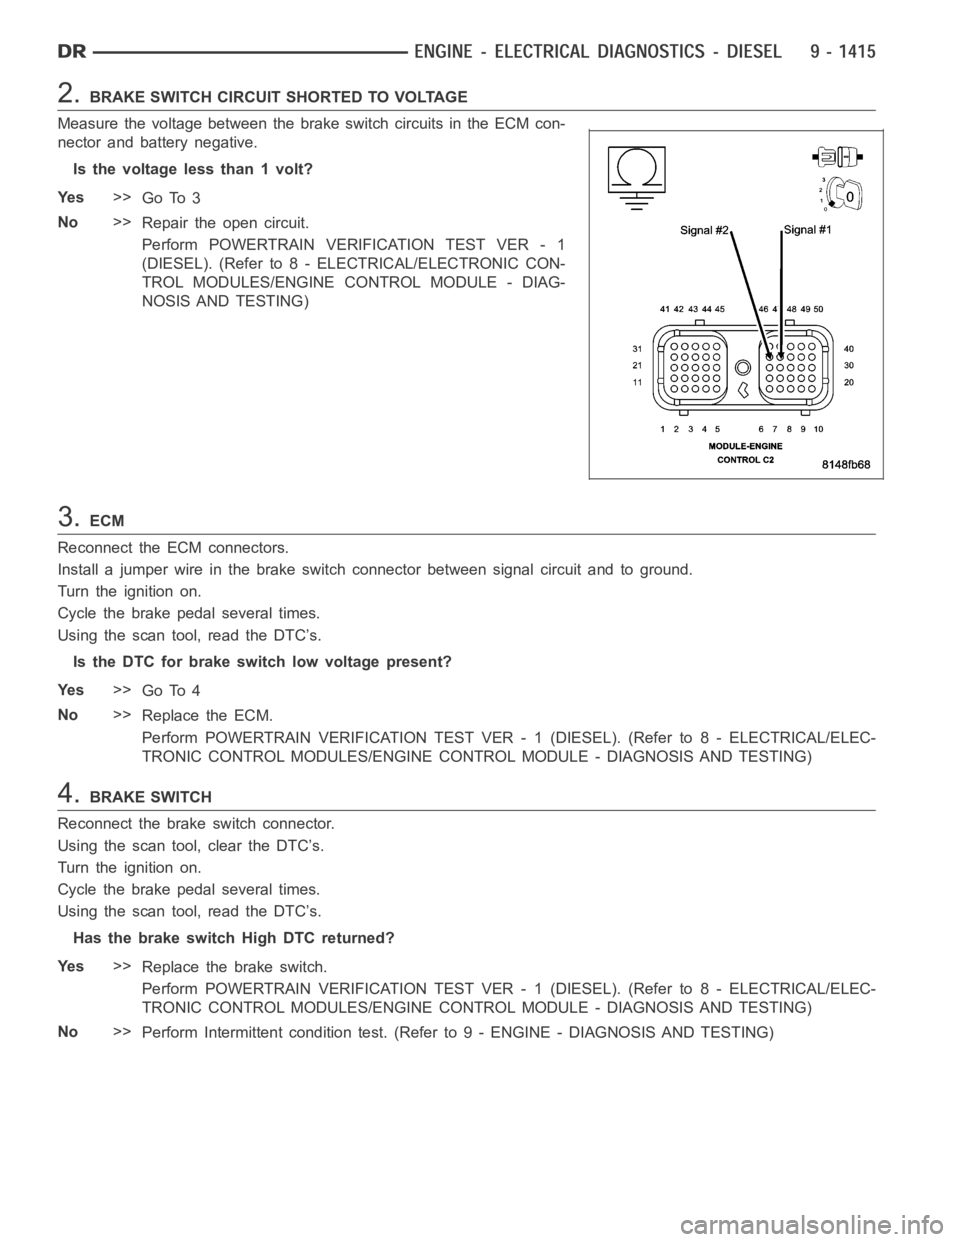
2.BRAKE SWITCH CIRCUIT SHORTED TO VOLTAGE
Measure the voltage between the brake switch circuits in the ECM con-
nector and battery negative.
Is the voltage less than 1 volt?
Ye s>>
Go To 3
No>>
Repair the open circuit.
Perform POWERTRAIN VERIFICATION TEST VER - 1
(DIESEL). (Refer to 8 - ELECTRICAL/ELECTRONIC CON-
TROL MODULES/ENGINE CONTROL MODULE - DIAG-
NOSIS AND TESTING)
3.ECM
Reconnect the ECM connectors.
Install a jumper wire in the brake switch connector between signal circuitand to ground.
Turn the ignition on.
Cycle the brake pedal several times.
Using the scan tool, read the DTC’s.
Is the DTC for brake switch low voltage present?
Ye s>>
Go To 4
No>>
Replace the ECM.
Perform POWERTRAIN VERIFICATION TEST VER - 1 (DIESEL). (Refer to 8 - ELECTRICAL/ELEC-
TRONIC CONTROL MODULES/ENGINE CONTROL MODULE - DIAGNOSIS AND TESTING)
4.BRAKE SWITCH
Reconnect the brake switch connector.
Using the scan tool, clear the DTC’s.
Turn the ignition on.
Cycle the brake pedal several times.
Using the scan tool, read the DTC’s.
Has the brake switch High DTC returned?
Ye s>>
Replace the brake switch.
Perform POWERTRAIN VERIFICATION TEST VER - 1 (DIESEL). (Refer to 8 - ELECTRICAL/ELEC-
TRONIC CONTROL MODULES/ENGINE CONTROL MODULE - DIAGNOSIS AND TESTING)
No>>
Perform Intermittent condition test. (Refer to 9 - ENGINE - DIAGNOSIS AND TESTING)
Page 726 of 5267

When Monitored:
While the ignition is on
Set Condition:
Speed control MUX switch below 1.0 volts for 5 seconds.
Possible Causes
S/C WIRING HARNESS OBSERVABLE PROBLEM
S/C SWITCH (ON/OFF)
CLOCKSPRING SHORTED TO GROUND
S/C SWITCH (RESUME/ACCEL)
S/C SWITCH SIGNAL CIRCUIT SHORTED TO GROUND
S/C SIGNAL CIRCUIT SHORTED TO SENSOR GROUND
ECM
Always perform the Pre-Diagnostic Troubleshooting procedure before proceeding. (Refer to 9 - ENGINE -
DIAGNOSIS AND TESTING)
Diagnostic Test
1.S/C SWITCH VOLTAGE BELOW 1.0 VOLT
Turn the ignition on.
With the scan tool, read the S/C Switch volts status in the ECM.
Is the S/C Switch voltage below 1.0 volt?
Ye s>>
Go To 3
No>>
Go To 2
2.S/C WIRING HARNESS OBSERVABLE PROBLEM
Turn the ignition off.
Using the Schematics as a guide, inspect the Wiring and Connectors.
Were any problems found?
Ye s>>
Repair as necessary.
Perform POWERTRAIN VERIFICATION TEST VER - 1 (DIESEL). (Refer to 8 - ELECTRICAL/ELEC-
TRONIC CONTROL MODULES/ENGINE CONTROL MODULE - DIAGNOSIS AND TESTING)
No>>
Go To 3
3.S/C SWITCH (ON/OFF)
Turn the ignition off.
Disconnect the S/C ON/OFF Switch harness connector.
NOTE: Check connectors - Clean/repair as necessary.
Turn the ignition on.
With the scan tool in Sensors, read the S/C Switch volts in the ECM.
Did the S/C Switch volts change to 5.0 volts?
Ye s>>
Replace the S/C ON/OFF Switch.
Perform POWERTRAIN VERIFICATION TEST VER - 1 (DIESEL). (Refer to 8 - ELECTRICAL/ELEC-
TRONIC CONTROL MODULES/ENGINE CONTROL MODULE - DIAGNOSIS AND TESTING)
No>>
Go To 4
Page 730 of 5267

When Monitored:
Key on or Engine running.
Set Condition:
Speed Control MUX switch above 11.5 volts for 5 seconds.
Possible Causes
S/C WIRING HARNESS OBSERVABLE PROBLEM
CLOCKSPRING SIGNAL/GROUND CIRCUIT OPEN
SPEED CONTROL ON/OFF SWITCH
S/C SWITCH SIGNAL CKT SHORTED TO VOLTAGE
S/C SWITCH SIGNAL CIRCUIT OPEN ECM TO CLOCK SPRING
S/C SWITCH SIGNAL CIRCUIT OPEN CLOCKSPRING TO S/C SWITCH
S/C SWITCH GROUND CIRCUIT OPEN CLOCKSPRING TO S/C SWITCH
S/C SWITCH GROUND CIRCUIT OPEN ECM TO CLOCKSPRING
ECM
Always perform the Pre-Diagnostic Troubleshooting procedure before proceeding. (Refer to 9 - ENGINE -
DIAGNOSIS AND TESTING)
Diagnostic Test
1.Scan tool SHOWS SPEED CONTROL SWITCH ON/OFF
Turn the ignition on.
With the scan tool in Inputs/Outputs, read the Speed Control inputs state inECM.
While monitoring the scan tool, push the Speed Control On/Off Switch several times, then leave it on.
Did the scan tool show Speed Control Switch off and on?
Ye s>>
Go To 2
No>>
Te s t C o m p l e t e .
2.S/C WIRING HARNESS OBSERVABLE PROBLEM
Turn the ignition off.
Using the Schematics as a guide, inspect the Wiring and Connectors.
Were any problems found?
Ye s>>
Repair as necessary.
Perform POWERTRAIN VERIFICATION TEST VER - 1 (DIESEL). (Refer to 8 - ELECTRICAL/ELEC-
TRONIC CONTROL MODULES/ENGINE CONTROL MODULE - DIAGNOSIS AND TESTING)
No>>
Go To 3
Page 734 of 5267
P0602-CHECKSUM ERROR
For a complete wiring diagramRefer to Section 8W.
When Monitored:
While the ignition is on.
Set Condition:
A deviation between the ECM memory and a stored calibration.
Possible Causes
FLASH ECM
ECM
Always perform the Pre-Diagnostic Troubleshooting procedure before proceeding. (Refer to 9 - ENGINE -
DIAGNOSIS AND TESTING)
Diagnostic Test
1.FLASH ECM
Using the scan tool, reflash the ECM with the proper calibration for the particular truck.
Is the flash successful?
Ye s>>
Repair complete.
No>>
Go To 2
2.ECM
With the scan tool, read DTCs.
Did P0602 set after the reflash?
Ye s>>
Replace the ECM.
No>>
Te s t C o m p l e t e .
Perform POWERTRAIN VERIFICATION TEST VER - 1 (DIESEL). (Refer to 8 - ELECTRICAL/ELEC-
TRONIC CONTROL MODULES/ENGINE CONTROL MODULE - DIAGNOSIS AND TESTING)
Page 736 of 5267
P0606-ECM HARDWARE ERROR
For a complete wiring diagramRefer to Section 8W.
When Monitored:
With the key on or engine running.
Set Condition:
ECM had detected internal failures.
Possible Causes
ECM
Always perform the Pre-Diagnostic Troubleshooting procedure before proceeding. (Refer to 9 - ENGINE -
DIAGNOSIS AND TESTING)
Diagnostic Test
1.ECM
Turn the ignition on.
NOTE: This DTC is caused by an internal Engine Control Module failure. Repairs are not possible to the
ECM.
With the scan tool, erase DTCs.
Is the DTC still set?
Ye s>>
Replace and program the ECM in accordance with the Service Information.
Perform POWERTRAIN VERIFICATION TEST VER - 1 (DIESEL). (Refer to 8 - ELECTRICAL/ELEC-
TRONIC CONTROL MODULES/ENGINE CONTROL MODULE - DIAGNOSIS AND TESTING)
No>>
Te s t C o m p l e t e .
Page 737 of 5267
P0607-ECM INTERNAL FAILURE
For a complete wiring diagramRefer to Section 8W.
When Monitored:
With the key on or engine running.
Set Condition:
ECM had detected internal failures.
Possible Causes
ECM
Always perform the Pre-Diagnostic Troubleshooting procedure before proceeding. (Refer to 9 - ENGINE -
DIAGNOSIS AND TESTING)
Diagnostic Test
1.ECM
Turn the ignition on.
NOTE: This DTC is caused by an internal Engine Control Module failure. Repairs are not possible to the
ECM.
Is the DTC P0606 set?
Ye s>>
Replace and program the ECM in accordance with the Service Information.
Perform POWERTRAIN VERIFICATION TEST VER - 1 (DIESEL). (Refer to 8 - ELECTRICAL/ELEC-
TRONIC CONTROL MODULES/ENGINE CONTROL MODULE - DIAGNOSIS AND TESTING)
No>>
Te s t C o m p l e t e .
Page 739 of 5267
When Monitored:
When the ignition is on.
Set Condition:
The feedback signal does not match the commanded signal for the voltage regulator.
Possible Causes
GENERATOR
OPEN DRIVER CIRCUIT
GEN SOURCE SHORTED TO BATTERY NEGATIVE
(K20) FIELD DRIVER CIRCUIT SHORTED TO VOLTAGE
GEN SOURCE OPEN
ECM
Always perform the Pre-Diagnostic Troubleshooting procedure before proceeding. (Refer to 9 - ENGINE -
DIAGNOSIS AND TESTING)
Diagnostic Test
1.GENERATOR
Turn the ignition off.
Disconnect the Generator field harness connector.
Check connectors - Clean/repair as necessary.
Measure the resistance between the generator field terminals.
Is the resistance between .5 and 15 Ohms?
Ye s>>
Go To 2
No>>
Replace the Generator.
Perform POWERTRAIN VERIFICATION TEST VER - 1 (DIESEL). (Refer to 8 - ELECTRICAL/ELEC-
TRONIC CONTROL MODULES/ENGINE CONTROL MODULE - DIAGNOSIS AND TESTING)
Page 743 of 5267

When Monitored:
Whilethekeyison.
Set Condition:
The commanded signal to the fuel lift pump circuit in the TIPM does not matchthe feedback signal from the
fuel lift pump circuit.
Possible Causes
WIRING HARNESS
TIPM
FUEL LIFT PUMP CONTROL CIRCUIT SHORTED TO EXTERNAL VOLTAGE
FUEL LIFT PUMP CONTROL CIRCUIT OPEN
FUEL LIFT PUMP GROUND CIRCUIT OPEN
FUEL LIFT PUMP GROUND CIRCUIT SHORTED TO EXTERNAL VOLTAGE
ECM
Always perform the Pre-Diagnostic Troubleshooting procedure before proceeding. (Refer to 9 - ENGINE -
DIAGNOSIS AND TESTING)
Diagnostic Test
1.POWER AT TPIM
Using a voltmeter, measure the voltage on the Battery Supply wire to the TIPM.
Turn the ignition on, engine off.
Does the voltmeter show battery voltage?
No>>
Fix or replace the open circuit in the Battery Supply Circuit.
Perform POWERTRAIN VERIFICATION TEST VER - 1 (DIESEL). (Refer to 8 - ELECTRICAL/ELEC-
TRONIC CONTROL MODULES/ENGINE CONTROL MODULE - DIAGNOSIS AND TESTING)
Ye s>>
Go To 2
2.DAMANGED WIRING HARNESS
Turn Ignition off.
Disconnect the ECM and TIPM connectors. Inspect the connectors for signs of damage or corrosion.
NOTE: Check connectors - Clean/repair as necessary.
Are any pins damaged?
Ye s>>
Fix or replace the harness
Perform POWERTRAIN VERIFICATION TEST VER - 1 (DIESEL). (Refer to 8 - ELECTRICAL/ELEC-
TRONIC CONTROL MODULES/ENGINE CONTROL MODULE - DIAGNOSIS AND TESTING)
No>>
Go To 5
3.FUEL LIFT PUMP CONTROL CIRCUIT OPEN
Using an ohmmeter, measure the resistance of the lift pump control circuitbetween the ECM connector and the
TIPM connector.
Is the resistance less than 10 Ohms?
Ye s>>
Go To 4
No>>
Repair the open ground circuit.
Perform POWERTRAIN VERIFICATION TEST VER - 1 (DIESEL). (Refer to 8 - ELECTRICAL/ELEC-
TRONIC CONTROL MODULES/ENGINE CONTROL MODULE - DIAGNOSIS AND TESTING)