2006 DODGE RAM SRT-10 air condition
[x] Cancel search: air conditionPage 566 of 5267

P0234-TURBOCHARGER OVERBOOST CONDITION
For a complete wiring diagramRefer to Section 8W.
When Monitored:
While running.
Set Condition:
The intake air pressure is above a calibrated value for a calibrated amountof time.
Possible Causes
OTHER DTC’S
WASTEGATE STUCK
TURBOCHARGER AND/OR WASTEGATE DAMAGE
WASTEGATE
TURBOCHARGER
WASTEGATE CONTROL VALVE
Always perform the Pre-Diagnostic Troubleshooting procedure before proceeding. (Refer to 9 - ENGINE -
DIAGNOSIS AND TESTING)
Diagnostic Test
1.OTHER DTC’S
With the scan tool, read DTCs.
Do you have additional DTC’s?
Ye s>>
Repair all other DTC’s first.
Perform POWERTRAIN VERIFICATION TEST VER - 1 (DIESEL). (Refer to 8 - ELECTRICAL/ELEC-
TRONIC CONTROL MODULES/ENGINE CONTROL MODULE - DIAGNOSIS AND TESTING)
No>>
Go To 2
2.TURBOCHARGER AND/OR WASTEGATE DAMAGE
Visually inspect the turbocharger assembly for signs of damage. Pay particular attention to the Wastegate area and
linkage.
Was any damage noticed?
Ye s>>
Repair or replace the Turbocharger or Wastegate.
Perform POWERTRAIN VERIFICATION TEST VER - 1 (DIESEL). (Refer to 8 - ELECTRICAL/ELEC-
TRONIC CONTROL MODULES/ENGINE CONTROL MODULE - DIAGNOSIS AND TESTING)
No>>
Go To 3
3.WASTEGATE
Pressure the Intake air system per test *INTAKE AIR SYSTEM PRESSURE TEST.
Pay particular attention to the Wastegate signal line and the Wastegate actuator canister area for leaks.
Were any leaks detected?
Ye s>>
Repair as necessary.
Perform POWERTRAIN VERIFICATION TEST VER - 1 (DIESEL). (Refer to 8 - ELECTRICAL/ELEC-
TRONIC CONTROL MODULES/ENGINE CONTROL MODULE - DIAGNOSIS AND TESTING)
No>>
Go To 4
Page 569 of 5267

When Monitored:
Ignition on.
Set Condition:
The intake air pressure is above a calibrated value past a calibrated amountoftime.
Possible Causes
OTHER CODES
MAP SENSOR
INTERMITTENT CONDITION
Always perform the Pre-Diagnostic Troubleshooting procedure before proceeding. (Refer to 9 - ENGINE -
DIAGNOSIS AND TESTING)
Diagnostic Test
1.OTHER DTC’S
Turn the ignition on.
With the scan tool, read the Engine DTC’s.
Are there any other MAP Sensor related DTC’s.
Ye s>>
Repair other MAP Sensor DTC’s.
Perform POWERTRAIN VERIFICATION TEST VER - 1 (DIESEL). (Refer to 8 - ELECTRICAL/ELEC-
TRONIC CONTROL MODULES/ENGINE CONTROL MODULE - DIAGNOSIS AND TESTING)
No>>
Go To 2
2.MAP SENSOR
Start the engine.
With the scan tool, read the MAP Sensor voltage.
Is the pressure reading of the MAP sensor less than 17.6 psia?
Ye s>>
Go To 3
No>>
Replace the MAP Sensor.
Perform POWERTRAIN VERIFICATION TEST VER - 1 (DIESEL). (Refer to 8 - ELECTRICAL/ELEC-
TRONIC CONTROL MODULES/ENGINE CONTROL MODULE - DIAGNOSIS AND TESTING)
3.MAP SENSOR
Operate the engine under normal driving conditions (no load) for at least 30 seconds.
Monitor the MAP sensor reading with the scan tool.
Did the pressure reading from the MAP sensor go above 29.6 psia for more than2.5 seconds?
Ye s>>
Replace the Map sensor.
Perform POWERTRAIN VERIFICATION TEST VER - 1 (DIESEL). (Refer to 8 - ELECTRICAL/ELEC-
TRONIC CONTROL MODULES/ENGINE CONTROL MODULE - DIAGNOSIS AND TESTING)
No>>
Refer to the INTERMITTENT CONDITION Symptom (Diagnostic Procedure). (Refer to 9 - ENGINE -
DIAGNOSIS AND TESTING)
Page 571 of 5267

When Monitored:
With the ignition on and battery voltage greater than 10.4 volts.
Set Condition:
The circuit voltage to the ECM falls below a calibrated threshold for a certain period of time.
Possible Causes
OTHER DTC’S
(K37) SIGNAL CIRCUIT SHORTED TO (K916) SENSOR RETURN CIRCUIT
(F855) 5-VOLT SUPPLY CIRCUIT SHORTED TO (K916) SENSOR RETURN CIRCUIT
MAP SENSOR
(K37) SIGNAL CIRCUIT OPEN
(F855) 5-VOLT SUPPLY CIRCUIT OPEN
MAP SENSOR (K37) SIGNAL CIRCUIT SHORT TO GROUND
ECM
Always perform the Pre-Diagnostic Troubleshooting procedure before proceeding. (Refer to 9 - ENGINE -
DIAGNOSIS AND TESTING)
Diagnostic Test
1.OTHER DTC’S
Turn the ignition on.
With the scan tool, read the Engine DTC’s.
Is there a 5-volt Supply DTC set?
Ye s>>
Refer to symptom list for problems related to the 5-volt Supply DTC.
Perform POWERTRAIN VERIFICATION TEST VER - 1 (DIESEL). (Refer to 8 - ELECTRICAL/ELEC-
TRONIC CONTROL MODULES/ENGINE CONTROL MODULE - DIAGNOSIS AND TESTING)
No>>
Go To 2
2.HIGH VOLTAGE
Turn the ignition off.
Disconnect the Map sensor harness connector.
Check connectors - Clean/repair as necessary.
Turn the ignition on.
Measure the voltage between the (F855) 5-volt supply circuit and sen-
sor (K916) return circuit of the Map sensor harness connector.
Is the voltage between 4.5 and 5.5 volts?
Ye s>>
Go To 3
No>>
Go To 4
Page 576 of 5267

When Monitored:
With the ignition on and battery voltage greater than 10.4 volts.
Set Condition:
The circuit voltage to the ECM is above a calibrated threshold for a certainperiod of time.
Possible Causes
OTHER DTC’S
(K37) SIGNAL CIRCUIT SHORTED TO BATTERY
(F855) 5-VOLT SUPPLY CIRCUIT SHORTED TO BATTERY
MAP SENSOR
(K37) SIGNAL CIRCUIT SHORT TO SUPPLY
(F855) 5-VOLT SUPPLY CIRCUIT SHORT TO BATTERY
INTERMITTENT
ECM
Always perform the Pre-Diagnostic Troubleshooting procedure before proceeding. (Refer to 9 - ENGINE -
DIAGNOSIS AND TESTING)
Diagnostic Test
1.OTHER DTC’S
Turn the ignition on.
With the scan tool, read the Engine DTC’s.
Is there a 5-volt Supply DTC set?
Ye s>>
Refer to symptom list for problems related to the 5-volt Supply DTC.
Perform POWERTRAIN VERIFICATION TEST VER - 1 (DIESEL). (Refer to 8 - ELECTRICAL/ELEC-
TRONIC CONTROL MODULES/ENGINE CONTROL MODULE - DIAGNOSIS AND TESTING)
No>>
Go To 2
2.HIGH VOLTAGE
Turn the ignition off.
Disconnect the Map sensor harness connector.
Check connectors - Clean/repair as necessary.
Turn the ignition on.
Measure the voltage between the (F855) 5-volt supply circuit and
(K916) sensor return circuit of the Map sensor harness connector.
Is the voltage between 4.5 and 5.5 volts?
Ye s>>
Go To 3
No>>
Go To 4
Page 581 of 5267

When Monitored:
When the ignition is on.
Set Condition:
The ECM detects an open or short circuit in the Wastegate solenoid circuit.
Possible Causes
DAMAGED WIRING HARNESS OR CONNECTORS
WASTEGATE SOLENOID
(F504) FUSED IGNITION SWITCH OUTPUT OPEN
(K139) WASTEGATE SOLENOID DRIVER CIRCUIT OPEN
(K139) WASTEGATE SOLENOID CIRCUIT SHORTED TO GROUND
(K139) WASTEGATE SOLENOID DRIVER SHORTED TO VOLTAGE
(K139) WASTEGATE SOLENOID DRIVER CIRCUIT SHORTED TO ANOTHER CIRCUIT
ECM
INTERMITTENT CONDITION
Always perform the Pre-Diagnostic Troubleshooting procedure before proceeding. (Refer to 9 - ENGINE -
DIAGNOSIS AND TESTING)
Diagnostic Test
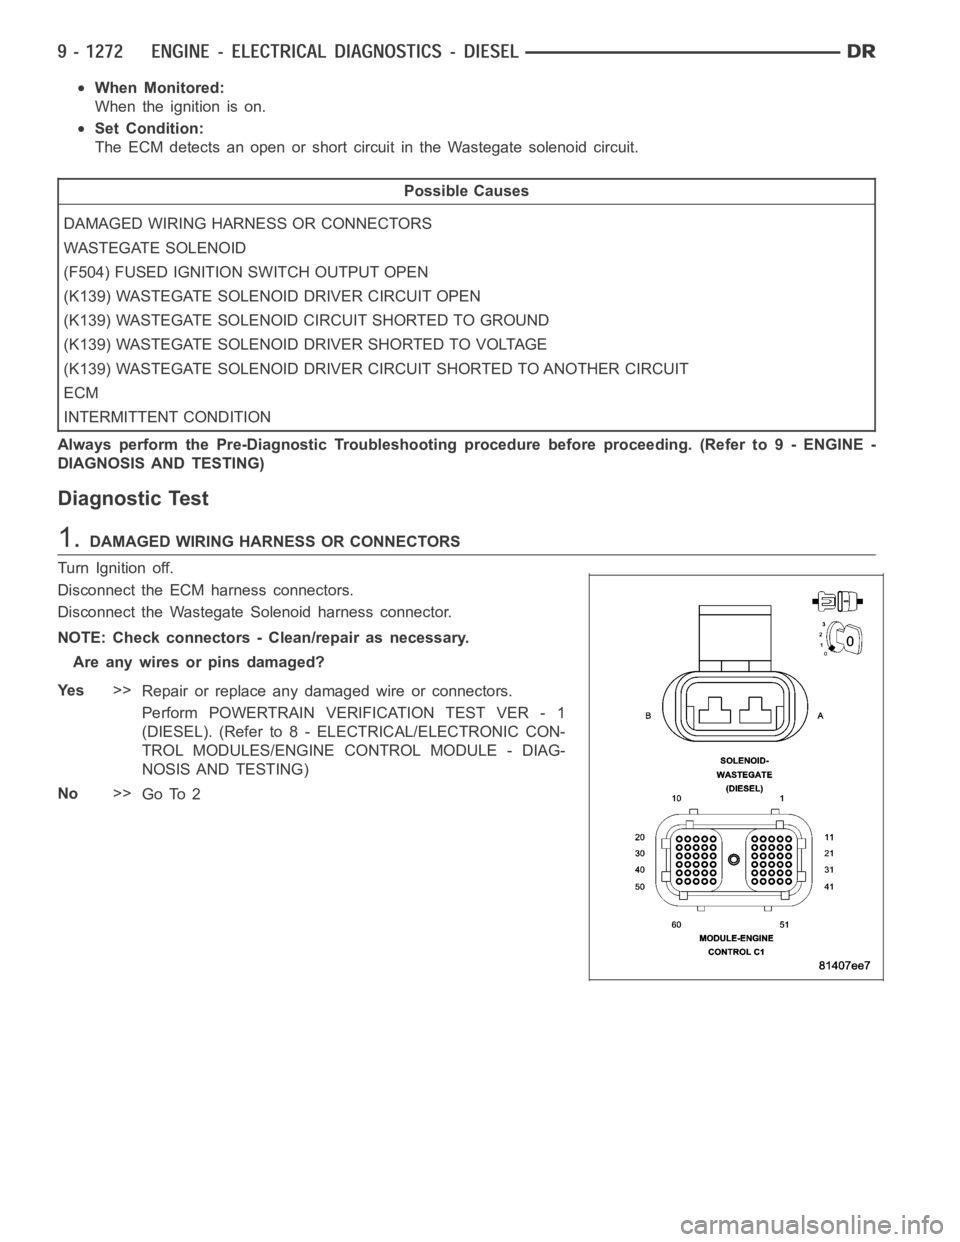
1.DAMAGED WIRING HARNESS OR CONNECTORS
Turn Ignition off.
Disconnect the ECM harness connectors.
Disconnect the Wastegate Solenoid harness connector.
NOTE: Check connectors - Clean/repair as necessary.
Areanywiresorpinsdamaged?
Ye s>>
Repair or replace any damaged wire or connectors.
Perform POWERTRAIN VERIFICATION TEST VER - 1
(DIESEL). (Refer to 8 - ELECTRICAL/ELECTRONIC CON-
TROL MODULES/ENGINE CONTROL MODULE - DIAG-
NOSIS AND TESTING)
No>>
Go To 2
Page 587 of 5267

When Monitored:
When the ignition is on.
Set Condition:
The ECM detects a discrepancy between the PWM supplied to the Electronic Fuel Control Actuator and the
PWM returned from the Electronic Fuel Control Actuator.
Possible Causes
FUEL PUMP
(K181) FUEL CONTROL ACTUATOR DRIVER OPEN
(K31) RETURN CIRCUIT OPEN FROM FCA TO ECM
(K181) FUEL CONTROL ACTUATOR DRIVER CIRCUIT SHORTED TO EXTERNAL VOLTAGE
(K31) FUEL CONTROL ACTUATOR RETURN CIRCUIT SHORTED TO EXTERNAL VOLTAGE
(K31) FCA RETURN CIRCUIT SHORTED TO (K181) FCA DRIVER CIRCUIT
(K181) FUEL CONTROL ACTUATOR DRIVER CIRCUIT SHORTED TO GROUND
(K181) FUEL CONTROL ACTUATOR DRIVER CIRCUIT SHORTED TO ANOTHER CIRCUIT
(K31) FUEL CONTROL ACTUATOR RETURN CIRCUIT SHORTED TO ANOTHER CIRCUIT
INTERMITTENT CONDITION
ECM
Always perform the Pre-Diagnostic Troubleshooting procedure before proceeding. (Refer to 9 - ENGINE -
DIAGNOSIS AND TESTING)
Diagnostic Test
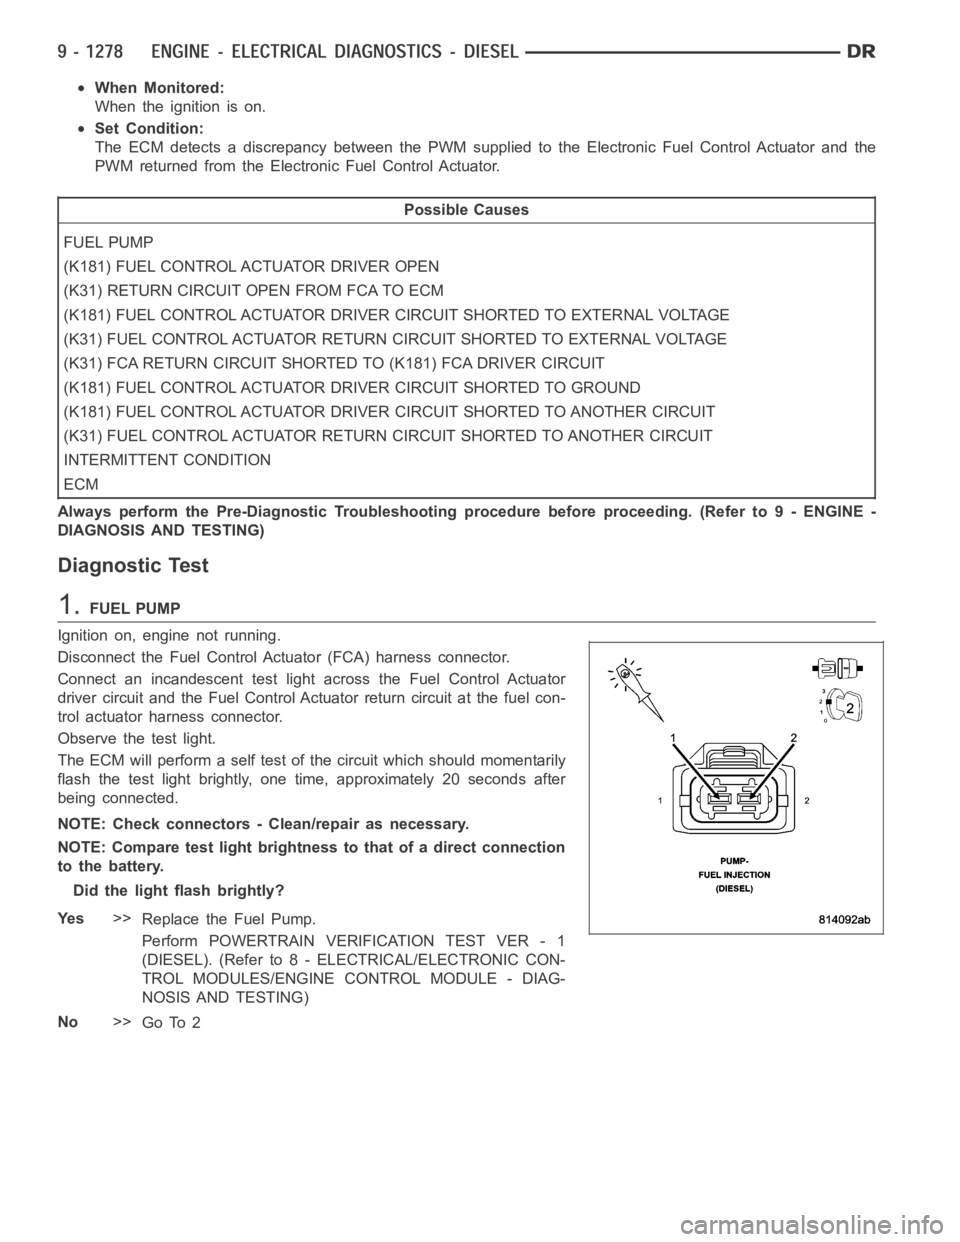
1.FUEL PUMP
Ignition on, engine not running.
Disconnect the Fuel Control Actuator (FCA) harness connector.
Connect an incandescent test light across the Fuel Control Actuator
driver circuit and the Fuel Control Actuator return circuit at the fuel con-
trol actuator harness connector.
Observe the test light.
The ECM will perform a self test of the circuit which should momentarily
flash the test light brightly, one time, approximately 20 seconds after
being connected.
NOTE: Check connectors - Clean/repair as necessary.
NOTE: Compare test light brightness to that of a direct connection
to the battery.
Did the light flash brightly?
Ye s>>
Replace the Fuel Pump.
Perform POWERTRAIN VERIFICATION TEST VER - 1
(DIESEL). (Refer to 8 - ELECTRICAL/ELECTRONIC CON-
TROL MODULES/ENGINE CONTROL MODULE - DIAG-
NOSIS AND TESTING)
No>>
Go To 2
Page 593 of 5267

When Monitored:
Whileengineisrunning.
Set Condition:
The boost pressure is lower than the expected boost pressure based on engine operating conditions.
Possible Causes
OTHER DTC’S
INTAKE AIR SYSTEM RESTRICTION
TURBO CHARGER DAMAGED
INTAKE AIR SYSTEM LEAK
BOOST PRESSURE SENSOR
BOOST PRESSURE SENSOR
TURBOCHARGER
INTERMITTENT CONDITION
Always perform the Pre-Diagnostic Troubleshooting procedure before proceeding. (Refer to 9 - ENGINE -
DIAGNOSIS AND TESTING)
Diagnostic Test
1.OTHER DTC’S
Turn the ignition on.
With the scan tool, read the Engine DTC’s.
Do you have other DTC’s?
Ye s>>
Repair other boost related DTC’s first.
Perform POWERTRAIN VERIFICATION TEST VER - 1 (DIESEL). (Refer to 8 - ELECTRICAL/ELEC-
TRONIC CONTROL MODULES/ENGINE CONTROL MODULE - DIAGNOSIS AND TESTING)
No>>
Go To 2
2.INTAKE AIR SYSTEM RESTRICTION
Inspect the air filter and intake air system for signs of restriction.
Were any restrictions found?
Ye s>>
Replace the Air Filter or repair the Intake air system for restriction.
Perform POWERTRAIN VERIFICATION TEST VER - 1 (DIESEL). (Refer to 8 - ELECTRICAL/ELEC-
TRONIC CONTROL MODULES/ENGINE CONTROL MODULE - DIAGNOSIS AND TESTING)
No>>
Go To 3
3.TURBO CHARGER DAMAGED
Disconnect the air cleaner connection to the turbo charger.
Using the service manual as a guide, visually inspect the turbo charger blades and turbo housing for signs of dam-
age.
Was any damaged found?
Ye s>>
Replace The Turbo charger.
Perform POWERTRAIN VERIFICATION TEST VER - 1 (DIESEL). (Refer to 8 - ELECTRICAL/ELEC-
TRONIC CONTROL MODULES/ENGINE CONTROL MODULE - DIAGNOSIS AND TESTING)
No>>
Go To 4
Page 595 of 5267

P0300-MULTIPLE CYLINDER MISFIRE
For a complete wiring diagramRefer to Section 8W.
When Monitored:
While the engine is idling.
Set Condition:
Misfire detected on multiple cylinders.
Possible Causes
LOW FUEL
OTHER DTC’S
DAMAGED FUEL LINES
VA LV E T R A I N
OBSTRUCTED FUEL INJECTOR SUPPLY LINES
DAMAGED OR OBSTRUCTED HIGH PRESSURE CONNECTORS
EXTERNAL DAMAGED FUEL INJECTORS
INTERNAL DAMAGED FUEL INJECTOR
NO COMPRESSION
EXCESSIVE ENGINE LEAK DOWN
Always perform the Pre-Diagnostic Troubleshooting procedure before proceeding. (Refer to 9 - ENGINE -
DIAGNOSIS AND TESTING)
Diagnostic Test
1.LOW FUEL
Using the scan tool, verify that the fuel level is above 15%.
Is the fuel level above 15%?
Ye s>>
Go To 2
No>>
Addfuelgotostep2.
Perform POWERTRAIN VERIFICATION TEST VER - 1 (DIESEL). (Refer to 8 - ELECTRICAL/ELEC-
TRONIC CONTROL MODULES/ENGINE CONTROL MODULE - DIAGNOSIS AND TESTING)
2.OTHER DTC’S
Read the Freeze frame data.
Is the DTC equal to the freeze frame DTC?
Ye s>>
Go To 3
No>>
Repair any other DTC’s first.
Perform POWERTRAIN VERIFICATION TEST VER - 1 (DIESEL). (Refer to 8 - ELECTRICAL/ELEC-
TRONIC CONTROL MODULES/ENGINE CONTROL MODULE - DIAGNOSIS AND TESTING)