Page 1753 of 2893

8. Before installing the C-pillar trim (A), whether it is
being replaced or reinstalled, temporarily remove")
����
��������
20-77
A
B
B
C
D
B
C
D A
A
B E D
A
C
D
E
E A
Fastener Locations
:Clip,3
E
(Red)
8. Before installing the C-pillar trim (A), whether it is
being replaced or reinstalled, temporarily remove
the new front clip (B).
9. Check the overlap between the headliner and C-pillar trim, and if necessary, adjust it (see page
24-187).
10. Carefully reinstall a new front clip (A) to the C-pillar trim (B). Be sure that the grommet (C) is nearest to
the top of the pin (D) as shown. 11. Reinstall the C-pillar trim (A).
–1 Insert the bottom of the trim into the rear shelf(B).
–2 Place the trim over the C-pillar (C), and fit its front clip (D) and rear clips (E) into holes in the
C-pillar, then lightly push the trim into place.
NOTE: Make sure the side curtain airbag is not tucked down under the clips and ribs.
Push lightly on the front clip. If you push too hard, the clip will be damaged, and it will not
hold the trim properly.
12. Reinstall the rear door opening seal.
13. Reinstall the rear seat side bolster (see page 20-134) and rear seat cushion (see page 20-133).
08/08/21 15:01:35 61SNR030_200_0079
ProCarManuals.com
DYNOMITE -2009-
Page 1754 of 2893
�
��
S
pecial Tools Required
20-78 Interior Trim
Trim Removal/Installation - Rear Shelf Area
A F
astener Locations
: Clip
A
(White)
’06 mo")
��������
�(�#�'��������������������������������� �����)�
��
S
pecial Tools Required
20-78 Interior Trim
Trim Removal/Installation - Rear Shelf Area
A F
astener Locations
: Clip
A
(White)
’06 model, 6
’07-09 models, 7
’06 model
’07-09 models A
A
A
A AAA
A
A
A
AA
A
KTC trim tool set SOJATP2014
SRS components are located in this area. Review the
S
RS component locations (see page 24-11) and the
precautions and procedures (see page 24-13) before
doing repairs or service.
NOTE: Put on gloves to protect your hands.
Take care not to bend or scratch the rear shelf or the trim.
Use the appropriate tool from the KTC trim tool set to avoid damage when removing components.
1. Remove these items: Rear seat cushion (see page 20-133)
Rear seat-back (see page 20-131)
Rear door opening seal, as needed (see step 3 onpage 20-68)
C-pillar trim, both sides (see step 3 on page 20-75)
2. From the trunk compartment, disconnect the high mount brake light connector (A). 3.
From the trunk compartment, release the six or
seven white clips (A) by tapping on them.
08/08/21 15:01:36 61SNR030_200_0080
ProCarManuals.com
DYNOMITE -2009-
Page 1755 of 2893

A
B
C D
FG
E
B
D G
A
D
E G
4. Release the hook (A) by pushing in on the detents
(B) on the rear shelf (C), then lift up on the front
edge")
��������
20-79
AB
C
A
B
C Fastener Locations
: Clip, 4(White)
A
B
C D
FG
E
B
D G
A
D
E G
4. Release the hook (A) by pushing in on the detents
(B) on the rear shelf (C), then lift up on the front
edge of the shelf at each detent. 5. Lift the rear shelf (A) upward to detach the
remaining four clips, and release the hooks (B) of
the high mount brake light from the rear shelf.
Release the pin (C) from the holes on the body.
6. Release each anchor rod (D) out through the hole in the rear shelf, and pull both rear seat belts (E) and
rear center seat belt (F) out through the slits (G) in
the rear shelf.
7. Install the shelf in the reverse order of removal, and note these items:
If the clips are damaged or stress-whitened, replace them with new ones.
When installing the rear shelf, slip the rear seat belt through the slit and the rear center seat belt
into the lid opening in the rear shelf.
Push the clips and the hooks into place securely.
Make sure the high mount brake light connector is connected securely.
08/08/21 15:01:36 61SNR030_200_0081
ProCarManuals.com
DYNOMITE -2009-
Page 1756 of 2893
��������
����
�(�#�'��������������������������������� �����)�
��
S
pecial Tools Required
20-80 Interior Trim
Trim Removal/Installation - Trunk Area
Fastener Locations
: Clip, 2(White)
A A
F
astener Locations: Clip, 4(White)
A
B
A
KTC trim tool set SOJATP2014
NOTE:
Put on gloves to protect your hands.
Take care not to bend or scratch the trim and panels.
Use the appropriate tool from the KTC trim tool set to avoid damage when removing components.
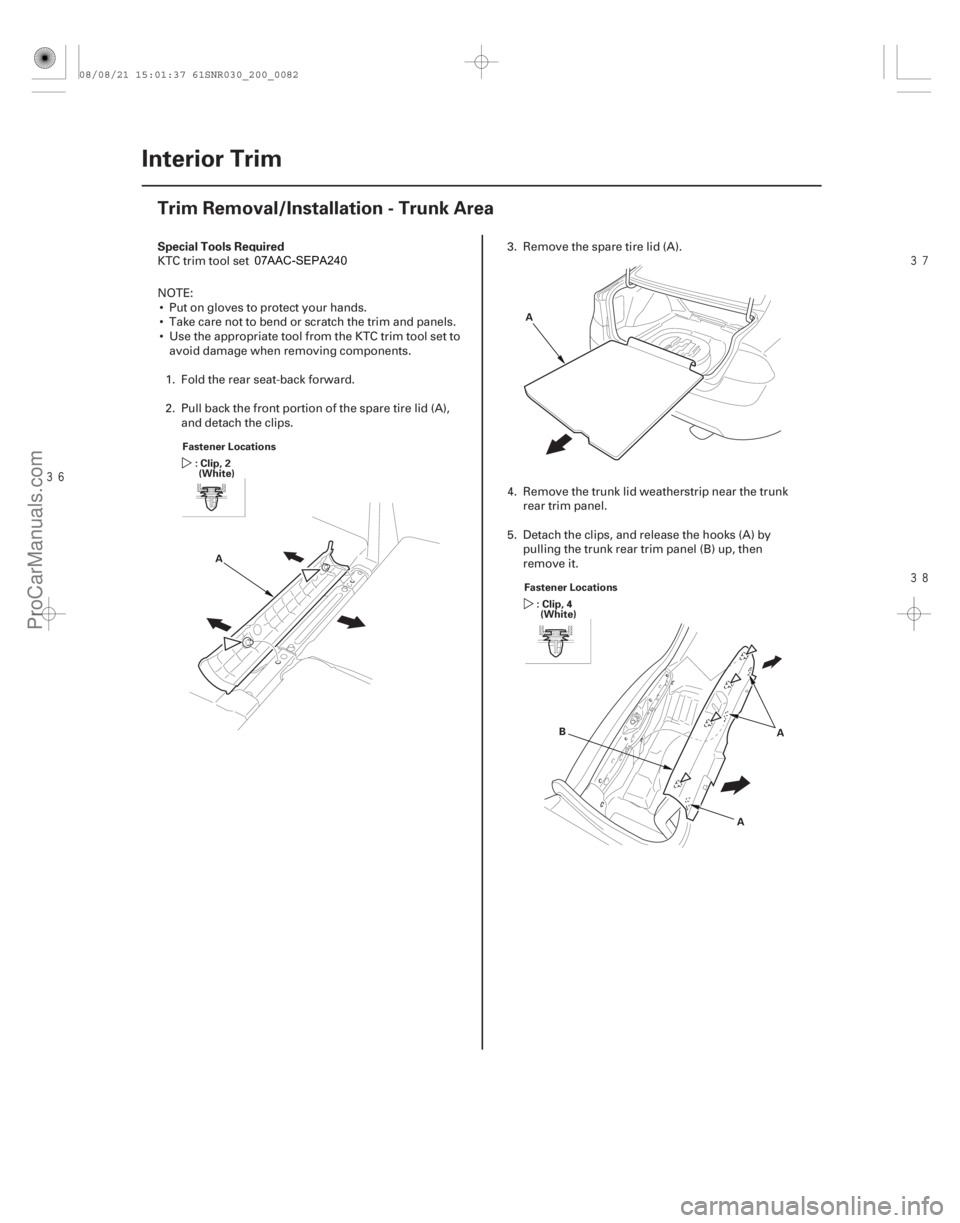
1. Fold the rear seat-back forward.
2. Pull back the front portion of the spare tire lid (A), and detach the clips. 3
. Remove the spare tire lid (A).
4. Remove the trunk lid weatherstrip near the trunk rear trim panel.
5. Detach the clips, and release the hooks (A) by pulling the trunk rear trim panel (B) up, then
remove it.
08/08/21 15:01:37 61SNR030_200_0082
ProCarManuals.com
DYNOMITE -2009-
Page 1764 of 2893
����
H
eadliner
Grab handle
Sunvisor Special Tools Required
20-8820-88
Interior Trim
Headliner Removal/Installation
(cont’d)
Carpet Repl")
�
�
�
��
�
��
�(�#�'�����������������������
���
���
� �����)����
H
eadliner
Grab handle
Sunvisor Special Tools Required
20-8820-88
Interior Trim
Headliner Removal/Installation
(cont’d)
Carpet Replacement
A
C
H
I
C
J K
B
B
F
D
E G
KTC trim tool set SOJATP2014
SRS components are located in this area. Review the
S
RS component locations (see page 24-11) and the
precautions and procedures (see page 24-13) before
doing repairs or service.
NOTE: Put on gloves to protect your hands.
Use the appropriate tool from the KTC trim tool set to avoid damage when removing components.
Take care not to damage, wrinkle, or twist the carpet.
Be careful not to damage the dashboard or other interior trim pieces.
1. Remove these items: Front seats, both sides (see page 20-118)
Rear seat cushion (see page 20-133)
Front door sill trim, both sides (see page 20-66)
Rear door sill trim, both sides (see page 20-67)
Kick panels, both sides (see step 5 on page 20-67)
B-pillar lower trim (see page 20-72)
Driver’s dashboard undercover (see page 20- 103)
Passenger’s dashboard undercover (see page 20-104)
Center console (see page 20-92)
Steering joint cover (see page 17-10)
08/08/21 15:01:42 61SNR030_200_0090
ProCarManuals.com
DYNOMITE -2009-
Page 1765 of 2893
����
H
eadliner
Grab handle
Sunvisor Special Tools Required
20-8820-88
Interior Trim
Headliner Removal/Installation
(cont’d)
Carpet Repl")
�
�
�
��
�
��
�(�#�'�����������������������
���
���
� �����)����
H
eadliner
Grab handle
Sunvisor Special Tools Required
20-8820-88
Interior Trim
Headliner Removal/Installation
(cont’d)
Carpet Replacement
A
C
H
I
C
J K
B
B
F
D
E G
KTC trim tool set SOJATP2014
SRS components are located in this area. Review the
S
RS component locations (see page 24-11) and the
precautions and procedures (see page 24-13) before
doing repairs or service.
NOTE: Put on gloves to protect your hands.
Use the appropriate tool from the KTC trim tool set to avoid damage when removing components.
Take care not to damage, wrinkle, or twist the carpet.
Be careful not to damage the dashboard or other interior trim pieces.
1. Remove these items: Front seats, both sides (see page 20-118)
Rear seat cushion (see page 20-133)
Front door sill trim, both sides (see page 20-66)
Rear door sill trim, both sides (see page 20-67)
Kick panels, both sides (see step 5 on page 20-67)
B-pillar lower trim (see page 20-72)
Driver’s dashboard undercover (see page 20- 103)
Passenger’s dashboard undercover (see page 20-104)
Center console (see page 20-92)
Steering joint cover (see page 17-10)
08/08/21 15:01:42 61SNR030_200_0090
ProCarManuals.com
DYNOMITE -2009-
Page 1769 of 2893
����
Special Tools Required
20-92 Consoles
Center Console Removal/Installation
A
B C F
astener Locations
:Clip,4
A
Fastener Locations :Clip")
���
����
����
�(�#�'�����������������
�����
�������
� �����)����
Special Tools Required
20-92 Consoles
Center Console Removal/Installation
A
B C F
astener Locations
:Clip,4
A
Fastener Locations :Clip,3
B : Clip, 2
C
C B
B
B
C A
KTC trim tool set SOJATP2014
SRS components are located in this area. Review the
S
RS component locations (see page 24-11) and the
precautions and procedures (see page 24-13) before
doing repairs or service.
NOTE: Use the appropriate tool from the KTC trim tool set to avoid damage when removing components.
Take care not to scratch the front seat, dashboard, and related parts.
1. Remove the passenger’s dashboard undercover (see page 20-104).
2. M/T model: Lower the shift lever boot (A) to release
the hooks (B) from the boot, then remove the shift
knob (C). 3.
Detach the clips by pulling the front inner panel (A)
up.
4. Gently pull out along the rear of the center console panel (A) to release the clips (B, C).
08/08/21 15:02:47 61SNR030_200_0094
ProCarManuals.com
DYNOMITE -2009-
Page 1771 of 2893
����
��������
20-94Consoles
Center Console Removal/Installation (cont’d)
A
B
C
B
A
B A
BC
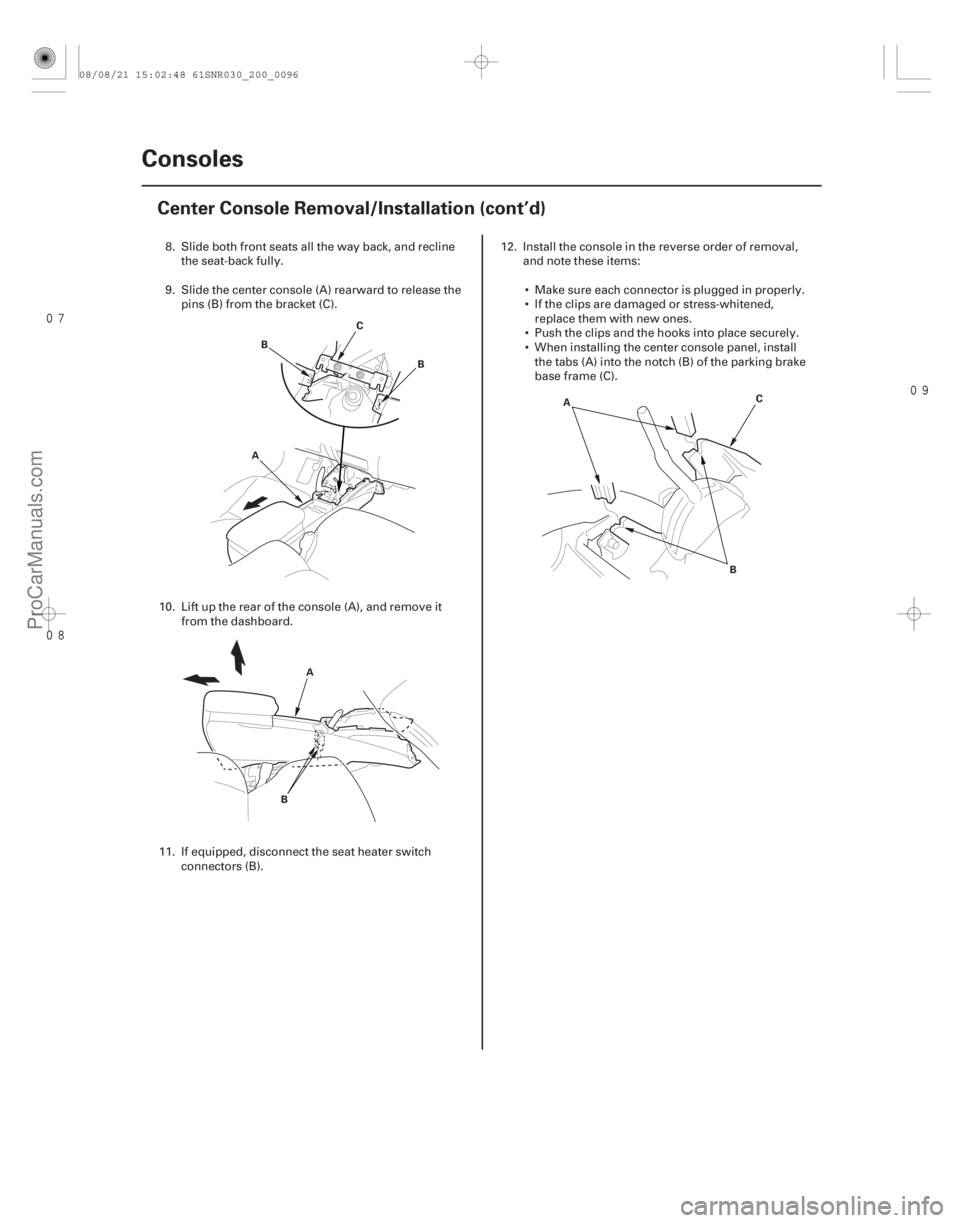
8. Slide both front seats all the way back, and recline
the seat-back fully.
9. Slide the center console (A) rearward to release the pins (B) from the bracket (C).
10. Lift up the rear of the console (A), and remove it from the dashboard.
11. If equipped, disconnect the seat heater switch connectors (B). 12. Install the console in the reverse order of removal,
and note these items:
Make sure each connector is plugged in properly.
If the clips are damaged or stress-whitened, replace them with new ones.
Push the clips and the hooks into place securely.
When installing the center console panel, install the tabs (A) into the notch (B) of the parking brake
base frame (C).
08/08/21 15:02:48 61SNR030_200_0096
ProCarManuals.com
DYNOMITE -2009-