Page 1713 of 2893
���� Cutting positions
20-38
Glass
Windshield Replacement
A
B A
B A
B
C
A B
A
A
A
C
A
NOTE:
Put on gloves to protect your hands.
Wear ey")
���
����
����
�(�#�'�������������������������������
� �����)���� Cutting positions
20-38
Glass
Windshield Replacement
A
B A
B A
B
C
A B
A
A
A
C
A
NOTE:
Put on gloves to protect your hands.
Wear eye protection while cutting the glass adhesive with a piano wire.
Use seat covers to avoid damaging the seat.
When replacing a broken windshield, a commercially available windshield cutter can be efficiently used for
cutting the adhesive. For details, follow the tool
manufacturer’s instructions.
1. Remove these items: Windshield wiper arms (see page 22-233)
Cowl covers (see page 20-163)
Rearview mirror (see page 20-35)
A-pillar trim, both sides (see page 20-69)
Roof moldings (see page 20-165)
2. Remove the molding (A) from the upper edge of the windshield (B). If necessary, cut the molding with a
utility knife.
3. If the old windshield will be reinstalled, make alignment marks across the glass and the body
with a grease pencil.
4. Pull down the front portion of the headliner (see page 20-84). Take care not to bend the
headliner excessively, or you may crease or break
it.
5. Apply protective tape along the edge of the dashboard and the body. Make a hole with an awl
through the rubber dam and adhesive from inside
the vehicle at a corner of the windshield. Push a
piece of piano wire through the hole, and wrap
each end around a piece of wood. 6. With a helper on the outside, pull the piano wire (A)
back and forth in a sawing motion. Hold the piano
wire as close to the windshield (B) as possible to
prevent damage to the body and the dashboard.
Carefully cut through the rubber dam and adhesive
(C) around the entire windshield.
7. Carefully remove the windshield.
08/08/21 15:00:07 61SNR030_200_0040
ProCarManuals.com
DYNOMITE -2009-
Page 1722 of 2893
����
20-47
Rear Window Replacement
A B B A
Fastener Locations
:Clip,2
NOTE: Put on gloves to protect your hands.
Wear eye protection while cut")
���
���
�(�#�'�������������������������������
� �����)����
20-47
Rear Window Replacement
A B B A
Fastener Locations
:Clip,2
NOTE: Put on gloves to protect your hands.
Wear eye protection while cutting the glass adhesive with a piano wire.
Use seat covers to avoid damaging any surfaces.
Do not damage the rear window defogger grid lines, window antenna grid lines, and terminals.
1. Remove these items:
Trunk lid
C-pillar trim (see page 20-75)
Rear shelf (see page 20-78)
2. Disconnect the window antenna connectors (A) and rear window defogger connectors (B).
3. If the old rear window will be reinstalled, make alignment marks across the glass and the body
with a grease pencil. 4. Pull down the rear portion of the headliner (A) by
detaching the clips. Take care not to bend the
headliner excessively, or you may crease or break
it.
5. Apply protective tape along the inside and outside edges of the body. Make a hole with an awl through
the adhesive from inside the vehicle at a corner of
the rear window. Push a piece of piano wire
through the hole, and wrap each end around a
piece of wood.
(cont’d)
08/08/21 15:00:12 61SNR030_200_0049
ProCarManuals.com
DYNOMITE -2009-
Page 1727 of 2893

21. Hold the rear window with suction cups over the
opening, align it with the alignment marks you
made in step 15, and set it down on the adhesive.
Light")
20-52Glass
Rear Window Replacement (cont’d)
21. Hold the rear window with suction cups over the
opening, align it with the alignment marks you
made in step 15, and set it down on the adhesive.
Lightly push on the rear window until its edges are
fully seated on the adhesive all the way around.
NOTE: Do not open or close any of the doors for
about an hour until the adhesive is dry.
22. Scrape or wipe the excess adhesive off with a putty knife or towel. To remove adhesive from a painted
surface or the rear window, use a soft shop towel
dampened with isopropyl alcohol.
23. After the adhesive has dried, spray water over the rear window and check for leaks. Mark the leaking
area, let the rear window dry, then seal with sealant.
Let the vehicle stand for at least 4 hours after rear
window installation. If the vehicle has to be used
within the first 4 hours, it must be driven slowly.
24. Reinstall all remaining removed parts. NOTE: Advise the customer not to do the following
things for 2 to 3 days: Slam the doors with all the windows rolled up.
Twist the body excessively (such as when going in and out of driveways at an angle or driving
over rough, uneven roads).
08/08/21 15:00:15 61SNR030_200_0054
ProCarManuals.com
DYNOMITE -2009-
Page 1736 of 2893
����
20-60 Moonroof
Frame and Drain Tube Replacement
A
A B
C
A
A C
C
C
A
B Fastener Locations
:Bolt,9
6x1.0mm
9.8 N·m
(1.0 kgf·m,")
���
��������
����
�(�#�'�������������������������������
� �����)����
20-60 Moonroof
Frame and Drain Tube Replacement
A
A B
C
A
A C
C
C
A
B Fastener Locations
:Bolt,9
6x1.0mm
9.8 N·m
(1.0 kgf·m, 7.2 lbf·ft) A
B
B
B
B B
C
A
SRS components are located in this area. Review the
SRS component locations (see page 24-11) and the
precautions and procedures (see page 24-13) before
doing repairs or service.
1. Remove these items: Headliner (see page 20-84)
Moonroof glass (see page 20-55)
2. Put on gloves to protect your hands. Disconnect the motor connector (A).
3. Disconnect the drain tubes (A).
4. Remove the roof wire harness (B) by detaching the harnessclips(C). 5. With an assistant holding the frame (A), remove the
bolts, starting at the rear, and release the rear
hooks (B) by moving the frame forward.
6. With the help of an assistant, carefully remove the frame through the front door opening. Take care
not to scratch the interior trim or the body, or tear
the seat covers.
7. To remove a front drain tube (A) from the body, remove the kick panel, left or right (see page 20-66),
and the driver’s dashboard undercover (see page
20-103) or the passenger’s dashboard undercover
(see page 20-104). Detach the clips (B) and remove
the drain valve (C) from the body hole, then remove
the front drain tube.
08/08/21 15:01:21 61SNR030_200_0062
ProCarManuals.com
DYNOMITE -2009-
Page 1744 of 2893
����
����
20-68Interior Trim
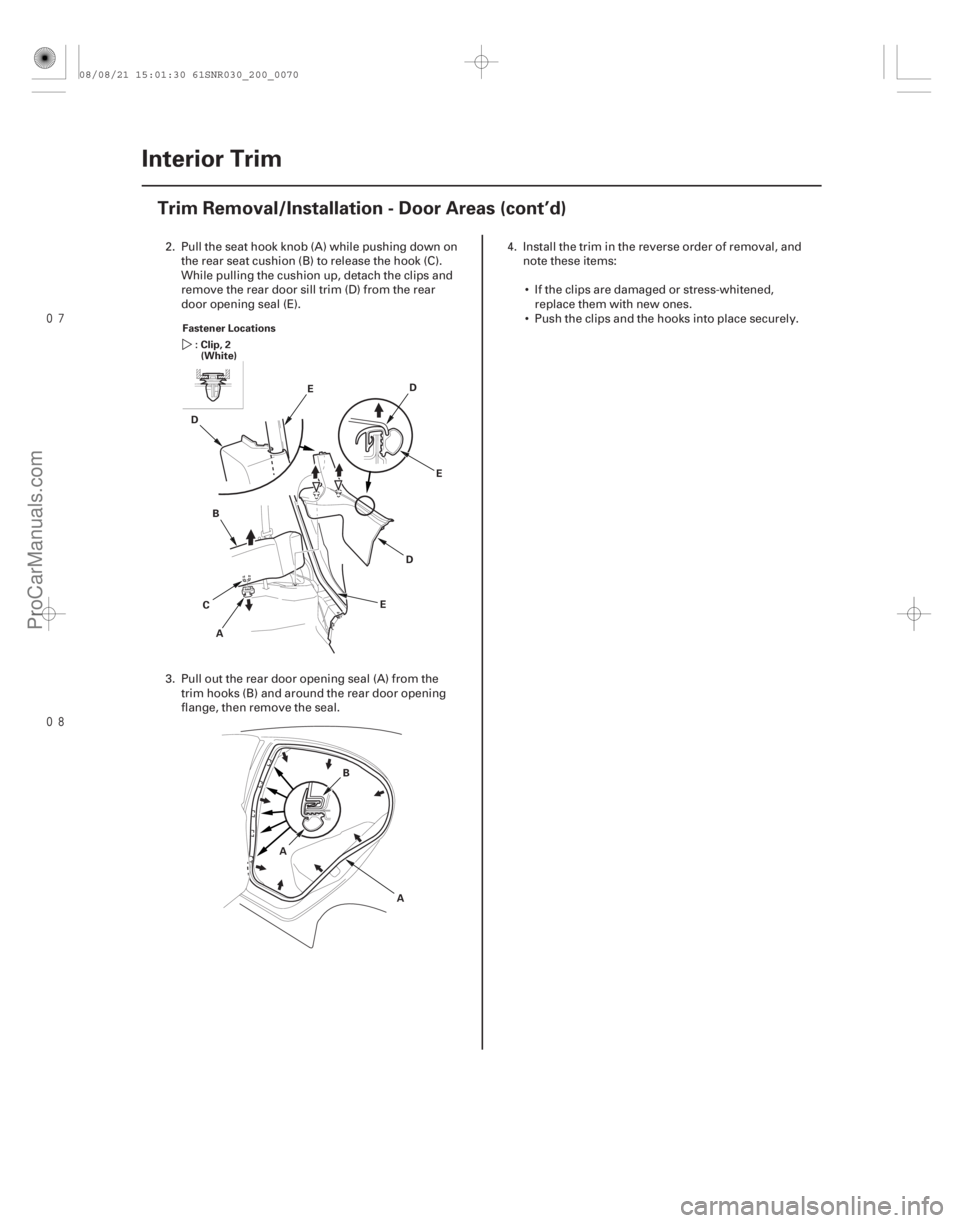
Trim Removal/Installation - Door Areas (cont’d)
C
Fastener Locations
: Clip, 2(White)
B D
E
D
D
E
A E
A
B
A
2. Pull the seat hook knob (A) while pushing down on the rear seat cushion (B) to release the hook (C).
While pulling the cushion up, detach the clips and
remove the rear door sill trim (D) from the rear
door opening seal (E).
3. Pull out the rear door opening seal (A) from the trim hooks (B) and around the rear door opening
flange, then remove the seal. 4. Install the trim in the reverse order of removal, and
note these items:
If the clips are damaged or stress-whitened, replace them with new ones.
Push the clips and the hooks into place securely.
08/08/21 15:01:30 61SNR030_200_0070
ProCarManuals.com
DYNOMITE -2009-
Page 1748 of 2893
�
��
S
pecial Tools RequiredB-Pillar Upper/Lower Trim
20-72 Interior Trim
Trim Removal/Installation - Pillar Areas (cont’d)
Fastener Locations
: C")
�
��
�(�#�'��������������������������������� �����)�
��
S
pecial Tools RequiredB-Pillar Upper/Lower Trim
20-72 Interior Trim
Trim Removal/Installation - Pillar Areas (cont’d)
Fastener Locations
: Clip, 2(White)
A B
A
KTC trim tool set SOJATP2014
SRS components are located in this area. Review the
S
RS component locations (see page 24-11) and the
precautions and procedures (see page 24-13) before
doing repairs or service.
NOTE: Put on gloves to protect your hands.
Take care not to bend or scratch the trim and panels.
Use the appropriate tool from the KTC trim tool set to avoid damage when removing components.
1. Remove these items: Front door sill trim (see page 20-66)
Rear door sill trim (see page 20-67)
Front door opening seal, as needed (see step 4on page 20-66)
Rear door opening seal, as needed (see step 3 on page 20-68)
2. Slide the front seat fully forward. 3.
Remove the B-pillar lower trim (A).
–1 Pull the upper portion of the trim back to release the upper hooks (B).
–2 Detach the lower clips by pulling the bottom of thetrimbackbyhand.
4. Remove the front seat belt lower anchor (see page 24-4).
08/08/21 15:01:32 61SNR030_200_0074
ProCarManuals.com
DYNOMITE -2009-
Page 1751 of 2893
����
S
pecial Tools RequiredC-Pillar Trim
20-75
A
D
B
C
E A
C D
E
F
A
B
KTC trim tool set SOJATP2014
SRS components are located in this area. Re")
��������
�(�#�'��������������������������������� �����)����
S
pecial Tools RequiredC-Pillar Trim
20-75
A
D
B
C
E A
C D
E
F
A
B
KTC trim tool set SOJATP2014
SRS components are located in this area. Review the
S
RS component locations (see page 24-11) and the
precautions and procedures (see page 24-13) before
doing repairs or service.
NOTE: Follow the C-pillar trim installation procedure carefully; improper installation could cause the side
curtain airbag to deploy improperly and possibly
cause injury.
Put on gloves to protect your hands.
Use the appropriate tool from the KTC trim tool set to avoid damage when removing components.
Take care not to scratch the trim and panels.
The front clip in the C-pillar trim (A) consists of a grommet (B) and a pin (C). The grommet expanded
with the pin secures it to the body panel (D). The
projections (E) on the pin are broken during removal,
so the clip must be replaced with a new one when the
trim is reinstalled. 1.
Remove these items:
Rear seat cushion (see page 20-133)
Rear seat side bolster (see page 20-134)
Rear door opening seal, as needed (see step 3 on page 20-68)
2. Fold the seat-back forward.
3. Hit the front clip in the C-pillar trim (A) with a rubber mallet. The clip is near the triangle mark (B).
Hitting the clip breaks the projections (C) on the pin
(D) and pushes it into the grommet (E) on the body
(F).
NOTE: The clip must be replaced with a new one
when the C-pillar trim is reinstalled.
(cont’d)
08/08/21 15:01:34 61SNR030_200_0077
ProCarManuals.com
DYNOMITE -2009-
Page 1752 of 2893

A
CA
B
B
Fastener Locations : Clip, 3(Red)
A
B A
B
D
E
C
4. Pull the front of the C-pillar trim (A) back by hand to")
����
��������
20-76Interior Trim
Trim Removal/Installation - Pillar Areas (cont’d)
A
CA
B
B
Fastener Locations : Clip, 3(Red)
A
B A
B
D
E
C
4. Pull the front of the C-pillar trim (A) back by hand toremove the front clip (B) from the body (C).
5. Pull the C-pillar trim (A) by hand to detach the clips, then pull the trim up from the rear shelf (B). 6. If the side curtain airbag has deployed, replace the
C-pillar trim and all clips on the trim with new ones
(see page 24-185).
7. If the side curtain airbag has not deployed, remove the front clip (A) from the removed C-pillar trim (B)
and discard it. Then check the trim:
To prevent the side curtain airbags from deploying improperly and possibly causing
injury, inspect the C-pillar trim and replace it if it
has any of the following damage:
– Any cracks, deformations, or stress-whitening in the C-pillar trim
– Any cracks or stress-whitening in the clip seating surfaces (C, D)
If the clips (E) are damaged or stress-whitened, replace them with new ones.
Replace the front clip with a new one.
08/08/21 15:01:34 61SNR030_200_0078
ProCarManuals.com
DYNOMITE -2009-