Page 2635 of 3171

PS-8
STEERING WHEEL
STEERING WHEEL
PFP:48430
On-Vehicle Inspection and ServiceEGS001LG
CHECKING CONDITION OF INSTALLATION
lCheck installation conditions of steering gear assembly, front suspension assembly, axle and steering col-
umn assembly.
lCheck if movement exists when steering wheel is moved up and down, to the left and right and to the axial
direction.
lCheck steering gear assembly mounting bolts and nuts for looseness. Refer toPS-14, "COMPONENT".
CHECKING STEERING WHEEL PLAY
lTurn steering wheel so that front wheels come to the straight-ahead position. Start engine and lightly turn
steering wheel to the left and right until front wheels start to move. Measure steering wheel movement on
the outer circumference.
lWhen the measurement value is outside the standard value, check backlash for each joint of steering col-
umn assembly and installation condition of steering gear assembly.
CHECKING NEUTRAL POSITION STEERING WHEEL
lMake sure that steering gear assembly, steering column assembly and steering wheel are installed in the
correct position.
lPerform neutral position inspection after wheel alignment. Refer toFSU-7, "Front Wheel Alignment".
lSet vehicle to the straight-ahead position and confirm steering wheel is in the neutral position.
lLoosen outer socket lock nut and turn inner socket to left and right equally to make fine adjustment if
steering wheel is not in the neutral position.
CHECKING STEERING WHEEL TURNING FORCE
1. Park vehicle on a level and dry surface, set parking brake.
2. Start engine.
3. Bring power steering fluid up to adequate operating temperature. [Make sure temperature of fluid is
approximately 50 to 80°C(122to176°F).]
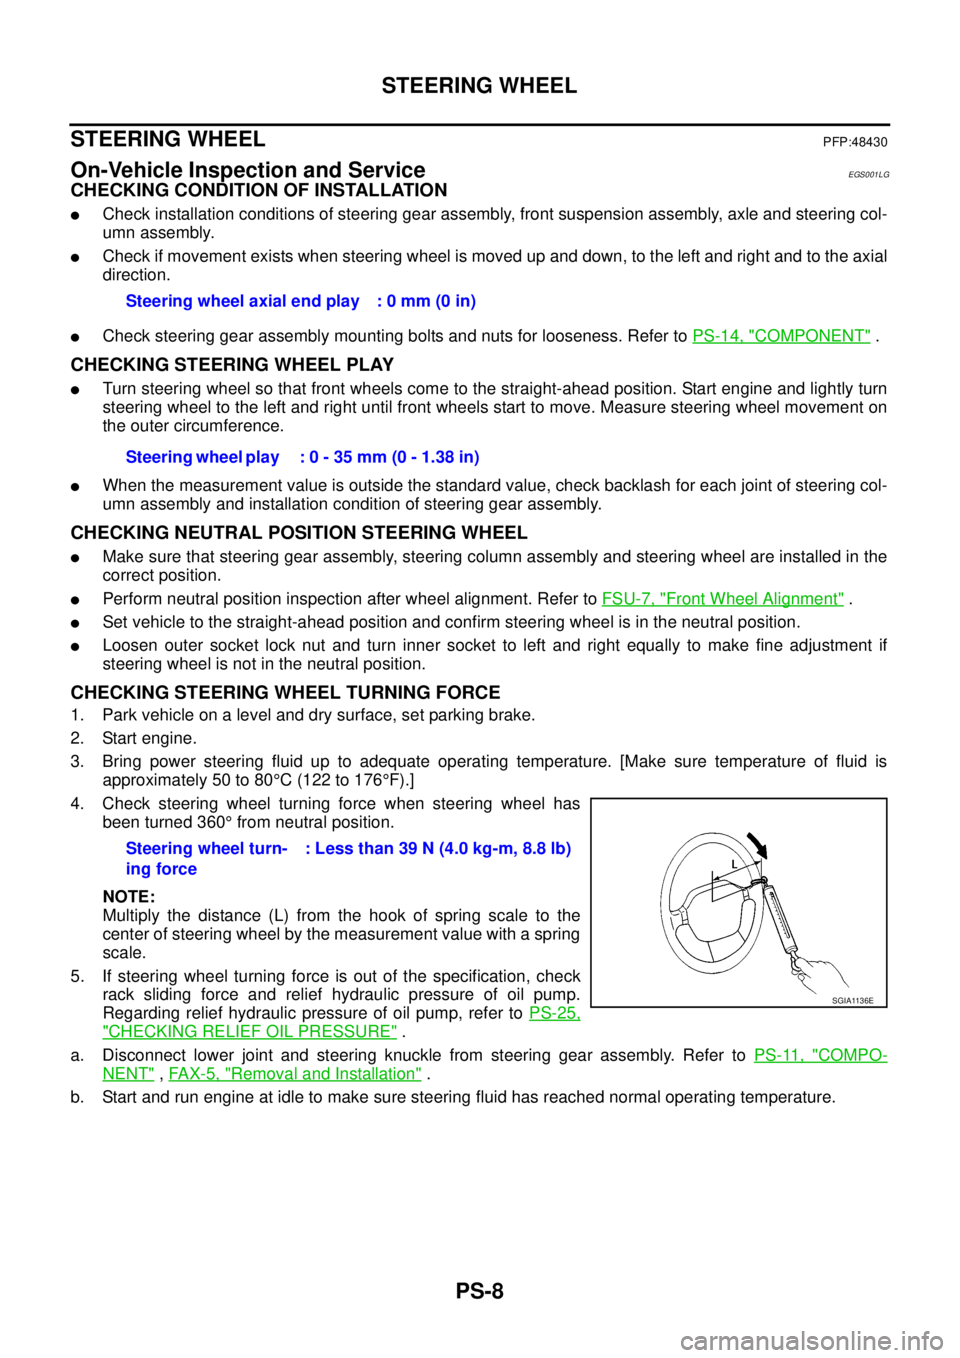
4. Check steering wheel turning force when steering wheel has
been turned 360°from neutral position.
NOTE:
Multiply the distance (L) from the hook of spring scale to the
center of steering wheel by the measurement value with a spring
scale.
5. If steering wheel turning force is out of the specification, check
rack sliding force and relief hydraulic pressure of oil pump.
Regarding relief hydraulic pressure of oil pump, refer toPS-25,
"CHECKING RELIEF OIL PRESSURE".
a. Disconnect lower joint and steering knuckle from steering gear assembly. Refer toPS-11, "
COMPO-
NENT",FAX-5, "Removal and Installation".
b. Start and run engine at idle to make sure steering fluid has reached normal operating temperature.Steering wheel axial end play : 0 mm (0 in)
Steering wheel play : 0 - 35 mm (0 - 1.38 in)
Steering wheel turn-
ing force: Less than 39 N (4.0 kg-m, 8.8 lb)
SGIA1136E
Page 2637 of 3171
PS-10
STEERING WHEEL
Removal and Installation
EGS001LH
REMOVAL
NOTE:
When reconnecting spiral cable, fix cable with a tape so that fixing case and rotating part keep aligned. This
will omit neutral position alignment procedure during spiral installation.
1. Set vehicle to the straight-ahead position.
2. Remove driver air bag module. Refer toSRS-36, "
DRIVER AIR BAG MODULE".
3. Remove steering wheel lock nut after steering is locked.
4. Remove steering wheel with the steering wheel puller [SST:
ST27180001] (A).
INSTALLATION
Reverse the removal procedure for installation attentive to the following operation.
NOTE:
Make sure that the spiral cable is in the neutral position. The neutral
position is detected by turning left 2.6 revolutions from the right end
position and ending with the locating pin at the top.
CAUTION:
Do not run spiral cable idle needlessly. And do not turn it more
than necessary (or it leads to disconnection of the cable).
SGIA1323E
PHIA0275E
Page 2644 of 3171

POWER STEERING GEAR AND LINKAGE
PS-17
C
D
E
F
H
I
J
K
L
MA
B
PS
DISASSEMBLY
1. Remove cylinder tubes from gear housing assembly.
2. Remove rear cover cap from gear-sub assembly.
3. Using a rear cover wrench [SST: KV489Q0030] (A) to remove
rear cover from pinion assembly.
4. Remove O-ring A using a flat-bladed screwdriver, and pull out
rear cover.
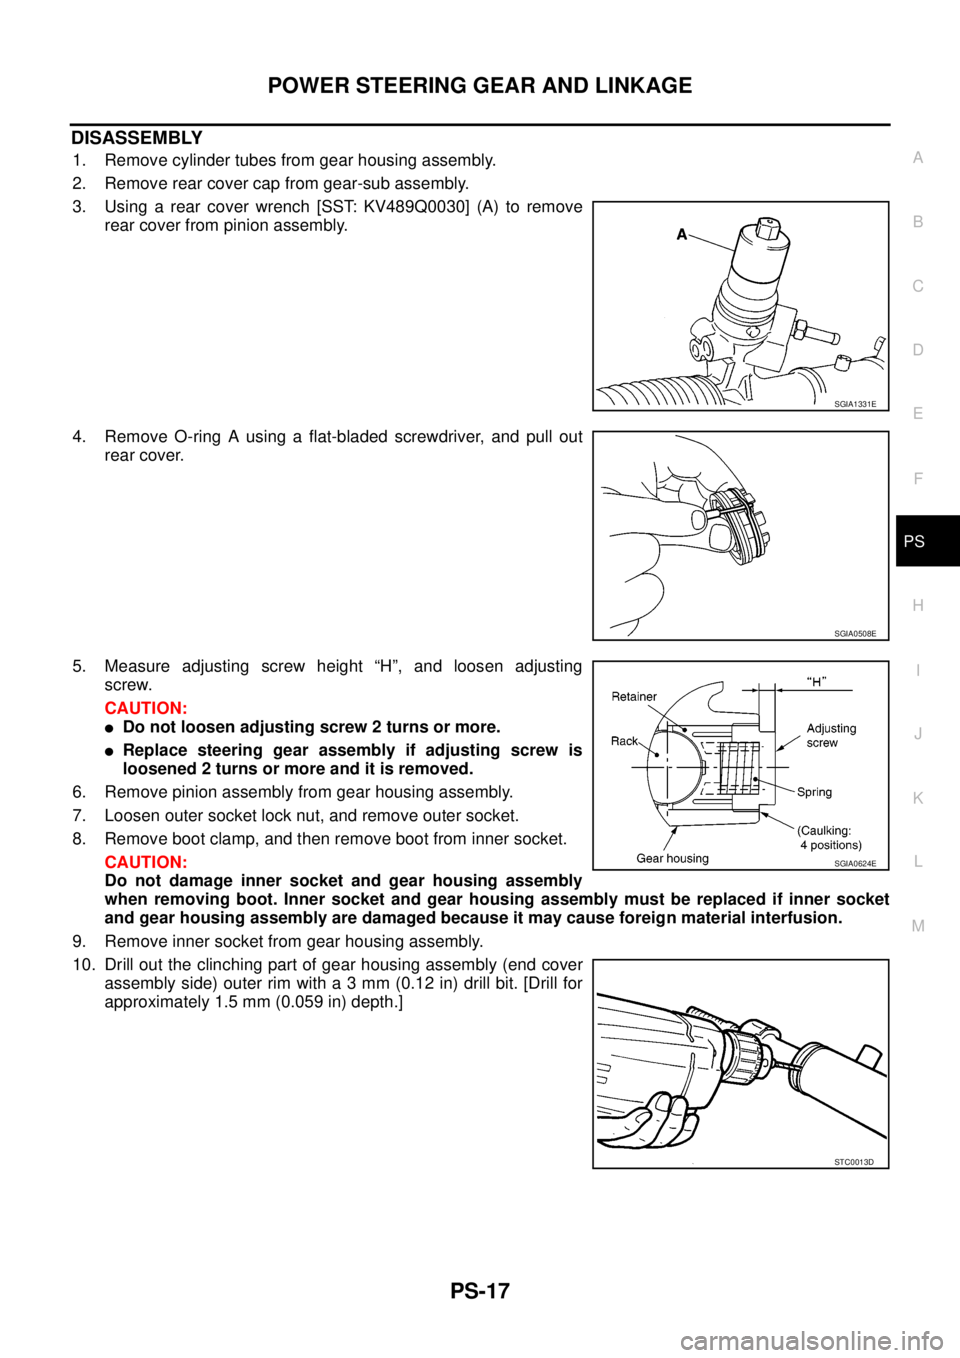
5. Measure adjusting screw height “H”, and loosen adjusting
screw.
CAUTION:
lDo not loosen adjusting screw 2 turns or more.
lReplace steering gear assembly if adjusting screw is
loosened 2 turns or more and it is removed.
6. Remove pinion assembly from gear housing assembly.
7. Loosen outer socket lock nut, and remove outer socket.
8. Remove boot clamp, and then remove boot from inner socket.
CAUTION:
Do not damage inner socket and gear housing assembly
when removing boot. Inner socket and gear housing assembly must be replaced if inner socket
and gear housing assembly are damaged because it may cause foreign material interfusion.
9. Remove inner socket from gear housing assembly.
10. Drill out the clinching part of gear housing assembly (end cover
assemblyside)outerrimwitha3mm(0.12in)drillbit.[Drillfor
approximately 1.5 mm (0.059 in) depth.]
SGIA1331E
SGIA0508E
SGIA0624E
STC0013D
Page 2649 of 3171

PS-22
POWER STEERING GEAR AND LINKAGE
10. Decide on the neutral position for the rack.
11. Install rear cover cap to gear sub-assembly.
CAUTION:
Make sure that the projection of rear cover cap is aligned
with the marking position of gear housing assembly.
12. Apply recommended thread locking sealant to the thread (2
turns thread), and then screw in the adjusting screw until it
reaches height “H” from gear housing assembly measured
before disassembling.
13. Move rack assembly 10 strokes throughout the full stroke so that
the parts can fit with each other.
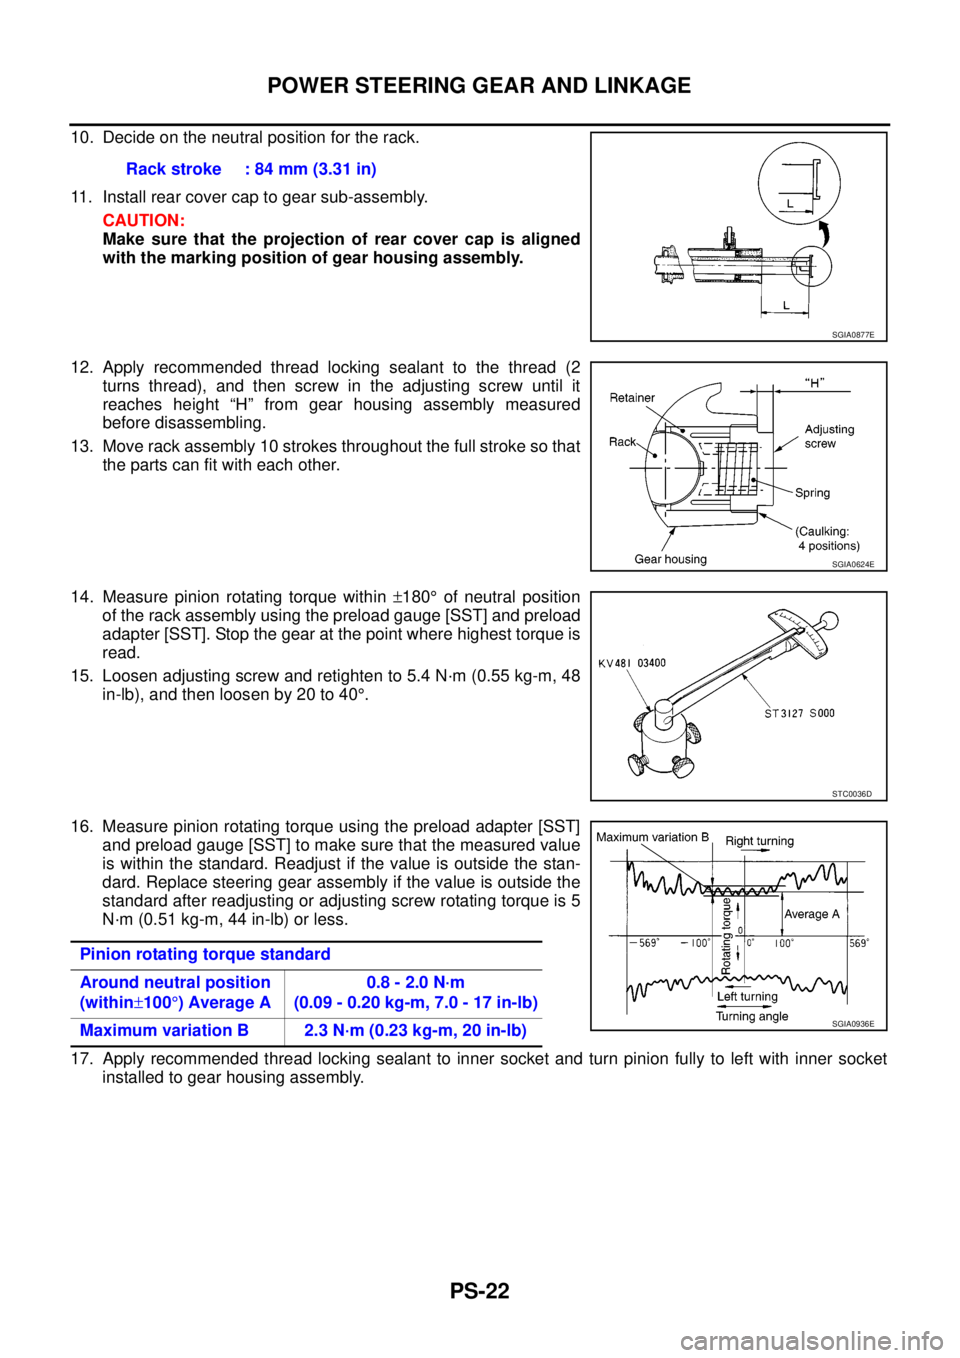
14. Measure pinion rotating torque within±180°of neutral position
of the rack assembly using the preload gauge [SST] and preload
adapter [SST]. Stop the gear at the point where highest torque is
read.
15. Loosen adjusting screw and retighten to 5.4 N·m (0.55 kg-m, 48
in-lb), and then loosen by 20 to 40°.
16. Measure pinion rotating torque using the preload adapter [SST]
and preload gauge [SST] to make sure that the measured value
is within the standard. Readjust if the value is outside the stan-
dard. Replace steering gear assembly if the value is outside the
standard after readjusting or adjusting screw rotating torque is 5
N·m (0.51 kg-m, 44 in-lb) or less.
17. Apply recommended thread locking sealant to inner socket and turn pinion fully to left with inner socket
installed to gear housing assembly.Rack stroke : 84 mm (3.31 in)
SGIA0877E
SGIA0624E
STC0036D
Pinion rotating torque standard
Around neutral position
(within±100°)AverageA0.8 - 2.0 N·m
(0.09 - 0.20 kg-m, 7.0 - 17 in-lb)
Maximum variation B 2.3 N·m (0.23 kg-m, 20 in-lb)
SGIA0936E
Page 2650 of 3171
POWER STEERING GEAR AND LINKAGE
PS-23
C
D
E
F
H
I
J
K
L
MA
B
PS
18. Set dial gauge as shown in the figure. Measure vertical move-
ment of rack assembly when pinion is turned clockwise with
torque of 19.6 N·m (2.0 kg-m, 14 ft-lb). Readjust adjusting screw
angle if the measured value is outside the standard. Replace
steering gear assembly if the measured value is still outside the
standard or adjusting screw rotating torque is 5 N·m (0.51 kg-m,
44 in-lb) or less.
19. Install large end of boot to gear housing assembly.
20. Install small end of boot to inner socket boot mounting groove.
21. Install boot clamps to boots, as shown in the figure.
SGIA1147E
Measuring pointRack axial direction 5 mm (0.20 in) from housing end surface
Rack radial direction Axial direction of the adjusting screw
Vertical movement 0.265 mm (0.0104 in)
SGIA1325E
AST139
Page 2651 of 3171
PS-24
POWER STEERING GEAR AND LINKAGE
22. Crimp the large-diameter boot clamp using suitable tool.
23. Install cylinder tubes to gear housing assembly.
24. Adjust inner socket to standard length “L”, and then tighten lock
nut to the specified torque. Refer toPS-16, "
COMPONENT".
Check length of inner socket “L” again after tightening lock nut.
Make sure that the length is the standard.
CAUTION:
Adjust toe-in after this procedure. Length achieved after
toe-in adjustment is not necessary the above value.
RAC1133D
Inner socket length “L” : 79 mm (3.11 in)
SGIA0167E
Page 2656 of 3171
POWER STEERING OIL PUMP
PS-29
C
D
E
F
H
I
J
K
L
MA
B
PS
lWhen installing rotor, turn mark face on rotor to body assem-
bly.
7. Install vane to rotor so that arc of vane faces cam ring side.
8. Check if drive shaft turns smoothly.
9. Install gasket to body assembly.
10. Install rear cover to body assembly, and then tighten mounting
bolts to the specified torque.
11. Install rear bracket to body assembly, and tighten the mounting
bolts to the specified torque.
12. Install front bracket to body assembly, and tighten the mounting
bolts to the specified torque.
13. Install pulley and washer to drive shaft, and then tighten lock nut
at the specified torque.
14. Install spring, flow control valve, copper washer, joint and eye-
bolt to body assembly. Then tighten eye-bolt to the specified
torque.
15. Apply recommended fluid to O-ring A, and then install O-ring A to body assembly.
16. Install suction pipe to body assembly.
SGIA0874E
SGIA0613E
SGIA0425E
Page 2665 of 3171
RAX-2
[M226]
PRECAUTIONS
[M226]PRECAUTIONSPFP:00001
PrecautionsEDS003HT
lWhen installing the rubber bushings, the final tightening must be done under unladen condition and with
the tires on level ground. Oil will shorten the life of the rubber bushings, so wipe off any spilled oil immedi-
ately.
lUnladen condition means the fuel tank, engine coolant and lubricants are at the full secification. The
spare tire, jack, hand tools, and mats are in their designated positions.
lLock nuts are not reusable. Always use new lock nuts for installation. New lock nuts are pre-oiled, do not
apply any additional lubrication.