Page 587 of 969

11-7
2035 Author�: Date�:
2005 LEXUS ES330 REPAIR MANUAL (RM1124U)
2. CHECK FUEL PUMP OPERATION AND FUEL LEAK
(a) When using the")
A86347DLC3
Hand-held Tester
A62390
FP
+B
- FUELFUEL SYSTEM (3MZ-FE)
11-7
2035 Author�: Date�:
2005 LEXUS ES330 REPAIR MANUAL (RM1124U)
2. CHECK FUEL PUMP OPERATION AND FUEL LEAK
(a) When using the hand-held tester.
(1) Connect the hand-held tester to the DLC3.
(2) Turn the ignition switch ON and the hand-held tes-
ter ON.
NOTICE:
Do not start the engine.
(3) Select the ACTIVE TEST mode on the hand-held
tester.
(4) If you need help to select the ACTIVE TEST mode
on the hand-held tester, refer to the hand-held tes-
ter operator's manual.
(b) When not using the hand-held tester.
(1) Remove the circuit opening relay.
(2) Using a service wire, connect terminals FP and +B
of the engine room relay block.
NOTICE:
Pay due attention to the terminal connecting position to
avoid a malfunction.
(3) Turn the ignition switch ON, and check that the fuel
pump operates.
NOTICE:
Do not start the engine.
(c) Check that there are no fuel leaks after doing mainte-
nance anywhere on the fuel system.
Page 609 of 969

11-29
2057 Author�: Date�:
2005 LEXUS ES330 REPAIR MANUAL (RM11")
A79473
A79476
A79474
Pinch
PinchRetainer
Pull Out
A81596
Retainer
Pipe
O-ring Quick Connector
Nylon Tube
- FUELFUEL TANK ASSY (3MZ-FE)
11-29
2057 Author�: Date�:
2005 LEXUS ES330 REPAIR MANUAL (RM1124U)
10. DISCONNECT PARKING BRAKE CABLE ASSY NO.3
(a) Remove the bolt and nut, then disconnect the parking
brake cable No. 3.
11. REMOVE FUEL TANK PROTECTOR LOWER CENTER
(a) Remove the 4 bolts, then remove the fuel tank protector
lower center.
12. REMOVE FUEL TANK ASSY
(a) Disconnect the fuel pump tube.
(1) Pinch the projection of the retainer to remove the
lock claws, then pull it down as shown in the illustra-
tion.
(2) Pull out the fuel pump tube.
NOTICE:
�Check around the quick connector for dirt or mud be-
fore this operation. Remove the dirt if necessary.
�Be careful of mud because the quick connector has
an O-ring which seals the pipe and quick connector
that can be contaminated.
�Do not use any tools in this operation.
�Do not bend or twist the nylon tube. Protect the quick
connector by covering it with a vinyl or plastic bag.
�When the pipe and quick connector are stuck, push
and pull the quick connector to release. Pull out the
quick connector from the pipe.
Page 610 of 969
(d)
(e)
A79478
11-30
- FUELFUEL TANK ASSY (3MZ-FE)
2058 Author�: Date�:
2005 LEXUS")
A86275
PinchPinch
Pull Out
A75650
Tube Connector
Pipe O-ring Nylon Tube
Quick Connector
A86276
A
A
Push
Pinch
Pinch(d)(d)
(e)
A79478
11-30
- FUELFUEL TANK ASSY (3MZ-FE)
2058 Author�: Date�:
2005 LEXUS ES330 REPAIR MANUAL (RM1124U)
(b) Disconnect the fuel tube No. 1.
(1) Pinch the tube connector, then pull out the fuel tube
No. 1.
NOTICE:
�Check around the quick connector for dirt or mud be-
fore this operation. Remove the dirt if necessary.
�Be careful of mud because the quick connector has
an O-ring which seals the pipe and quick connector
that can be contaminated.
�Do not use any tools in this operation.
�Do not bend or twist the nylon tube. Protect the quick
connector by covering it with a vinyl or plastic bag.
�When the pipe and quick connector are stuck, push
and pull the quick connector to release. Pull out the
quick connector carefully.
(c) Set up a transmission jack underneath the fuel tank.
(d) Remove the 2 bolts which hold the fuel tank bands.
(e) Loosen the clamp bolt.
(f) Operate the transmission jack, then disconnect the fuel
tank inlet pipe.
(g) Disconnect the fuel tank vent hose from the charcoal can-
ister.
(1) Deeply push the quick connector to release the lock
pin.
(2) Pinch portion A.
(3) Pull out the fuel tank vent hose.
(h) Operate the transmission jack, then remove the fuel tank.
(i) Remove the 2 pins, then remove the 2 fuel tank bands as
shown in the illustration.
Page 611 of 969
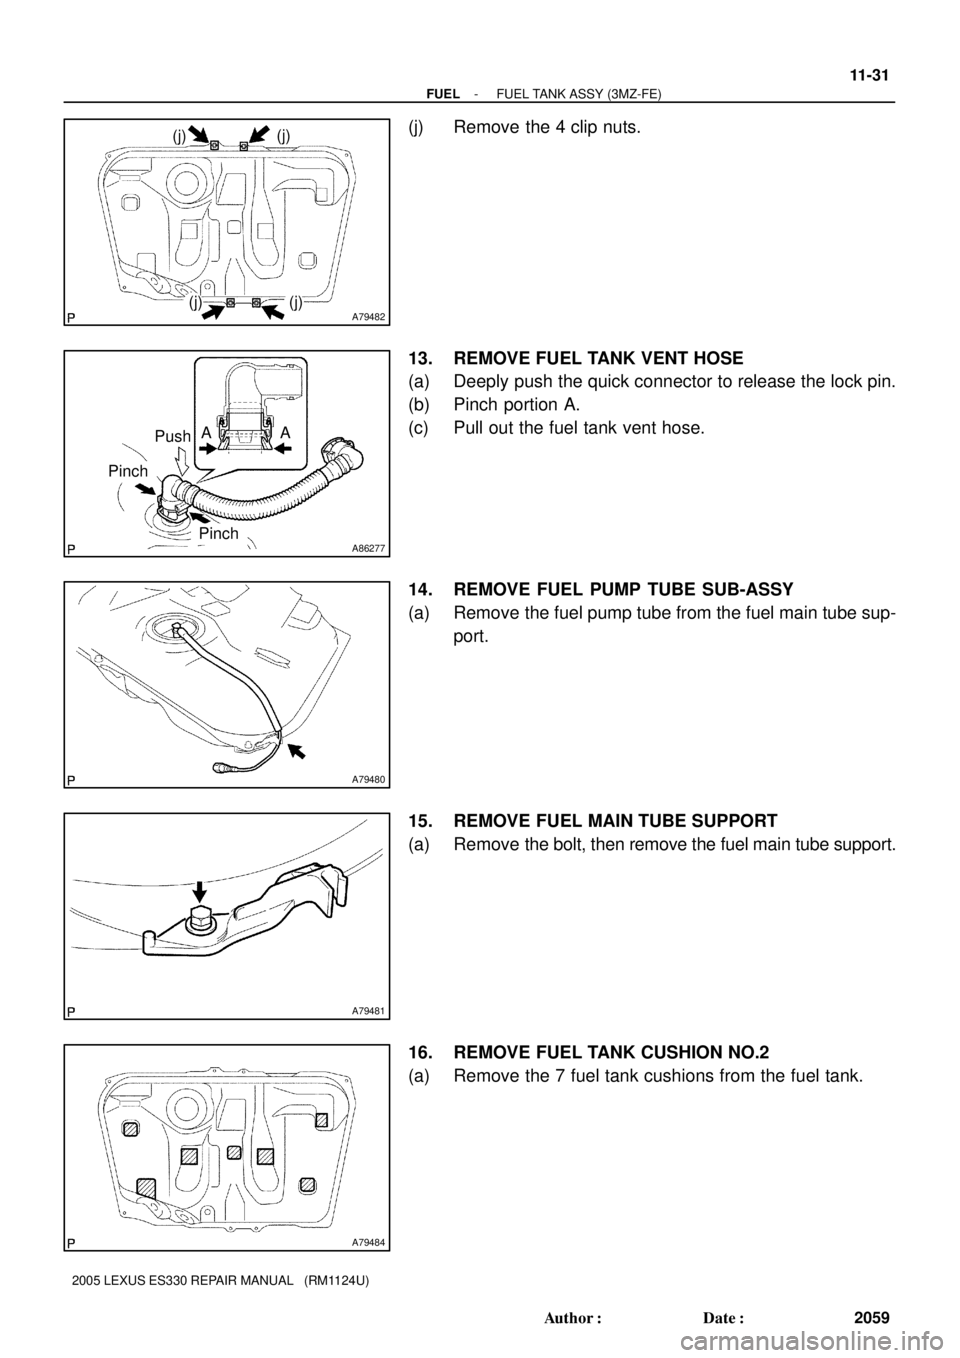
A79482
(j)(j)
(j)(j)
A86277Pinch
PinchPushAA
A79480
A79481
A79484
- FUELFUEL TANK ASSY (3MZ-FE)
11-31
2059 Author�: Date�:
2005 LEXUS ES330 REPAIR MANUAL (RM1124U)
(j) Remove the 4 clip nuts.
13. REMOVE FUEL TANK VENT HOSE
(a) Deeply push the quick connector to release the lock pin.
(b) Pinch portion A.
(c) Pull out the fuel tank vent hose.
14. REMOVE FUEL PUMP TUBE SUB-ASSY
(a) Remove the fuel pump tube from the fuel main tube sup-
port.
15. REMOVE FUEL MAIN TUBE SUPPORT
(a) Remove the bolt, then remove the fuel main tube support.
16. REMOVE FUEL TANK CUSHION NO.2
(a) Remove the 7 fuel tank cushions from the fuel tank.
Page 613 of 969

11-33
2061 Author�: Date�:
2005 LEXUS ES330 REPAIR MANUAL (RM1124U)
(i) Connect the fuel pump tube.
(1) Push in the quick connector to the pipe un")
A81598
Retainer
Push
- FUELFUEL TANK ASSY (3MZ-FE)
11-33
2061 Author�: Date�:
2005 LEXUS ES330 REPAIR MANUAL (RM1124U)
(i) Connect the fuel pump tube.
(1) Push in the quick connector to the pipe until the
quick connector makes a ºclickº sound, then push
up the retainer until the claws lock.
NOTICE:
�Check the connected part for damage or foreign ob-
jects.
�After connecting, check if the connector and pipe are
securely connected by pulling on them.
22. INSTALL FUEL TANK PROTECTOR LOWER CENTER
Torque: 5.4 NVm (55 kgfVcm, 48 in.Vlbf)
23. INSTALL PARKING BRAKE CABLE ASSY NO.3
Torque: 5.4 NVm (55 kgfVcm, 48 in.Vlbf)
24. INSTALL PARKING BRAKE CABLE ASSY NO.2
Torque: 5.4 NVm (55 kgfVcm, 48 in.Vlbf)
25. INSTALL EXHAUST PIPE ASSY CENTER
(a) Install 2 new gaskets and the exhaust pipe center to the 2 exhaust pipe supports.
(b) Tighten the 2 bolts and 4 new nuts.
Torque: 56 NVm (571 kgfVcm, 41 ftVlbf)
26. INSTALL FUEL SUCTION W/ PUMP & GAUGE TUBE ASSY (See page 11-20)
27. ADD FUEL
28. CONNECT ENGINE WIRE NO. 3 (BATTERY NEGATIVE TERMINAL)
Torque: 5.4 NVm (55 kgfVcm, 48 in.Vlbf)
29. CHECK FOR FUEL LEAKS (See page 11-5)
30. CHECK FOR EXHAUST GAS LEAKS
31. INSTALL REAR FLOOR SERVICE HOLE COVER (See page 11-20)
32. INSTALL REAR SEAT CUSHION ASSY
33. INSTALL FLOOR PANEL BRACE REAR (See page 15-2)
34. SYSTEM INITIALIZATION (See page 19-15)
Page 618 of 969

12-5
2066 Author�: Date�:
2005 LEXUS ES330 REPAIR MANUAL (RM1124U)
(d) If you have no hand-")
A86348Battery
A59500
Vacuum Gauge
A72589
Pressure Gauge
- EMISSION CONTROLEMISSION CONTROL SYSTEM (3MZ-FE)
12-5
2066 Author�: Date�:
2005 LEXUS ES330 REPAIR MANUAL (RM1124U)
(d) If you have no hand-held tester:
Force the VSV for EVAP to operate.
(1) Disconnect the VSV for EVAP connector.
(2) Connect the positive (+) and negative (-) leads of
the battery to the VSV for EVAP terminals.
(3) Start the engine.
(e) Check the vacuum at idle.
Vacuum:
Maintain at 0.368 to 19.713 in.Hg (5 to 268 in.Aq) for
over 5 seconds.
HINT:
If the vacuum does not change, it can be concluded that the
hose which connects the VSV to the service port is loose or
blocked, or the VSV is malfunctioning.
(f) If you have the hand-held tester:
Return to the normal VSV for EVAP.
(1) Stop the engine.
(2) Disconnect the hand-held tester from the DLC3.
(g) If you have no hand-held tester:
Return to the normal VSV for EVAP.
(1) Stop the engine.
(2) Disconnect the positive (+) and negative (-) leads
of the battery from the VSV for EVAP terminals.
(3) Reconnect the VSV for EVAP connector.
(h) Disconnect the vacuum gauge from the EVAP service
port on the purge line.
(i) Connect a pressure gauge to the EVAP service port on
the purge line.
Page 619 of 969

2067 Author�: Date�:
2005 LEXUS ES3")
A86347DLC3
Hand-held Tester
A86349Battery
A59501
Pressure Gauge
Pressure
A52634
Fuel Tank CapPressure Gauge
12-6
- EMISSION CONTROLEMISSION CONTROL SYSTEM (3MZ-FE)
2067 Author�: Date�:
2005 LEXUS ES330 REPAIR MANUAL (RM1124U)
(j) If you have the hand-held tester:
Force the VSV for CCV to operate.
(1) Connect the hand-held tester to the DLC3.
(2) Turn the ignition switch ON.
(3) Turn the hand-held tester ON.
(4) Use the ACTIVE TEST mode on the hand-held tes-
ter to operate the VSV for CCV.
NOTICE:
Do not start the engine during this operation.
HINT:
If the check is not completed within 10 minutes, the forced close
of the VSV for CCV will be tested.
(k) If you have no hand-held tester:
Force the VSV for CCV to operate.
(1) Disconnect the VSV for CCV connector.
(2) Connect the positive (+) and negative (-) leads of
the battery to the VSV for CCV terminals.
(l) Check the pressure.
(1) Add the pressure (13.5 to 15.5 in.Aq) from the
EVAP service port.
Pressure:
2 minutes after the pressure is added, the gauge
should be over 7.7 to 8.8 in.Aq.
HINT:
If you cannot add the pressure, it can be concluded that the
hose which connects the VSV for EVAP canister fuel tank is
slipped off or the VSV is open.
(2) Check if the pressure decreases when the fuel tank
cap is removed while adding the pressure.
HINT:
If the pressure does not decrease when the filler cap is re-
moved, it can be concluded that the hose which connects the
service port to the fuel tank is blocked, etc.
(m) If you have the hand-held tester:
Return to the normal VSV for CCV operation.
(1) Turn the ignition switch ON.
(2) Disconnect the hand-held tester from the DLC3.
(n) If you have no hand-held tester:
Return to the normal VSV for CCV operation.
(1) Disconnect the positive (+) and negative (-) leads
of the battery to the VSV for CCV terminals.
(2) Reconnect the VSV for CCV connector.
Page 629 of 969

(b)
(b)(c)
A86393
A A
PushPinch
Pinch
A86360
(e)
(e)
(f) 12-16
- EMISSION CONTROLCHARCOAL CANISTER ASSY (3MZ-FE)
2077 Author�: Date�:
2005 LEXUS ES330 REPAIR MANUAL (RM1124U)
CHA")
120BT-01
A86270
(a)
(b)
(b)(c)
A86393
A A
PushPinch
Pinch
A86360
(e)
(e)
(f) 12-16
- EMISSION CONTROLCHARCOAL CANISTER ASSY (3MZ-FE)
2077 Author�: Date�:
2005 LEXUS ES330 REPAIR MANUAL (RM1124U)
CHARCOAL CANISTER ASSY (3MZ-FE)
REPLACEMENT
1. DISCHARGE FUEL SYSTEM PRESSURE (See page 11-1)
2. DISCONNECT ENGINE WIRE NO. 3 (BATTERY NEGATIVE TERMINAL)
3. REMOVE REAR SEAT CUSHION ASSY (See page 72-39)
4. REMOVE REAR FLOOR SERVICE HOLE COVER (See page 11-20)
5. REMOVE FUEL SUCTION W/ PUMP & GAUGE TUBE ASSY (See page 11-20)
6. DRAIN FUEL
7. REMOVE FLOOR PANEL BRACE REAR (See page 15-2)
8. REMOVE EXHAUST PIPE ASSY CENTER (See page 11-28)
9. DISCONNECT PARKING BRAKE CABLE ASSY NO.2 (See page 11-28)
10. DISCONNECT PARKING BRAKE CABLE ASSY NO.3 (See page 11-28)
11. REMOVE FUEL TANK PROTECTOR LOWER CENTER (See page 11-28)
12. REMOVE FUEL TANK ASSY (See page 11-28)
13. REMOVE CHARCOAL CANISTER ASSY
(a) Disconnect the VSV connector.
(b) Remove the 2 wire harness clamps.
(c) Disconnect the fuel hose No. 1.
(d) Disconnect the fuel tank vent hose.
(1) Deeply push the quick connector to release the lock
pin.
(2) Pinch portion A.
(3) Pull out the fuel tank vent hose.
(e) Remove the 2 bolts.
(f) Unfasten the claw, then remove the charcoal canister.