Page 631 of 969
120BW-01
A86357
A A
Push
Pinch
Pinch
PushPinch
Pinch
(b)
A86388
Push
Push 12-18
- EMISSION CONTROLCHARCOAL CANISTER FILTER SUB-ASSY (3MZ-FE)
2079 Author�: Date�:
2005 LEXUS ES330 REPAIR MANUAL (RM1124U)
CHARCOAL CANISTER FILTER SUB-ASSY (3MZ-FE)
REPLACEMENT
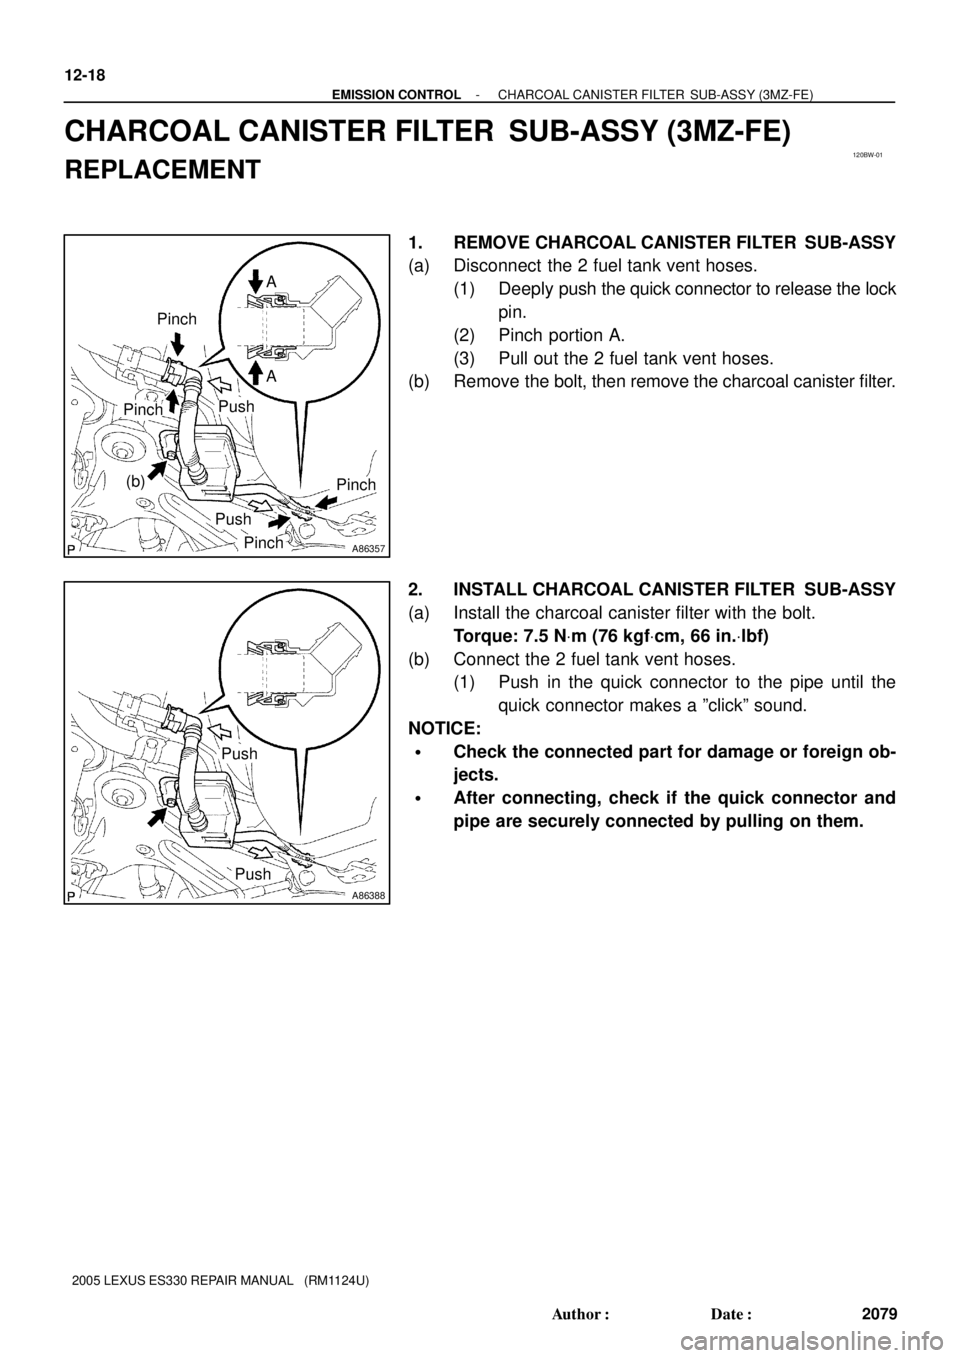
1. REMOVE CHARCOAL CANISTER FILTER SUB-ASSY
(a) Disconnect the 2 fuel tank vent hoses.
(1) Deeply push the quick connector to release the lock
pin.
(2) Pinch portion A.
(3) Pull out the 2 fuel tank vent hoses.
(b) Remove the bolt, then remove the charcoal canister filter.
2. INSTALL CHARCOAL CANISTER FILTER SUB-ASSY
(a) Install the charcoal canister filter with the bolt.
Torque: 7.5 NVm (76 kgfVcm, 66 in.Vlbf)
(b) Connect the 2 fuel tank vent hoses.
(1) Push in the quick connector to the pipe until the
quick connector makes a ºclickº sound.
NOTICE:
�Check the connected part for damage or foreign ob-
jects.
�After connecting, check if the quick connector and
pipe are securely connected by pulling on them.
Page 650 of 969

16-1
2279 Author�: Date�:
2005 LEXUS ES330 REPAIR MANUAL (RM1124U)
COOLING SYSTEM (3MZ-FE)
ON-VEHICLE INSPECTION
1. INSPECT COO")
160QB-01
A60522
Radiator Cap
Tester
- COOLINGCOOLING SYSTEM (3MZ-FE)
16-1
2279 Author�: Date�:
2005 LEXUS ES330 REPAIR MANUAL (RM1124U)
COOLING SYSTEM (3MZ-FE)
ON-VEHICLE INSPECTION
1. INSPECT COOLING SYSTEM FOR LEAKS
(a) Remove the water outlet cap.
CAUTION:
To avoid the danger of being burned, do not remove the wa-
ter outlet cap while the engine and radiator are still hot.
Thermal expansion will cause hot engine coolant and
steam to blow out from the radiator.
(b) Fill the radiator with coolant, then attach a radiator cap
tester.
(c) Warm up the engine.
(d) Pump it to 118 kPa (1.2 kgf/cm
2, 17.1 psi), then check that
the pressure does not drop.
If the pressure drops, check the hoses, radiator and water
pump for leaks. If there are no signs or traces of external coolant
leaks, check the heater core, cylinder block and head.
(e) Reinstall the water outlet cap.
2. CHECK ENGINE COOLANT LEVEL AT RESERVOIR
(a) The engine coolant should be between the ºLOWº and ºFULLº lines when the engine is cold.
If low, check for leaks and add ºToyota Super Long Life Coolantº or similar high quality ethylene glycol based
non-silicate, non-amine, non-nitrite, and non-borate coolant with long-life hybrid organic acid technology
up to the ºFULLº line.
3. CHECK ENGINE COOLANT QUALITY
(a) Remove the water outlet cap.
CAUTION:
To avoid the danger of being burned, do not remove the water outlet cap while the engine and radiator
are still hot. Thermal expansion will cause hot engine coolant and steam to blow out from the radiator.
(b) Check if there are any excessive deposits of rust or scale around the water outlet cap and water outlet
filler hole; the coolant should free of oil.
If excessively dirty, replace the coolant.
(c) Reinstall the water outlet cap.
Page 651 of 969
A73603
16-2
- COOLINGCOOLING SYSTEM (3MZ-FE)
2280 Author�: Date�:
2005 LEXUS ES330 REPAIR MANUAL (RM1124U)
4. INSPECT FIN BLOCKAGE
(a) If the fins are clogged, wash them with water or a steam
cleaner, then dry with compressed air.
NOTICE:
�If the distance between the steam cleaner and core is
too close, there is a possibility of damaging the fins,
so keep the following injection distance.
Injection Pressure
kPa (kgf/cm2, psi)
Injection Distance
mm (in.)
2,942 to 4,903
(30 to 50, 427 to 711)300 (11.811)
4,903 to 7,845
(50 to 80, 711 to 1,138)500 (19.685)
�If the fins are bent, straighten them with a screwdriver
or pliers.
�Be careful not to expose electronic components to
water.
Page 668 of 969
A86585
Hood Lock Release
Lever ProtectorHood Lock Assy
Radiator AssyRadiator Support
Cushion
Radiator Support
LowerRadiator Support Upper
Fan Shroud
Sub-assy
Temperature Detect
Switch
Radiator Hose Outlet
Radiator Hose Inlet
Oil Cooler
Inlet Hose
Oil Cooler
Outlet Hose
5.0 (51, 44 in.Vlbf)
14 (142, 10)
8.0 (82, 71 in.Vlbf)
x3x5
x3
: Specified torque
N´m (kgf´cm, ft´lbf)
- COOLINGRADIATOR ASSY (3MZ-FE)
16-19
2297 Author�: Date�:
2005 LEXUS ES330 REPAIR MANUAL (RM1124U)
Page 670 of 969

16-21
2299 Author�: Date�:
2005 LEXUS ES330 REPAIR MANUAL (RM1124U)
REPLACEMENT
1. DISCONNECT BATTERY NEGATIVE TERMINAL
2. DRAIN EN")
160QK-01
A61350
Clip
A86560
A86561
- COOLINGRADIATOR ASSY (3MZ-FE)
16-21
2299 Author�: Date�:
2005 LEXUS ES330 REPAIR MANUAL (RM1124U)
REPLACEMENT
1. DISCONNECT BATTERY NEGATIVE TERMINAL
2. DRAIN ENGINE COOLANT (See page 16-9)
3. REMOVE ENGINE UNDER COVER NO.1
4. REMOVE ENGINE UNDER COVER NO.2
5. REMOVE RADIATOR LOWER AIR DEFLECTOR (See page 19-5)
6. REMOVE BATTERY
7. REMOVE BATTERY TRAY
8. REMOVE AIR CLEANER INLET ASSY (See page 19-5)
9. REMOVE AIR CLEANER ASSY (See page 19-5)
10. REMOVE AIR CLEANER BRACKET (See page 19-5)
11. REMOVE AIR CLEANER INLET NO.1 (See page 19-5)
12. DISCONNECT RADIATOR HOSE INLET
13. DISCONNECT RADIATOR HOSE OUTLET
14. DISCONNECT OIL COOLER INLET HOSE
15. DISCONNECT OIL COOLER OUTLET HOSE
16. REMOVE HOOD LOCK RELEASE LEVER
PROTECTOR
(a) Using a screwdriver with the tip wrapped in tape, remove
the protector.
NOTICE:
Removing the protector damages the clips inside the pro-
tector, therefore it is necessary to use a new protector
when installing.
17. SEPARATE HOOD LOCK ASSY
(a) Disconnect the hood switch connector.
(b) Remove the 3 bolts, then separate the hood lock.
18. REMOVE RADIATOR SUPPORT UPPER
(a) Disconnect the horn connectors.
(b) Remove the 5 bolts, then remove the radiator support up-
per.
Page 671 of 969

2300 Author�: Date�:
2005 LEXUS ES330 REPAIR MANUAL (RM1124U)
19. REMOVE RADIATOR ASSY
(a) Disconnect the 2 wire harness connectors.
(b) Remove th")
A86562
A86563
16-22
- COOLINGRADIATOR ASSY (3MZ-FE)
2300 Author�: Date�:
2005 LEXUS ES330 REPAIR MANUAL (RM1124U)
19. REMOVE RADIATOR ASSY
(a) Disconnect the 2 wire harness connectors.
(b) Remove the radiator from the vehicle.
20. REMOVE RADIATOR SUPPORT CUSHION
(a) Remove the 2 radiator support cushions from the radiator.
21. REMOVE RADIATOR SUPPORT LOWER
(a) Remove the 2 radiator support lowers from the radiator.
22. REMOVE FAN SHROUD SUB-ASSY
(a) Disconnect the temperature detect switch connector.
(b) Remove the 3 bolts, then remove the fan shroud with mo-
tor.
23. REMOVE TEMPERATURE DETECT SWITCH
24. REPLACE RADIATOR ASSY
25. INSTALL FAN SHROUD SUB-ASSY
Torque: 5.0 NVm (51 kgfVcm, 44 in.Vlbf)
26. INSTALL RADIATOR SUPPORT UPPER
Torque: 14 NVm (142 kgfVcm, 10 ftVlbf)
27. INSTALL HOOD LOCK ASSY
Torque: 8.0 NVm (82 kgfVcm, 71 in.Vlbf)
28. INSTALL AIR CLEANER INLET NO.1 (See page 19-5)
29. INSTALL AIR CLEANER BRACKET (See page 19-5)
30. INSTALL AIR CLEANER ASSY (See page 19-5)
31. INSTALL AIR CLEANER INLET ASSY (See page 19-5)
32. CHECK CONNECTION OF VACUUM HOSE (See page 14-29)
33. ADD ENGINE COOLANT (See page 16-9)
34. CHECK FOR ENGINE COOLANT LEAKS (See page 16-1)
Page 686 of 969
A78827Adjusting Bar Bracket
(b)
(a)
(a)
(b)
(b)
A36749
A60523
A86600
17-10
- LUBRICATIONOIL PUMP ASSY (3MZ-FE)
2315 Author�: Date�:
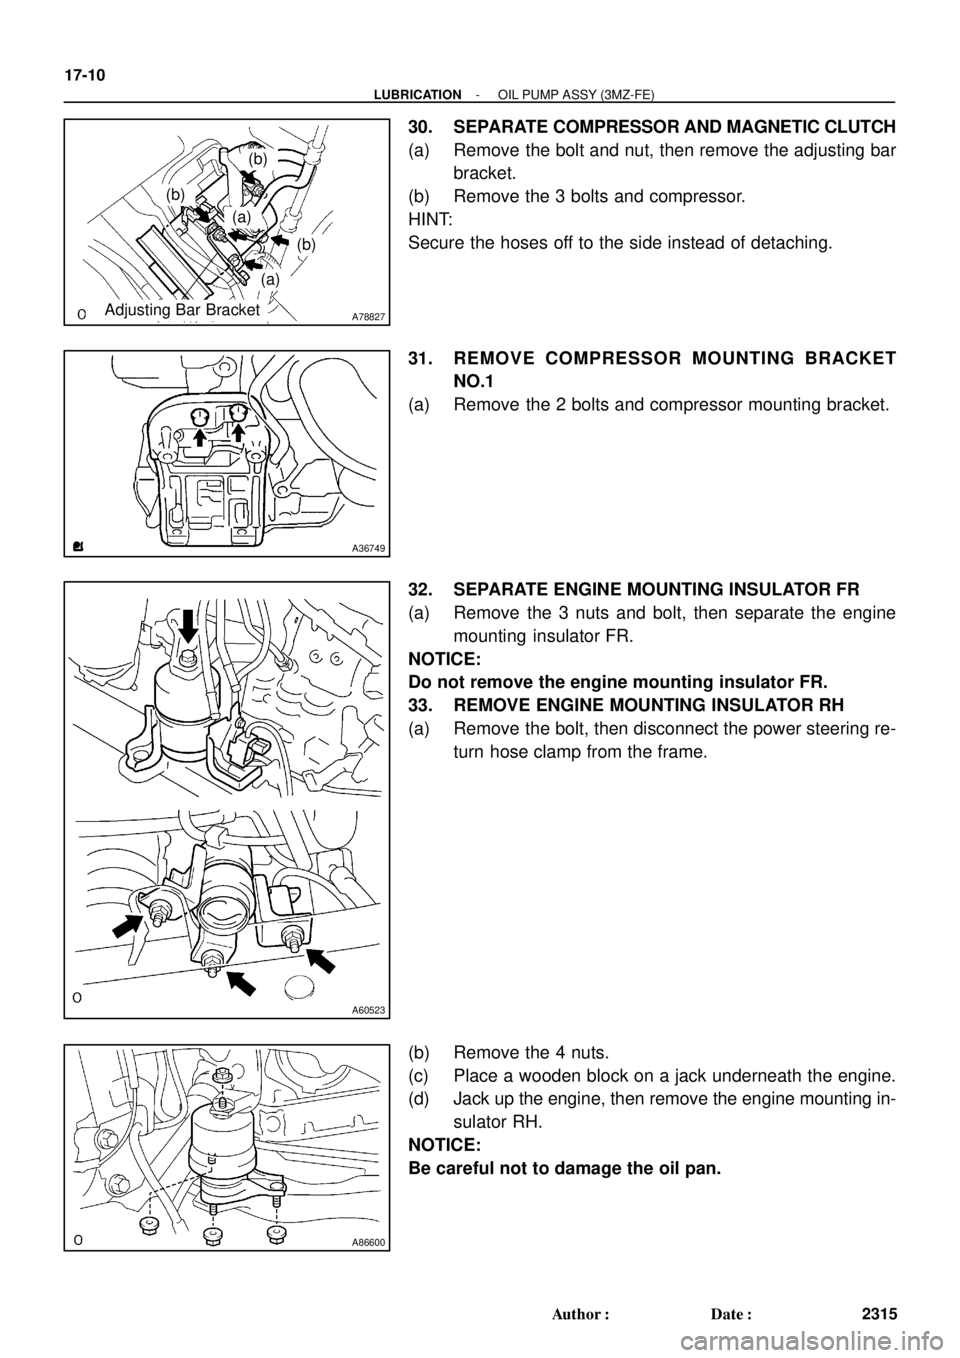
30. SEPARATE COMPRESSOR AND MAGNETIC CLUTCH
(a) Remove the bolt and nut, then remove the adjusting bar
bracket.
(b) Remove the 3 bolts and compressor.
HINT:
Secure the hoses off to the side instead of detaching.
31. REMOVE COMPRESSOR MOUNTING BRACKET
NO.1
(a) Remove the 2 bolts and compressor mounting bracket.
32. SEPARATE ENGINE MOUNTING INSULATOR FR
(a) Remove the 3 nuts and bolt, then separate the engine
mounting insulator FR.
NOTICE:
Do not remove the engine mounting insulator FR.
33. REMOVE ENGINE MOUNTING INSULATOR RH
(a) Remove the bolt, then disconnect the power steering re-
turn hose clamp from the frame.
(b) Remove the 4 nuts.
(c) Place a wooden block on a jack underneath the engine.
(d) Jack up the engine, then remove the engine mounting in-
sulator RH.
NOTICE:
Be careful not to damage the oil pan.
Page 688 of 969
A36754
B04137
A51990
A78754
SST 17-12
- LUBRICATIONOIL PUMP ASSY (3MZ-FE)
2317 Author�: Date�:
(c) Loosen and remove the 17 bolts and 2 nuts uniformly.
(d) Using a screwdriver, remove the oil pan by prying be-
tween the cylinder block and oil pan.
NOTICE:
Be careful not to damage the contact surfaces of the oil pan
and cylinder block.
38. REMOVE CRANKSHAFT POSITION SENSOR
(a) Disconnect the crankshaft position sensor connector.
(b) Remove the bolt and crankshaft position sensor.
39. REMOVE OIL PUMP ASSY
(a) Remove the 9 bolts.
(b) Using a screwdriver, remove the oil pump by prying be-
tween the oil pump and bearing cap.
(c) Remove the O-ring.
40. INSTALL OIL PUMP SEAL
(a) Using SST and a hammer, tap in the new oil seal until its
surface is flush with the oil pump body edge.
SST 09223-00010
NOTICE:
�Be careful not to tap the oil seal at an angle.
�Keep the lip free of foreign objects.
(b) Apply multi-purpose grease to the oil seal lip.