Page 213 of 969

2529 Author�: Date�:
2005 LEXUS ES330 REPAIR MANUAL (RM1124U)
(d) Install the")
D31340
D25420
C88135
D31339
Breather Hose
C88278
40-14
- AUTOMATIC TRANSMISSION / TRANSAUTOMATIC TRANSAXLE ASSY (U151E)
2529 Author�: Date�:
2005 LEXUS ES330 REPAIR MANUAL (RM1124U)
(d) Install the flywheel housing under cover with the 2 bolts.
Torque: 7.8 NVm (80 kgfVcm, 69 in.Vlbf)
21. INSTALL ENGINE MOUNTING BRACKET FR
(a) Install the engine mounting bracket FR with the 3 bolts to
the automatic transaxle.
Torque: 64 NVm (653 kgfVcm, 47 ftVlbf)
22. INSTALL TRANSMISSION OIL FILLER TUBE
SUB-ASSY
(a) Coat a new O-ring with ATF, and install it to the oil filler
tube.
(b) Install the oil filler tube with the bolt to the automatic trans-
axle.
Torque: 5.5 NVm (56 kgfVcm, 49 in.Vlbf)
(c) Install the ATF level gauge.
(d) Connect the breather hose to the wire harness bracket.
23. INSTALL TRANSMISSION CONTROL CABLE
BRACKET NO.1
(a) Install the control cable bracket No.1 with the 2 bolts.
Torque: 12 NVm (122 kgfVcm, 9 ftVlbf)
24. INSTALL OIL COOLER INLET TUBE NO.1
(a) Temporarily install the oil cooler outlet tube No.1.
(b) Temporarily install the oil cooler inlet tube No.1.
Page 278 of 969

OVERHAUL
HINT:
Overhaul the RH side by the same procedures with LH side.
1. REMOV")
320E6-04
F41534
F41535
F41536
- BRAKEFRONT BRAKE
32-33
2467 Author�: Date�:
2005 LEXUS ES330 REPAIR MANUAL (RM1124U)
OVERHAUL
HINT:
Overhaul the RH side by the same procedures with LH side.
1. REMOVE FRONT WHEEL
2. DRAIN BRAKE FLUID
NOTICE:
Wash the brake fluid off immediately if it comes into contact with any painted surfaces.
3. DISCONNECT FRONT FLEXIBLE HOSE
(a) Remove the union bolt and a gasket from the disc brake cylinder, then disconnect the flexible hose
from the disc brake cylinder.
4. REMOVE DISC BRAKE CYLINDER ASSY LH
(a) Remove the 2 bolts and disc brake cylinder.
5. REMOVE DISC BRAKE PAD KIT FRONT (PAD ONLY)
(a) Remove the 2 brake pads with anti
squeal shims.
6. REMOVE ANTI SQUEAL SHIM KIT FRONT
(a) Remove the 2 anti squeal shims from 2 brake pads.
(b) Using a screwdriver, remove the wear indicator from 2
brake pads.
7. REMOVE FRONT DISC BRAKE PAD SUPPORT PLATE
(a) Remove the upper side front disc brake pad support plate.
8. REMOVE FRONT DISC BRAKE PAD SUPPORT PLATE
(a) Remove the bottom side front disc brake pad support plate.
9. REMOVE FRONT DISC BRAKE CYLINDER SLIDE PIN
(a) Remove the 2 cylinder slide pins from the disc brake cylin-
der mounting.
Page 284 of 969

(2) Install the wear indicator to the 2 brake pads.
NOTICE:
�When replac")
F41866
Anti Squeal
Shim
Wear Indicator
- BRAKEFRONT BRAKE
32-39
2473 Author�: Date�:
2005 LEXUS ES330 REPAIR MANUAL (RM1124U)
(2) Install the wear indicator to the 2 brake pads.
NOTICE:
�When replacing worn pads, the anti squeal shims
must be replaced together with the pads.
�Install the shims and pad wear indicator correctly of
which positions and directions.
(b) Install the anti squeal shim kit front (Twin piston Type).
(1) Apply the anti squeal shim with pad grease, and
install the anti squeal shim to each pad.
(2) Install the wear indicator to the 2 brake pads.
NOTICE:
�When replacing worn pads, the anti squeal shims
must be replaced together with the pads.
�Install the shims and pad wear indicator correctly of
which positions and directions.
38. INSTALL DISC BRAKE PAD KIT FRONT (PAD ONLY)
(a) Install the 2 disc brake pads with the pad wear indicator facing upward.
NOTICE:
There should be no oil or grease on the friction surface of the pads and the disc.
39. INSTALL DISC BRAKE CYLINDER ASSY LH
(a) Install the disc brake cylinder with the 2 bolts.
Torque: 34.3 NVm (350 kgfVcm, 25 ftVlbf)
40. CONNECT FRONT FLEXIBLE HOSE
(a) Connect a new gasket and flexible hose with the union bolt.
Torque: 29.4 NVm (300 kgfVcm, 22 ftVlbf)
HINT:
Install the flexible hose lock securely in the lock hold of the disc brake cylinder.
41. FILL RESERVOIR WITH BRAKE FLUID
42. BLEED MASTER CYLINDER (SEE PAGE 32-4)
SST 09023-00101
43. BLEED BRAKE LINE (SEE PAGE 32-4)
44. CHECK FLUID LEVEL IN RESERVOIR (SEE PAGE 32-4)
45. CHECK BRAKE FLUID LEAKAGE
46. INSTALL FRONT WHEEL
Torque: 103 NVm (1,050 kgfVcm, 76 ftVlbf)
Page 299 of 969
3203N-09
F41016
F41018F41017
C84803
32-54
- BRAKESPEED SENSOR FRONT LH
2488 Author�: Date�:
2005 LEXUS ES330 REPAIR MANUAL (RM1124U)
SPEED SENSOR FRONT LH
REPLACEMENT
HINT:
Replace the RH side by the same procedures with LH side.
1. REMOVE FRONT WHEEL
2. REMOVE FRONT FENDER LINER LH
3. REMOVE SPEED SENSOR FRONT LH
(a) Disconnect the speed sensor connector and clamp.
(b) Remove the 2 clamp bolts holding the sensor harness
and clamp from the body and shock absorber.
(c) Remove the bolt and speed sensor FR LH.
NOTICE:
Do not stick and foreign matter on the sensor tip.
Page 300 of 969
C84803
F41018F41017
A
B
F41016
- BRAKESPEED SENSOR FRONT LH
32-55
2489 Author�: Date�:
2005 LEXUS ES330 REPAIR MANUAL (RM1124U)
4. INSTALL SPEED SENSOR FRONT LH
(a) Install the speed sensor FR LH with the bolt.
Torque: 8.0 NVm (82 kgfVcm, 71 in.Vlbf)
NOTICE:
Make sure the sensor tip is clean.
(b) Install the sensor harness clamps with the 2 bolts ºAº and
ºBº to the body and shock absorber.
Torque:
Bolt A: 5.0 NVm (51 kgfVcm, 44 in.Vlbf)
Bolt B: 18.8 NVm (192 kgfVcm, 14 ftVlbf)
(c) Connect the clamp to the knuckle.
(d) Connect the speed sensor connector and clamp.
5. INSTALL FRONT FENDER LINER LH
6. INSTALL FRONT WHEEL
Torque: 103 NVm (1,050 kgfVcm, 76 ftVlbf)
7. CHECK ABS SPEED SENSOR SIGNAL (SEE PAGE 05-420 or 05-471)
Page 301 of 969
3203O-06
F40301
C83035
32-56
- BRAKESKID CONTROL SENSOR
2490 Author�: Date�:
2005 LEXUS ES330 REPAIR MANUAL (RM1124U)
SKID CONTROL SENSOR
REPLACEMENT
HINT:
Replace the RH side by the same procedure with LH side.
1. REMOVE REAR WHEEL
2. SEPARATE SKID CONTROL SENSOR WIRE
(a) Disconnect the connector from the skid control sensor.
3. REMOVE REAR DISC BRAKE CALIPER ASSY LH (SEE PAGE 32-41)
4. REMOVE REAR DISC
5. REMOVE REAR AXLE HUB & BEARING ASSY LH
(a) Remove the 4 bolts and rear axle hub & bearing assy.
Page 303 of 969
C83035
32-58
- BRAKESKID CONTROL SENSOR
2492 Author�: Date�:
2005 LEXUS ES330 REPAIR MANUAL (RM1124U)
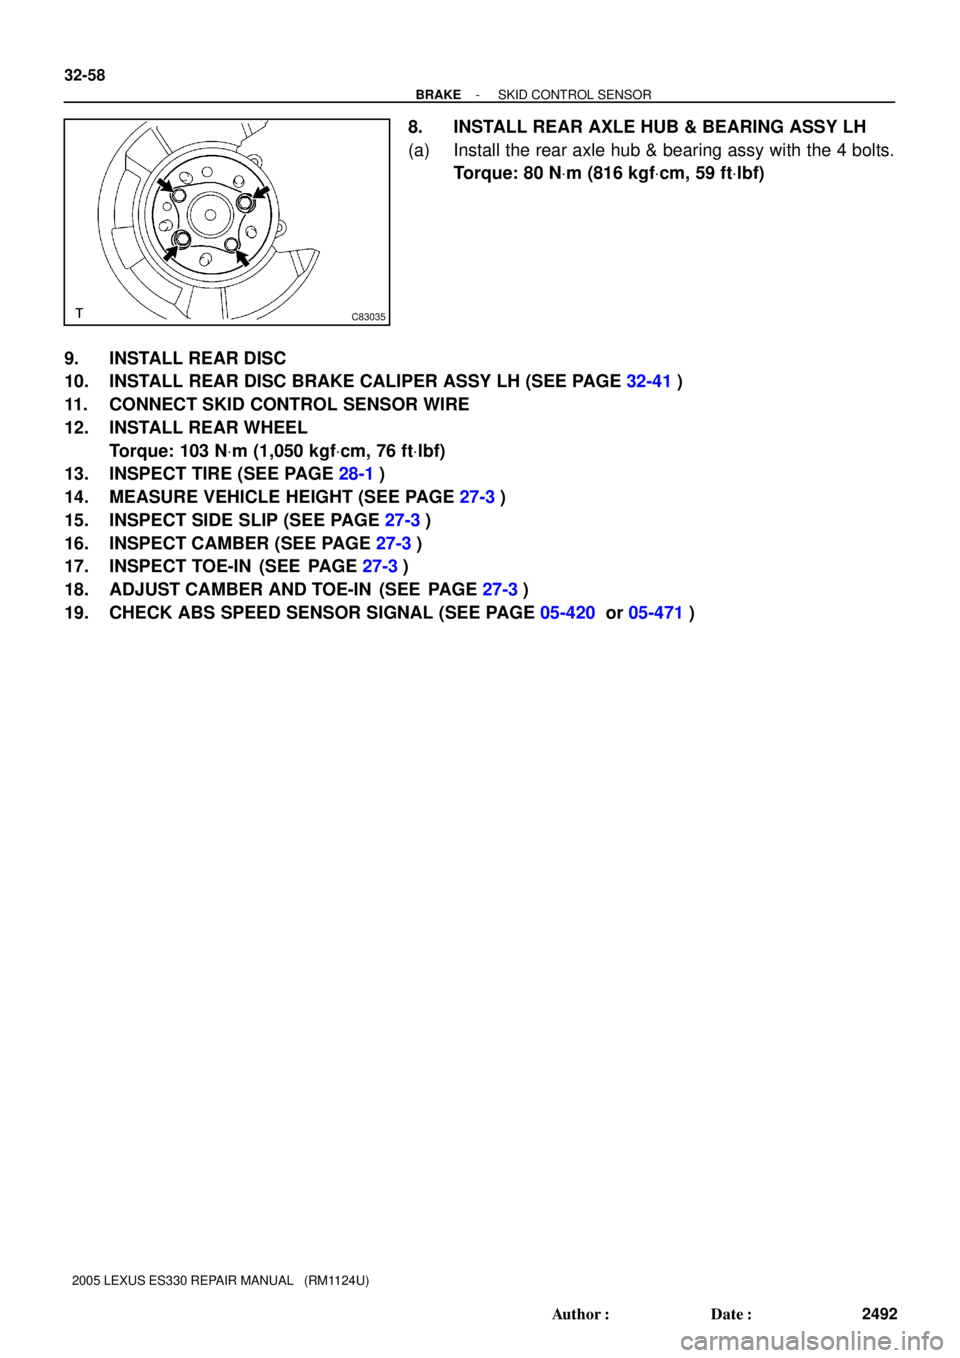
8. INSTALL REAR AXLE HUB & BEARING ASSY LH
(a) Install the rear axle hub & bearing assy with the 4 bolts.
Torque: 80 NVm (816 kgfVcm, 59 ftVlbf)
9. INSTALL REAR DISC
10. INSTALL REAR DISC BRAKE CALIPER ASSY LH (SEE PAGE 32-41)
11. CONNECT SKID CONTROL SENSOR WIRE
12. INSTALL REAR WHEEL
Torque: 103 NVm (1,050 kgfVcm, 76 ftVlbf)
13. INSPECT TIRE (SEE PAGE 28-1)
14. MEASURE VEHICLE HEIGHT (SEE PAGE 27-3)
15. INSPECT SIDE SLIP (SEE PAGE 27-3)
16. INSPECT CAMBER (SEE PAGE 27-3)
17. INSPECT TOE-IN (SEE PAGE 27-3)
18. ADJUST CAMBER AND TOE-IN (SEE PAGE 27-3)
19. CHECK ABS SPEED SENSOR SIGNAL (SEE PAGE 05-420 or 05-471)
Page 318 of 969

PARKING BRAKE CABLE ASSY NO.3
REPLACEMENT
HINT:
�COMPON")
3305K-02
C90471
C90462F41690
- PARKING BRAKEPARKING BRAKE CABLE ASSY NO.3
33-1 1
2507 Author�: Date�:
2005 LEXUS ES330 REPAIR MANUAL (RM1124U)
PARKING BRAKE CABLE ASSY NO.3
REPLACEMENT
HINT:
�COMPONENTS: See page 33-3
�For parking brake cable No.2, employ the same procedure to the RH side.
1. REMOVE REAR WHEEL
2. REMOVE REAR DISC BRAKE CALIPER ASSY LH
(a) Remove the 2 bolts and separate the rear disc brake caliper assy LH.
HINT:
Do not the flexible hose from the brake caliper assy LH.
3. REMOVE REAR DISC(See page 33-16)
4. REMOVE PARKING BRAKE SHOE RETURN TENSION SPRING(See page 33-16)
5. REMOVE PARKING BRAKE SHOE STRUT COMPRESSION SPRING(See page 33-16)
6. REMOVE PARKING BRAKE SHOE STRUT LH(See page 33-16)
7. REMOVE PARKING BRAKE SHOE(See page 33-16)
8. REMOVE PARKING BRAKE CABLE HEAT INSULATOR
(a) Remove the 3 nuts and parking brake heat insulator.
9. REMOVE PARKING BRAKE CABLE ASSY NO.3
(a) Remove the 2 bolts and disconnect the parking brake
cable assy No.3 from the backing plate.
(b) Remove the 2 nuts, bolt and parking brake cable assy
No.3.