Page 377 of 969

14-1
2093 Author�: Date�:
2005 LEXUS ES330 REPAIR MANUAL")
141C0-02
A82940
Vane Pump
CrankshaftGenerator Measuring Points for Belt Deflection
or Tension
Compressor
- ENGINE MECHANICALENGINE (3MZ-FE)
14-1
2093 Author�: Date�:
2005 LEXUS ES330 REPAIR MANUAL (RM1124U)
ENGINE (3MZ-FE)
INSPECTION
1. INSPECT ENGINE COOLANT (See page 16-1)
2. INSPECT ENGINE OIL
3. INSPECT BATTERY
Standard specific gravity: 1.25 to 1.29 at 20�C (68�F)
4. INSPECT AIR CLEANER FILTER ELEMENT SUB-ASSY
5. INSPECT SPARK PLUG (See page 18-3)
6. INSPECT V-RIBBED BELT
(a) Belt deflection:
Pressing force: 98 N (10 kgf, 22 lbf)
New Belt
mm (in.)Used Belt
mm (in.)
V-ribbed Belt
(For fan and generator)9.1 to 10.5
(0.358 to 0.413)11 to 13.5
(0.433 to 0.531)
V-ribbed Belt
(For vane pump)8 to 10
(0.315 to 0.394)11 to 14
(0.433 to 0.551)
(b) Belt tension:
New Belt
N (kg , lb)Used Belt
N (kg , lb)
V-ribbed Belt
(For fan and generator)637 to 735
(65 to 75 , 143 to 165)392 to 588
(40 to 60 , 88 to 132)
V-ribbed Belt
(For vane pump)588 to 686
(60 to 70 , 132 to 154)245 to 392
(25 to 40 , 55 to 88)
NOTICE:
�Check the drive belt deflection at the specified point.
�When installing a new belt, set its tension value as
specified.
�When inspecting a belt which is used for over 5 min-
utes, apply the specification of ºUsed beltº.
�When reinstalling a belt which is used for over 5 min-
utes, adjust its belt deflection and tension to the inter-
mediate value of each specification in ºUsed beltº.
�The V- ribbed belt tension and deflection value
should be checked after 2 revolutions of engine
cranking.
�When using a belt tension gauge, confirm the accura-
cy first by using a master gauge.
7. INSPECT IGNITION TIMING
(a) Warm up engine.
(b) When using the hand-held tester or OBD II scan tool:
(1) Connect the hand-held tester or OBD II scan tool
to the DLC3.
(2) Enter DATA LIST MODE on the hand-held tester or
OBD II scan tool.
Ignition timing: 8 to 12� BTDC
HINT:
Refer to the hand-held tester or OBD II scan tool operator's
manual if you need help to select DATA LIST.
Page 383 of 969

(b)
(b)(a)
(a)
A36719
P18805
- ENGINE MECHANICALVALVE CLEARANCE (3MZ-FE)
14-7
2099 Author�: Date�:
2005 LEXUS ES330 REPAIR MANUAL (RM1124U)
VALVE CLEARANCE (3MZ-FE)
ADJUSTMENT
1.")
141J7-02
A78541
(b)
(b)
(b)(a)
(a)
A36719
P18805
- ENGINE MECHANICALVALVE CLEARANCE (3MZ-FE)
14-7
2099 Author�: Date�:
2005 LEXUS ES330 REPAIR MANUAL (RM1124U)
VALVE CLEARANCE (3MZ-FE)
ADJUSTMENT
1. DISCONNECT BATTERY NEGATIVE TERMINAL
2. DRAIN ENGINE COOLANT (See page 16-9)
3. REMOVE FRONT FENDER APRON SEAL RH
4. REMOVE FRONT SUSPENSION UPPER BRACE CENTER (W/O TEMS) (See page 10-1 1)
5. REMOVE V-BANK COVER SUB-ASSY (See page 10-1 1)
6. REMOVE AIR CLEANER CAP SUB-ASSY (See page 10-1 1)
7. REMOVE EMISSION CONTROL VALVE SET (See page 11-13)
8. REMOVE INTAKE AIR SURGE TANK (See page 11-13)
9. REMOVE RADIATOR HOSE INLET
10. REMOVE IGNITION COIL ASSY
11. REMOVE CYLINDER HEAD COVER SUB-ASSY
(a) Remove the 2 engine wire harness clamps.
(b) Remove the 3 nuts, then disconnect the engine wire har-
ness.
(c) Remove the 9 bolts and cylinder head cover.
12. REMOVE CYLINDER HEAD COVER SUB-ASSY LH
(a) Using an E6 Torx) socket wrench, remove the 2 bolts and
disconnect the engine wire harness protector.
(b) Remove the 9 bolts and cylinder head cover.
13. INSPECT VALVE CLEARANCE
(a) Turn the crankshaft pulley, then align the timing notch with
the timing mark º0º of the timing belt No. 1 cover.
(b) Check that the valve lifters on the intake side of the No.
1 cylinder are not pushed by the cam.
If the valve lifters are pushed, turn the crankshaft by 1 revolution
(360�) and align the marks as above.
Page 400 of 969
A78305
N´m (kgf´cm, ft´lbf)
: Specified torque
8.5 (87, 75 in.Vlbf)
220 (2,250, 162)
8.5 (87, 75 in.Vlbf)
28 (286, 21)
27 (280, 20)
Timing Belt Tensioner AssyCrankshaft PulleyTiming Belt No. 1 Cover
Timing Belt Guide No. 2
Engine Mounting Bracket RH Timing Belt No. 2 Cover
Timing Belt
14-24
- ENGINE MECHANICALPARTIAL ENGINE ASSY (3MZ-FE)
2116 Author�: Date�:
2005 LEXUS ES330 REPAIR MANUAL (RM1124U)
Page 401 of 969
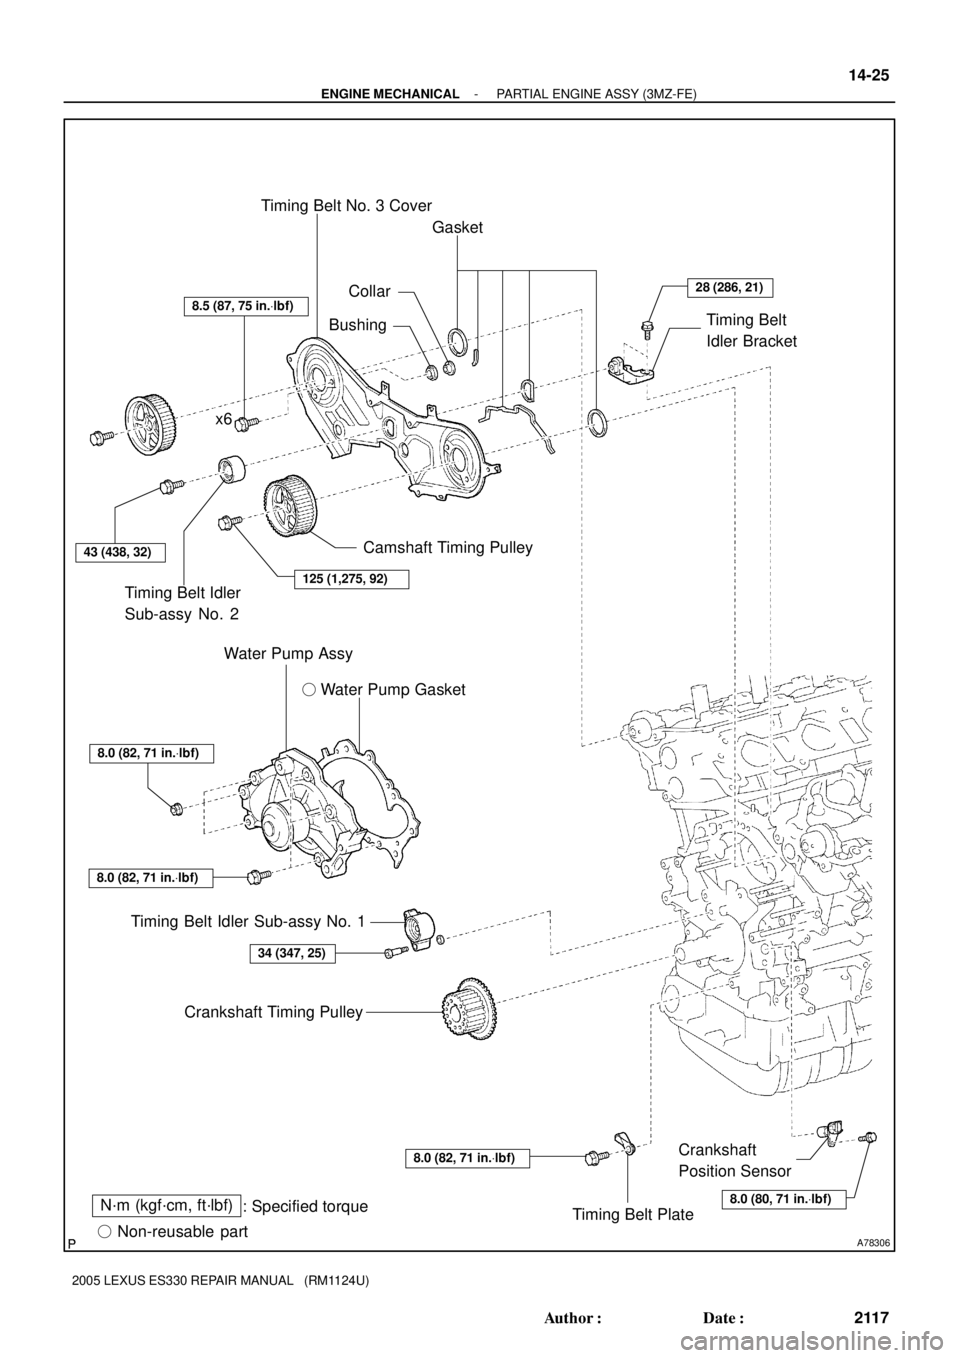
A78306
N´m (kgf´cm, ft´lbf)
: Specified torque
� Non-reusable part� Water Pump Gasket
28 (286, 21)
8.5 (87, 75 in.Vlbf)
125 (1,275, 92)
43 (438, 32)
8.0 (82, 71 in.Vlbf)
8.0 (82, 71 in.Vlbf)
34 (347, 25)
8.0 (80, 71 in.Vlbf)
8.0 (82, 71 in.Vlbf)
Timing Belt PlateCrankshaft
Position Sensor Crankshaft Timing Pulley Timing Belt Idler Sub-assy No. 1Water Pump Assy Timing Belt Idler
Sub-assy No. 2Camshaft Timing Pulley x6Timing Belt No. 3 Cover
CollarGasket
Timing Belt
Idler Bracket
Bushing
- ENGINE MECHANICALPARTIAL ENGINE ASSY (3MZ-FE)
14-25
2117 Author�: Date�:
2005 LEXUS ES330 REPAIR MANUAL (RM1124U)
Page 416 of 969

2132 Author�: Date�:
2005 LEXUS ES330 REPAIR MANUAL (RM1124U)
OVERHAUL
1. REMOVE SPARK PLUG
2. REMOVE OIL FILLER")
141CR-02
A78700
SST
A78701
SST 14-40
- ENGINE MECHANICALPARTIAL ENGINE ASSY (3MZ-FE)
2132 Author�: Date�:
2005 LEXUS ES330 REPAIR MANUAL (RM1124U)
OVERHAUL
1. REMOVE SPARK PLUG
2. REMOVE OIL FILLER CAP SUB-ASSY
3. REMOVE OIL FILLER CAP GASKET
4. REMOVE CYLINDER HEAD COVER SUB-ASSY LH
5. REMOVE CYLINDER HEAD COVER GASKET NO.2
6. REMOVE CYLINDER HEAD COVER SUB-ASSY
7. REMOVE CYLINDER HEAD COVER GASKET
8. REMOVE VENTILATION VALVE SUB-ASSY
9. REMOVE CAMSHAFT TIMING OIL CONTROL VALVE ASSY
10. REMOVE VVT SENSOR
(a) Remove both the camshaft oil control valves.
(b) Remove the O-ring from each camshaft oil control valve.
11. REMOVE OIL LEVEL GAGE SUB-ASSY
12. REMOVE OIL LEVEL GAGE GUIDE
13. REMOVE CRANKSHAFT PULLEY
(a) Using SST, loosen the pulley bolt.
SST 09213-54015 (91651-60855), 09330-00021
(b) Using SST and the pulley bolt, remove the pulley.
SST 09950- 50013 (09951- 05010, 09952- 05010,
09953-05020, 09954-05031)
NOTICE:
Before using SST, apply lubricating oil to the threads and
tip of the center bolt 150.
14. REMOVE TIMING BELT NO.1 COVER
15. REMOVE TIMING BELT NO.2 COVER
16. REMOVE ENGINE MOUNTING BRACKET RH
17. REMOVE TIMING BELT GUIDE NO.2
Page 417 of 969

14-41
2133 Author�: Date�:
2005 LEXUS ES330 REPAIR MANUAL (RM1124U)
18. REMOVE TIMING BELT
(a)")
A78326
Turn
A05052
A52840
A78327
Approximately 60�
Turn
- ENGINE MECHANICALPARTIAL ENGINE ASSY (3MZ-FE)
14-41
2133 Author�: Date�:
2005 LEXUS ES330 REPAIR MANUAL (RM1124U)
18. REMOVE TIMING BELT
(a) Set the No. 1 cylinder to the TDC/compression.
(1) Temporarily install the crankshaft pulley bolt and
washer to the crankshaft.
(2) Turn the crankshaft clockwise, then align the timing
mark of the crankshaft timing pulley with the oil
pump body.
(3) Check that the timing marks of the camshaft timing
pulleys and the timing belt No. 3 cover are aligned.
If not, turn the crankshaft by 1 revolution (360�).
(4) Remove the crankshaft pulley bolt.
(b) If reusing the timing belt, check that there are 3 installa-
tion marks on the timing belt as shown in the illustration.
(1) If the installation marks have disappeared, put new
installation marks on the timing belt before remov-
ing.
(c) Set the No. 1 cylinder to approximately 60� BTDC/com-
pression.
(1) Turn the crankshaft counterclockwise by approxi-
mately 60�.
NOTICE:
If the timing belt is disengaged, having the crankshaft
pulley set at the wrong angle can cause contact of the pis-
ton head with the valve head when removing the camshaft
timing pulley and camshaft, which causes damage. So al-
ways set the crankshaft pulley at the correct angle.
(d) Remove the timing belt tensioner.
NOTICE:
Do not reinstall the tensioner with its plunger extended.
Page 418 of 969

(6) (1)(4) (2)(3)
A78703
SST
A78704
SST
A78705
SST 14-42
- ENGINE MECHANICALPARTIAL ENGINE ASSY (3MZ-FE)
2134 Author�: Date�:
2005 LEXUS ES330 REPAIR MANUAL (RM1124U)
(e) Remove the timin")
A78702
(5)
(6) (1)(4) (2)(3)
A78703
SST
A78704
SST
A78705
SST 14-42
- ENGINE MECHANICALPARTIAL ENGINE ASSY (3MZ-FE)
2134 Author�: Date�:
2005 LEXUS ES330 REPAIR MANUAL (RM1124U)
(e) Remove the timing belt in this order.
1stNo. 1 idler pulley
2ndRH camshaft timing pulley
3rdNo. 2 idler pulley
4thLH camshaft timing pulley
5thWater pump pulley
6thCrankshaft timing pulley
19. REMOVE TIMING BELT IDLER SUB-ASSY NO.1
(a) Using a socket hexagon wrench 10, remove the pivot bolt, timing belt idler No. 1 and plate washer.
20. REMOVE TIMING BELT IDLER SUB-ASSY NO.2
21. REMOVE CRANKSHAFT POSITION SENSOR
22. REMOVE CAMSHAFT TIMING PULLEY
(a) Using SST, remove the bolt and RH timing pulley.
SST 09960-10010 (09962-01000, 09963-01000)
(b) Using SST, remove the bolt and LH timing pulley.
SST 09960-10010 (09962-01000, 09963-01000)
HINT:
Arrange the camshaft timing pulleys (RH and LH sides) so that
they can be returned to the original locations when reassem-
bling.
23. REMOVE TIMING BELT NO.3 COVER
24. REMOVE TIMING BELT IDLER BRACKET
25. REMOVE CRANKSHAFT TIMING PULLEY
(a) Remove the bolt and timing belt plate.
(b) Install the pulley bolt to the crankshaft.
(c) Using SST, remove the crankshaft timing pulley.
SST 09950- 50013 (09951- 05010, 09952- 05010,
09953-05020, 09954-05011)
NOTICE:
�Do not scratch the sensor part of the crankshaft tim-
ing pulley.
�Before using SST, apply lubricating oil to the threads
and tip of the center bolt 150.
Page 427 of 969

14-51
2143 Author�: Date�:
2005 LEXUS ES330 REPAIR MANUAL (RM1124U)
51. REMOVE OIL PUMP SEAL
(a) Using a screwdriver, pry")
A62375
A05245
A05243
EM3336
- ENGINE MECHANICALPARTIAL ENGINE ASSY (3MZ-FE)
14-51
2143 Author�: Date�:
2005 LEXUS ES330 REPAIR MANUAL (RM1124U)
51. REMOVE OIL PUMP SEAL
(a) Using a screwdriver, pry out the oil seal.
52. REMOVE SPARK PLUG TUBE GASKET
(a) Bend up the tab on the ventilation baffle plate which pre-
vents the gasket from slipping out.
NOTICE:
Be careful not to damage the baffle plate of the cylinder
head cover.
(b) Using a screwdriver and hammer, tap out the gasket.
(c) Using needle-nose pliers, pry out the gasket.
NOTICE:
Be careful not to damage the cylinder head cover.
53. INSPECT TIMING BELT
NOTICE:
�Do not bend, twist or turn the timing belt inside out.
�Do not allow contact of the timing belt with oil, water
or steam.
�Do not use the timing belt tension when installing or
removing the mounting bolt of the camshaft timing
pulley.
Check the belt for any defects as shown in the illustrations.
Also, check these points below.
(a) If the belt tears in a short time:
�Check if the belt is installed properly.
�Check if the timing cover gasket is damaged and if
it is installed properly.
(b) If the belt teeth are cracked or damaged, check if either
camshaft is locked.
(c) If there is noticeable wear or cracks on the belt face,
check if there are nicks on the side of the idler pulley lock
and water pump.

: Specified torque
8.5 (87, 75 in.Vlbf)
220 (2,250, 162)
8.5 (87, 75 in.Vlbf)
28 (286, 21)
27 (280, 20)
Timing Belt Tensioner AssyCrankshaft PulleyTiming Belt No. 1 Cove")