Page 1007 of 2870

CO(H4SO)-24
COOLING
Water Pump
9) Install the V-belts.
STALLATION, V-belt.>
10) Install the radiator.
STALLATION, Radiator.>
2. TURBO MODEL
1) Install the water pump onto cylinder block (LH).
NOTE:
Replace the gasket with a new one.
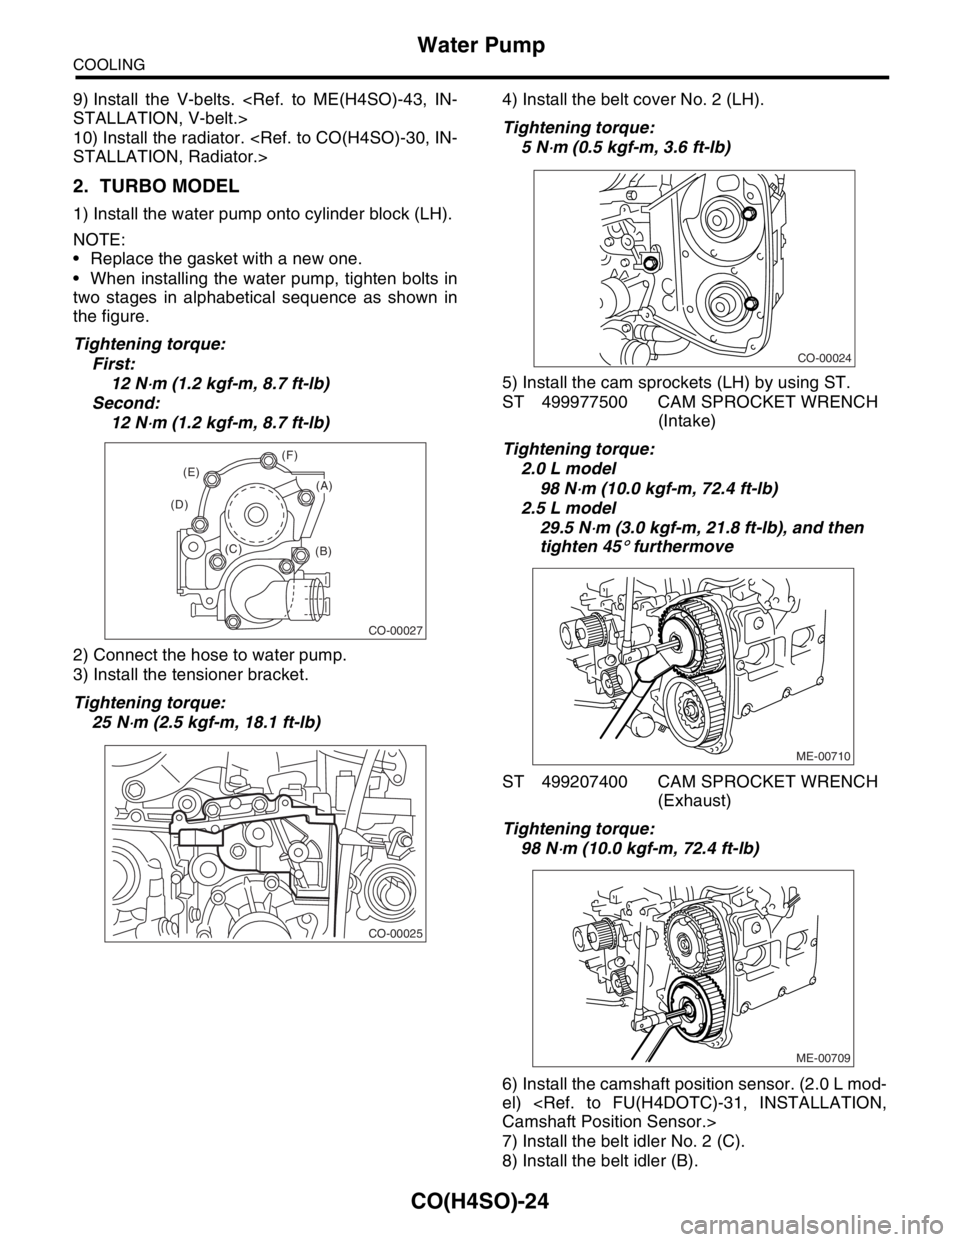
When installing the water pump, tighten bolts in
two stages in alphabetical sequence as shown in
the figure.
Tightening torque:
First:
12 N
⋅m (1.2 kgf-m, 8.7 ft-lb)
Second:
12 N
⋅m (1.2 kgf-m, 8.7 ft-lb)
2) Connect the hose to water pump.
3) Install the tensioner bracket.
Tightening torque:
25 N
⋅m (2.5 kgf-m, 18.1 ft-lb)4) Install the belt cover No. 2 (LH).
Tightening torque:
5 N
⋅m (0.5 kgf-m, 3.6 ft-lb)
5) Install the cam sprockets (LH) by using ST.
ST 499977500 CAM SPROCKET WRENCH
(Intake)
Tightening torque:
2.0 L model
98 N
⋅m (10.0 kgf-m, 72.4 ft-lb)
2.5 L model
29.5 N
⋅m (3.0 kgf-m, 21.8 ft-lb), and then
tighten 45
° furthermove
ST 499207400 CAM SPROCKET WRENCH
(Exhaust)
Tightening torque:
98 N
⋅m (10.0 kgf-m, 72.4 ft-lb)
6) Install the camshaft position sensor. (2.0 L mod-
el)
Camshaft Position Sensor.>
7) Install the belt idler No. 2 (C).
8) Install the belt idler (B).
CO-00027
(B) (C) (D)(E)(F)
(A)
CO-00025
CO-00024
ME-00710
ME-00709
Page 1008 of 2870

CO(H4SO)-25
COOLING
Water Pump
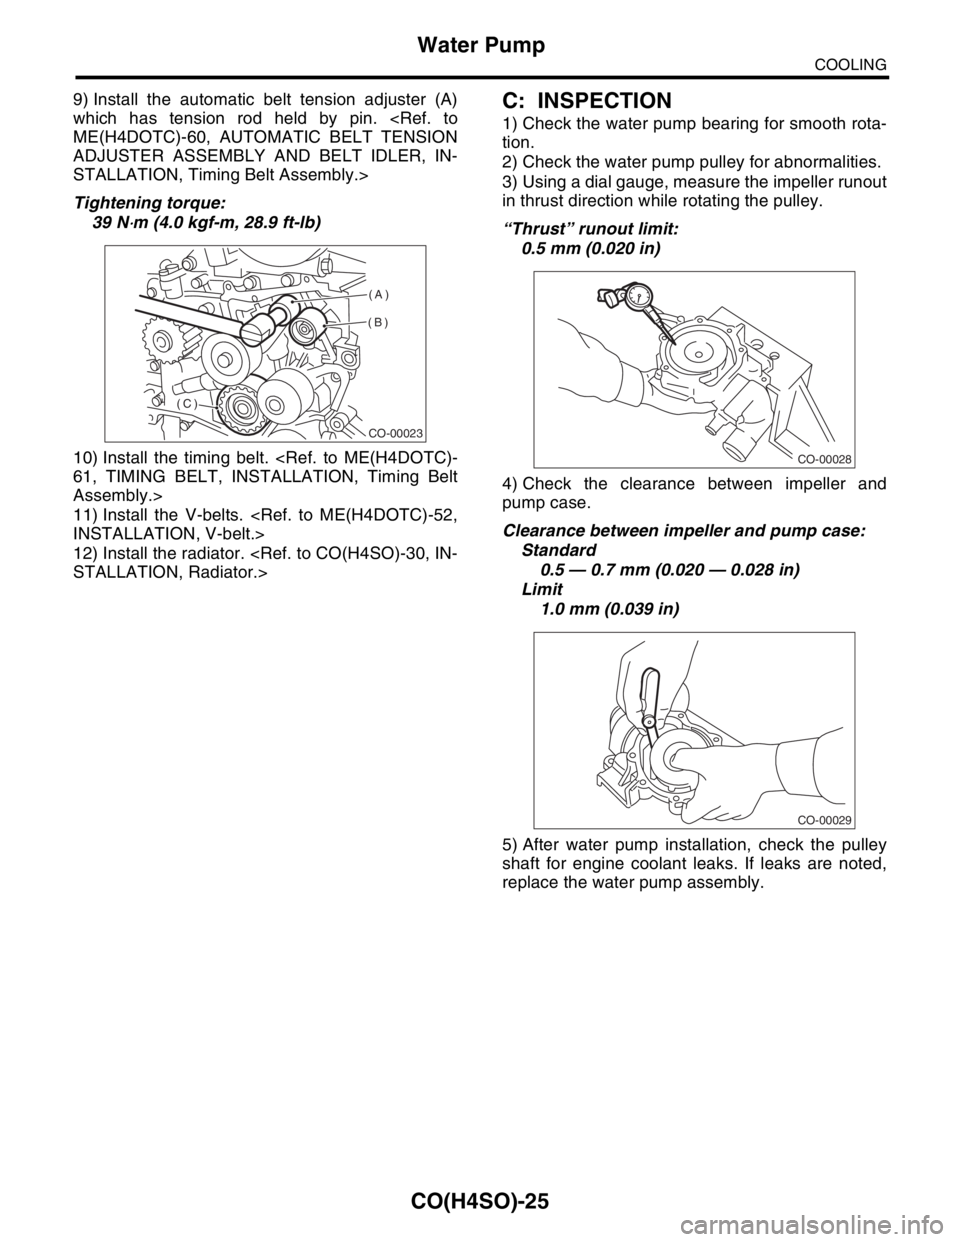
9) Install the automatic belt tension adjuster (A)
which has tension rod held by pin.
ME(H4DOTC)-60, AUTOMATIC BELT TENSION
ADJUSTER ASSEMBLY AND BELT IDLER, IN-
STALLATION, Timing Belt Assembly.>
Tightening torque:
39 N
⋅m (4.0 kgf-m, 28.9 ft-lb)
10) Install the timing belt.
61, TIMING BELT, INSTALLATION, Timing Belt
Assembly.>
11) Install the V-belts.
INSTALLATION, V-belt.>
12) Install the radiator.
STALLATION, Radiator.>
C: INSPECTION
1) Check the water pump bearing for smooth rota-
tion.
2) Check the water pump pulley for abnormalities.
3) Using a dial gauge, measure the impeller runout
in thrust direction while rotating the pulley.
“Thrust” runout limit:
0.5 mm (0.020 in)
4) Check the clearance between impeller and
pump case.
Clearance between impeller and pump case:
Standard
0.5 — 0.7 mm (0.020 — 0.028 in)
Limit
1.0 mm (0.039 in)
5) After water pump installation, check the pulley
shaft for engine coolant leaks. If leaks are noted,
replace the water pump assembly.
CO-00023
(A)
(B)
(C)
CO-00028
CO-00029
Page 1009 of 2870
CO(H4SO)-26
COOLING
Thermostat
5. Thermostat
A: REMOVAL
1) Set the vehicle on a lift.
2) Lift-up the vehicle.
3) Remove the under cover.
4) Drain the engine coolant completely.
CO(H4SO)-19, DRAINING OF ENGINE COOL-
ANT, REPLACEMENT, Engine Coolant.>
5) Disconnect the radiator outlet hose from thermo-
stat cover.
NON-TURBO MODEL
6) Disconnect the radiator outlet hose.
TURBO MODEL7) Remove the thermostat cover and gasket, and
pull out the thermostat.
B: INSTALLATION
1) Install the thermostat in the water pump, and
then install the thermostat cover together with a
gasket.
NOTE:
When reinstalling the thermostat, use a new gas-
ket.
The thermostat must be installed with the jiggle
pin (A) facing to front side.
Tightening torque:
6.5 N
⋅m (0.66 kgf-m, 4.8 ft-lb)
2) Fill engine coolant.
FILLING OF ENGINE COOLANT, REPLACE-
MENT, Engine Coolant.>
CO-00009
CO-00076
CO-00030
CO-00031
CO-00032
(A)
Page 1011 of 2870
CO(H4SO)-28
COOLING
Radiator
6. Radiator
A: REMOVAL
1. NON-TURBO MODEL
WARNING:
The radiator is pressurized. Wait until the en-
gine cools down before working on the radia-
tor.
1) Set the vehicle on a lift.
2) Disconnect the ground cable from battery.
3) Lift-up the vehicle.
4) Remove the under cover.
5) Drain the engine coolant completely.
CO(H4SO)-19, DRAINING OF ENGINE COOL-
ANT, REPLACEMENT, Engine Coolant.>
6) Disconnect the connectors of radiator main fan
motor (A) and sub fan motor (B).
7) Disconnect the radiator outlet hose from water
pump.8) Disconnect the ATF cooler hoses from ATF pipe.
(AT model) Plug the openings in the hose and radi-
ator with caps in order to prevent ATF from leaking.
9) Lower the vehicle.
10) Disconnect the over flow hose.
11) Remove the reservoir tank.
12) Disconnect the radiator inlet hose from engine.
13) Remove the radiator upper brackets.
FU-00009
CO-00013
(A)(B)
CO-00076
CO-00034
CO-00015
CO-00035
CO-00036
Page 1012 of 2870

CO(H4SO)-29
COOLING
Radiator
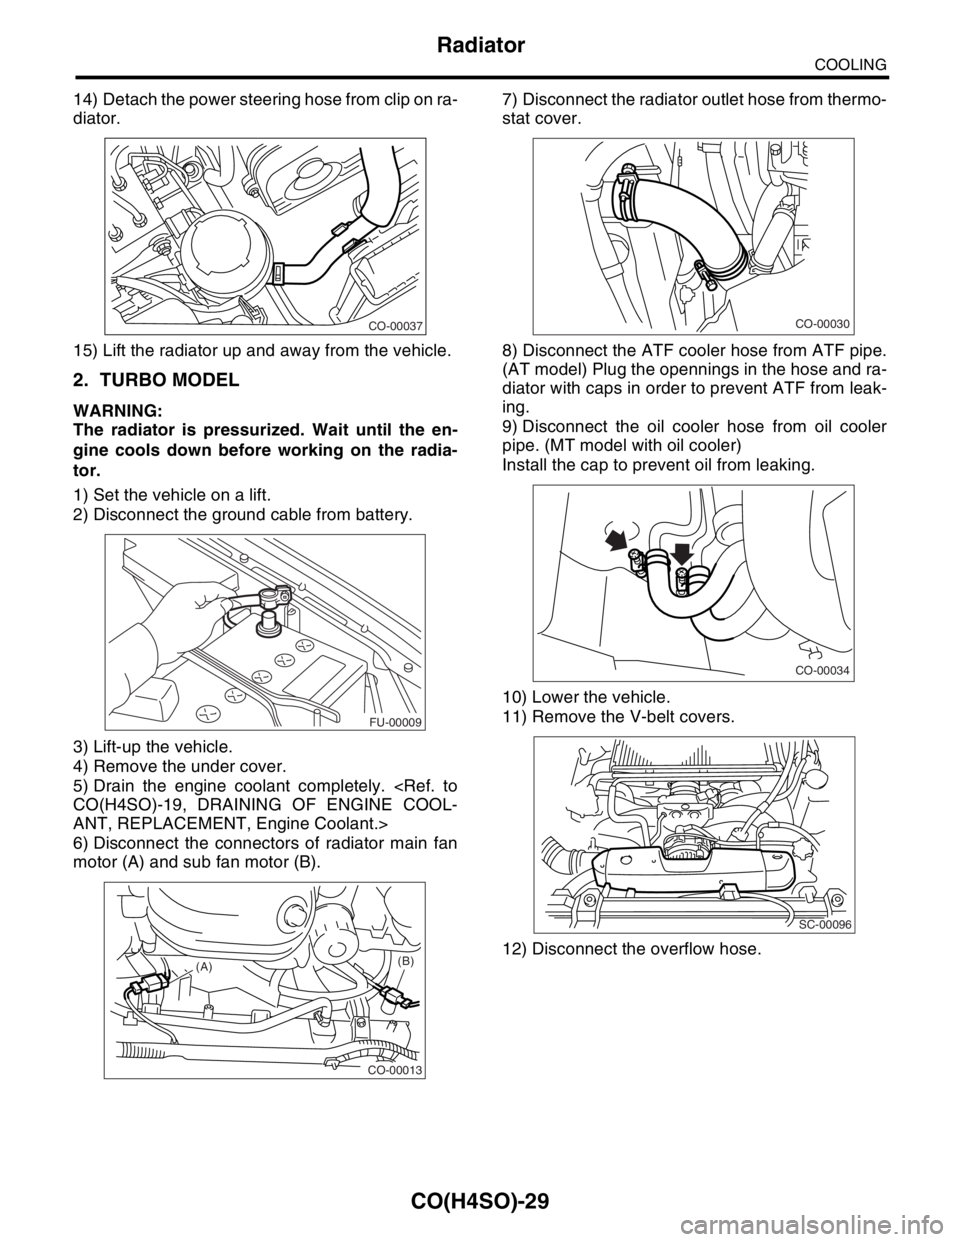
14) Detach the power steering hose from clip on ra-
diator.
15) Lift the radiator up and away from the vehicle.
2. TURBO MODEL
WARNING:
The radiator is pressurized. Wait until the en-
gine cools down before working on the radia-
tor.
1) Set the vehicle on a lift.
2) Disconnect the ground cable from battery.
3) Lift-up the vehicle.
4) Remove the under cover.
5) Drain the engine coolant completely.
CO(H4SO)-19, DRAINING OF ENGINE COOL-
ANT, REPLACEMENT, Engine Coolant.>
6) Disconnect the connectors of radiator main fan
motor (A) and sub fan motor (B).7) Disconnect the radiator outlet hose from thermo-
stat cover.
8) Disconnect the ATF cooler hose from ATF pipe.
(AT model) Plug the opennings in the hose and ra-
diator with caps in order to prevent ATF from leak-
ing.
9) Disconnect the oil cooler hose from oil cooler
pipe. (MT model with oil cooler)
Install the cap to prevent oil from leaking.
10) Lower the vehicle.
11) Remove the V-belt covers.
12) Disconnect the overflow hose.
CO-00037
FU-00009
CO-00013
(A)(B)
CO-00030
CO-00034
SC-00096
Page 1013 of 2870
CO(H4SO)-30
COOLING
Radiator
13) Remove the reservoir tank.
14) Disconnect the radiator inlet hose (A) and wa-
ter tank hose (B) from radiator.
15) Remove the radiator upper brackets.
16) Disconnect the power steering hose from clips
on radiator.
17) Lift the radiator up and away from the vehicle.18) Remove the radiator under cover (AT model).
B: INSTALLATION
1. NON-TURBO MODEL
1) Attach the radiator lower cushions to holes on
the vehicle.
2) Install the radiator to vehicle.
NOTE:
Fit pins on the lower side of radiator into cushions
on the body side.
3) Install the radiator upper brackets and tighten
bolts.
Tightening torque:
18 N
⋅m (1.8 kgf-m, 13.0 ft-lb)
CO-00015
CO-00039
(A) (B)
CO-00040
CO-00037
CO-00070
CO-00041
CO-00036
Page 1014 of 2870
CO(H4SO)-31
COOLING
Radiator
4) Attach the power steering hose to radiator.
5) Connect the radiator inlet hose.
6) Install the reservoir tank.
Tightening torque:
4.9 N
⋅m (0.50 kgf-m, 3.6 ft-lb)
7) Connect the overflow hose.
8) Lift-up the vehicle.
9) Connect the ATF cooler hoses. (AT model)10) Connect the radiator outlet hose.
11) Connect the connectors to radiator main fan
motor (A) and sub fan motor (B).
12) Install the under cover.
13) Lower the vehicle.
14) Connect the battery ground cable to battery.
15) Fill engine coolant.
FILLING OF ENGINE COOLANT, REPLACE-
MENT, Engine Coolant.>
16) Check the ATF level.
SPECTION, Automatic Transmission Fluid.>
CO-00037
CO-00035
CO-00015
CO-00034
CO-00076
CO-00013
(A)(B)
FU-00009
Page 1015 of 2870
CO(H4SO)-32
COOLING
Radiator
2. TURBO MODEL
1) Install the radiator under cover to radiator.
2) Attach the radiator lower cushions to holes on
the vehicle.
3) Install the radiator to vehicle.
NOTE:
Fit pins on the lower side of radiator into cushions
on body side.
4) Install the radiator upper brackets, and then
tighten the bolts.
Tightening torque:
18 N
⋅m (1.8 kgf-m, 13.0 ft-lb)5) Connect the power steering hose to radiator.
6) Connect the radiator inlet hose (A) and water
tank hose (B).
7) Install the reservoir tank.
Tightening torque:
4.9 N
⋅m (0.50 kgf-m, 3.6 ft-lb)
8) Connect the over flow hose.
9) Install the V-belt cover.
10) Lift-up the vehicle.
11) Connect the ATF cooler hoses. (AT model).
CO-00070
CO-00041
CO-00040
CO-00037
CO-00039
(A) (B)
CO-00015
SC-00096