Page 1098 of 3870

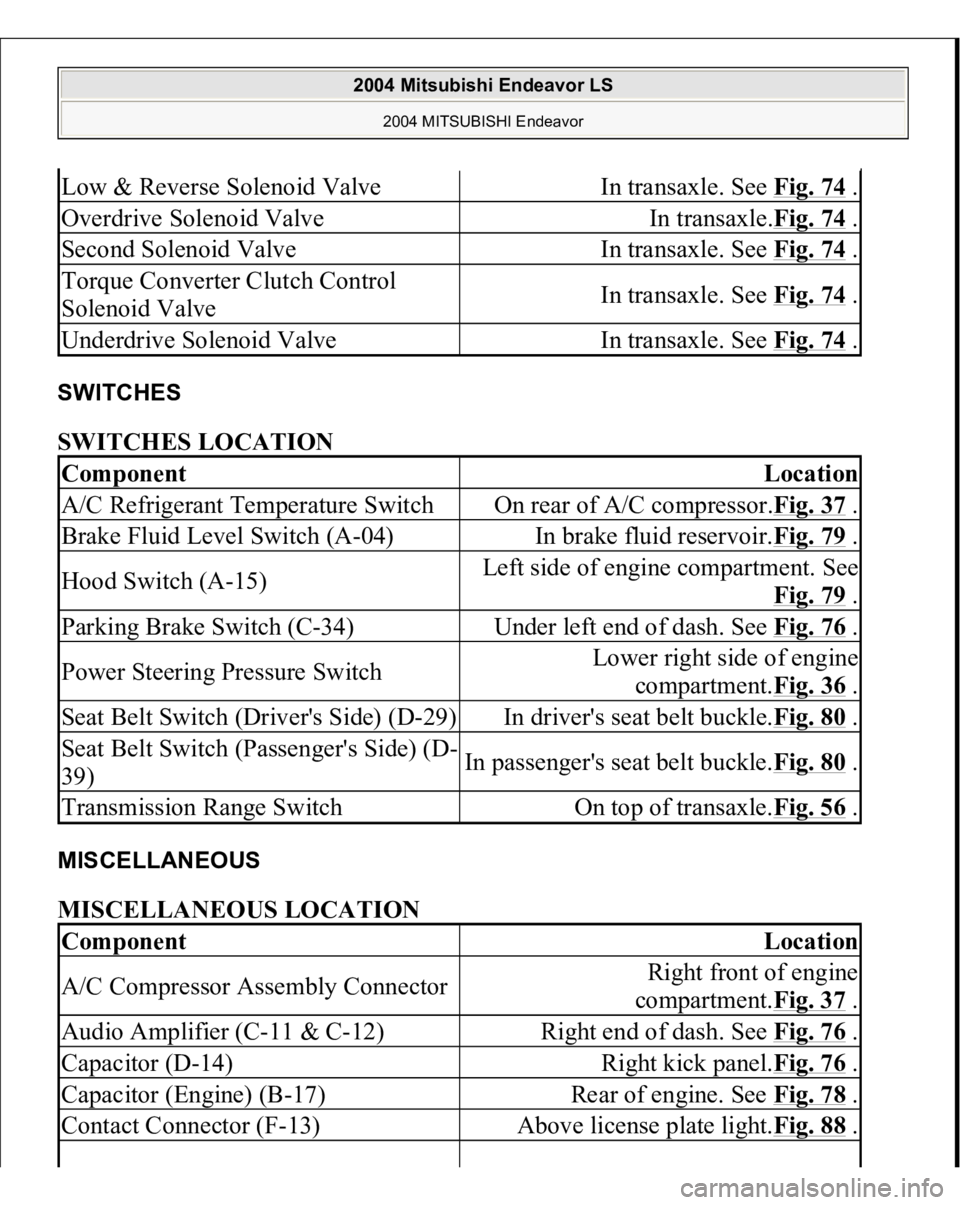
SWITCHES SWITCHES LOCATION MISCELLANEOUS MISCELLANEOUS LOCATION Low & Reverse Solenoid Valve
In transaxle. See Fig. 74
.
Overdrive Solenoid Valve
In transaxle.Fig. 74
.
Second Solenoid Valve
In transaxle. See Fig. 74
.
Torque Converter Clutch Control
Solenoid Valve
In transaxle. See Fig. 74
.
Underdrive Solenoid Valve
In transaxle. See Fig. 74
.
Component
Location
A/C Refrigerant Temperature Switch
On rear of A/C compressor.Fig. 37
.
Brake Fluid Level Switch (A-04)
In brake fluid reservoir.Fig. 79
.
Hood Switch (A-15)
Left side of engine compartment. See
Fig. 79
.
Parking Brake Switch (C-34)
Under left end of dash. See Fig. 76
.
Power Steering Pressure Switch
Lower right side of engine
compartment.Fig. 36
.
Seat Belt Switch (Driver's Side) (D-29)
In driver's seat belt buckle.Fig. 80
.
Seat Belt Switch (Passenger's Side) (D-
39)
In passenger's seat belt buckle.Fig. 80
.
Transmission Range Switch
On top of transaxle.Fig. 56
.
Component
Location
A/C Compressor Assembly Connector
Right front of engine
compartment.Fig. 37
.
Audio Amplifier (C-11 & C-12)
Right end of dash. See Fig. 76
.
Capacitor (D-14)
Right kick panel.Fig. 76
.
Capacitor (Engine) (B-17)
Rear of engine. See Fig. 78
.
Contact Connector (F-13)
Above license plate light.Fig. 88
.
2004 Mitsubishi Endeavor LS
2004 MITSUBISHI Endeavor
Page 1242 of 3870
Fig. 40: Identifying AWD Right Bank
Courtesy of MITSUBISHI MOTOR SALES OF AMERICA.
5. Apply the designated sealant to the screw area of the cylinder block drain plug,
and then tighten to the standard torque.
Specified sealant: 3M (tm) AAD Part No.8731 or equivalent
Tightening torque: 39 +/- 5 N.m (29 +/- 3 ft-lb)
2004 Mitsubishi Endeavor Limited 2004 ENGINE Engine Cooling - Endeavor
Page 1264 of 3870
Fig. 60: Installing O
-Ring
Courtesy of MITSUBISHI MOTOR SALES OF AMERICA.
> >B<< ENGINE COOLANT TEMPERATURE SENSOR INSTALLATION Apply the specified sealant to the thread of the engine coolant temperature sensor,
and then tighten it to the specified torque.
Specified Sealant:3M(tm) AAD part number 8371 or equivalent
2004 Mitsubishi Endeavor Limited 2004 ENGINE Engine Cooling - Endeavor
Page 1300 of 3870
TORQUE SPECIFICATION
S
See illustration in REMOVAL & INSTALLATION
or OVERHAUL
.
WIRING DIAGRAMS For wiring diagrams, see STARTING/CHARGING
.
2004 Mitsubishi Endeavor Limited
2004 STARTING & CHARGING SYSTEMS Generators & Regulators - Endeavor
Page 1303 of 3870
Fig. 2: Checking Engine Oil Level
Courtesy of MITSUBISHI MOTOR SALES OF AMERICA.
ENGINE OIL REPLACEMENT 1. Start the engine and allow it to warm up until the temperature of the coolant
reaches 80 - 90°C (176 - 194°F).
2. Remove the engine oil filler cap.
3. Remove the drain plug to drain oil.
4. Install a new drain plug gasket so that it faces in the direction shown in the
illustration, and then tighten the drain plug to the specified torque.
Tightening torque: 39 +/- 5 N.m (29 +/- 3 ft-lb)
WARNING:Use care as oil could be hot.
2004 Mitsubishi Endeavor Limited 2004 ENGINE Engine Lubrication - Endeavor
Page 1308 of 3870
Fig. 7: Applying Small Amount Of Engine Oil To O
-Ring Of New Oil
Filter
Courtesy of MITSUBISHI MOTOR SALES OF AMERICA.
Tightening torque: Approximately 1 turn [14 +/- 2 N m (124 +/-18 in-lb)]
8. Install the drain plug and refill engine oil. (Refer to ENGINE OIL
REPLACEMENT
.)
9. Rev the engine a few times, and check to be sure that no engine oil leaks from
the installation section of the oil filter.
ENGINE OIL PRESSURE CHECK
2004 Mitsubishi Endeavor Limited 2004 ENGINE Engine Lubrication - Endeavor
Page 1312 of 3870
8. Use special tool MD998054 to tighten the engine oil pressure switch to the
specified torque.
Fig. 11: Tightening Engine Oil Pressure Switch With Special Tool
(MD998054)
Courtesy of MITSUBISHI MOTOR SALES OF AMERICA.
Tightening torque: 10 +/- 2 N.m (87 +/- 17 in-lb)
SPECIFICATIONS FASTENER TIGHTENING SPECIFICATIONS
engine oil pressure switch has been installed.
2004 Mitsubishi Endeavor Limited 2004 ENGINE Engine Lubrication - Endeavor
Page 1323 of 3870
Fig. 5: Holding The Drive Plate Or Flywheel Using Special Tool MD998781
Courtesy of MITSUBISHI MOTOR SALES OF AMERICA.
2. Clean the bolt hole in crankshaft bolt, damper pulley seating surface and the
washer.
3. Degrease the cleaned seating surface of the damper pulley.
4. Install the damper pulley.
5. Apply a minimum amount engine oil to the thread and lower flange of the
crankshaft bolt.
6. Install the washer to the crankshaft bolt with its inside chamfered side toward
the bolt head.
7. Tighten the crankshaft bolt to the specified torque.
Tightening torque: 185+/-5 N.m (137+/-3 ft-lb)
2004 Mitsubishi Endeavor Limited 2004 ENGINE Engine Overhaul - Endeavor