Page 1931 of 4500
a. Measure the voltage according to the value(s) in the table below.
Fig. 25: Identifying Driver Side Junction Block ECU Connectors
Courtesy of TOYOTA MOTOR SALES, U.S.A., INC.
DRIVER SIDE JUNCTION BLOCK ECU TERMINALS VOLTAGE SPECIFICATION
NG: REPAIR OR REPLACE HARNESS OR CONNECTOR (STOP LAMP SWITCH - DRIVER
SIDE J/B ECU)
OK: REPLACE DRIVER SIDE J/B
CIRCUIT DESCRIPTION
Pedal conditionTester connectionSpecification
DepressedD3-12 (STPI) - Body ground10 to 14 V
ReleasedD3-12 (STPI) - Body groundBelow 1 V
Page 1934 of 4500
Fig. 27: Identifying Cruise Control Main Switch Positions
Courtesy of TOYOTA MOTOR SALES, U.S.A., INC.
HAND-HELD TESTER VALUE (ECM)
OK: When cruise control main switch operation is performed the standard values will be above.
RESULT DETAIL
Item
Measurement Item /
Display (Range)
Normal ConditionDiagnostic Note
MAIN SW (MAIN)Main SW signal (Main
CPU) / ON or OFFON: Main SW ON (Pushed on)
OFF Main SW OFF (Pushed off)-
MAIN SW (SUB)Main SW signal (Main
CPU) / ON or OFFON: Main SW ON (Pushed on)
OFF Main SW OFF (Pushed off)-
CANCEL SWCANCEL SW signal / ON or
OFFON: CANCEL SW ON OFF:
CANCEL SW OFF-
SET/COAST SWSET/COAST SW signal / ON
or OFFON: SET/COAST SW ON OFF:
SET/COAST SW OFF-
RES/ACC SWRES/ACC SW signal / ON or
OFFON: RES/ACC SW ON OFF:
RES/ACC OFF-
Page 1942 of 4500
1.CHECK HARNESS AND CONNECTOR (TC of DLC3 - ECM)
a. Disconnect the E2 connector from the ECM.
b. Measure the resistance according to the value(s) in the table below.
DLC3 CONNECTOR TERMINALS RESISTANCE SPECIFICATION
Fig. 33: Identifying DLC3 Connector Terminals
Courtesy of TOYOTA MOTOR SALES, U.S.A., INC.
Tester connectionConditionSpecified condition
TC (E2-3) - TC (D1 - 13)AlwaysBelow 1 ohms
Page 1944 of 4500
Fig. 34: Disconnecting E2 Connector From ECM
Courtesy of TOYOTA MOTOR SALES, U.S.A., INC.
NG: REPAIR OR REPLACE HARNESS OR CONNECTOR (DLC3 - ECM)
OK: Go to next step
2.CHECK HARNESS AND CONNECTOR (CG of DLC3 - BODY GROUND)
a. Measure the resistance according to the value(s) in the table below.
DLC3 CONNECTOR TERMINALS RESISTANCE SPECIFICATION
Fig. 35: Identifying DLC3 Connector (CG) Terminals
Courtesy of TOYOTA MOTOR SALES, U.S.A., INC.
NG: REPAIR OR REPLACE HARNESS OR CONNECTOR (DLC3 - BODY GROUND)
OK: Go to next step
Tester connectionConditionSpecified condition
CG (D1-4) - Body groundAlwaysBelow 1 ohms
Page 1945 of 4500
3.CHECK HARNESS AND CONNECTOR (TC of DLC3 - BODY GROUND)
a. Measure the resistance according to the value(s) in the table below.
DLC3 CONNECTOR TERMINALS RESISTANCE SPECIFICATION
NG: REPAIR OR REPLACE WIRE HARNESS AND EACH ECU
Fig. 36: Identifying DLC3 Connector (TC) Terminals
Courtesy of TOYOTA MOTOR SALES, U.S.A., INC.
OK: REPLACE ECM (SEE REPLACEMENT
)
Tester connectionConditionSpecified condition
TC (D1-13) - Body groundAlways10 kohms or higher
Page 1963 of 4500
15. Return the reflector to the original position and read the current angle.
DIVERGENCE OF BEAM AXIS TABLE
HINT:
When the values displayed on the screen are normal, the values are within the above range. If the
value is out of range, check the installation condition of the bumper reinforcement, etc.
16. Turn the headlamp dimmer switch to the TAIL position.
17. Press the "ENTER" key.
Fig. 16: Identifying "ENTER" Key
UPPER/LOWER SIDE-2° TO +2°
RIGHT/LEFT SIDE-4° TO +4°
Page 1996 of 4500

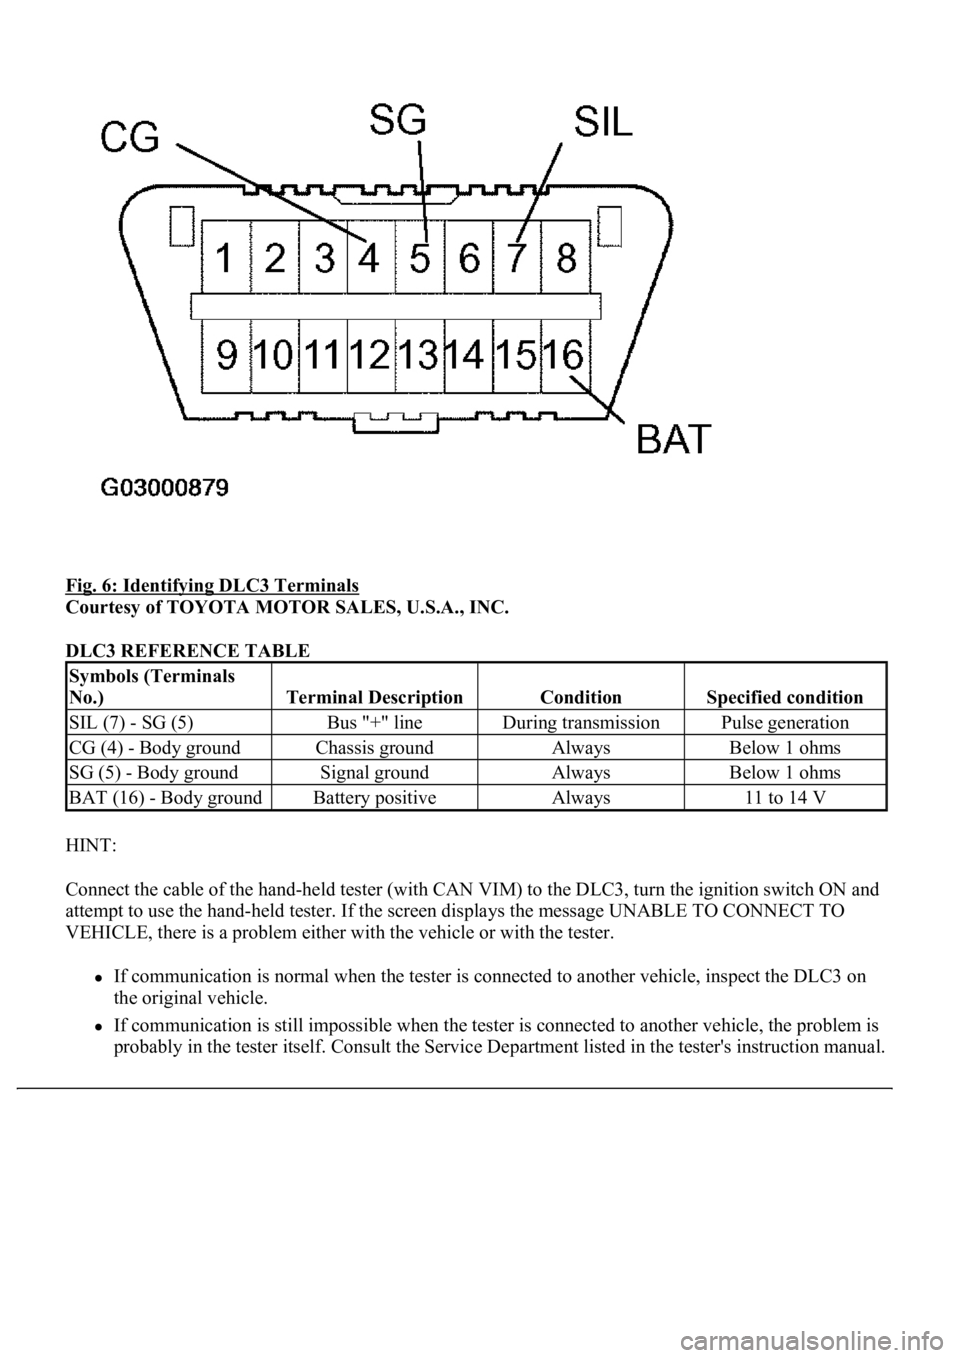
Fig. 6: Identifying DLC3 Terminals
Courtesy of TOYOTA MOTOR SALES, U.S.A., INC.
DLC3 REFERENCE TABLE
HINT:
Connect the cable of the hand-held tester (with CAN VIM) to the DLC3, turn the ignition switch ON and
attempt to use the hand-held tester. If the screen displays the message UNABLE TO CONNECT TO
VEHICLE, there is a problem either with the vehicle or with the tester.
If communication is normal when the tester is connected to another vehicle, inspect the DLC3 on
the original vehicle.
If communication is still impossible when the tester is connected to another vehicle, the problem is
probabl
y in the tester itself. Consult the Service Department listed in the tester's instruction manual.
Symbols (Terminals
No.)
Terminal DescriptionConditionSpecified condition
SIL (7) - SG (5)Bus "+" lineDuring transmissionPulse generation
CG (4) - Body groundChassis groundAlwaysBelow 1 ohms
SG (5) - Body groundSignal groundAlwaysBelow 1 ohms
BAT (16) - Body groundBattery positiveAlways11 to 14 V
Page 2182 of 4500

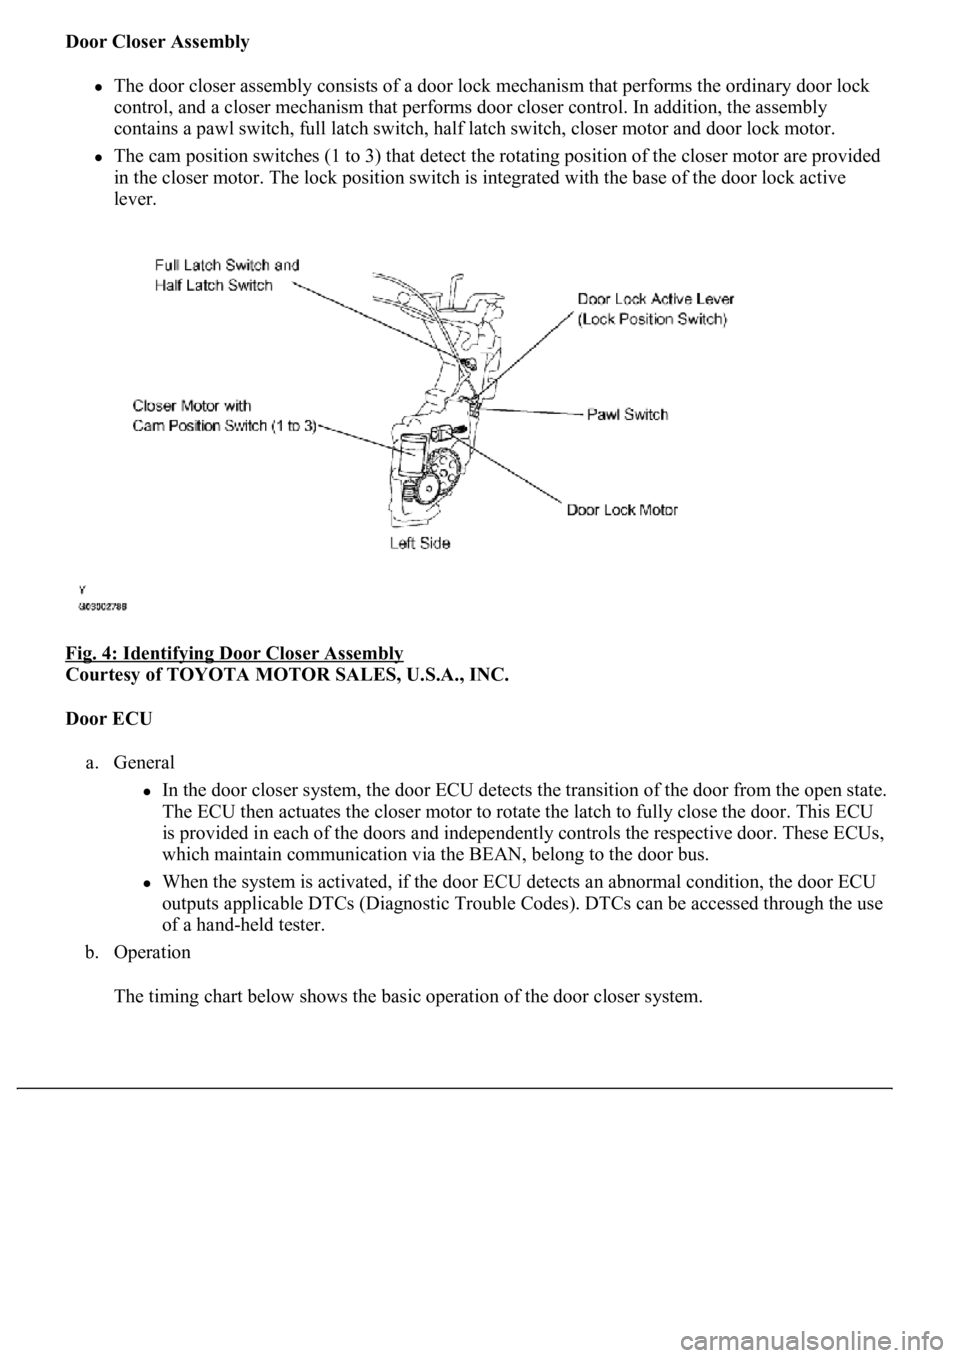
Door Closer Assembly
The door closer assembly consists of a door lock mechanism that performs the ordinary door lock
control, and a closer mechanism that performs door closer control. In addition, the assembly
contains a pawl switch, full latch switch, half latch switch, closer motor and door lock motor.
The cam position switches (1 to 3) that detect the rotating position of the closer motor are provided
<004c005100030057004b004800030046004f0052005600480055000300500052005700520055001100030037004b00480003004f00520046004e0003005300520056004c0057004c0052005100030056005a004c00570046004b0003004c00560003004c00
5100570048004a005500440057004800470003005a004c0057[h the base of the door lock active
lever.
Fig. 4: Identifying Door Closer Assembly
Courtesy of TOYOTA MOTOR SALES, U.S.A., INC.
Door ECU
a. General
In the door closer system, the door ECU detects the transition of the door from the open state.
The ECU then actuates the closer motor to rotate the latch to fully close the door. This ECU
is provided in each of the doors and independently controls the respective door. These ECUs,
which maintain communication via the BEAN, belong to the door bus.
When the system is activated, if the door ECU detects an abnormal condition, the door ECU
outputs applicable DTCs (Diagnostic Trouble Codes). DTCs can be accessed through the use
of a hand-held tester.
b. Operation
The timin
g chart below shows the basic operation of the door closer system.