Page 430 of 4500
Fig. 172: Rear Blower Motor Circuit
Courtesy of TOYOTA MOTOR SALES, U.S.A., INC.
INSPECTION PROCEDURE
1.INSPECT LUGGAGE ROOM J/B ECU (RHR, RFR - BODY GROUND)
a. Remove the luggage room J/B with connectors still connected.
b. Turn the ignition switch to the ON position.
c. Measure the voltage according to the value (s) in the table below.
Standard:
LUGGAGE ROOM J/B ECU (RHR, RFR - BODY GROUND) VOLTAGE
Tester connectionConditionSpecified condition
L14-18 (RHR) - Body groundRear blower switch to OFF positionBelow 1 V
Page 431 of 4500
NG: Go to STEP 2
Fig. 173: Inspecting Luggage Room J/B ECU (RHR, RFR
- Body Ground)
Courtesy of TOYOTA MOTOR SALES, U.S.A., INC.
OK: Go to STEP 4
2.INSPECT AIR CONDITIONING AMPLIFIER (RHR, RFR1)
a. Remove the A/C amplifier with connectors still connected.
b. Turn the ignition switch to the ON position.
c. Measure the voltage according to the value (s) in the table below.
Standard:
AIR CONDITIONING AMPLIFIER (RHR, RFR1) VOLTAGE
L14-18 (RHR) - Body groundRear blower switch to LO position10 to 14 V
L14-18 (RHR) - Body groundRear blower switch to HI position10 to 14 V
L14-19 (RFR) - Body groundRear blower switch to OFF positionBelow 1 V
L14-19 (RFR) - Body groundRear blower switch to LO positionBelow 1 V
L14-19 (RFR) - Body groundRear blower switch to HI position10 to 14 V
Page 435 of 4500

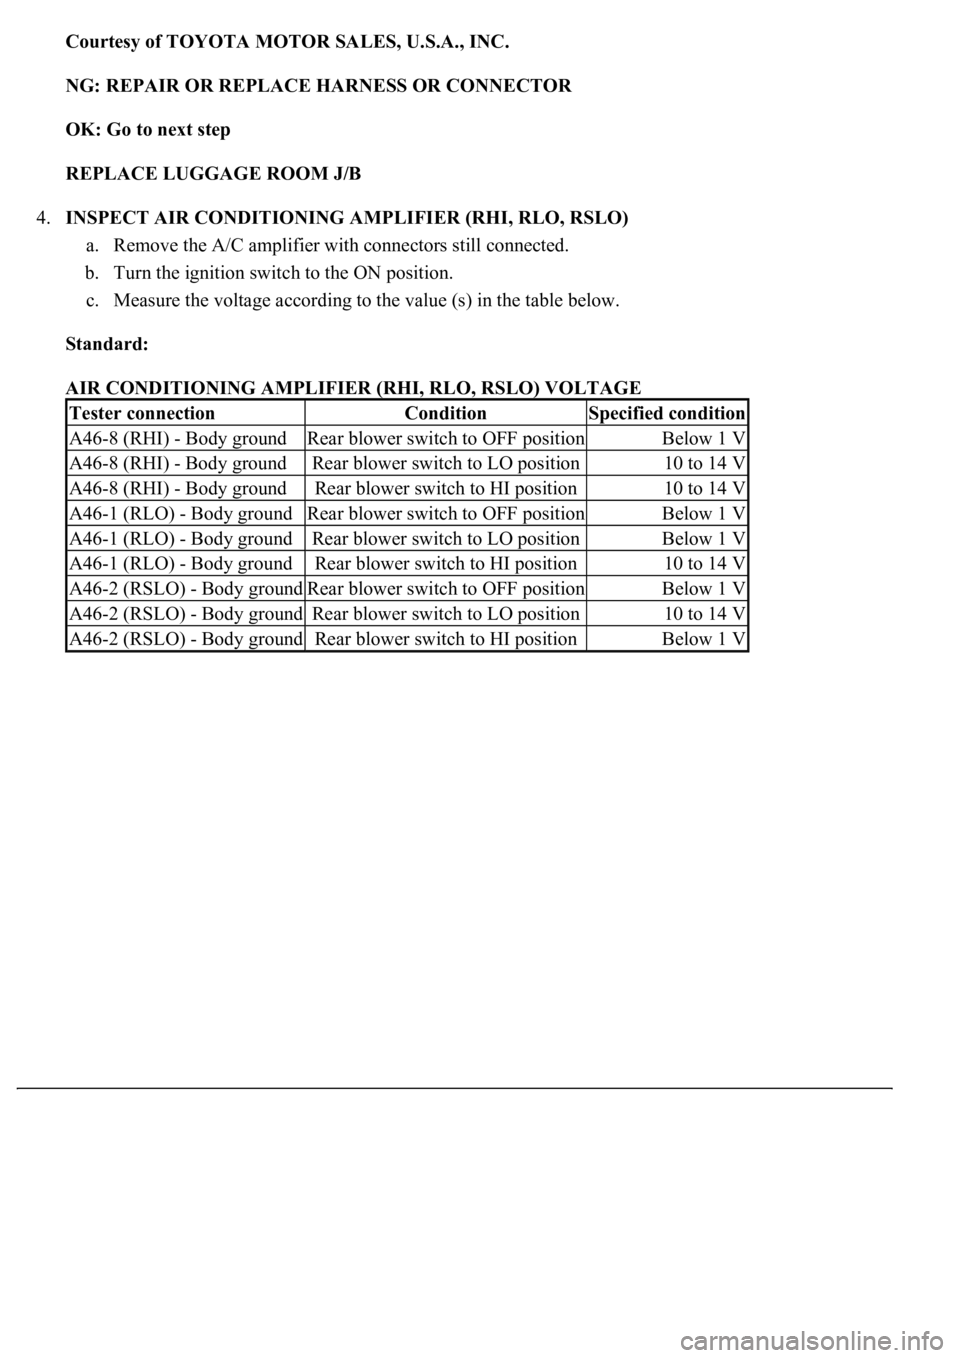
Courtesy of TOYOTA MOTOR SALES, U.S.A., INC.
NG: REPAIR OR REPLACE HARNESS OR CONNECTOR
OK: Go to next step
REPLACE LUGGAGE ROOM J/B
4.INSPECT AIR CONDITIONING AMPLIFIER (RHI, RLO, RSLO)
a. Remove the A/C amplifier with connectors still connected.
b. Turn the ignition switch to the ON position.
c. Measure the voltage according to the value (s) in the table below.
Standard:
AIR CONDITIONING AMPLIFIER (RHI, RLO, RSLO) VOLTAGE
Tester connectionConditionSpecified condition
A46-8 (RHI) - Body groundRear blower switch to OFF positionBelow 1 V
A46-8 (RHI) - Body groundRear blower switch to LO position10 to 14 V
A46-8 (RHI) - Body groundRear blower switch to HI position10 to 14 V
A46-1 (RLO) - Body groundRear blower switch to OFF positionBelow 1 V
A46-1 (RLO) - Body groundRear blower switch to LO positionBelow 1 V
A46-1 (RLO) - Body groundRear blower switch to HI position10 to 14 V
A46-2 (RSLO) - Body groundRear blower switch to OFF positionBelow 1 V
A46-2 (RSLO) - Body groundRear blower switch to LO position10 to 14 V
A46-2 (RSLO) - Body groundRear blower switch to HI positionBelow 1 V
Page 449 of 4500
a. Remove the luggage room J/B ECU with connectors still connected.
b. Measure the voltage according to the value (s) in the table below.
Standard:
LUGGAGE ROOM J/B ECU (RMGV - BODY GROUND) VOLTAGE
NG: Go to STEP 3
Fig. 185: Inspecting Luggage Room J/B ECU (RMGV
- Body Ground)
Courtesy of TOYOTA MOTOR SALES, U.S.A., INC.
OK: Go to next step
2.INSPECT REAR AIR CONDITIONING AMPLIFIER (RMGV - BODY GROUND)
a. Remove the A/C amplifier with connectors still connected.
b. Measure the voltage according to the value (s) in the table below.
Tester connectionConditionSpecified
condition
L14-11 (RMGV) - Body
groundTurn the ignition switch to ON position Turn the rear A/C
switch to ON positionBelow 1 V
Page 450 of 4500
Standard:
REAR AIR CONDITIONING AMPLIFIER (RMGV - BODY GROUND) VOLTAGE
NG: REPAIR OR REPLACE HARNESS OR CONNECTOR (REAR AIR CONDITIONING
AMPLIFIER - REAR MAGNETIC VALVE)
Fig. 186: Inspecting Rear Air Conditioning Amplifier (RMGV
- Body Ground)
Courtesy of TOYOTA MOTOR SALES, U.S.A., INC.
OK: PROCEED TO NEXT CIRCUIT INSPECTION SHOWN IN PROBLEM SYMPTOMS
TABLE
3.CHECK HARNESS AND CONNECTOR (LUGGAGE ROOM J/B - REAR MAGNETIC VALVE)
(SEE ELECTRONIC CIRCUIT INSPECTION PROCEDURE
)
Tester connectionConditionSpecified
condition
A46-5 (RMGV) - Body
groundTurn the ignition switch to ON position Turn the rear A/C
switch to ON positionBelow 1 V
Page 451 of 4500
a. Measure the resistance according to the value (s) in the table below.
Standard:
LUGGAGE ROOM J/B - REAR MAGNETIC VALVE VOLTAGE
NG: REPAIR OR REPLACE HARNESS OR CONNECTOR
Fig. 187: Identifying Terminals Of R38 Rear Magnetic Valve Connector
Courtesy of TOYOTA MOTOR SALES, U.S.A., INC.
OK: Go to next step
4.INSPECT REAR MAGNETIC VALVE
Tester connectionConditionSpecified condition
R38-1 - Body groundIgnition switch OFF --> ONBelow 1 V --> 10 V to 14 V
Page 454 of 4500
cigarette smoke.
Standard:
LUGGAGE ROOM J/B ECU (RMGV - BODY GROUND) VOLTAGE
Tester connectionConditionSpecified
condition
L14-16 (SMOK) -
Body groundTurn the ignition switch to ON position Turn the rear A/C mode
to AUTO Apply cigarette smokeAbove 4.0 V
L14-16 (SMOK) -
Body groundTurn the ignition switch to ON position Turn the rear A/C mode
to AUTO Not Apply cigarette smokeBelow 1 V
Page 463 of 4500
NG: Go to STEP 2
Fig. 195: Inspecting Air Conditioning Amplifier
Courtesy of TOYOTA MOTOR SALES, U.S.A., INC.
OK: Go to STEP 3
2.INSPECT INTELLIGENT SWING REGISTER STEP MOTOR
a. Remove the intelligent swing register.
b. Measure the resistance according to the value (s) in the table below.
Standard:
INTELLIGENT SWING REGISTER STEP MOTOR RESISTANCE
Tester connectionConditioncondition
A12-24 (PS+B) -
Body groundTurn the ignition switch to ON position Turn the mode selector to
FACE or B/L position Swing switch is pressed10 to 14 V
Tester connectionConditionSpecified condition
I18-9 - I18-3 (2)Always279 to 321 ohms