Page 358 of 4500
The display is as specified in the normal condition.
Result:
AIR CONDITIONER TEST RESULT
B: PROCEED TO NEXT CIRCUIT INSPECTION SHOWN IN PROBLEM SYMPTOMS TABLE
C: REPLACE AIR CONDITIONING AMPLIFIER (SEE REPLACEMENT )
A: Go to next step
2.INSPECT AIR CONDITIONING AMPLIFIER (NOX - SG-1)
a. Remove the A/C amplifier with connectors still connected.
b. Turn the ignition switch to the ON position.
c. Measure the voltage according to the value (s) in the table below.
Standard:
AIR CONDITIONING AMPLIFIER (NOX - SG-1) VOLTAGE
HINT:
As the temperature increases, the voltage decreases.
Result:
AIR CONDITIONING AMPLIFIER (NOX - SG-1) TEST RESULT
NGA
OK (Checking from the PROBLEM SYMPTOM TABLE)B
OK (Checking from the DTC)C
Tester connectionConditionSpecified condition
A13-17 (NOX) - A13-8 (SG-1)Ignition switch ON at 10 to 35C° (50 to 95°F)1.0 to 4.5 V
NGA
OK (Checking from the PROBLEM SYMPTOMS TABLE)B
OK (Checking from the DTC)C
Page 390 of 4500

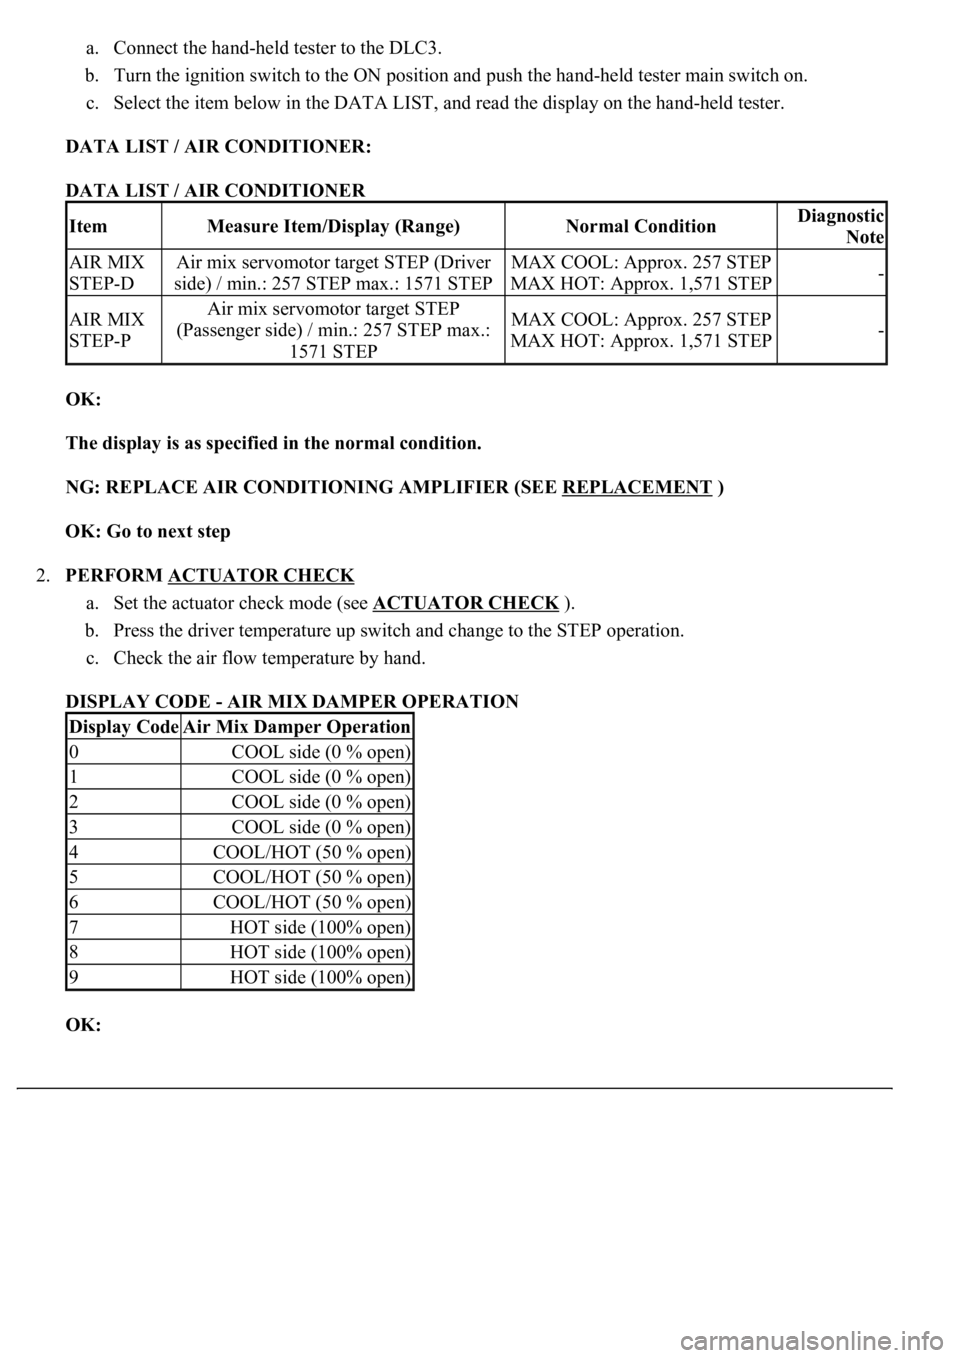
a. Connect the hand-held tester to the DLC3.
b. Turn the ignition switch to the ON position and push the hand-held tester main switch on.
c. Select the item below in the DATA LIST, and read the display on the hand-held tester.
DATA LIST / AIR CONDITIONER:
DATA LIST / AIR CONDITIONER
OK:
The display is as specified in the normal condition.
NG: REPLACE AIR CONDITIONING AMPLIFIER (SEE REPLACEMENT
)
OK: Go to next step
2.PERFORM ACTUATOR CHECK
a. Set the actuator check mode (see ACTUATOR CHECK
).
b. Press the driver temperature up switch and change to the STEP operation.
c. Check the air flow temperature by hand.
DISPLAY CODE - AIR MIX DAMPER OPERATION
OK:
ItemMeasure Item/Display (Range)Normal ConditionDiagnostic
Note
AIR MIX
STEP-DAir mix servomotor target STEP (Driver
side) / min.: 257 STEP max.: 1571 STEPMAX COOL: Approx. 257 STEP
MAX HOT: Approx. 1,571 STEP-
AIR MIX
STEP-PAir mix servomotor target STEP
(Passenger side) / min.: 257 STEP max.:
1571 STEPMAX COOL: Approx. 257 STEP
MAX HOT: Approx. 1,571 STEP-
Display CodeAir Mix Damper Operation
0COOL side (0 % open)
1COOL side (0 % open)
2COOL side (0 % open)
3COOL side (0 % open)
4COOL/HOT (50 % open)
5COOL/HOT (50 % open)
6COOL/HOT (50 % open)
7HOT side (100% open)
8HOT side (100% open)
9HOT side (100% open)
Page 399 of 4500
Courtesy of TOYOTA MOTOR SALES, U.S.A., INC.
NG: REPAIR OR REPLACE HARNESS OR / CONNECTOR
OK: REPLACE AIR CONDITIONING AMPLIFIER (SEE REPLACEMENT
)
CIRCUIT DESCRIPTION
This is the back-up power source circuit for the A/C amplifier. Power is supplied even when turning the ignition
switch off and is used for diagnostic trouble code memory, etc.
WIRING DIAGRAM
Fig. 146: Back
-Up Power Source Circuit
Page 400 of 4500
Courtesy of TOYOTA MOTOR SALES, U.S.A., INC.
INSPECTION PROCEDURE
1.INSPECT RADIO AND RECEIVER ASSY
a. Turn the ignition switch to the ON position.
b. Turn the radio and receiver assy on.
c. Set the radio channels and register them.
d. Turn the ignition switch off.
e. Turn the ignition switch to the ON position.
f. Turn the radio and receiver assy on.
g. Check if the registered memory is deleted or not.
OK:
The registered memory is not deleted.
NG: REPAIR OR REPLACE HARNESS OR CONNECTOR (DRIVER SIDE J/B - BATTERY)
OK: Go to next step
2.INSPECT FUSE (A/C)
a. Remove the A/C fuse from the driver side J/B.
b. Measure the resistance according to the value (s) in the table below.
Standard:
FUSE (A/C) RESISTANCE
NG: CHECK FOR SHORT IN ALL HARNESSES AND COMPONENTS CONNECTED TO
FAILURE FUSE
Tester itemConditionSpecified condition
A/C fuseAlwaysBelow 1 ohms
Page 402 of 4500
Fig. 148: Inspecting Air Conditioning Amplifier (B - Body Ground)
Courtesy of TOYOTA MOTOR SALES, U.S.A., INC.
OK: PROCEED TO NEXT CIRCUIT INSPECTION SHOWN IN PROBLEM SYMPTOMS
TABLE
CIRCUIT DESCRIPTION
The main power source is supplied to the A/C amplifier when the ignition switch is turned to the ON position.
The power source supplied is used for operating the A/C amplifier and servomotor, etc.
WIRING DIAGRAM
Page 404 of 4500
FUSE (P-IG) RESISTANCE
NG: CHECK FOR SHORT IN ALL HARNESSES AND COMPONENTS CONNECTED TO
FAILURE FUSE
OK: Go to next step
2.INSPECT AIR CONDITIONING AMPLIFIER (IG - GND)
a. Remove the A/C amplifier assy with connectors still connected.
b. Turn the ignition switch to the ON position.
c. Measure the voltage according to the value (s) in the table below.
Standard:
AIR CONDITIONING AMPLIFIER (IG - GND) VOLTAGE
NG: Go to STEP 3
Tester itemConditionSpecified condition
P-IG fuseAlwaysBelow 1 ohms
Tester connectionConditionSpecified condition
A11-9 (IG) - 14-1 (GND)Ignition switch ON10 to 14V
Page 405 of 4500
<0029004c004a00110003001400180013001d0003002c005100560053004800460057004c0051004a00030024004c005500030026005200510047004c0057004c00520051004c0051004a0003002400500053004f004c0049004c004800550003000b002c00
2a0003[- GND)
Courtesy of TOYOTA MOTOR SALES, U.S.A., INC.
OK: PROCEED TO NEXT CIRCUIT INSPECTION SHOWN IN PROBLEM SYMPTOMS
TABLE
3.CHECK HARNESS AND CONNECTOR (AIR CONDITIONING AMPLIFIER - BATTERY)
(SEE ELECTRONIC CIRCUIT INSPECTION PROCEDURE
)
a. Measure the voltage according to the value (s) in the table below.
Standard:
AIR CONDITIONING AMPLIFIER - BATTERY VOLTAGE
NG: REPAIR OR REPLACE HARNESS OR CONNECTOR
Tester connectionConditionSpecified condition
A11-9 (IG) - Body groundIgnition switch OFF --> ONBelow 1.0V --> 10 to 14 V
Page 408 of 4500
Fig. 153: ACC Power Source Circuit
Courtesy of TOYOTA MOTOR SALES, U.S.A., INC.
INSPECTION PROCEDURE
1.INSPECT AIR CONDITIONING AMPLIFIER (ACC - BODY GROUND)
a. Remove the A/C amplifier assy with connectors still connected.
b. Measure the voltage according to the value (s) in the table below.
Standard:
AIR CONDITIONING AMPLIFIER (ACC - BODY GROUND) VOLTAGE
NG: Go to STEP 2
Tester connectionConditionSpecified condition
A11-3 (ACC) - Body groundTurn the ignition switch to the ACC position10 to 14 V