2001 NISSAN ALMERA ECU
[x] Cancel search: ECUPage 374 of 2898
SAT037DA
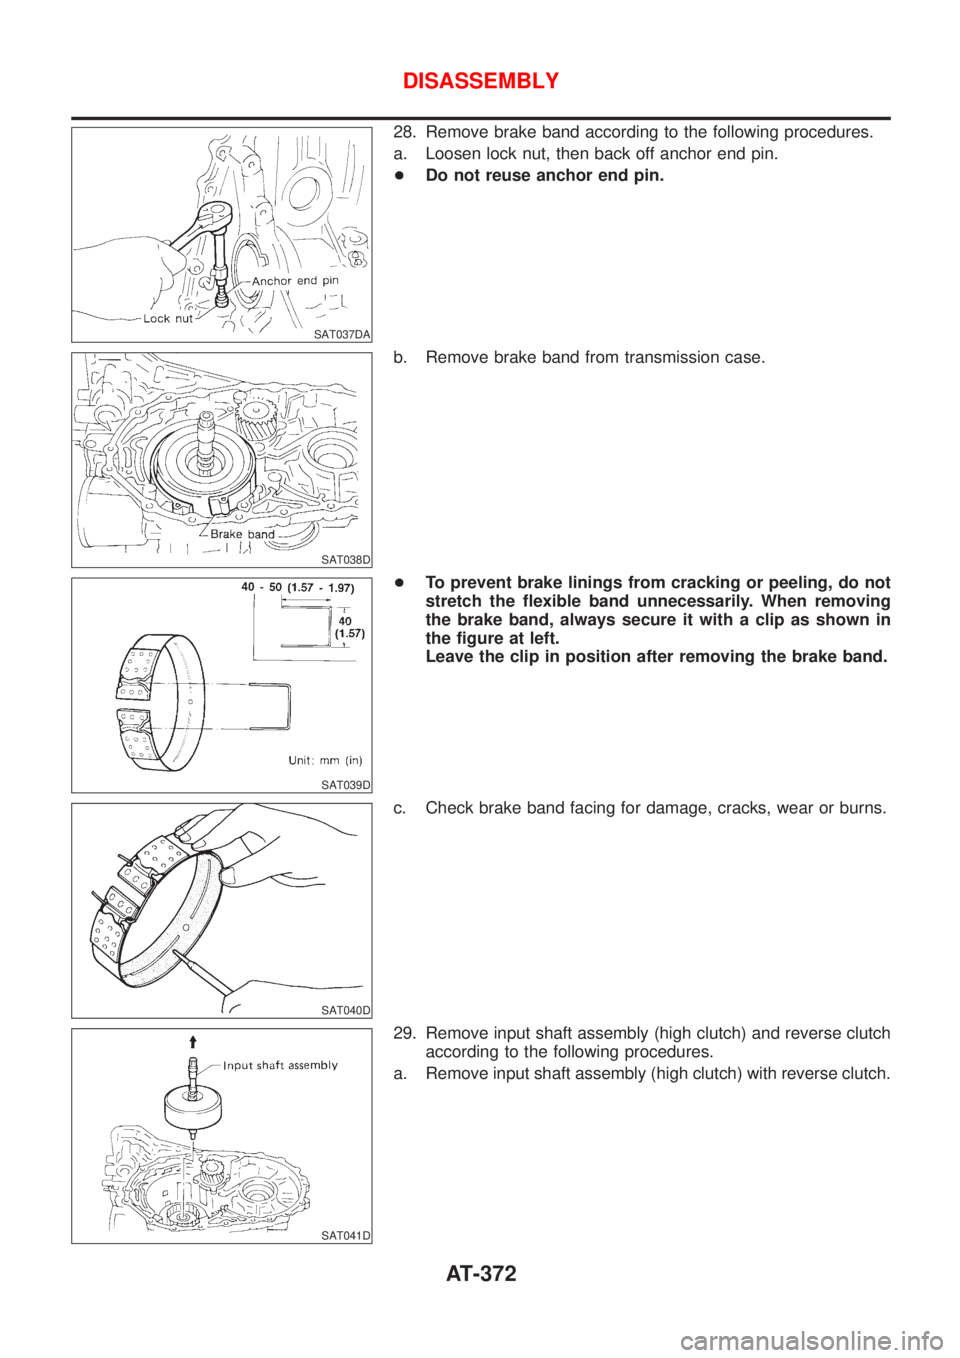
28. Remove brake band according to the following procedures.
a. Loosen lock nut, then back off anchor end pin.
+Do not reuse anchor end pin.
SAT038D
b. Remove brake band from transmission case.
SAT039D
+To prevent brake linings from cracking or peeling, do not
stretch the flexible band unnecessarily. When removing
the brake band, always secure it with a clip as shown in
the figure at left.
Leave the clip in position after removing the brake band.
SAT040D
c. Check brake band facing for damage, cracks, wear or burns.
SAT041D
29. Remove input shaft assembly (high clutch) and reverse clutch
according to the following procedures.
a. Remove input shaft assembly (high clutch) with reverse clutch.
DISASSEMBLY
AT-372
Page 504 of 2898
Support BearingNJAX0018S05Make sure wheel bearing rolls freely and is free from noise, cracks,
pitting or wear.
Support Bearing BracketNJAX0018S06Check support bearing bracket for cracks with a magnetic explora-
tion or dyeing test.
ASSEMBLYNJAX0019+After drive shaft has been assembled, ensure that it
moves smoothly over its entire range without binding.
+Use NISSAN GENUINE GREASE or equivalent after every
overhaul.
SFA800
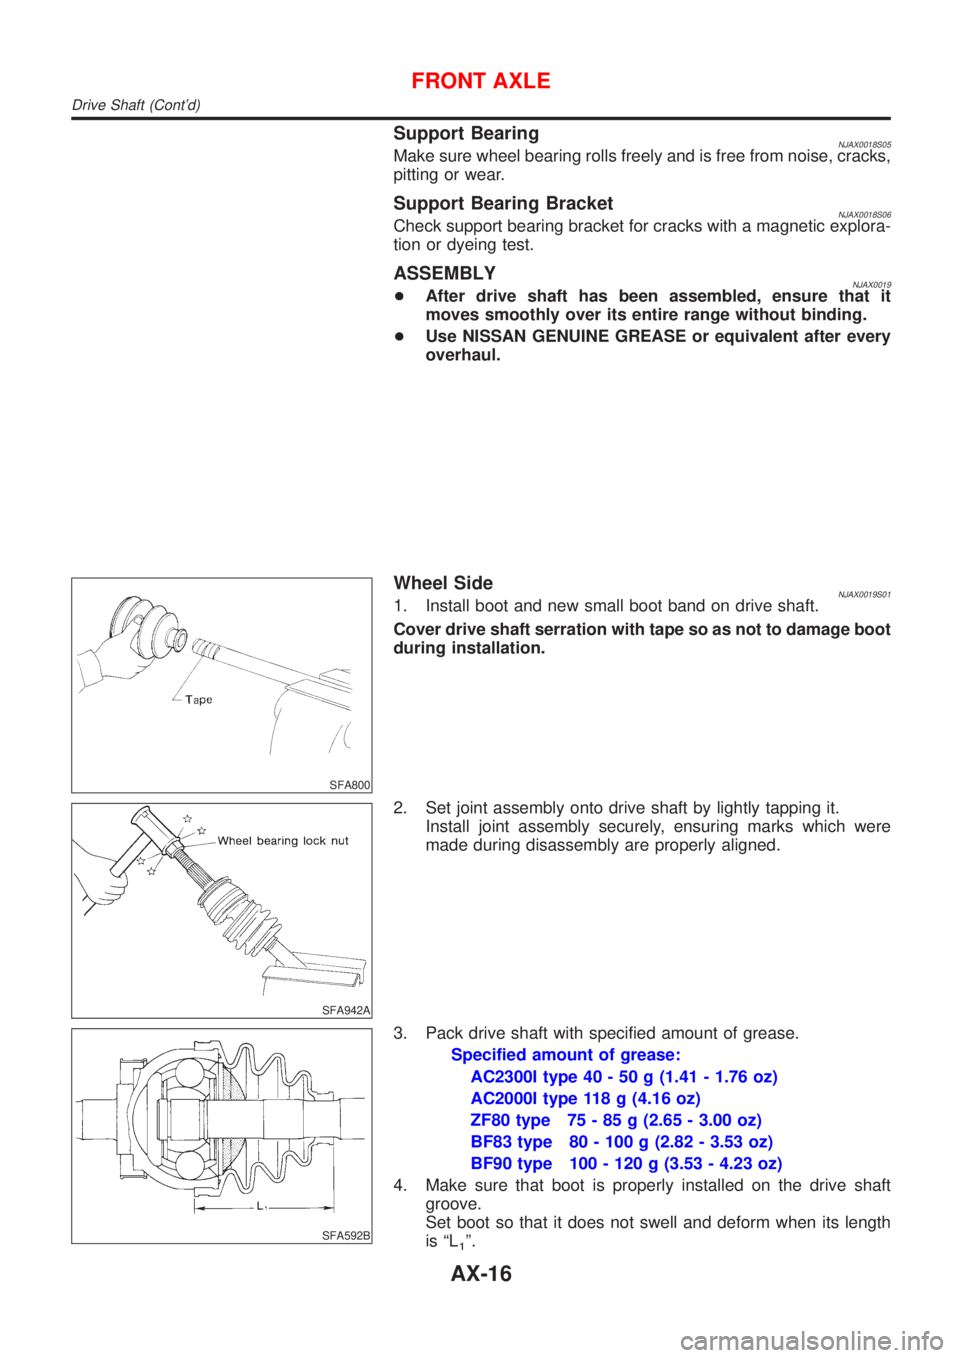
Wheel SideNJAX0019S011. Install boot and new small boot band on drive shaft.
Cover drive shaft serration with tape so as not to damage boot
during installation.
SFA942A
2. Set joint assembly onto drive shaft by lightly tapping it.
Install joint assembly securely, ensuring marks which were
made during disassembly are properly aligned.
SFA592B
3. Pack drive shaft with specified amount of grease.
Specified amount of grease:
AC2300I type 40 - 50 g (1.41 - 1.76 oz)
AC2000I type 118 g (4.16 oz)
ZF80 type 75 - 85 g (2.65 - 3.00 oz)
BF83 type 80 - 100 g (2.82 - 3.53 oz)
BF90 type 100 - 120 g (3.53 - 4.23 oz)
4. Make sure that boot is properly installed on the drive shaft
groove.
Set boot so that it does not swell and deform when its length
is ªL
1º.
FRONT AXLE
Drive Shaft (Cont'd)
AX-16
Page 505 of 2898
Length ªL1º:
AC2300I type 94 - 96 mm (3.70 - 3.78 in)
AC2000I type 90 mm (3.54 in)
ZF80 type 91.4 - 91.6 mm (3.598 - 3.606 in)
BF83 type 95 mm (3.74 in)
BF90 type 85.5 mm (3.366 in)
SFA443B
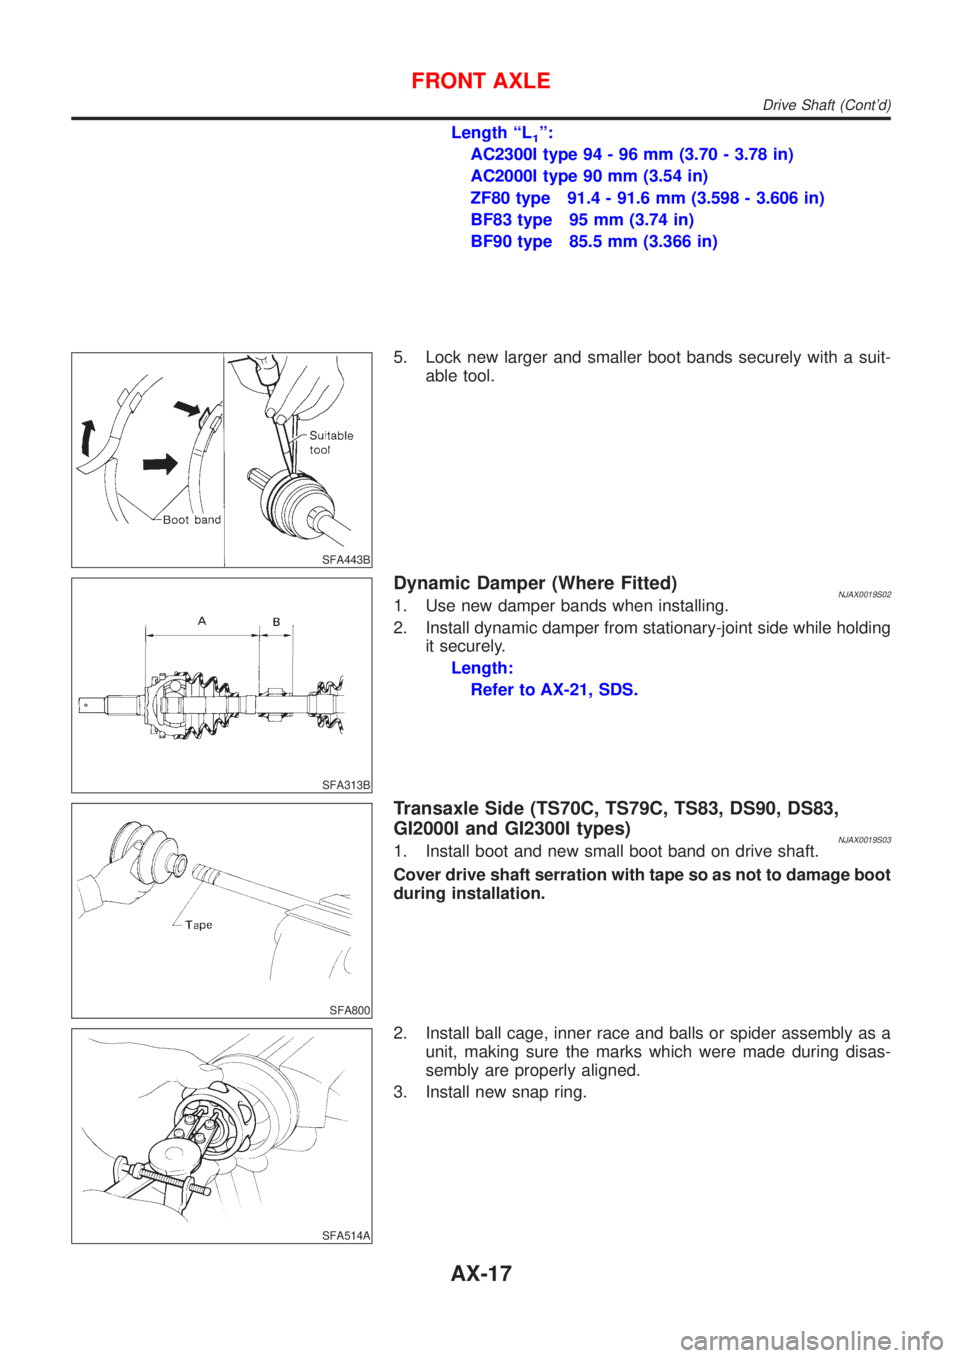
5. Lock new larger and smaller boot bands securely with a suit-
able tool.
SFA313B
Dynamic Damper (Where Fitted)NJAX0019S021. Use new damper bands when installing.
2. Install dynamic damper from stationary-joint side while holding
it securely.
Length:
Refer to AX-21, SDS.
SFA800
Transaxle Side (TS70C, TS79C, TS83, DS90, DS83,
GI2000I and GI2300I types)
NJAX0019S031. Install boot and new small boot band on drive shaft.
Cover drive shaft serration with tape so as not to damage boot
during installation.
SFA514A
2. Install ball cage, inner race and balls or spider assembly as a
unit, making sure the marks which were made during disas-
sembly are properly aligned.
3. Install new snap ring.
FRONT AXLE
Drive Shaft (Cont'd)
AX-17
Page 506 of 2898
SFA149A
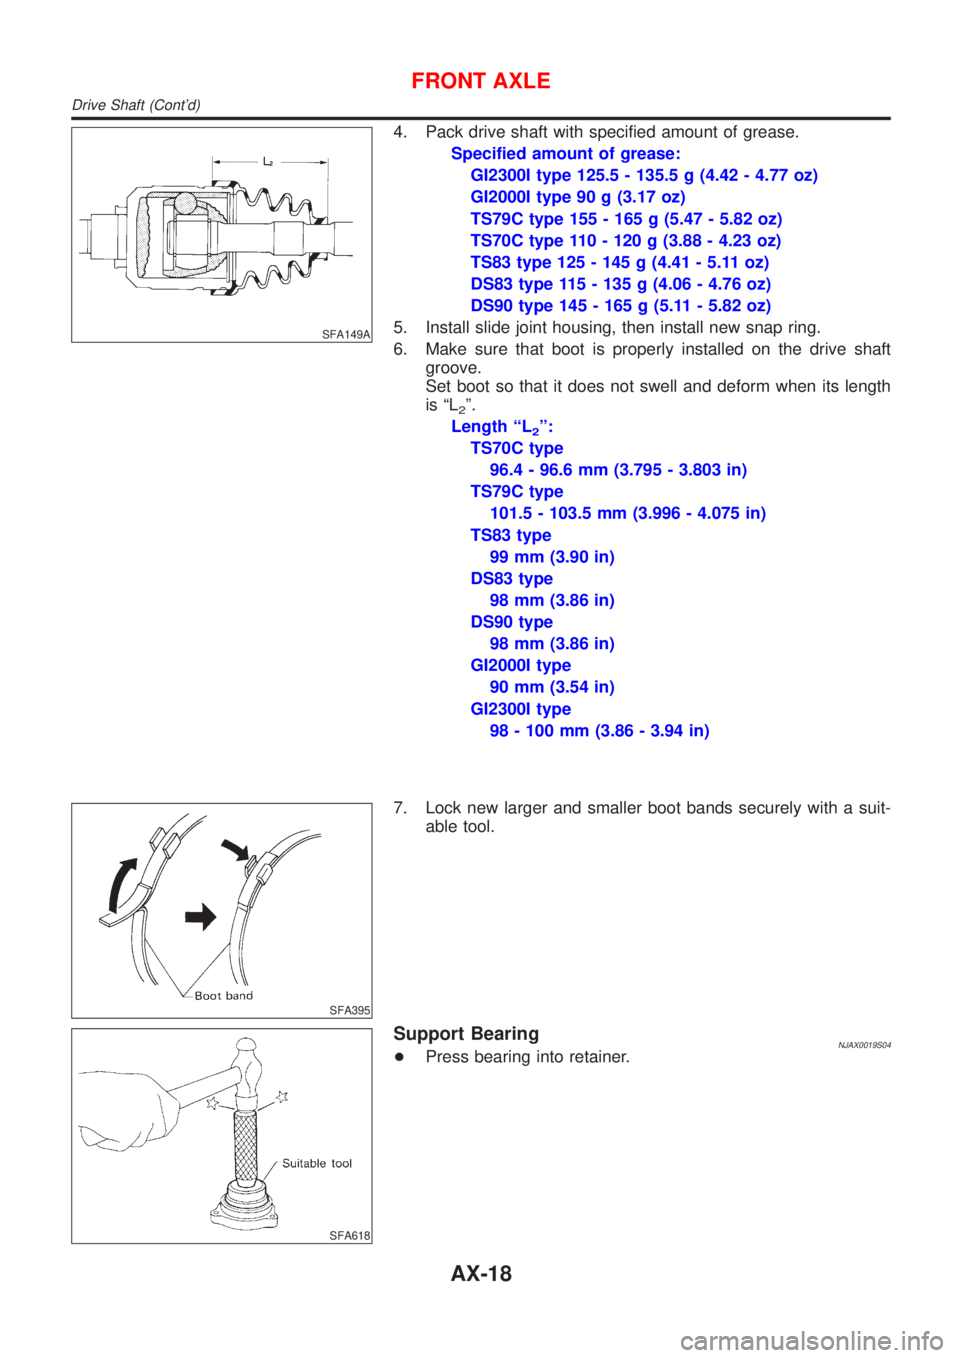
4. Pack drive shaft with specified amount of grease.
Specified amount of grease:
GI2300I type 125.5 - 135.5 g (4.42 - 4.77 oz)
GI2000I type 90 g (3.17 oz)
TS79C type 155 - 165 g (5.47 - 5.82 oz)
TS70C type 110 - 120 g (3.88 - 4.23 oz)
TS83 type 125 - 145 g (4.41 - 5.11 oz)
DS83 type 115 - 135 g (4.06 - 4.76 oz)
DS90 type 145 - 165 g (5.11 - 5.82 oz)
5. Install slide joint housing, then install new snap ring.
6. Make sure that boot is properly installed on the drive shaft
groove.
Set boot so that it does not swell and deform when its length
is ªL
2º.
Length ªL
2º:
TS70C type
96.4 - 96.6 mm (3.795 - 3.803 in)
TS79C type
101.5 - 103.5 mm (3.996 - 4.075 in)
TS83 type
99 mm (3.90 in)
DS83 type
98 mm (3.86 in)
DS90 type
98 mm (3.86 in)
GI2000I type
90 mm (3.54 in)
GI2300I type
98 - 100 mm (3.86 - 3.94 in)
SFA395
7. Lock new larger and smaller boot bands securely with a suit-
able tool.
SFA618
Support BearingNJAX0019S04+Press bearing into retainer.
FRONT AXLE
Drive Shaft (Cont'd)
AX-18
Page 518 of 2898

REAR DISC BRAKE (CAM & STRUT TYPE)..............35
Component ................................................................35
Pad Replacement ......................................................35
Removal .....................................................................37
Disassembly...............................................................37
Inspection...................................................................38
CALIPER.................................................................38
ROTOR...................................................................39
Assembly ...................................................................39
Installation ..................................................................42
REAR DISC BRAKE (BALL & RAMP TYPE)..............43
Component ................................................................43
Pad Replacement ......................................................43
Removal .....................................................................45
Disassembly...............................................................45
Inspection...................................................................45
CALIPER.................................................................45
ROTOR...................................................................46
Installation ..................................................................46
PARKING BRAKE CONTROL......................................47
Components...............................................................47
Removal and Installation ...........................................47
Inspection...................................................................47
Adjustment .................................................................48
ABS
DESCRIPTION...............................................................49
Purpose......................................................................49
ABS (Anti-Lock Brake System) Operation ................49
ABS Hydraulic Circuit ................................................49
System Components .................................................50
System Description ....................................................50
SENSOR.................................................................50
CONTROL UNIT......................................................50
ABS ACTUATOR AND ELECTRIC UNIT....................50
Component Parts and Harness Connector
Location .....................................................................52
Schematic/Sedan .......................................................53
Wiring Diagram - ABS -/Sedan..................................54
Schematic/Hatchback ................................................58
Wiring Diagram - ABS -/Hatchback ...........................59
MODELS WITH SELF-DIAGNOSIS FUNCTION
(DATA LINK CONNECTOR TERMINAL NO. 9)
...........59
MODELS WITHOUT SELF-DIAGNOSIS
FUNCTION (DATA LINK CONNECTOR TERMINAL
NO. 9)
.....................................................................60
ON BOARD DIAGNOSTIC SYSTEM
DESCRIPTION...............................................................63
Self-diagnosis (Only Models with Data Link
Connector Terminal No. 9) ........................................63
FUNCTION..............................................................63
SELF-DIAGNOSIS PROCEDURE..............................63
HOW TO READ SELF-DIAGNOSTIC RESULTS
(MALFUNCTION CODES)
........................................64
HOW TO ERASE SELF-DIAGNOSTIC RESULTS
(MALFUNCTION CODES)
........................................64
CONSULT-II ...............................................................65
CONSULT-II APPLICATION TO ABS..........................65
ECU (ABS CONTROL UNIT) PART NUMBER
MODE
.....................................................................65
CONSULT-II Inspection Procedure............................65
SELF-DIAGNOSIS PROCEDURE..............................65
SELF-DIAGNOSTIC RESULTS MODE.......................67
DATA MONITOR PROCEDURE................................68
ACTIVE TEST PROCEDURE....................................69
DATA MONITOR MODE...........................................70
ACTIVE TEST MODE...............................................70
TROUBLE DIAGNOSIS - INTRODUCTION..................71
How to Perform Trouble Diagnoses for Quick
and Accurate Repair ..................................................71
INTRODUCTION......................................................71
TROUBLE DIAGNOSIS - BASIC INSPECTION...........72
Preliminary Check......................................................72
Ground Circuit Check ................................................75
ABS ACTUATOR AND ELECTRIC UNIT GROUND.....75
TROUBLE DIAGNOSIS - GENERAL
DESCRIPTION...............................................................76
Malfunction Code/Symptom Chart.............................76
MODELS WITH SELF-DIAGNOSIS FUNCTION
(DATA LINK CONNECTOR TERMINAL NO. 9)
...........76
TROUBLE DIAGNOSES FOR SELF-DIAGNOSTIC
ITEMS.............................................................................78
Wheel Sensor or Rotor ..............................................78
DIAGNOSTIC PROCEDURE.....................................78
ABS Actuator Solenoid Valve or Solenoid Valve
Relay ..........................................................................81
DIAGNOSTIC PROCEDURE.....................................81
Motor Relay or Motor.................................................84
DIAGNOSTIC PROCEDURE.....................................84
Low Voltage ...............................................................86
DIAGNOSTIC PROCEDURE.....................................86
Control Unit ................................................................88
DIAGNOSTIC PROCEDURE.....................................88
TROUBLE DIAGNOSES FOR SYMPTOMS.................89
1. ABS Works Frequently ..........................................89
2. Unexpected Pedal Action ......................................89
3. Long Stopping Distance ........................................90
4. ABS Does Not Work ..............................................91
5. Pedal Vibration and Noise.....................................92
6. ABS Warning Lamp Does Not Come On
When Ignition Switch Is Turned On...........................93
7. ABS Warning Lamp Stays On When Ignition
Switch Is Turned On ..................................................95
REMOVAL AND INSTALLATION.................................97
Wheel Sensors ..........................................................97
ABS Actuator and Electric Unit..................................98
CONTENTS(Cont'd)
BR-2
Page 532 of 2898
SBR222B
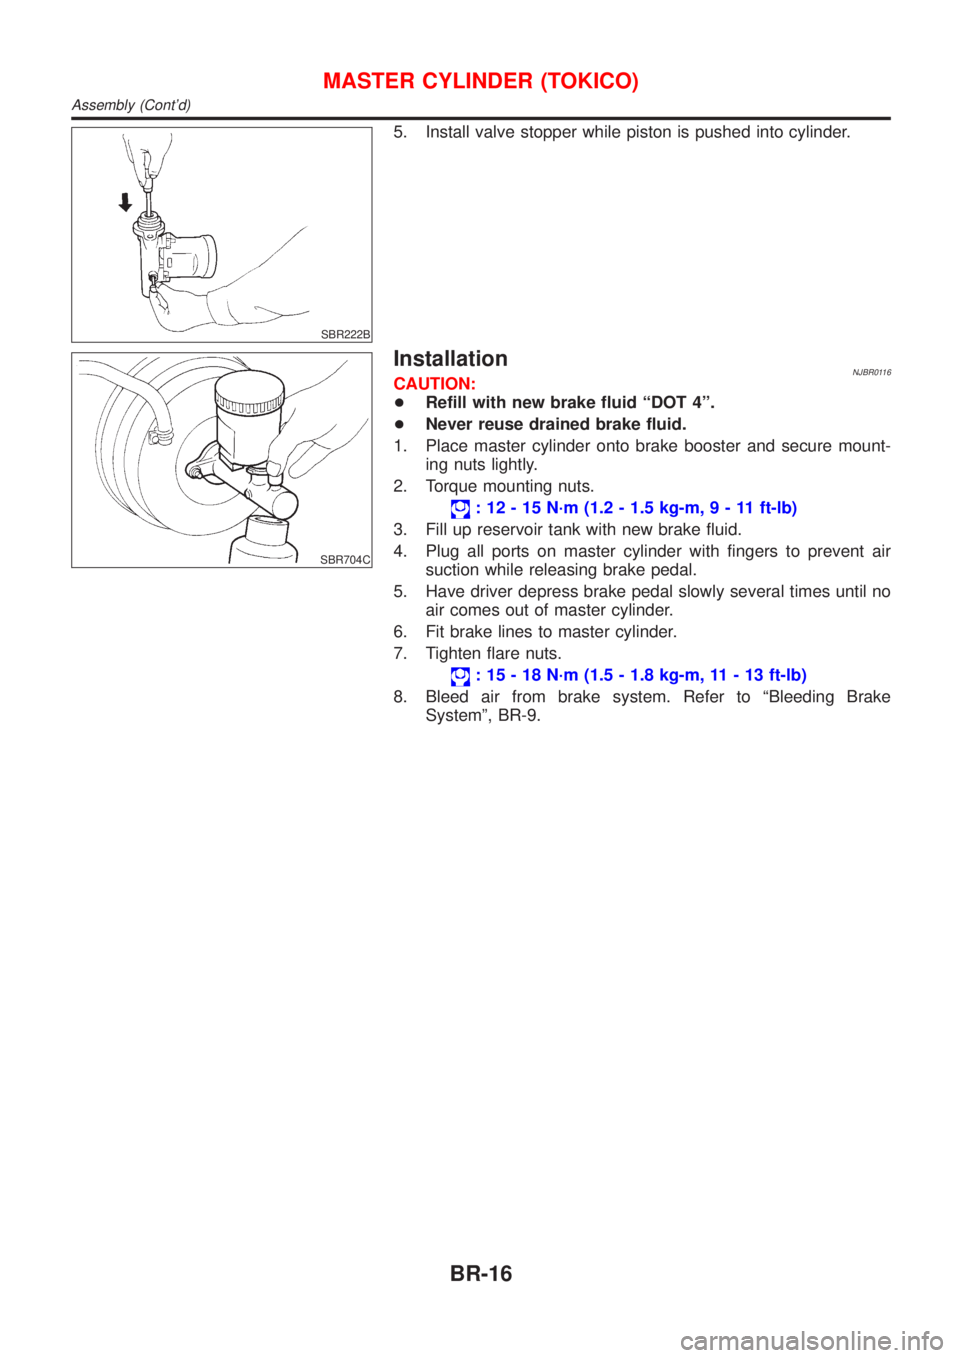
5. Install valve stopper while piston is pushed into cylinder.
SBR704C
InstallationNJBR0116CAUTION:
+Refill with new brake fluid ªDOT 4º.
+Never reuse drained brake fluid.
1. Place master cylinder onto brake booster and secure mount-
ing nuts lightly.
2. Torque mounting nuts.
: 12 - 15 N´m (1.2 - 1.5 kg-m,9-11ft-lb)
3. Fill up reservoir tank with new brake fluid.
4. Plug all ports on master cylinder with fingers to prevent air
suction while releasing brake pedal.
5. Have driver depress brake pedal slowly several times until no
air comes out of master cylinder.
6. Fit brake lines to master cylinder.
7. Tighten flare nuts.
: 15 - 18 N´m (1.5 - 1.8 kg-m, 11 - 13 ft-lb)
8. Bleed air from brake system. Refer to ªBleeding Brake
Systemº, BR-9.
MASTER CYLINDER (TOKICO)
Assembly (Cont'd)
BR-16
Page 534 of 2898
SBR231E
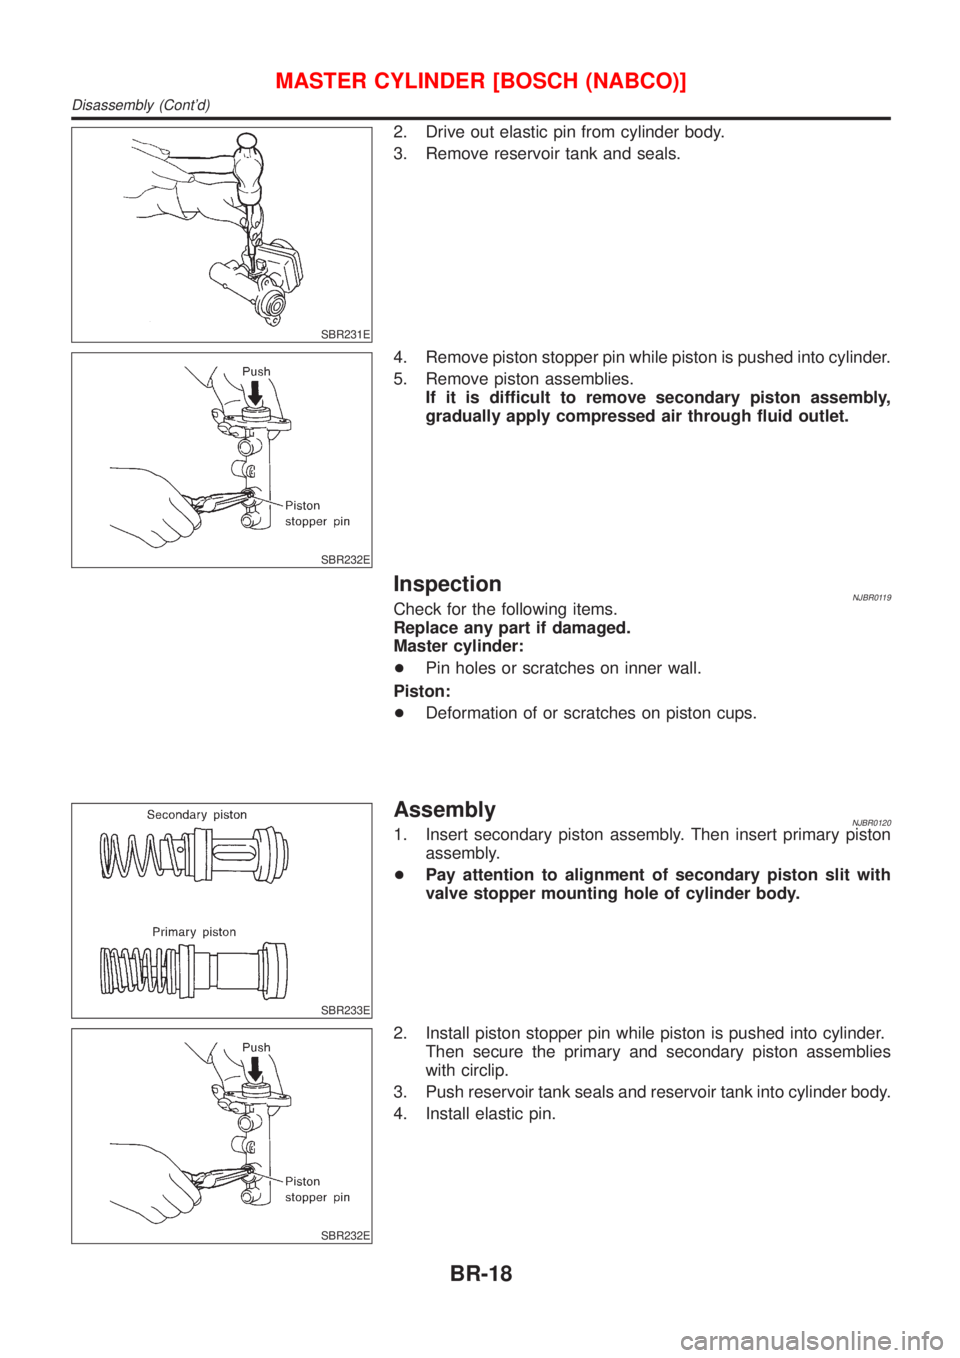
2. Drive out elastic pin from cylinder body.
3. Remove reservoir tank and seals.
SBR232E
4. Remove piston stopper pin while piston is pushed into cylinder.
5. Remove piston assemblies.
If it is difficult to remove secondary piston assembly,
gradually apply compressed air through fluid outlet.
InspectionNJBR0119Check for the following items.
Replace any part if damaged.
Master cylinder:
+Pin holes or scratches on inner wall.
Piston:
+Deformation of or scratches on piston cups.
SBR233E
AssemblyNJBR01201. Insert secondary piston assembly. Then insert primary piston
assembly.
+Pay attention to alignment of secondary piston slit with
valve stopper mounting hole of cylinder body.
SBR232E
2. Install piston stopper pin while piston is pushed into cylinder.
Then secure the primary and secondary piston assemblies
with circlip.
3. Push reservoir tank seals and reservoir tank into cylinder body.
4. Install elastic pin.
MASTER CYLINDER [BOSCH (NABCO)]
Disassembly (Cont'd)
BR-18
Page 535 of 2898
SBR236E
InstallationNJBR0121CAUTION:
+Refill with new brake fluid ªDOT 4º.
+Never reuse drained brake fluid.
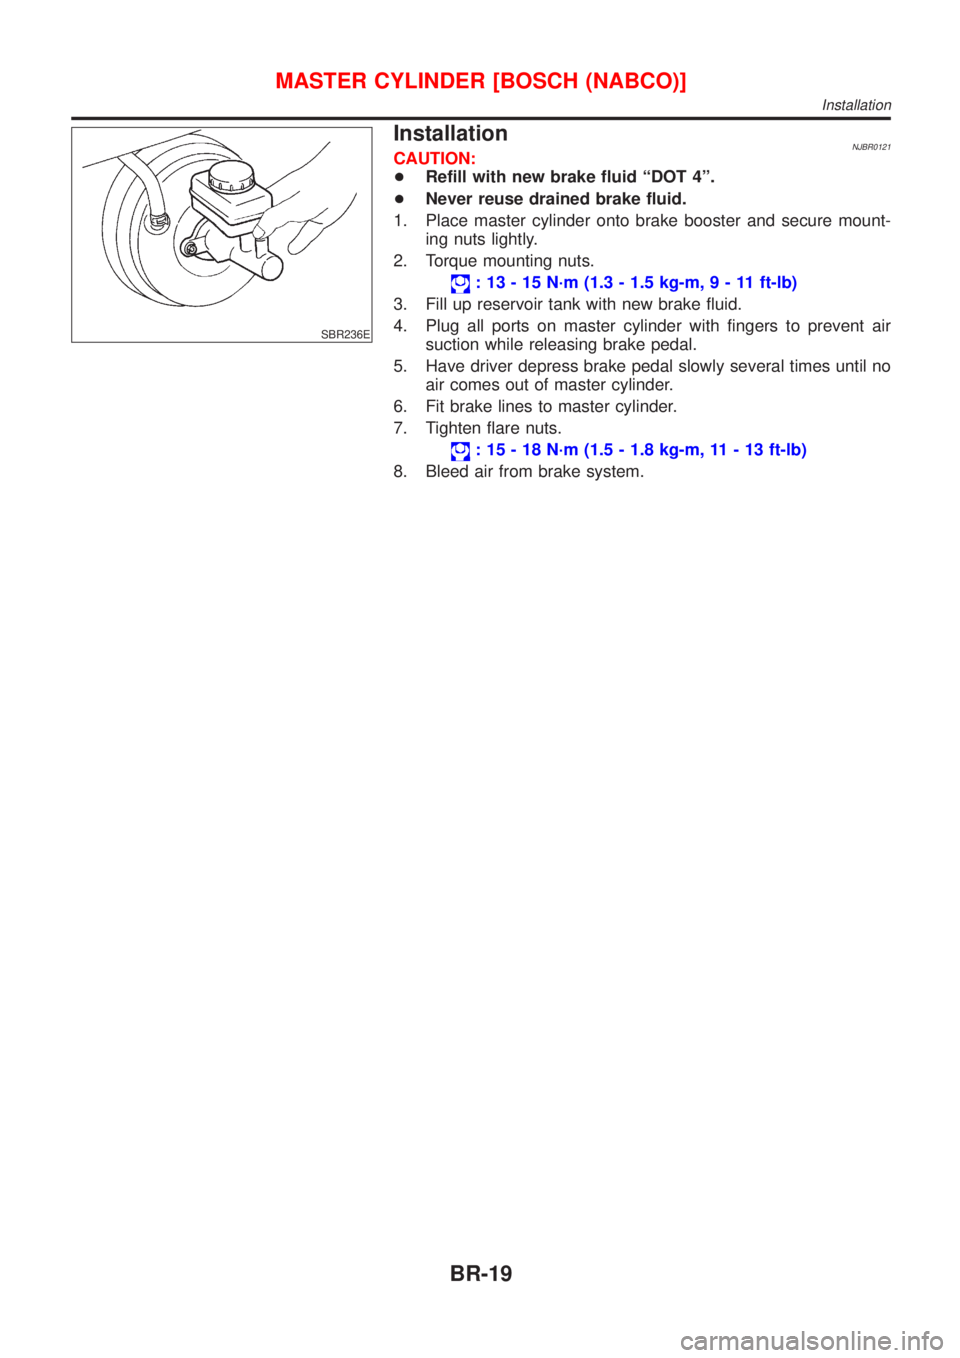
1. Place master cylinder onto brake booster and secure mount-
ing nuts lightly.
2. Torque mounting nuts.
: 13 - 15 N´m (1.3 - 1.5 kg-m,9-11ft-lb)
3. Fill up reservoir tank with new brake fluid.
4. Plug all ports on master cylinder with fingers to prevent air
suction while releasing brake pedal.
5. Have driver depress brake pedal slowly several times until no
air comes out of master cylinder.
6. Fit brake lines to master cylinder.
7. Tighten flare nuts.
: 15 - 18 N´m (1.5 - 1.8 kg-m, 11 - 13 ft-lb)
8. Bleed air from brake system.
MASTER CYLINDER [BOSCH (NABCO)]
Installation
BR-19