2000 DODGE NEON ignition
[x] Cancel search: ignitionPage 187 of 1285
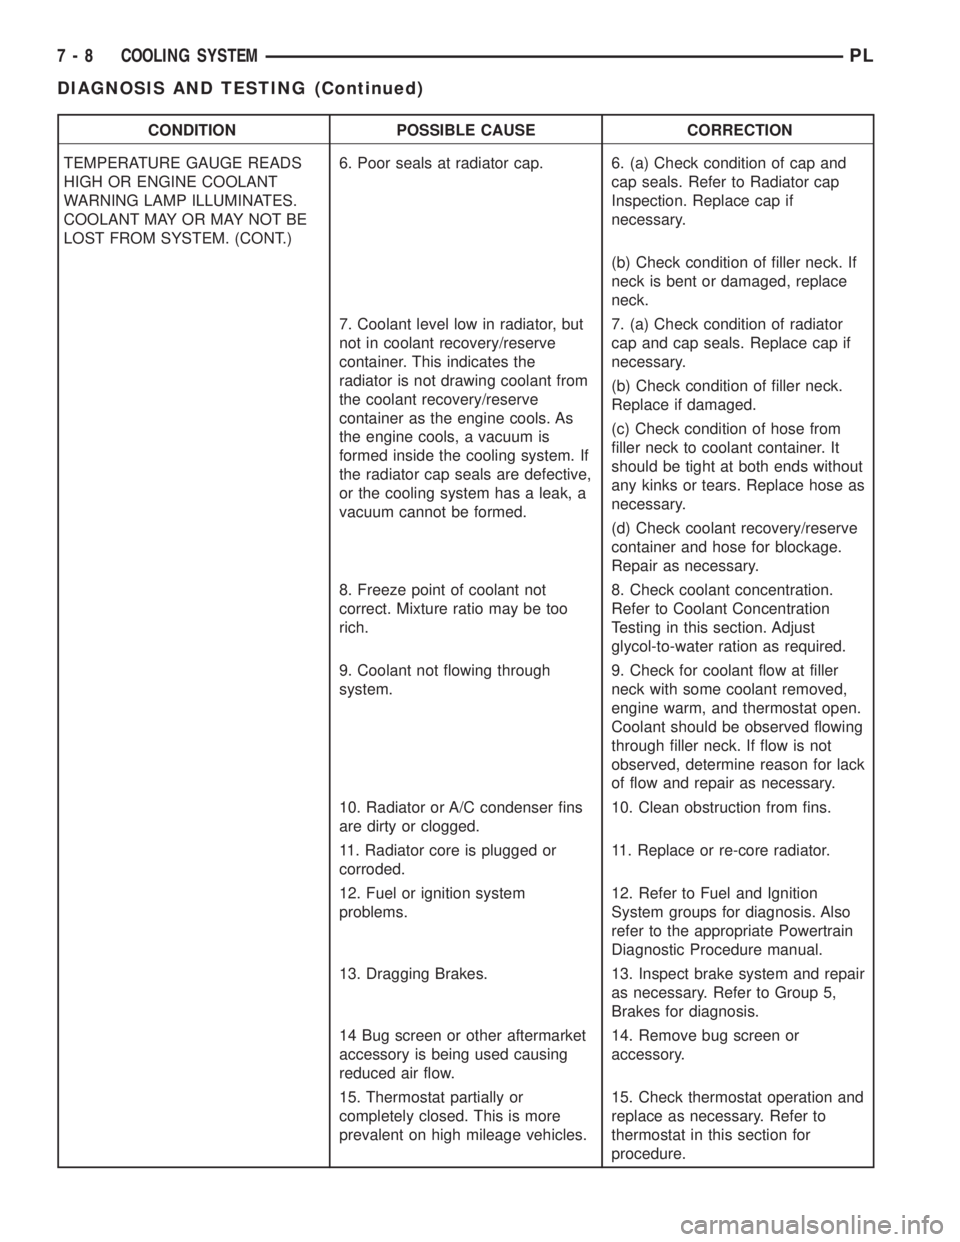
CONDITION POSSIBLE CAUSE CORRECTION
TEMPERATURE GAUGE READS
HIGH OR ENGINE COOLANT
WARNING LAMP ILLUMINATES.
COOLANT MAY OR MAY NOT BE
LOST FROM SYSTEM. (CONT.)6. Poor seals at radiator cap. 6. (a) Check condition of cap and
cap seals. Refer to Radiator cap
Inspection. Replace cap if
necessary.
(b) Check condition of filler neck. If
neck is bent or damaged, replace
neck.
7. Coolant level low in radiator, but
not in coolant recovery/reserve
container. This indicates the
radiator is not drawing coolant from
the coolant recovery/reserve
container as the engine cools. As
the engine cools, a vacuum is
formed inside the cooling system. If
the radiator cap seals are defective,
or the cooling system has a leak, a
vacuum cannot be formed.7. (a) Check condition of radiator
cap and cap seals. Replace cap if
necessary.
(b) Check condition of filler neck.
Replace if damaged.
(c) Check condition of hose from
filler neck to coolant container. It
should be tight at both ends without
any kinks or tears. Replace hose as
necessary.
(d) Check coolant recovery/reserve
container and hose for blockage.
Repair as necessary.
8. Freeze point of coolant not
correct. Mixture ratio may be too
rich.8. Check coolant concentration.
Refer to Coolant Concentration
Testing in this section. Adjust
glycol-to-water ration as required.
9. Coolant not flowing through
system.9. Check for coolant flow at filler
neck with some coolant removed,
engine warm, and thermostat open.
Coolant should be observed flowing
through filler neck. If flow is not
observed, determine reason for lack
of flow and repair as necessary.
10. Radiator or A/C condenser fins
are dirty or clogged.10. Clean obstruction from fins.
11. Radiator core is plugged or
corroded.11. Replace or re-core radiator.
12. Fuel or ignition system
problems.12. Refer to Fuel and Ignition
System groups for diagnosis. Also
refer to the appropriate Powertrain
Diagnostic Procedure manual.
13. Dragging Brakes. 13. Inspect brake system and repair
as necessary. Refer to Group 5,
Brakes for diagnosis.
14 Bug screen or other aftermarket
accessory is being used causing
reduced air flow.14. Remove bug screen or
accessory.
15. Thermostat partially or
completely closed. This is more
prevalent on high mileage vehicles.15. Check thermostat operation and
replace as necessary. Refer to
thermostat in this section for
procedure.
7 - 8 COOLING SYSTEMPL
DIAGNOSIS AND TESTING (Continued)
Page 189 of 1285
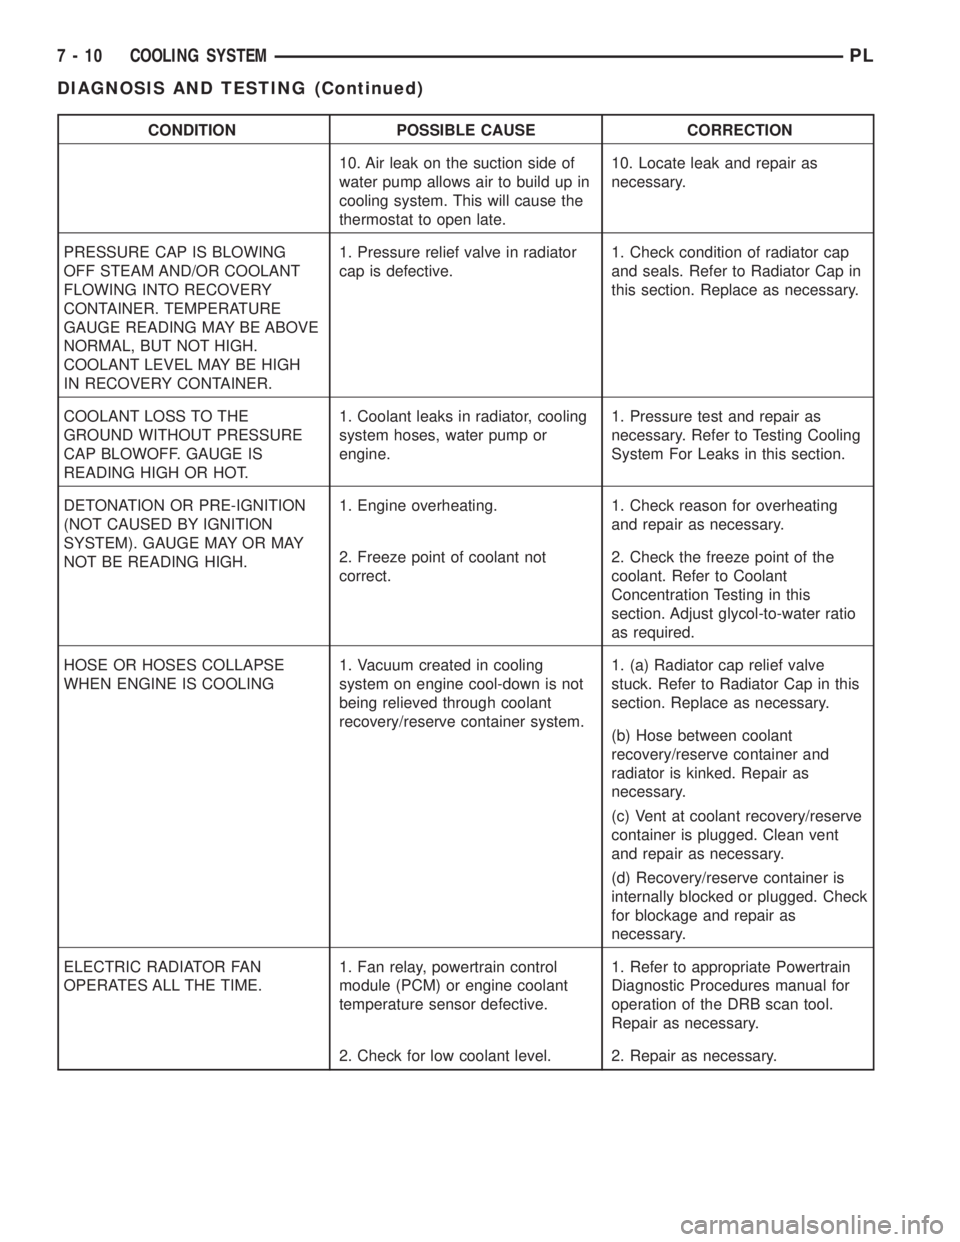
CONDITION POSSIBLE CAUSE CORRECTION
10. Air leak on the suction side of
water pump allows air to build up in
cooling system. This will cause the
thermostat to open late.10. Locate leak and repair as
necessary.
PRESSURE CAP IS BLOWING
OFF STEAM AND/OR COOLANT
FLOWING INTO RECOVERY
CONTAINER. TEMPERATURE
GAUGE READING MAY BE ABOVE
NORMAL, BUT NOT HIGH.
COOLANT LEVEL MAY BE HIGH
IN RECOVERY CONTAINER.1. Pressure relief valve in radiator
cap is defective.1. Check condition of radiator cap
and seals. Refer to Radiator Cap in
this section. Replace as necessary.
COOLANT LOSS TO THE
GROUND WITHOUT PRESSURE
CAP BLOWOFF. GAUGE IS
READING HIGH OR HOT.1. Coolant leaks in radiator, cooling
system hoses, water pump or
engine.1. Pressure test and repair as
necessary. Refer to Testing Cooling
System For Leaks in this section.
DETONATION OR PRE-IGNITION
(NOT CAUSED BY IGNITION
SYSTEM). GAUGE MAY OR MAY
NOT BE READING HIGH.1. Engine overheating. 1. Check reason for overheating
and repair as necessary.
2. Freeze point of coolant not
correct.2. Check the freeze point of the
coolant. Refer to Coolant
Concentration Testing in this
section. Adjust glycol-to-water ratio
as required.
HOSE OR HOSES COLLAPSE
WHEN ENGINE IS COOLING1. Vacuum created in cooling
system on engine cool-down is not
being relieved through coolant
recovery/reserve container system.1. (a) Radiator cap relief valve
stuck. Refer to Radiator Cap in this
section. Replace as necessary.
(b) Hose between coolant
recovery/reserve container and
radiator is kinked. Repair as
necessary.
(c) Vent at coolant recovery/reserve
container is plugged. Clean vent
and repair as necessary.
(d) Recovery/reserve container is
internally blocked or plugged. Check
for blockage and repair as
necessary.
ELECTRIC RADIATOR FAN
OPERATES ALL THE TIME.1. Fan relay, powertrain control
module (PCM) or engine coolant
temperature sensor defective.1. Refer to appropriate Powertrain
Diagnostic Procedures manual for
operation of the DRB scan tool.
Repair as necessary.
2. Check for low coolant level. 2. Repair as necessary.
7 - 10 COOLING SYSTEMPL
DIAGNOSIS AND TESTING (Continued)
Page 199 of 1285
(4) Rotate pump by hand to check for freedom of
movement.
(5) Install rear timing belt cover and camshaft
sprocket.
(6) Install timing belt tensioner and timing belt.
Refer to Group 9, Engine for procedure.
(7) Install right engine mount bracket. Refer to
Group 9, Engine for procedure.
(8) Install upper and lower torque isolator struts.
Refer to Group 9, Engine for procedure.
(9) Fill cooling system. Refer to procedures in this
section.
(10) Install accessory drive belts. Refer to proce-
dure in this section.
(11) Perform camshaft and crankshaft timing
relearn procedure as follows:
²Connect the DRB scan tool to the data link
(diagnostic) connector. This connector is located in
the passenger compartment; at the lower edge of
instrument panel; near the steering column.
²Turn the ignition switch on and access the ªmis-
cellaneousº screen.
²Select ªre-learn cam/crankº option and follow
directions on DRB screen.
WATER PUMP INLET TUBE
The inlet tube connects the water pump to the
radiator and heater core. This tube is sealed by an
O-ring and held in place by fasteners to the block.
REMOVAL
CAUTION: Do not use any sharp tools to remove
hoses from inlet tube. This may cause the tube to
leak.
(1) Drain cooling system. Refer to procedure in
this section.
(2) Remove upper radiator hose to access the hose
connections at the inlet tube.(3) Remove intake manifold. Refer to Group 9,
Engine for procedure.
(4) Remove lower radiator hose and heater hose
from the inlet tube.
(5) Remove lower intake manifold support bracket.
(6) Remove the inlet tube to the block fasteners.
(7) Rotate tube while removing the tube from the
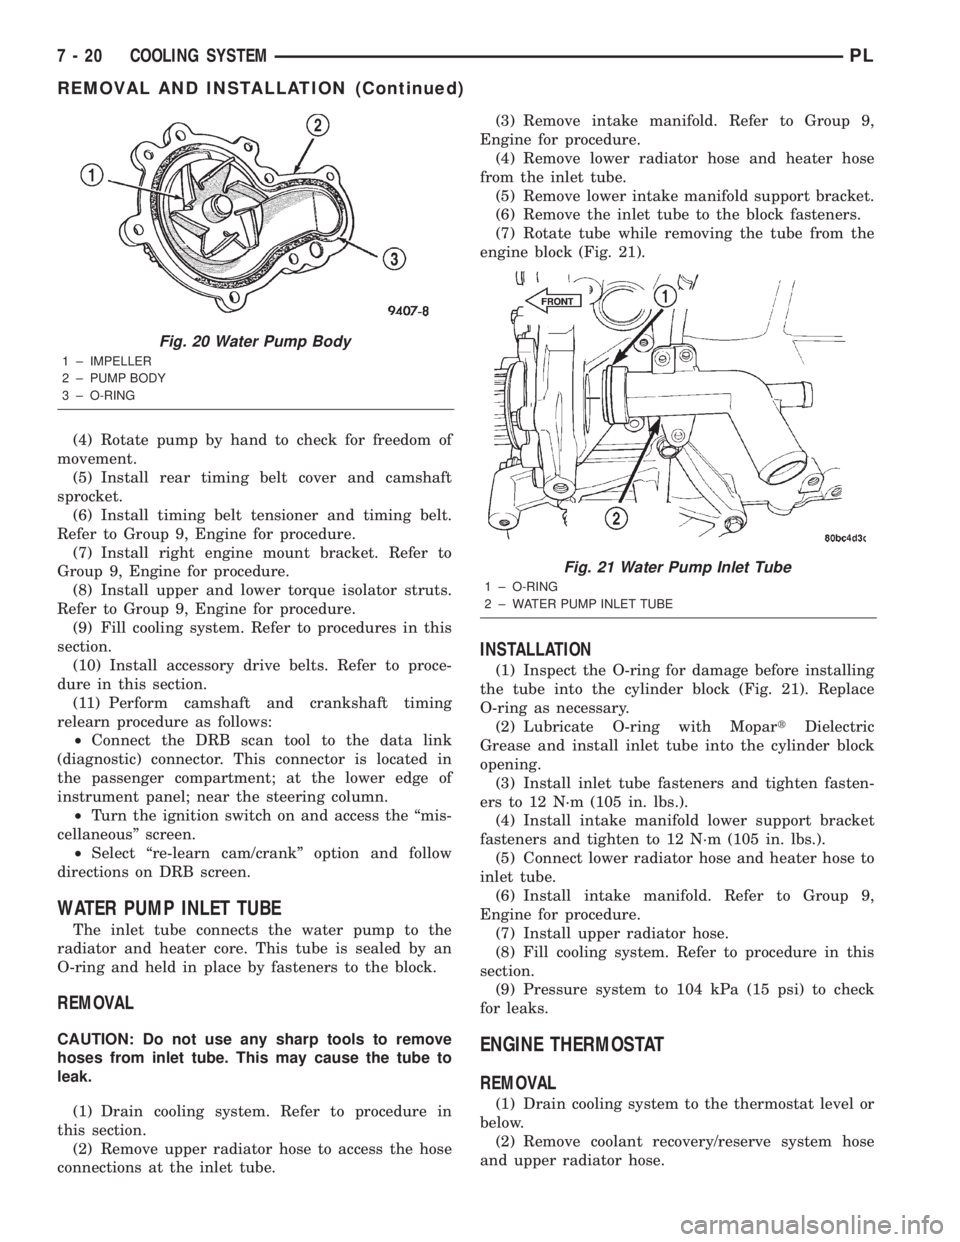
engine block (Fig. 21).
INSTALLATION
(1) Inspect the O-ring for damage before installing
the tube into the cylinder block (Fig. 21). Replace
O-ring as necessary.
(2) Lubricate O-ring with MopartDielectric
Grease and install inlet tube into the cylinder block
opening.
(3) Install inlet tube fasteners and tighten fasten-
ers to 12 N´m (105 in. lbs.).
(4) Install intake manifold lower support bracket
fasteners and tighten to 12 N´m (105 in. lbs.).
(5) Connect lower radiator hose and heater hose to
inlet tube.
(6) Install intake manifold. Refer to Group 9,
Engine for procedure.
(7) Install upper radiator hose.
(8) Fill cooling system. Refer to procedure in this
section.
(9) Pressure system to 104 kPa (15 psi) to check
for leaks.
ENGINE THERMOSTAT
REMOVAL
(1) Drain cooling system to the thermostat level or
below.
(2) Remove coolant recovery/reserve system hose
and upper radiator hose.
Fig. 20 Water Pump Body
1 ± IMPELLER
2 ± PUMP BODY
3 ± O-RING
Fig. 21 Water Pump Inlet Tube
1 ± O-RING
2 ± WATER PUMP INLET TUBE
FRONT
7 - 20 COOLING SYSTEMPL
REMOVAL AND INSTALLATION (Continued)
Page 210 of 1285
BATTERY
TABLE OF CONTENTS
page page
GENERAL INFORMATION
INTRODUCTION..........................1
DESCRIPTION AND OPERATION
BATTERY IGNITION OFF DRAW (IOD).........2
CHARGING TIME REQUIRED................2
DIAGNOSIS AND TESTING
BATTERY BUILT-IN TEST INDICATOR.........3
BATTERY IGNITION OFF DRAW (IOD).........4
BATTERY LOAD TEST......................6
BATTERY OPEN CIRCUIT VOLTAGE...........7
SERVICE PROCEDURES
BATTERY CHARGING......................7CHARGING COMPLETELY DISCHARGED
BATTERY..............................8
VISUAL INSPECTION......................9
REMOVAL AND INSTALLATION
BATTERY...............................10
BATTERY THERMOWRAP..................10
BATTERY TRAY..........................11
SPECIFICATIONS
BATTERY SPECIFICATIONS................11
TORQUE...............................11
GENERAL INFORMATION
INTRODUCTION
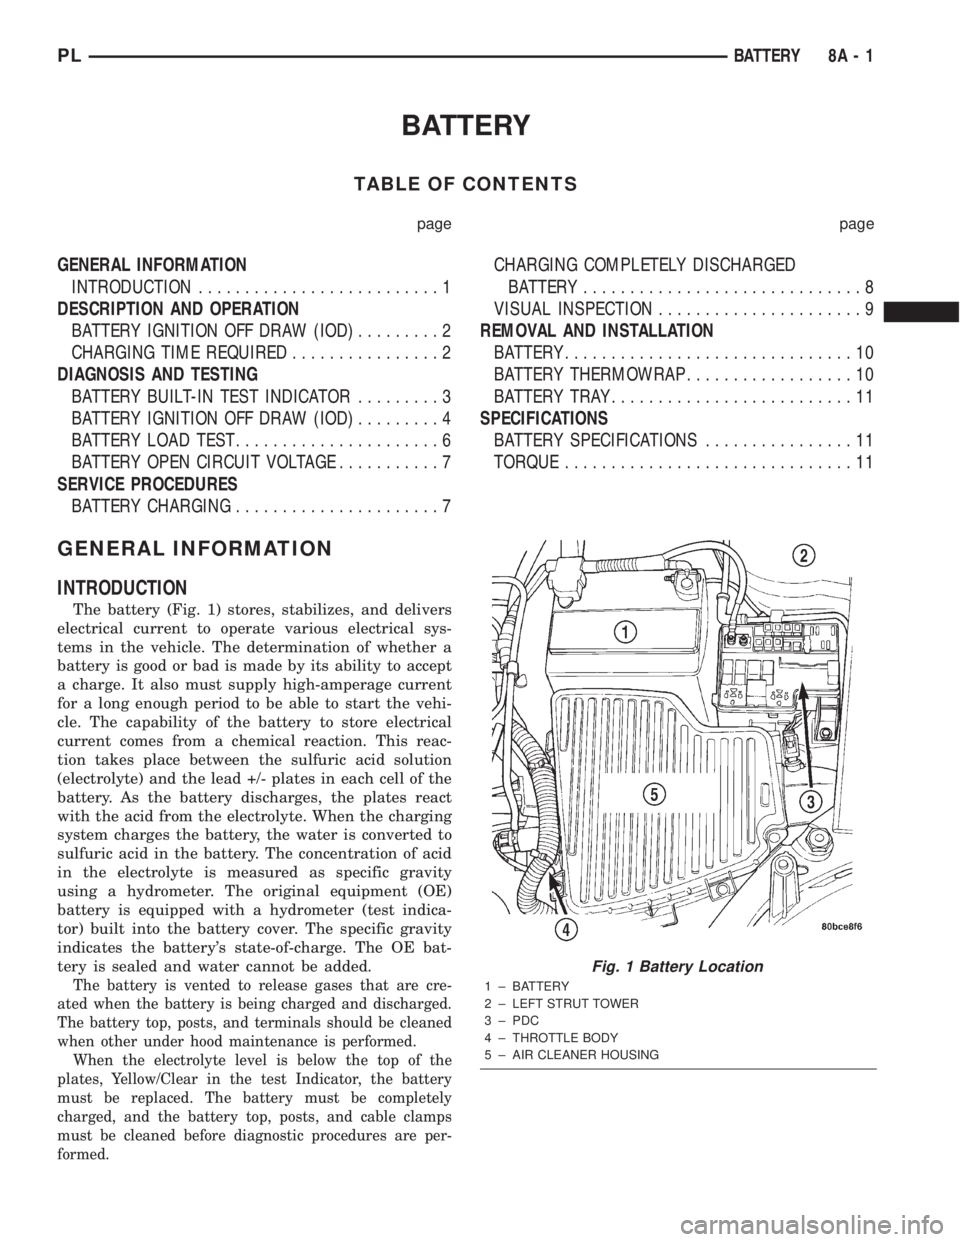
The battery (Fig. 1) stores, stabilizes, and delivers
electrical current to operate various electrical sys-
tems in the vehicle. The determination of whether a
battery is good or bad is made by its ability to accept
a charge. It also must supply high-amperage current
for a long enough period to be able to start the vehi-
cle. The capability of the battery to store electrical
current comes from a chemical reaction. This reac-
tion takes place between the sulfuric acid solution
(electrolyte) and the lead +/- plates in each cell of the
battery. As the battery discharges, the plates react
with the acid from the electrolyte. When the charging
system charges the battery, the water is converted to
sulfuric acid in the battery. The concentration of acid
in the electrolyte is measured as specific gravity
using a hydrometer. The original equipment (OE)
battery is equipped with a hydrometer (test indica-
tor) built into the battery cover. The specific gravity
indicates the battery's state-of-charge. The OE bat-
tery is sealed and water cannot be added.
The battery is vented to release gases that are cre-
ated when the battery is being charged and discharged.
The battery top, posts, and terminals should be cleaned
when other under hood maintenance is performed.
When the electrolyte level is below the top of the
plates, Yellow/Clear in the test Indicator, the battery
must be replaced. The battery must be completely
charged, and the battery top, posts, and cable clamps
must be cleaned before diagnostic procedures are per-
formed.
Fig. 1 Battery Location
1 ± BATTERY
2 ± LEFT STRUT TOWER
3 ± PDC
4 ± THROTTLE BODY
5 ± AIR CLEANER HOUSING
PLBATTERY 8A - 1
Page 211 of 1285
DESCRIPTION AND OPERATION
BATTERY IGNITION OFF DRAW (IOD)
A completely normal vehicle will have a small
amount of current drain on the battery with the key
out of the ignition. It can range from 4 to 10 milli-
amperes after all the modules time out. If a vehicle
will not be operated for approximately a 20 days, the
IOD fuse should be disconnected to minimize the
vehicle electrical drain on the battery. The IOD fuse
is located in the Power Distribution Center (PDC).
Refer to the PDC cover to locate the proper fuse.
CHARGING TIME REQUIRED
WARNING: NEVER EXCEED 20 AMPS WHEN
CHARGING A COLD -1ÉC (30ÉF) BATTERY. PER-
SONAL INJURY MAY RESULT.
The time required to charge a battery will vary
depending upon the following factors.
SIZE OF BATTERY
A completely discharged large heavy-duty battery
may require more recharging time than a completely
discharged small capacity battery, refer to Battery
Charging Timetable for charging times.
TEMPERATURE
A longer time will be needed to charge a battery at
-18ÉC (0ÉF) than at 27ÉC (80ÉF). When a fast charger
is connected to a cold battery, current accepted by
battery will be very low at first. In time, the battery
will accept a higher rate as battery temperature
warms.
CHARGER CAPACITY
A charger which can supply only five amperes will
require a much longer period of charging than a
charger that can supply 20 amperes or more.
STATE OF CHARGE
A completely discharged battery requires more
charging time than a partially charged battery.
NOTE: Do not attempt to recharge a battery with a
yellow/clear test indicator.
Electrolyte is nearly pure water in a completely
discharged battery. At first, the charging current
amperage will be low. As water is converted back to
sulfuric acid inside the battery, the current amp rate
will rise. Also, the specific gravity of the electrolyte
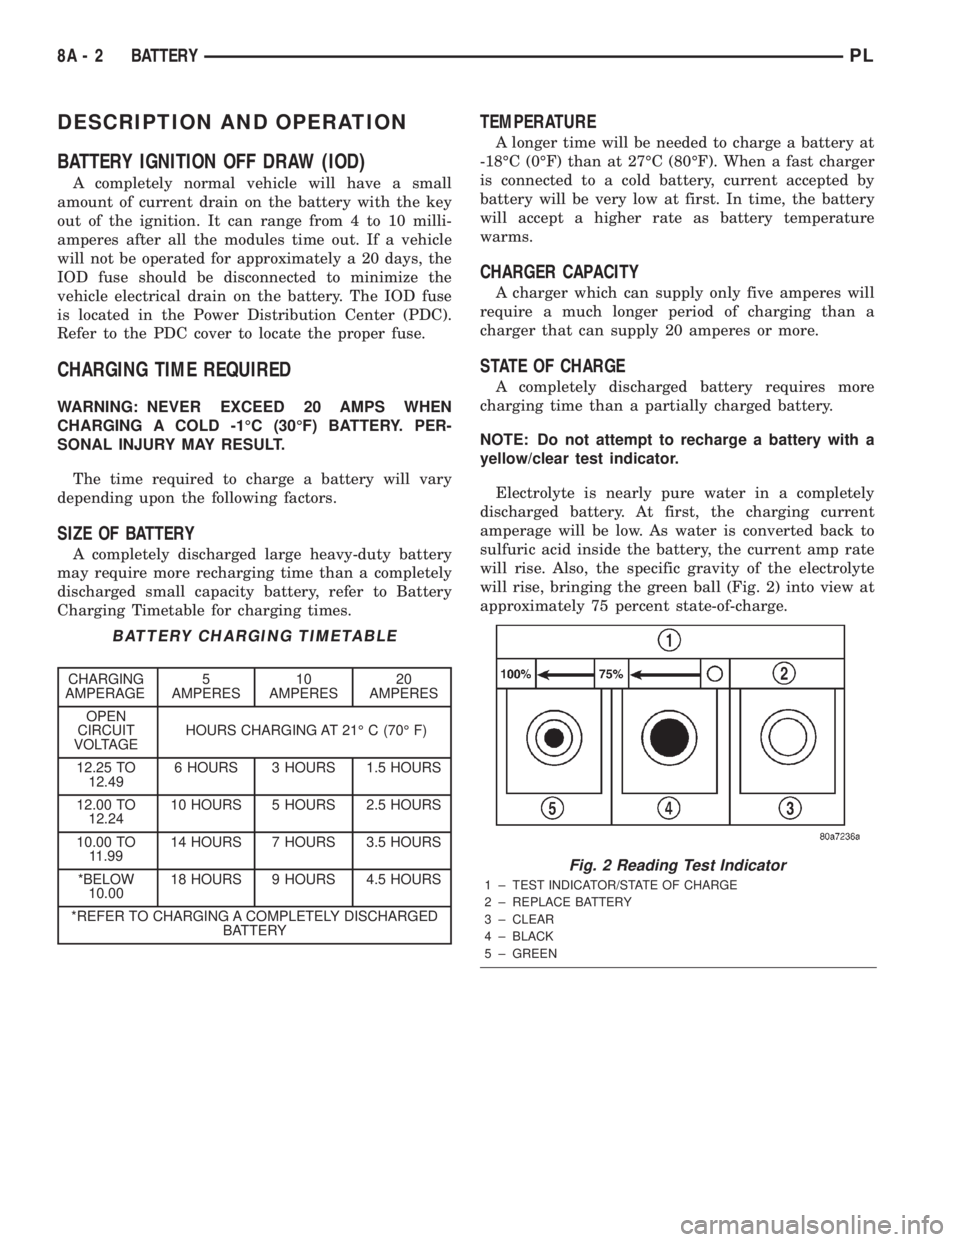
will rise, bringing the green ball (Fig. 2) into view at
approximately 75 percent state-of-charge.
BATTERY CHARGING TIMETABLE
CHARGING
AMPERAGE5
AMPERES10
AMPERES20
AMPERES
OPEN
CIRCUIT
VOLTAGEHOURS CHARGING AT 21É C (70É F)
12.25 TO
12.496 HOURS 3 HOURS 1.5 HOURS
12.00 TO
12.2410 HOURS 5 HOURS 2.5 HOURS
10.00 TO
11.9914 HOURS 7 HOURS 3.5 HOURS
*BELOW
10.0018 HOURS 9 HOURS 4.5 HOURS
*REFER TO CHARGING A COMPLETELY DISCHARGED
BATTERY
Fig. 2 Reading Test Indicator
1 ± TEST INDICATOR/STATE OF CHARGE
2 ± REPLACE BATTERY
3 ± CLEAR
4 ± BLACK
5 ± GREEN
8A - 2 BATTERYPL
Page 212 of 1285
DIAGNOSIS AND TESTING
BATTERY BUILT-IN TEST INDICATOR
USING TEST INDICATOR
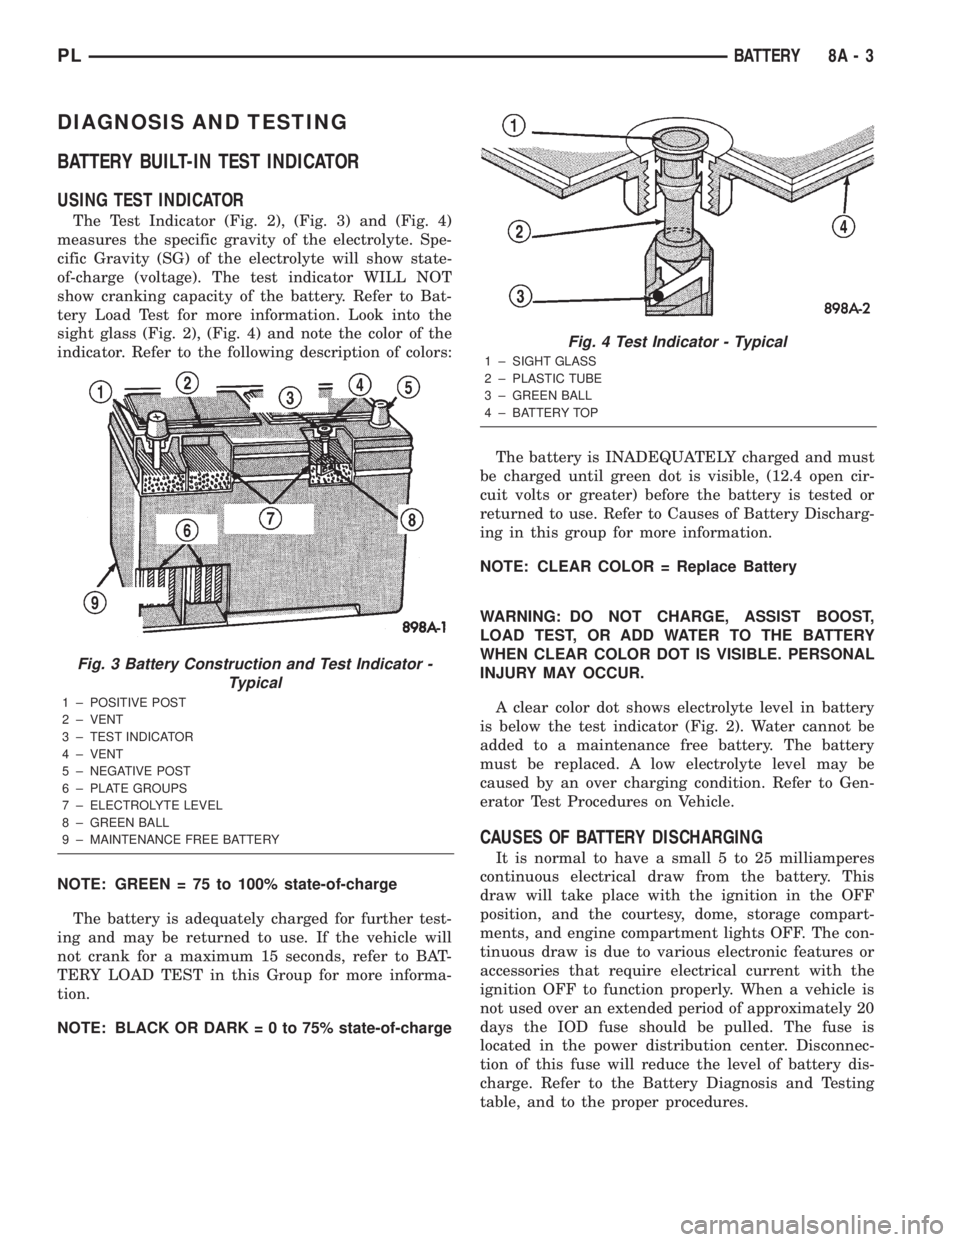
The Test Indicator (Fig. 2), (Fig. 3) and (Fig. 4)
measures the specific gravity of the electrolyte. Spe-
cific Gravity (SG) of the electrolyte will show state-
of-charge (voltage). The test indicator WILL NOT
show cranking capacity of the battery. Refer to Bat-
tery Load Test for more information. Look into the
sight glass (Fig. 2), (Fig. 4) and note the color of the
indicator. Refer to the following description of colors:
NOTE: GREEN = 75 to 100% state-of-charge
The battery is adequately charged for further test-
ing and may be returned to use. If the vehicle will
not crank for a maximum 15 seconds, refer to BAT-
TERY LOAD TEST in this Group for more informa-
tion.
NOTE: BLACK OR DARK=0to75%state-of-chargeThe battery is INADEQUATELY charged and must
be charged until green dot is visible, (12.4 open cir-
cuit volts or greater) before the battery is tested or
returned to use. Refer to Causes of Battery Discharg-
ing in this group for more information.
NOTE: CLEAR COLOR = Replace Battery
WARNING: DO NOT CHARGE, ASSIST BOOST,
LOAD TEST, OR ADD WATER TO THE BATTERY
WHEN CLEAR COLOR DOT IS VISIBLE. PERSONAL
INJURY MAY OCCUR.
A clear color dot shows electrolyte level in battery
is below the test indicator (Fig. 2). Water cannot be
added to a maintenance free battery. The battery
must be replaced. A low electrolyte level may be
caused by an over charging condition. Refer to Gen-
erator Test Procedures on Vehicle.
CAUSES OF BATTERY DISCHARGING
It is normal to have a small 5 to 25 milliamperes
continuous electrical draw from the battery. This
draw will take place with the ignition in the OFF
position, and the courtesy, dome, storage compart-
ments, and engine compartment lights OFF. The con-
tinuous draw is due to various electronic features or
accessories that require electrical current with the
ignition OFF to function properly. When a vehicle is
not used over an extended period of approximately 20
days the IOD fuse should be pulled. The fuse is
located in the power distribution center. Disconnec-
tion of this fuse will reduce the level of battery dis-
charge. Refer to the Battery Diagnosis and Testing
table, and to the proper procedures.
Fig. 3 Battery Construction and Test Indicator -
Typical
1 ± POSITIVE POST
2 ± VENT
3 ± TEST INDICATOR
4 ± VENT
5 ± NEGATIVE POST
6 ± PLATE GROUPS
7 ± ELECTROLYTE LEVEL
8 ± GREEN BALL
9 ± MAINTENANCE FREE BATTERY
Fig. 4 Test Indicator - Typical
1 ± SIGHT GLASS
2 ± PLASTIC TUBE
3 ± GREEN BALL
4 ± BATTERY TOP
PLBATTERY 8A - 3
Page 213 of 1285
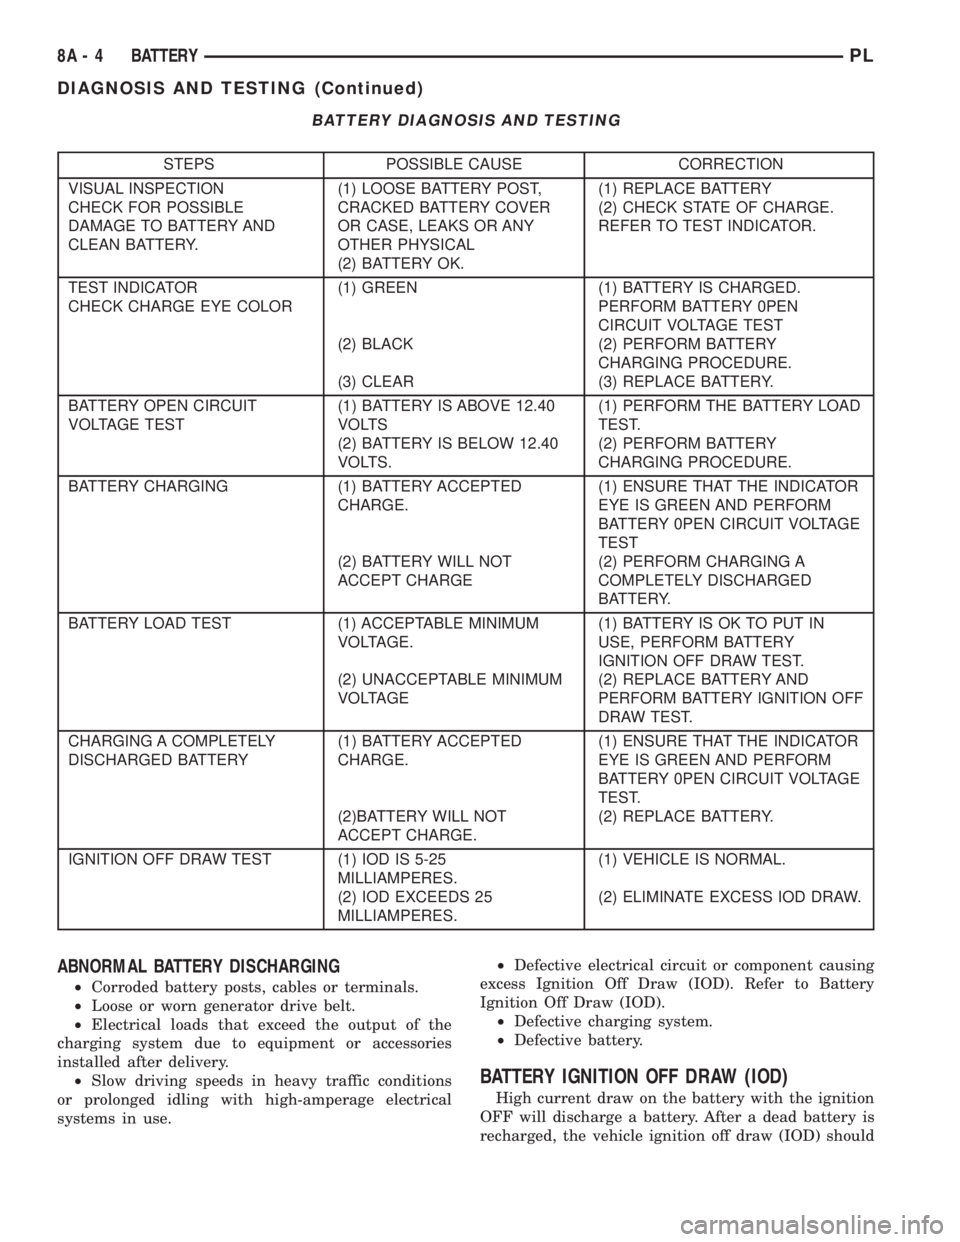
BATTERY DIAGNOSIS AND TESTING
STEPS POSSIBLE CAUSE CORRECTION
VISUAL INSPECTION
CHECK FOR POSSIBLE
DAMAGE TO BATTERY AND
CLEAN BATTERY.(1) LOOSE BATTERY POST,
CRACKED BATTERY COVER
OR CASE, LEAKS OR ANY
OTHER PHYSICAL
(2) BATTERY OK.(1) REPLACE BATTERY
(2) CHECK STATE OF CHARGE.
REFER TO TEST INDICATOR.
TEST INDICATOR
CHECK CHARGE EYE COLOR(1) GREEN
(2) BLACK
(3) CLEAR(1) BATTERY IS CHARGED.
PERFORM BATTERY 0PEN
CIRCUIT VOLTAGE TEST
(2) PERFORM BATTERY
CHARGING PROCEDURE.
(3) REPLACE BATTERY.
BATTERY OPEN CIRCUIT
VOLTAGE TEST(1) BATTERY IS ABOVE 12.40
VOLTS
(2) BATTERY IS BELOW 12.40
VOLTS.(1) PERFORM THE BATTERY LOAD
TEST.
(2) PERFORM BATTERY
CHARGING PROCEDURE.
BATTERY CHARGING (1) BATTERY ACCEPTED
CHARGE.
(2) BATTERY WILL NOT
ACCEPT CHARGE(1) ENSURE THAT THE INDICATOR
EYE IS GREEN AND PERFORM
BATTERY 0PEN CIRCUIT VOLTAGE
TEST
(2) PERFORM CHARGING A
COMPLETELY DISCHARGED
BATTERY.
BATTERY LOAD TEST (1) ACCEPTABLE MINIMUM
VOLTAGE.
(2) UNACCEPTABLE MINIMUM
VOLTAGE(1) BATTERY IS OK TO PUT IN
USE, PERFORM BATTERY
IGNITION OFF DRAW TEST.
(2) REPLACE BATTERY AND
PERFORM BATTERY IGNITION OFF
DRAW TEST.
CHARGING A COMPLETELY
DISCHARGED BATTERY(1) BATTERY ACCEPTED
CHARGE.
(2)BATTERY WILL NOT
ACCEPT CHARGE.(1) ENSURE THAT THE INDICATOR
EYE IS GREEN AND PERFORM
BATTERY 0PEN CIRCUIT VOLTAGE
TEST.
(2) REPLACE BATTERY.
IGNITION OFF DRAW TEST (1) IOD IS 5-25
MILLIAMPERES.
(2) IOD EXCEEDS 25
MILLIAMPERES.(1) VEHICLE IS NORMAL.
(2) ELIMINATE EXCESS IOD DRAW.
ABNORMAL BATTERY DISCHARGING
²Corroded battery posts, cables or terminals.
²Loose or worn generator drive belt.
²Electrical loads that exceed the output of the
charging system due to equipment or accessories
installed after delivery.
²Slow driving speeds in heavy traffic conditions
or prolonged idling with high-amperage electrical
systems in use.²Defective electrical circuit or component causing
excess Ignition Off Draw (IOD). Refer to Battery
Ignition Off Draw (IOD).
²Defective charging system.
²Defective battery.
BATTERY IGNITION OFF DRAW (IOD)
High current draw on the battery with the ignition
OFF will discharge a battery. After a dead battery is
recharged, the vehicle ignition off draw (IOD) should
8A - 4 BATTERYPL
DIAGNOSIS AND TESTING (Continued)
Page 214 of 1285
be checked. To determine if a high current draw con-
dition exists first check the vehicle with a test lamp.
(1) Verify that all electrical accessories are OFF.
²Remove key from ignition switch
²Turn off all lights
²Trunk lid is closed
²Engine compartment hood lamp is disconnected
or lamp removed
²Map lamp on rear view mirror
²Glove box door is closed
²Sun visor vanity lights are OFF
²All doors are closed
²Allow the ignition key lamp system to time out
in approximately 30 seconds, if equipped.
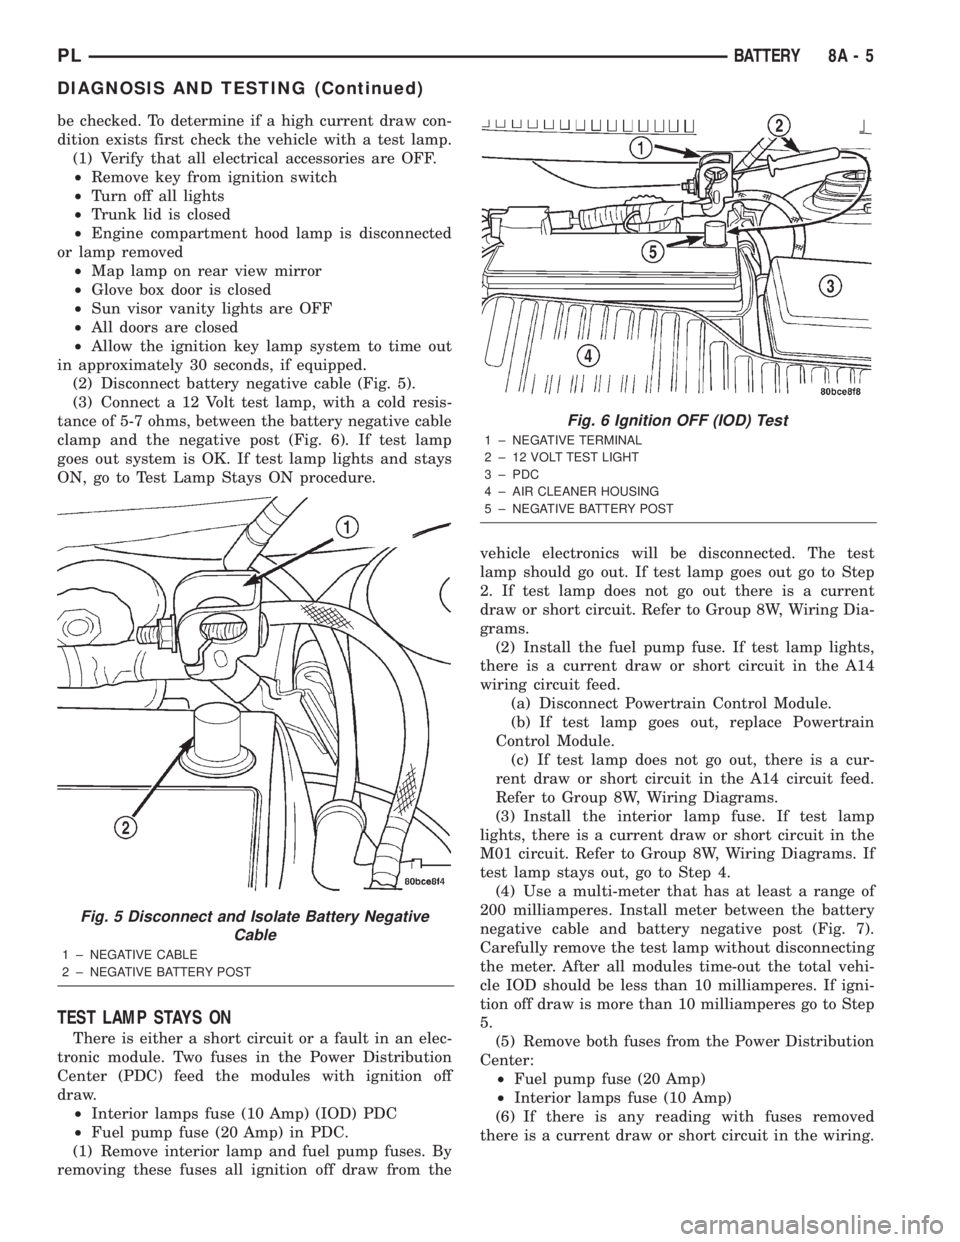
(2) Disconnect battery negative cable (Fig. 5).
(3) Connect a 12 Volt test lamp, with a cold resis-
tance of 5-7 ohms, between the battery negative cable
clamp and the negative post (Fig. 6). If test lamp
goes out system is OK. If test lamp lights and stays
ON, go to Test Lamp Stays ON procedure.
TEST LAMP STAYS ON
There is either a short circuit or a fault in an elec-
tronic module. Two fuses in the Power Distribution
Center (PDC) feed the modules with ignition off
draw.
²Interior lamps fuse (10 Amp) (IOD) PDC
²Fuel pump fuse (20 Amp) in PDC.
(1) Remove interior lamp and fuel pump fuses. By
removing these fuses all ignition off draw from thevehicle electronics will be disconnected. The test
lamp should go out. If test lamp goes out go to Step
2. If test lamp does not go out there is a current
draw or short circuit. Refer to Group 8W, Wiring Dia-
grams.
(2) Install the fuel pump fuse. If test lamp lights,
there is a current draw or short circuit in the A14
wiring circuit feed.
(a) Disconnect Powertrain Control Module.
(b) If test lamp goes out, replace Powertrain
Control Module.
(c) If test lamp does not go out, there is a cur-
rent draw or short circuit in the A14 circuit feed.
Refer to Group 8W, Wiring Diagrams.
(3) Install the interior lamp fuse. If test lamp
lights, there is a current draw or short circuit in the
M01 circuit. Refer to Group 8W, Wiring Diagrams. If
test lamp stays out, go to Step 4.
(4) Use a multi-meter that has at least a range of
200 milliamperes. Install meter between the battery
negative cable and battery negative post (Fig. 7).
Carefully remove the test lamp without disconnecting
the meter. After all modules time-out the total vehi-
cle IOD should be less than 10 milliamperes. If igni-
tion off draw is more than 10 milliamperes go to Step
5.
(5) Remove both fuses from the Power Distribution
Center:
²Fuel pump fuse (20 Amp)
²Interior lamps fuse (10 Amp)
(6) If there is any reading with fuses removed
there is a current draw or short circuit in the wiring.
Fig. 5 Disconnect and Isolate Battery Negative
Cable
1 ± NEGATIVE CABLE
2 ± NEGATIVE BATTERY POST
Fig. 6 Ignition OFF (IOD) Test
1 ± NEGATIVE TERMINAL
2 ± 12 VOLT TEST LIGHT
3 ± PDC
4 ± AIR CLEANER HOUSING
5 ± NEGATIVE BATTERY POST
PLBATTERY 8A - 5
DIAGNOSIS AND TESTING (Continued)