Page 1204 of 2267

System Description
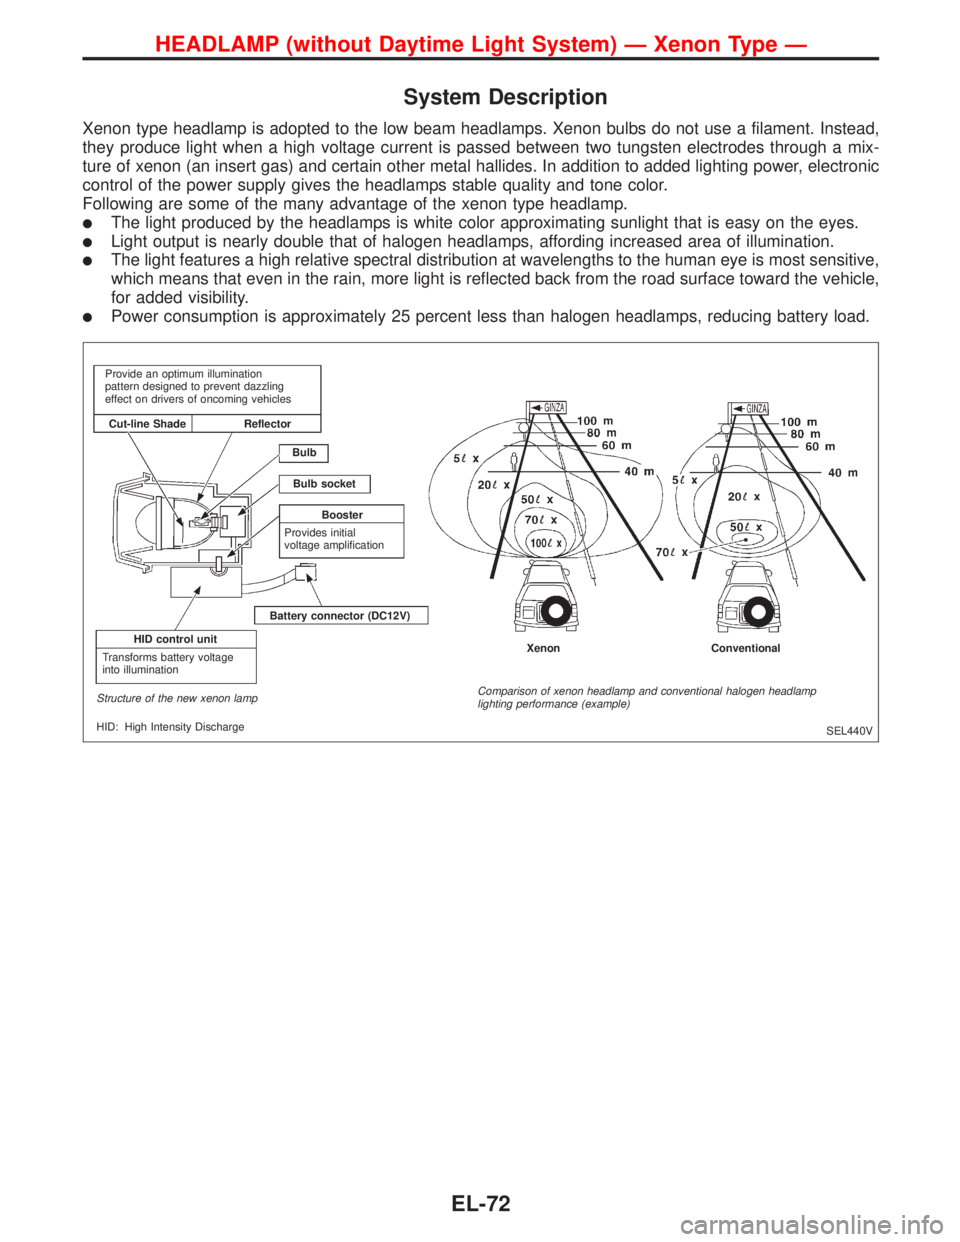
Xenon type headlamp is adopted to the low beam headlamps. Xenon bulbs do not use a filament. Instead,
they produce light when a high voltage current is passed between two tungsten electrodes through a mix-
ture of xenon (an insert gas) and certain other metal hallides. In addition to added lighting power, electronic
control of the power supply gives the headlamps stable quality and tone color.
Following are some of the many advantage of the xenon type headlamp.
�The light produced by the headlamps is white color approximating sunlight that is easy on the eyes.
�Light output is nearly double that of halogen headlamps, affording increased area of illumination.
�The light features a high relative spectral distribution at wavelengths to the human eye is most sensitive,
which means that even in the rain, more light is reflected back from the road surface toward the vehicle,
for added visibility.
�Power consumption is approximately 25 percent less than halogen headlamps, reducing battery load.
SEL440V Provide an optimum illumination
pattern designed to prevent dazzling
effect on drivers of oncoming vehicles
Cut-line Shade Reflector
Bulb
Bulb socket
Booster
Provides initial
voltage amplification
Battery connector (DC12V)
HID control unit
Transforms battery voltage
into illumination
Structure of the new xenon lamp
HID: High Intensity DischargeXenon Conventional
Comparison of xenon headlamp and conventional halogen headlamp
lighting performance (example)
HEADLAMP (without Daytime Light System)—Xenon Type—
EL-72
Page 1205 of 2267
Wiring Diagram—H/LAMP—
YEL133C
BATTERY
Refer to EL-POWER.: With gasoline engine
: With diesel engine
OFF
1ST2ND
LOW
HIGHPASSOFF
1ST2ND
LOW
HIGHPASS
LOW
HIGHPASS
LOW
HIGHPASSCOMBINATION
SWITCH
(LIGHTING
SWITCH)
Next page PASS
HIGH LOW PASS
HIGH LOW
HEADLAMP (without Daytime Light System)—Xenon Type—
EL-73
Page 1206 of 2267
YEL004D
HEADLAMP (without Daytime Light System)—Xenon Type—
Wiring Diagram—H/LAMP—(Cont’d)
EL-74
Page 1207 of 2267

WARNING:
�The xenon headlamp has a high-tension current generating area. Be extremely careful when
removing and installing. Be certain to disconnect the battery negative cable prior to removing or
installing.
�When the xenon headlamp is lit, do not touch the harness (covered with red or amber insulation),
bulb itself or the bulb socket with your bare hands.
�Never service a xenon headlamp with wet hands.
�When checking body side harness with a circuit tester, be certain to disconnect the harness
connector from the xenon headlamp.
�When the xenon headlamp is lit, the xenon bulb must be installed in the headlamp housing.
(Never turn on xenon headlamp, if the bulb is out of the headlamp housing.)
CAUTION:
Make sure to install the bulb securely; if the xenon bulb is improperly installed in its socket, high-
tension current leaks occur. This may lead to a melted bulb and/or bulb socket.
Trouble Diagnoses
Symptom Possible cause Repair order
LH or RH xenon headlamp
(low beam) blinks, lacks
brightness or does not illu-
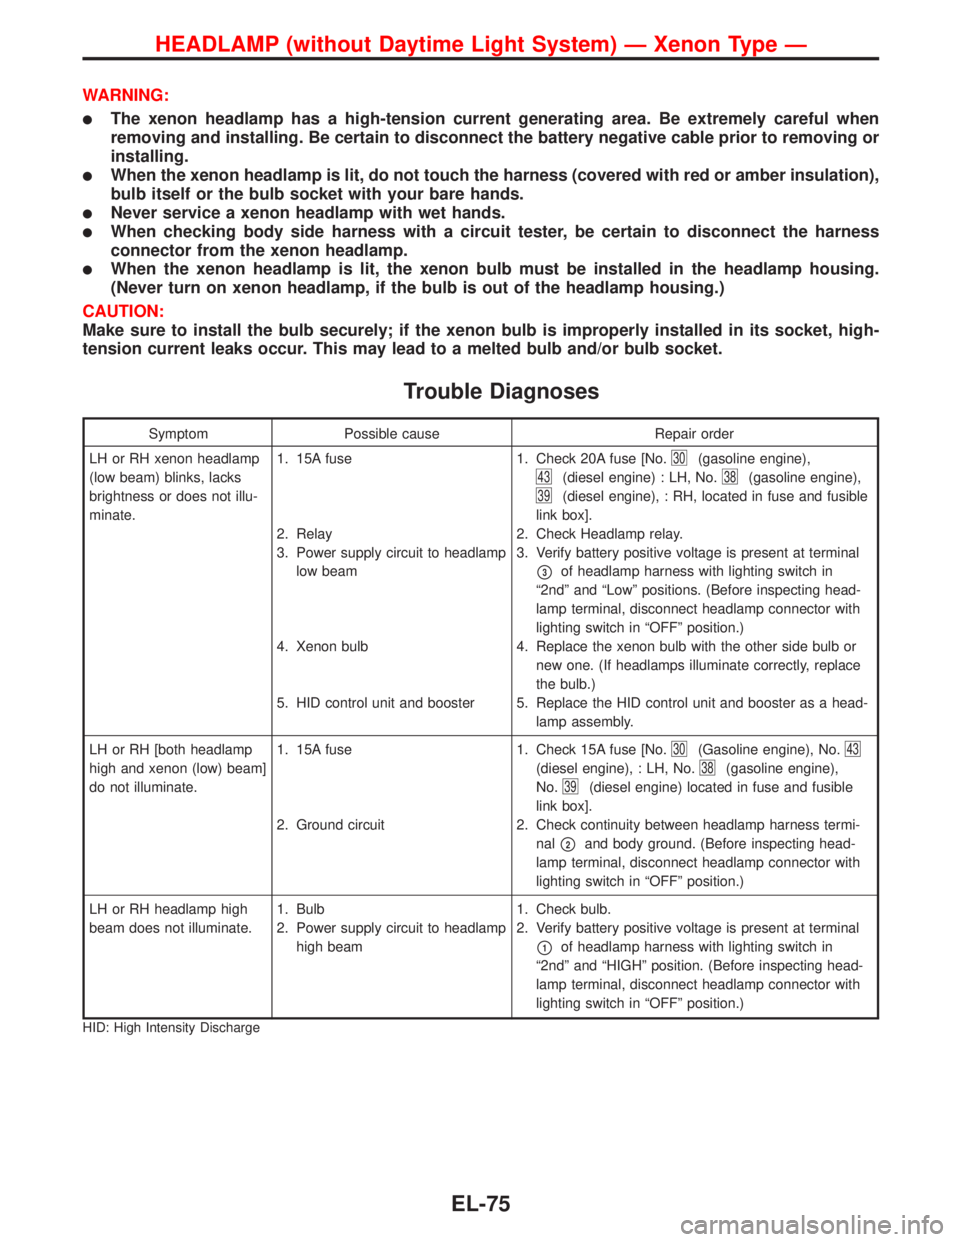
minate.1. 15A fuse 1. Check 20A fuse [No.
30(gasoline engine),
43(diesel engine) : LH, No.38(gasoline engine),
39(diesel engine), : RH, located in fuse and fusible
link box].
2. Relay 2. Check Headlamp relay.
3. Power supply circuit to headlamp
low beam3. Verify battery positive voltage is present at terminal
�3of headlamp harness with lighting switch in
“2nd”and“Low”positions. (Before inspecting head-
lamp terminal, disconnect headlamp connector with
lighting switch in“OFF”position.)
4. Xenon bulb 4. Replace the xenon bulb with the other side bulb or
new one. (If headlamps illuminate correctly, replace
the bulb.)
5. HID control unit and booster 5. Replace the HID control unit and booster as a head-
lamp assembly.
LH or RH [both headlamp
high and xenon (low) beam]
do not illuminate.1. 15A fuse 1. Check 15A fuse [No.
30(Gasoline engine), No.43
(diesel engine), : LH, No.38(gasoline engine),
No.
39(diesel engine) located in fuse and fusible
link box].
2. Ground circuit 2. Check continuity between headlamp harness termi-
nal
�2and body ground. (Before inspecting head-
lamp terminal, disconnect headlamp connector with
lighting switch in“OFF”position.)
LH or RH headlamp high
beam does not illuminate.1. Bulb
2. Power supply circuit to headlamp
high beam1. Check bulb.
2. Verify battery positive voltage is present at terminal
�1of headlamp harness with lighting switch in
“2nd”and“HIGH”position. (Before inspecting head-
lamp terminal, disconnect headlamp connector with
lighting switch in“OFF”position.)
HID: High Intensity Discharge
HEADLAMP (without Daytime Light System)—Xenon Type—
EL-75
Page 1208 of 2267

Bulb Replacement
CAUTION:
�After replacing a new xenon bulb, be sure to make aim-
ing adjustments.
�Hold only the plastic base when handling the bulb. Never
touch the glass envelope.
�Do not leave headlamp reflector without bulb for a long
period of time. Dust, moisture, smoke, etc. entering
headlamp body may affect the performance of the head-
lamp. Remove headlamp bulb from the headlamp reflec-
tor just before a replacement bulb is installed.
1. Disconnect negative battery cable.
2. Remove side combination lamp and radiator grille.
3. Disconnect headlamp connector.
4. Remove headlamp assembly.
WARNING:
Never service a xenon headlamp with wet hands.
XENON BULB (LOW BEAM)
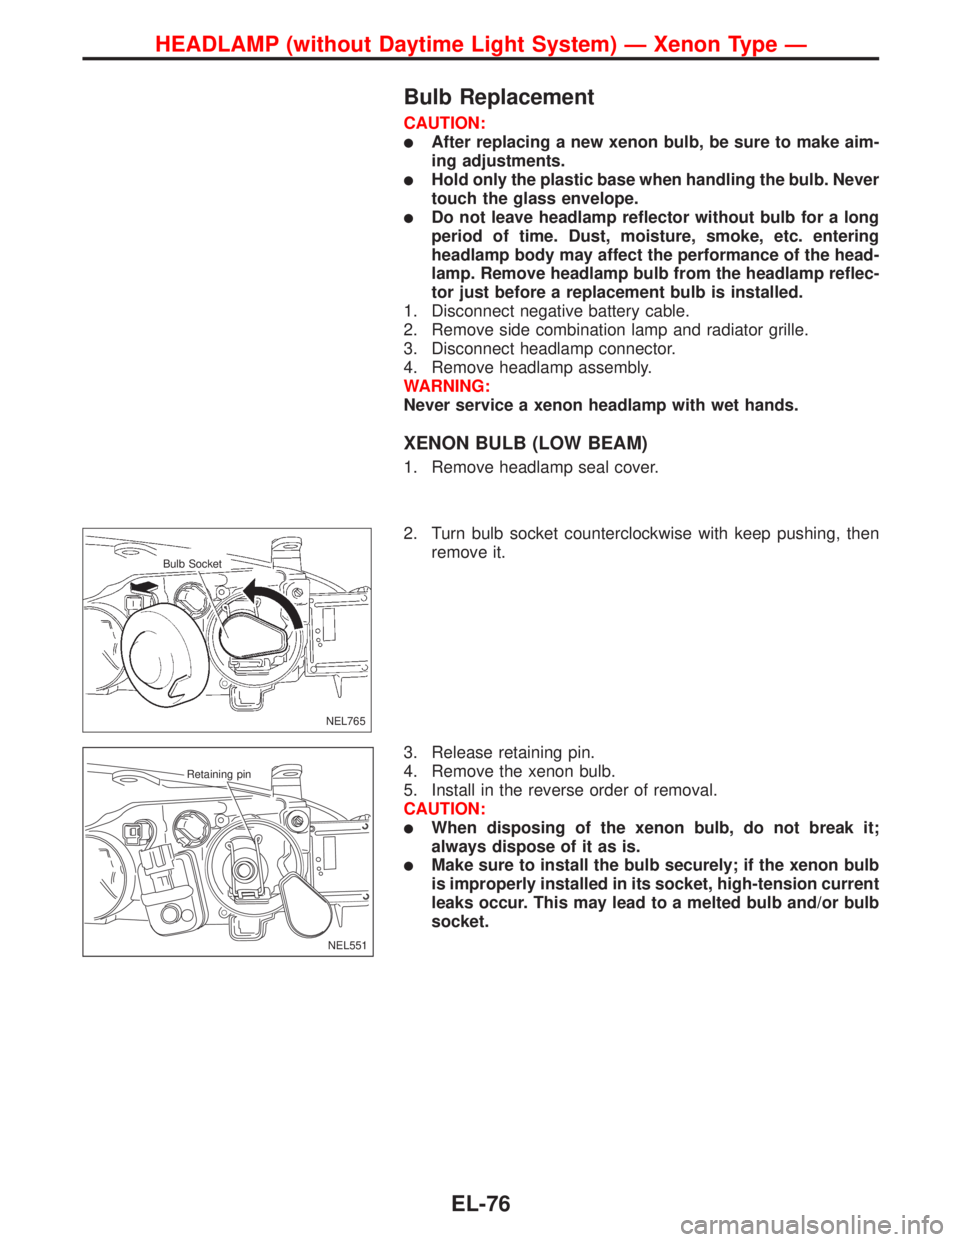
1. Remove headlamp seal cover.
2. Turn bulb socket counterclockwise with keep pushing, then
remove it.
3. Release retaining pin.
4. Remove the xenon bulb.
5. Install in the reverse order of removal.
CAUTION:
�When disposing of the xenon bulb, do not break it;
always dispose of it as is.
�Make sure to install the bulb securely; if the xenon bulb
is improperly installed in its socket, high-tension current
leaks occur. This may lead to a melted bulb and/or bulb
socket.
NEL765
.Bulb Socket
NEL551 Retaining pin
HEADLAMP (without Daytime Light System)—Xenon Type—
EL-76
Page 1209 of 2267
HIGH BEAM
1. Pull off headlamp seal cover.
2. Disconnect bulb connector.
3. Release retaining pin.
4. Remove the bulb.
5. Install in the reverse order of removal.
NEL564
.Seal cover
Retaining pin
HEADLAMP (without Daytime Light System)—Xenon Type—
Bulb Replacement (Cont’d)
EL-77
Page 1210 of 2267
Schematic
CONVENTIONAL TYPE
YEL273C
BATTERY
FUSE COMBINATION SWITCH
(LIGHTING SWITCH)
HEADLAMP
RELAY LH
COMBINATION
METER
(HI BEAM INDI-
CATOR)LOWHIGH
HEADLAMP LH
LOW HIGH
HEADLAMP RH HEADLAMP
RELAY RHIGNITION SWITCH
ON or STARTIGNITION SWITCH
START
DAYTIME LIGHT CONTROL UNIT
To tail lamp
ALTERNATOR OFF 1ST 2ND
HEADLAMP—Daytime Light System—
EL-78
Page 1211 of 2267
Wiring Diagram—DTRL—
CONVENTIONAL TYPE
YEL262B
910
58 R/WR
R/B G
113639127251110148W
7
P6
R/G
R/WR
:
::
:
GK
R/BJ P
I R/G
H R/W
FRG
EL-DTRL-01
E111
E111
GS
DI
15A
31
32GS
DI15A
32
33GS
DI
BATTERY
Refer to EL-POWER.: With gasoline engine
: With diesel engine
OFF
1ST2ND
LOW
HIGHPASSOFF
1ST2ND
LOW
HIGHPASS
LOW
HIGHPASS
LOW
HIGHPASSCOMBINATION
SWITCH
(LIGHTING
SWITCH)
Next page PASS
HIGH LOW PASS
HIGH LOWTo EL-DTRL-03 To EL-DTRL-03
HEADLAMP—Daytime Light System—
EL-79