Page 415 of 2267
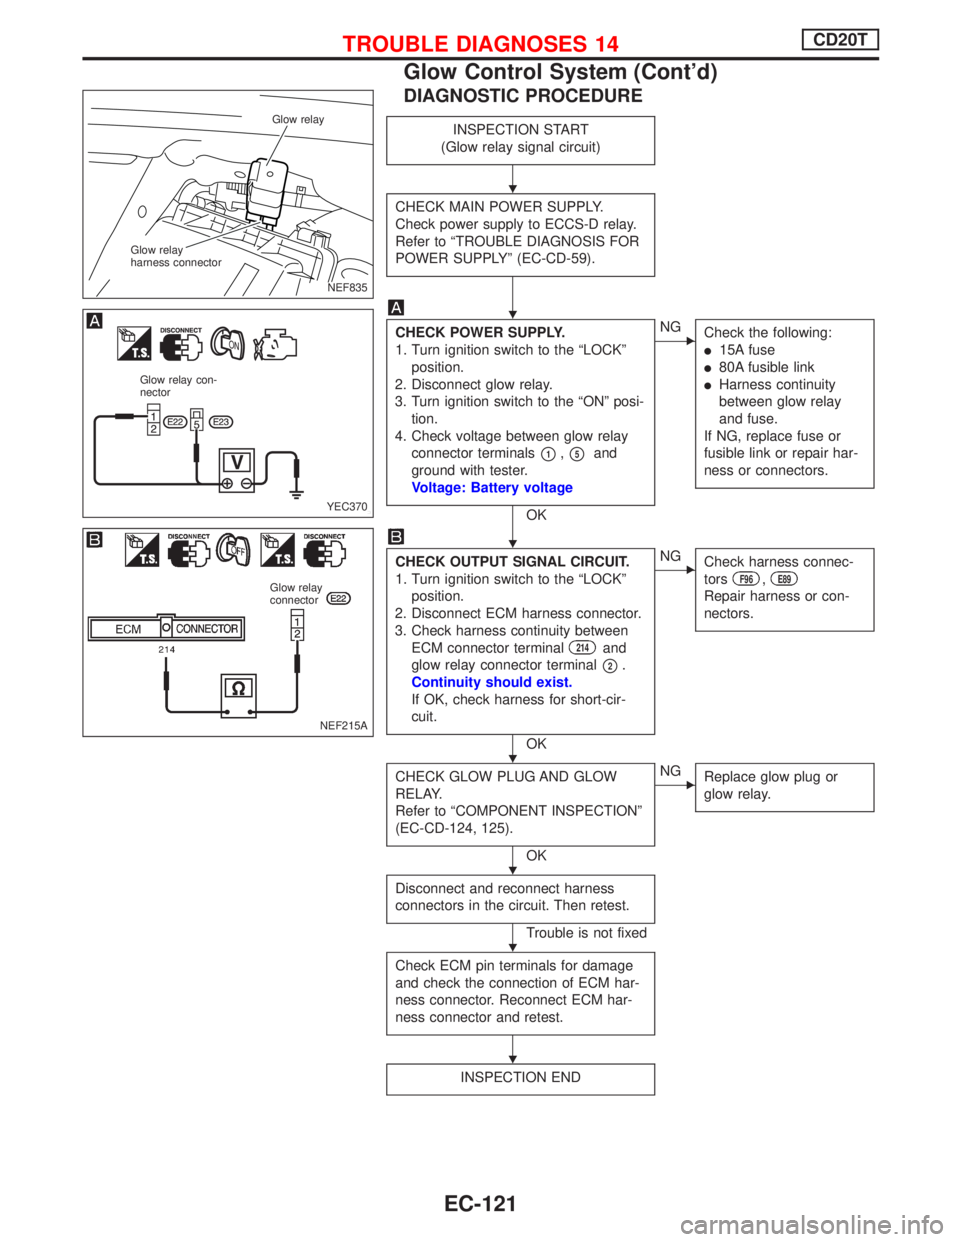
DIAGNOSTIC PROCEDURE
INSPECTION START
(Glow relay signal circuit)
CHECK MAIN POWER SUPPLY.
Check power supply to ECCS-D relay.
Refer to ªTROUBLE DIAGNOSIS FOR
POWER SUPPLYº (EC-CD-59).
CHECK POWER SUPPLY.
1. Turn ignition switch to the ªLOCKº
position.
2. Disconnect glow relay.
3. Turn ignition switch to the ªONº posi-
tion.
4. Check voltage between glow relay
connector terminals
p1,p5and
ground with tester.
Voltage: Battery voltage
OK
ENG
Check the following:
l15A fuse
l80A fusible link
lHarness continuity
between glow relay
and fuse.
If NG, replace fuse or
fusible link or repair har-
ness or connectors.
CHECK OUTPUT SIGNAL CIRCUIT.
1. Turn ignition switch to the ªLOCKº
position.
2. Disconnect ECM harness connector.
3. Check harness continuity between
ECM connector terminal
214and
glow relay connector terminal
p2.
Continuity should exist.
If OK, check harness for short-cir-
cuit.
OK
ENG
Check harness connec-
tors
F96,E89
Repair harness or con-
nectors.
CHECK GLOW PLUG AND GLOW
RELAY.
Refer to ªCOMPONENT INSPECTIONº
(EC-CD-124, 125).
OK
ENG
Replace glow plug or
glow relay.
Disconnect and reconnect harness
connectors in the circuit. Then retest.
Trouble is not fixed
Check ECM pin terminals for damage
and check the connection of ECM har-
ness connector. Reconnect ECM har-
ness connector and retest.
INSPECTION END
NEF835 Glow relay
Glow relay
harness connector
YEC370
Glow relay con-
nector
NEF215A
Glow relay
connector
H
H
H
H
H
H
H
TROUBLE DIAGNOSES 14CD20T
Glow Control System (Cont'd)
EC-121
Page 416 of 2267
INSPECTION START
(Glow indicator lamp circuit)
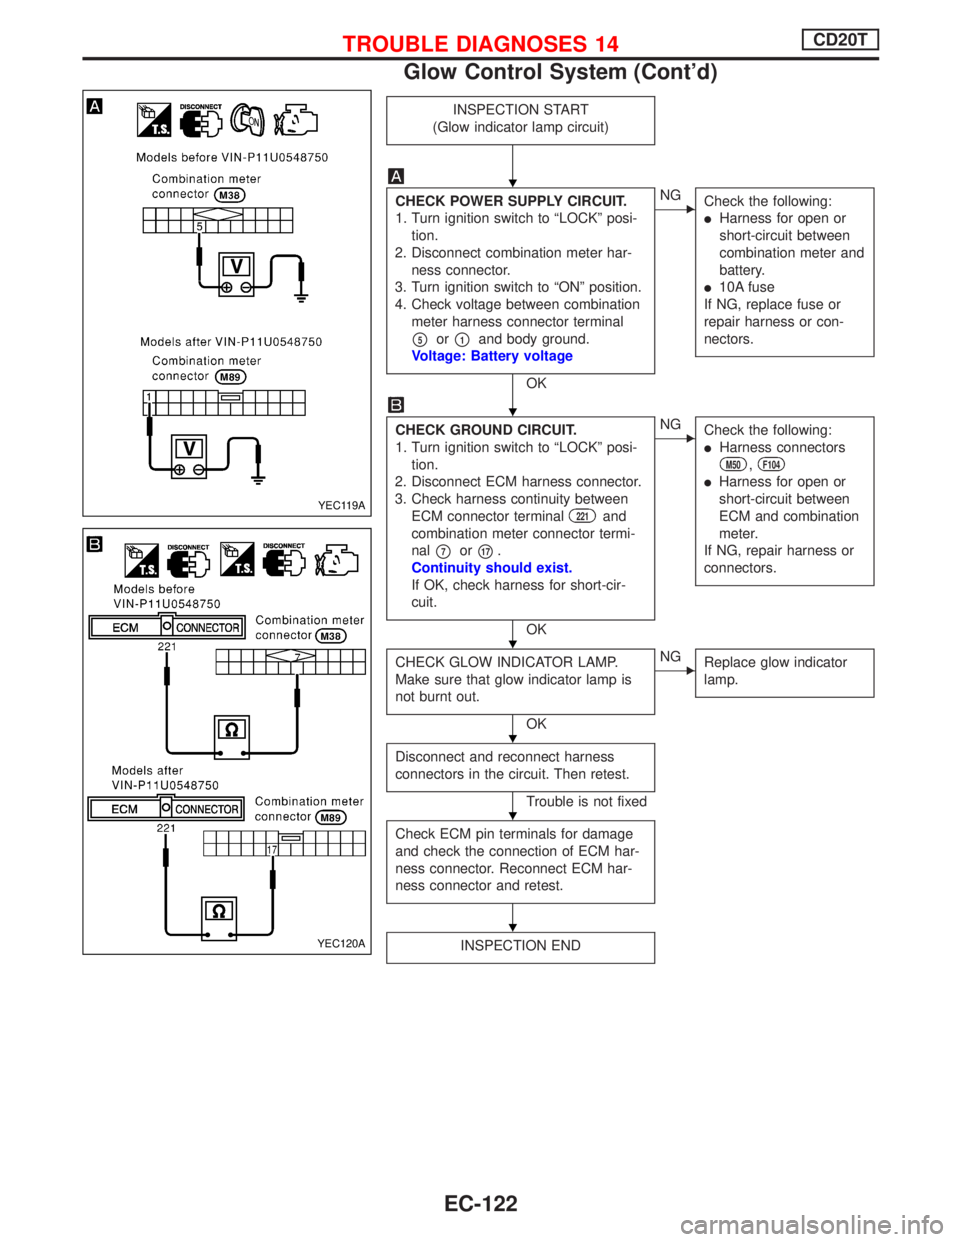
CHECK POWER SUPPLY CIRCUIT.
1. Turn ignition switch to ªLOCKº posi-
tion.
2. Disconnect combination meter har-
ness connector.
3. Turn ignition switch to ªONº position.
4. Check voltage between combination
meter harness connector terminal
p5orp1and body ground.
Voltage: Battery voltage
OK
ENG
Check the following:
lHarness for open or
short-circuit between
combination meter and
battery.
l10A fuse
If NG, replace fuse or
repair harness or con-
nectors.
CHECK GROUND CIRCUIT.
1. Turn ignition switch to ªLOCKº posi-
tion.
2. Disconnect ECM harness connector.
3. Check harness continuity between
ECM connector terminal
221and
combination meter connector termi-
nal
p7orp17.
Continuity should exist.
If OK, check harness for short-cir-
cuit.
OK
ENG
Check the following:
lHarness connectors
M50,F104
lHarness for open or
short-circuit between
ECM and combination
meter.
If NG, repair harness or
connectors.
CHECK GLOW INDICATOR LAMP.
Make sure that glow indicator lamp is
not burnt out.
OK
ENG
Replace glow indicator
lamp.
Disconnect and reconnect harness
connectors in the circuit. Then retest.
Trouble is not fixed
Check ECM pin terminals for damage
and check the connection of ECM har-
ness connector. Reconnect ECM har-
ness connector and retest.
INSPECTION END
YEC119A
YEC120A
H
H
H
H
H
H
TROUBLE DIAGNOSES 14CD20T
Glow Control System (Cont'd)
EC-122
Page 417 of 2267
INSPECTION START
(Glow plug circuit)
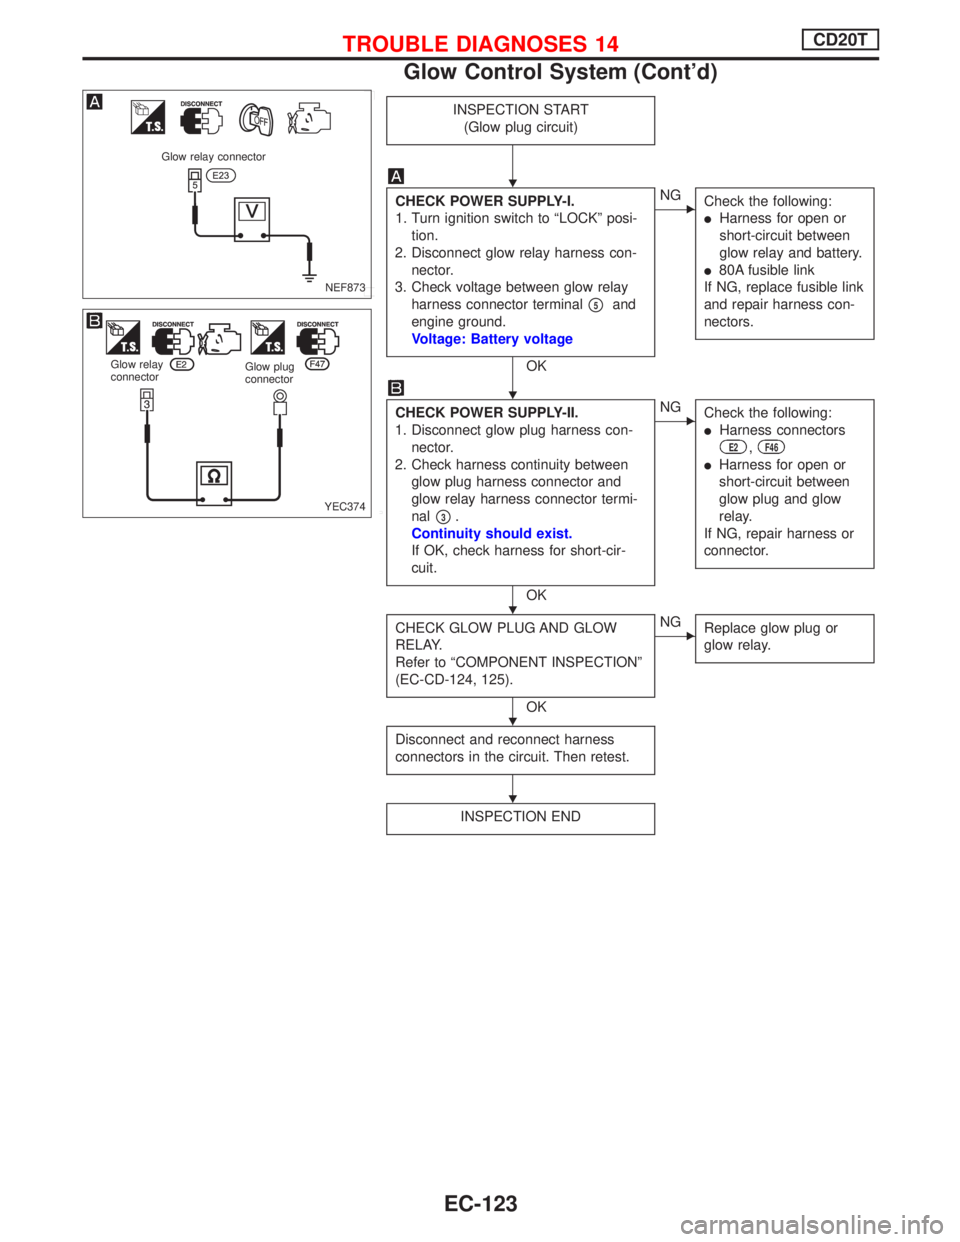
CHECK POWER SUPPLY-I.
1. Turn ignition switch to ªLOCKº posi-
tion.
2. Disconnect glow relay harness con-
nector.
3. Check voltage between glow relay
harness connector terminal
p5and
engine ground.
Voltage: Battery voltage
OK
ENG
Check the following:
lHarness for open or
short-circuit between
glow relay and battery.
l80A fusible link
If NG, replace fusible link
and repair harness con-
nectors.
CHECK POWER SUPPLY-II.
1. Disconnect glow plug harness con-
nector.
2. Check harness continuity between
glow plug harness connector and
glow relay harness connector termi-
nal
p3.
Continuity should exist.
If OK, check harness for short-cir-
cuit.
OK
ENG
Check the following:
lHarness connectors
E2,F46
lHarness for open or
short-circuit between
glow plug and glow
relay.
If NG, repair harness or
connector.
CHECK GLOW PLUG AND GLOW
RELAY.
Refer to ªCOMPONENT INSPECTIONº
(EC-CD-124, 125).
OK
ENG
Replace glow plug or
glow relay.
Disconnect and reconnect harness
connectors in the circuit. Then retest.
INSPECTION END
NEF873
Glow relay connector
YEC374
Glow relay
connectorGlow plug
connector
H
H
H
H
H
TROUBLE DIAGNOSES 14CD20T
Glow Control System (Cont'd)
EC-123
Page 418 of 2267
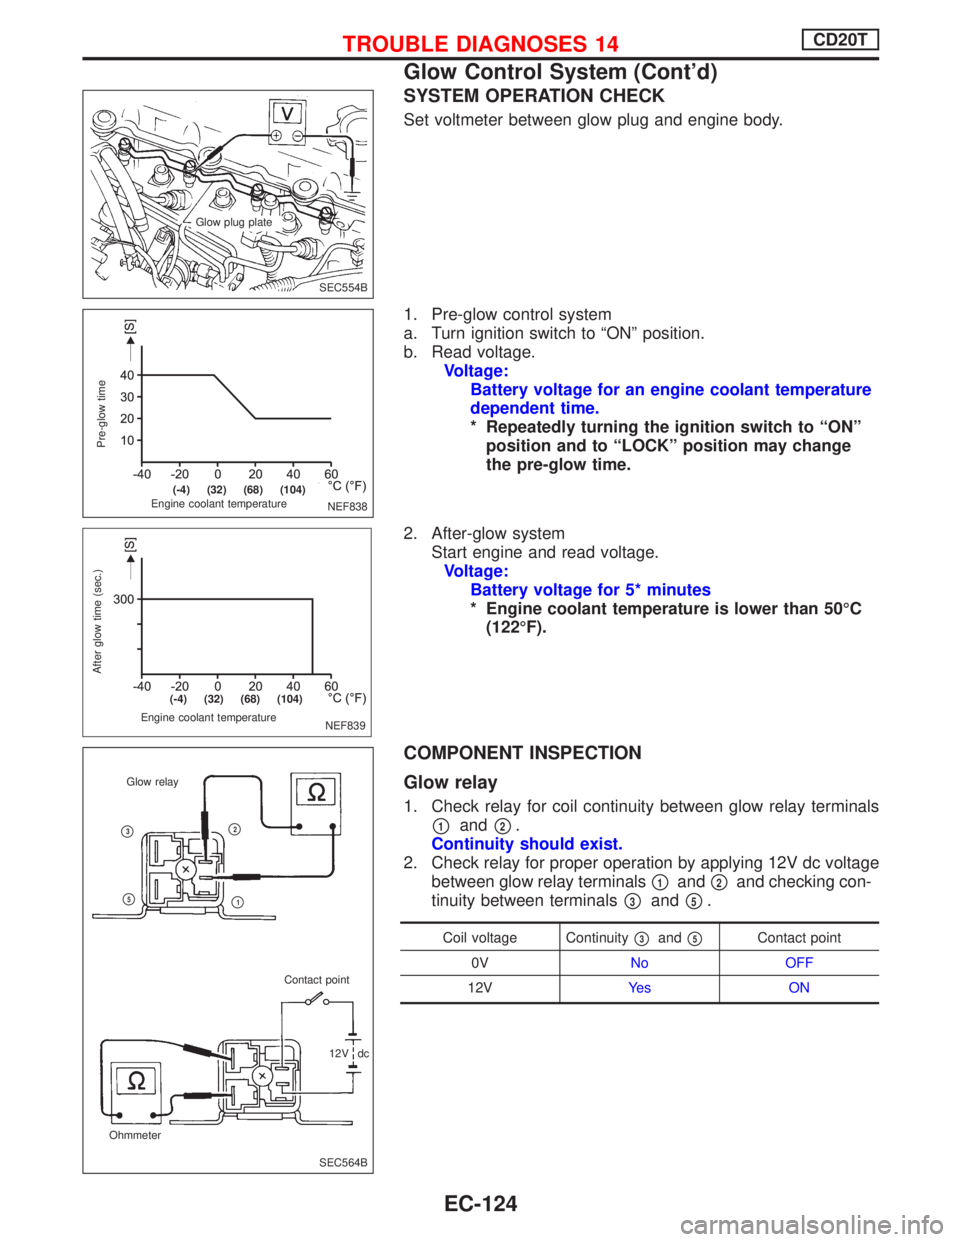
SYSTEM OPERATION CHECK
Set voltmeter between glow plug and engine body.
1. Pre-glow control system
a. Turn ignition switch to ªONº position.
b. Read voltage.
Voltage:
Battery voltage for an engine coolant temperature
dependent time.
* Repeatedly turning the ignition switch to ªONº
position and to ªLOCKº position may change
the pre-glow time.
2. After-glow system
Start engine and read voltage.
Voltage:
Battery voltage for 5* minutes
* Engine coolant temperature is lower than 50ÉC
(122ÉF).
COMPONENT INSPECTION
Glow relay
1. Check relay for coil continuity between glow relay terminals
p1andp2.
Continuity should exist.
2. Check relay for proper operation by applying 12V dc voltage
between glow relay terminals
p1andp2and checking con-
tinuity between terminals
p3andp5.
Coil voltage Continuityp3andp5Contact point
0VNo OFF
12VYe s O N
SEC554B Glow plug plate
NEF838
Pre-glow time
Engine coolant temperature
.(-4) (32) (68) (104)
NEF839 Engine coolant temperature
After glow time (sec.)
.(-4) (32) (68) (104)
SEC564B OhmmeterGlow relay
Contact point
12V dc
p2
p1
p3
p5
TROUBLE DIAGNOSES 14CD20T
Glow Control System (Cont'd)
EC-124
Page 419 of 2267
Glow plug
1. Remove glow plug connecting plate.
2. Check each glow plug for continuity.
Continuity should exist:
Approximately 0.5W[at 25ÉC (77ÉF)]
lIf NG, replace glow plug.
3. Install glow plug connecting plate securely.
lDo not bump glow plug heating element. If it is bumped,
replace glow plug with new one. (If glow plug is dropped
from a height of 0.1 m (3.94 in) or greater, replace with
new one.)
lIf glow plug installation hole is contaminated with
carbon, remove using a reamer or suitable tool.
lHand-tighten glow plug by turning it 2 to 3 times, then
tighten using a tool to specified torque.
: 15 - 20 N´m (1.5 - 2.0 kg-m, 11 - 14 ft-lb)
SEF630K Ohmmeter
SEC565B Glow nut
Glow harness
Connecting
plate
Washer
Spring washer
Glow plug
TROUBLE DIAGNOSES 14CD20T
Glow Control System (Cont'd)
EC-125
Page 420 of 2267
Air Conditioner Cut Control
The Air Conditioner relay is controlled by the ECM. During the
following conditions, the ECM will cut the power supply towards
the air conditioner relay:
lStarting engine
lQuick acceleration from low speed
lUndershooting of idle speed
lHigh engine coolant temperature [above 107ÉC (225ÉF)].
lMalfunctioning of engine speed sensor, accelerator position
sensor or vehicle speed sensor when engine speed is below
2,100 rpm.
Malfunction is detected when ....Check Items
(Possible cause)
lAir conditioner relay signal circuit is shorted.lHarness or connectors
(The air conditioner relay signal circuit is shorted).
lAir conditioner relay
DIAGNOSTIC TROUBLE CONFIRMATION
PROCEDURE
1) Turn ignition switch and air conditioner switch to the
ªONº position.
2) Select ªDATA MONITORº mode with CONSULT-II.
3) Wait at least 2 seconds.
TROUBLE DIAGNOSES 15CD20T
EC-126
Page 421 of 2267
YEC813
IGNITION SWITCH
ON or START
FUSE
BLOCK
(J/B)
Refer to EL-POWER.
: Detectable line for DTC
: Non-detectable line for DTC
AIR CONDITIONER
RELAY
To compressor
(Refer to HA-A/C.)
A/C
CONTROL
PANEL
LOWHIGH
NORMALTRIPLE-
PRESSURE
SWITCH
THERMISTORTHERMO
CONTROL
AMP.
ECM
REFER TO THE FOLLOWING
FUSE BLOCK - Junction Box (J/B)
FUSE BLOCK - Junction Box (J/B)
TROUBLE DIAGNOSES 15CD20T
Air Conditioner Cut Control (Cont'd)
EC-127
Page 422 of 2267
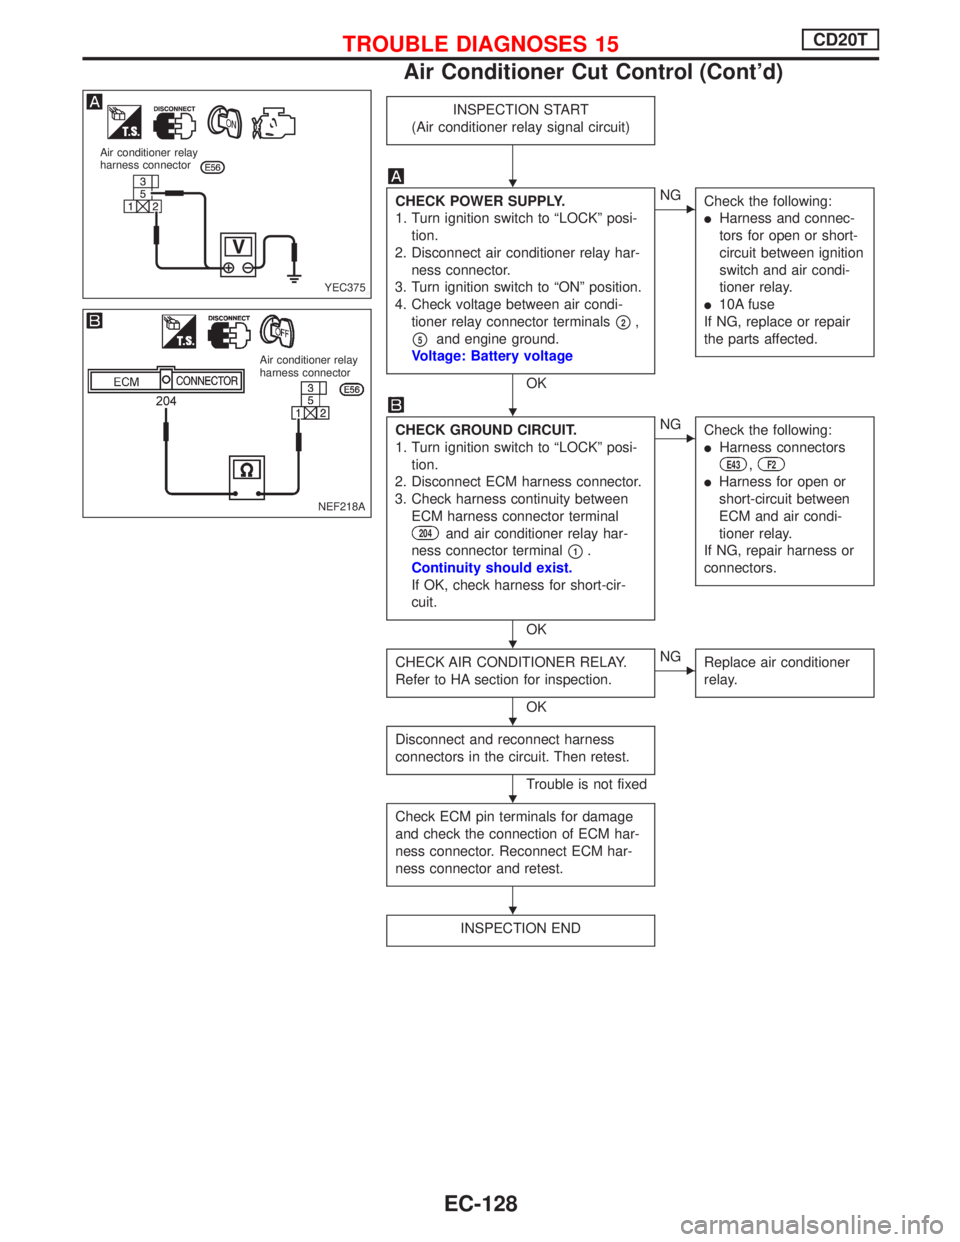
INSPECTION START
(Air conditioner relay signal circuit)
CHECK POWER SUPPLY.
1. Turn ignition switch to ªLOCKº posi-
tion.
2. Disconnect air conditioner relay har-
ness connector.
3. Turn ignition switch to ªONº position.
4. Check voltage between air condi-
tioner relay connector terminals
p2,
p5and engine ground.
Voltage: Battery voltage
OK
ENG
Check the following:
lHarness and connec-
tors for open or short-
circuit between ignition
switch and air condi-
tioner relay.
l10A fuse
If NG, replace or repair
the parts affected.
CHECK GROUND CIRCUIT.
1. Turn ignition switch to ªLOCKº posi-
tion.
2. Disconnect ECM harness connector.
3. Check harness continuity between
ECM harness connector terminal
204and air conditioner relay har-
ness connector terminal
p1.
Continuity should exist.
If OK, check harness for short-cir-
cuit.
OK
ENG
Check the following:
lHarness connectors
E43,F2
lHarness for open or
short-circuit between
ECM and air condi-
tioner relay.
If NG, repair harness or
connectors.
CHECK AIR CONDITIONER RELAY.
Refer to HA section for inspection.
OK
ENG
Replace air conditioner
relay.
Disconnect and reconnect harness
connectors in the circuit. Then retest.
Trouble is not fixed
Check ECM pin terminals for damage
and check the connection of ECM har-
ness connector. Reconnect ECM har-
ness connector and retest.
INSPECTION END
YEC375 Air conditioner relay
harness connector
Air conditioner relay
harness connector
NEF218A
H
H
H
H
H
H
TROUBLE DIAGNOSES 15CD20T
Air Conditioner Cut Control (Cont'd)
EC-128