Page 261 of 2267
REMOVAL
lAfter any adjustment, check sunroof operation and lid alignment.
lHandle finisher plate and glass lid with care so not to cause damage.
lIt is desirable for easy installation to mark each point before removal.
CAUTION:
Always work with a helper.
Link and wire
assemblySunroof frame
assemblyShade assemblyLid assemblyMotor assembly
Tilt glass lid up.
p1Sunroof lid mount screws
p2Lid assembly
p3Rear drain mount screws
p4Rear drain assembly
Operate sunroof switch to tilt glass lid down.
p5Shade assembly
Sunroof switch/interior accessories/headlining (Models equipped with sunroof)lRefer to ªRoof Trimº in ªINTERIOR TRIMº for details, BT-25, BT-26, BT-27.
p6Motor switch bracket
p7Motor assembly
p8Wind deflector mount nuts
p9Wind deflector mount screws
p10Wind deflector assembly
p11Drain hoses
p12Sunroof unit bracket
p13Sunroof frame assembly
p14Guide stopper
p15Link and wire assembly
SUNROOF
BT-47
Page 262 of 2267
HFor Wiring Diagram, refer to ªELECTRIC SUNROOFº in EL section.
NBT049
SEC. 736
Rear drain
assemblyRear drain screw
Link and wire
assembly
Guide stopper
Wind deflector mounting nuts
Drain hose
Sunroof unit bracket
5.1 - 6.4
(0.52 - 0.65,
45.1 - 56.4) Motor
switch bracketMotor assembly
5.1 - 6.4
(0.52 - 0.65,
45.1 - 56.4)Sunroof frame
assembly Wind
deflector
assemblyWind deflector mounting
screws
Shade assemblyGuide stopperScrew
: N´m (kg-m, in-lb) Lid assembly
Manual type
Drive
Handle
: Apply grease
SUNROOF
BT-48
Page 264 of 2267

ADJUSTMENT
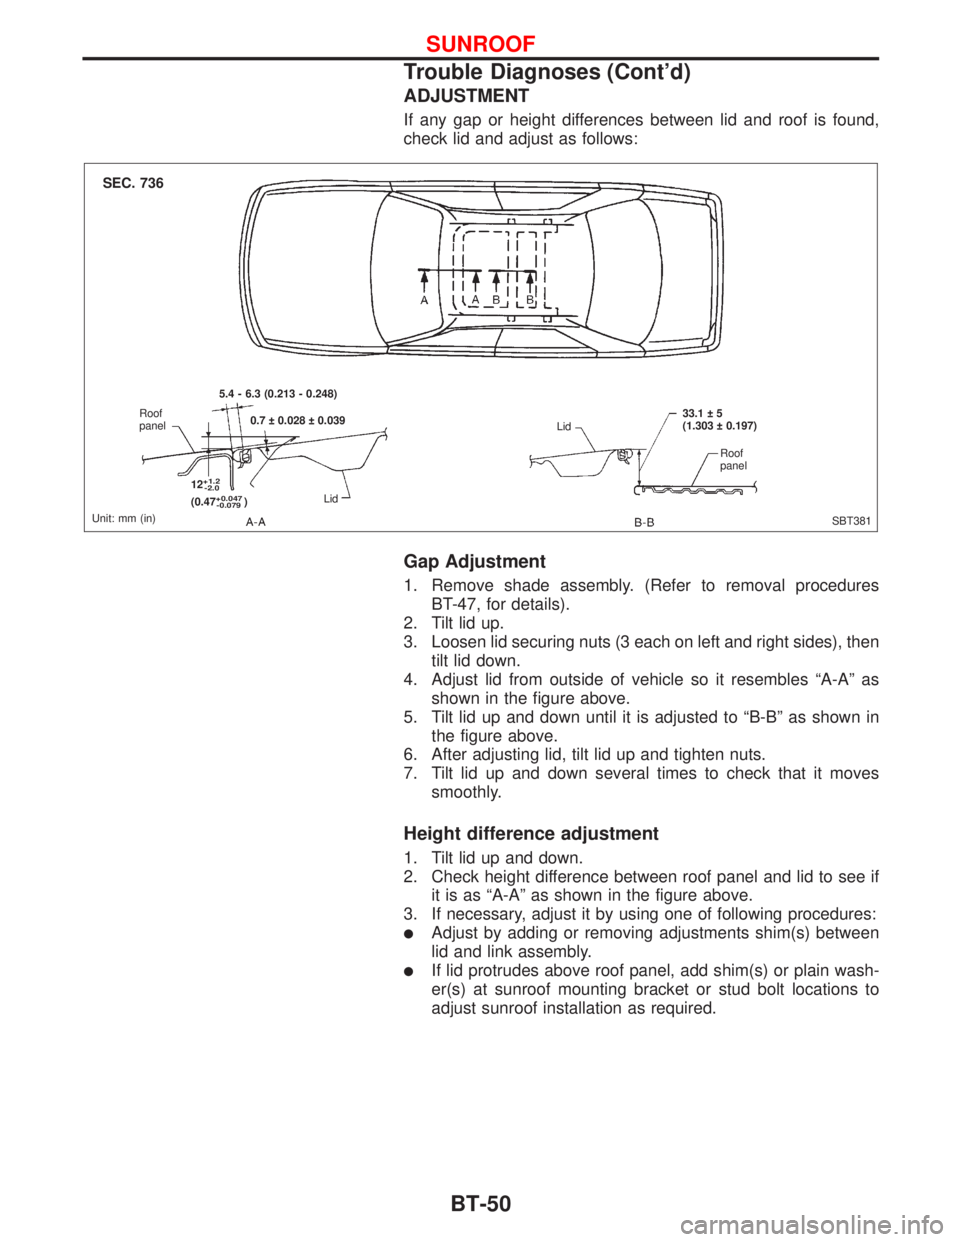
If any gap or height differences between lid and roof is found,
check lid and adjust as follows:
Gap Adjustment
1. Remove shade assembly. (Refer to removal procedures
BT-47, for details).
2. Tilt lid up.
3. Loosen lid securing nuts (3 each on left and right sides), then
tilt lid down.
4. Adjust lid from outside of vehicle so it resembles ªA-Aº as
shown in the figure above.
5. Tilt lid up and down until it is adjusted to ªB-Bº as shown in
the figure above.
6. After adjusting lid, tilt lid up and tighten nuts.
7. Tilt lid up and down several times to check that it moves
smoothly.
Height difference adjustment
1. Tilt lid up and down.
2. Check height difference between roof panel and lid to see if
it is as ªA-Aº as shown in the figure above.
3. If necessary, adjust it by using one of following procedures:
lAdjust by adding or removing adjustments shim(s) between
lid and link assembly.
lIf lid protrudes above roof panel, add shim(s) or plain wash-
er(s) at sunroof mounting bracket or stud bolt locations to
adjust sunroof installation as required.
SBT381 Unit: mm (in)Roof
panel5.4 - 6.3 (0.213 - 0.248)
0.7 0.028 0.039
12
+1.2
-2.0
(0.47+0.047
-0.079)LidLid33.1 5
(1.303 0.197)
Roof
panel
SEC. 736
SUNROOF
Trouble Diagnoses (Cont'd)
BT-50
Page 1139 of 2267
HARNESS CONNECTOR (SLIDE-LOCKING TYPE)
�A new style slide-locking type connector is used on certain systems and components, especially those
related to OBD.
�The slide-locking type connectors help prevent incomplete locking and accidental looseness or discon-
nection.
�The slide-locking type connectors are disconnected by pushing or lifting the slider. Refer to the illustra-
tion below.
CAUTION:
Do not pull the harness or wires when disconnecting the connector.
Be careful not to damage the connector support bracket when disconnecting the connector.
[Example]
SEL769V Waterproof type
�1Firmly grasp shell of con-
nector housing at A.�2Push slider until
connector pops or
snaps apart.�3Disconnect harness
connector.
Non-waterproof type
�1Firmly grasp shell
of connector hous-
ing at A.�2Pull back on the slider
while pulling apart
male and female
halves of connector.�3Disconnect harness
connector.
HARNESS CONNECTOR
Description (Cont’d)
EL-7