Page 145 of 2267
Pad Replacement
WARNING:
Clean brake pads with a vacuum dust collector to minimize
the hazard of airborne particles or other materials.
CAUTION:
lWhen cylinder body is open, do not depress brake pedal
because piston will pop out.
lBe careful not to damage piston boot or get oil on rotor.
Always replace shims when replacing pads.
lIf shims are rusted or show peeling of the rubber coat,
replace them with new shims.
lIt is not necessary to remove connecting bolt except for
disassembly or replacement of caliper assembly. In this
case, suspend cylinder body with wire so as not to
stretch brake hose.
lBurnish the brake contact surfaces after refinishing or
replacing rotors, after replacing pads, or if a soft pedal
occurs at very low mileage.
Refer to ªBrake Burnishing Procedureº, ªCHECK AND
ADJUSTMENTº, BR-7.
NBR438
FRONT DISC BRAKE
BR-23
Page 146 of 2267
1. Remove master cylinder reservoir cap.
2. Remove lower pin bolt.
3. Open cylinder body upward. Then remove pad retainers, and
inner and outer shims.
Standard pad thickness:
11 mm (0.43 in)
Pad wear limit:
2.0 mm (0.079 in)
Carefully monitor brake fluid level because brake fluid will
return to reservoir when pushing back piston.
Removal
WARNING:
Clean brake pads with a vacuum dust collector to minimize
the hazard of airborne materials.
CAUTION:
Suspend caliper assembly with wire so as not to stretch
brake hose.
Remove torque member fixing bolts and connecting bolt.
It is not necessary to remove connecting bolt except for
disassembly or replacement of caliper assembly.
NBR156
SBR079B Wire
NBR159
FRONT DISC BRAKE
Pad Replacement (Cont'd)
BR-24
Page 148 of 2267
Pad Replacement
WARNING:
Clean brake pads with a vacuum dust collector to minimize
the hazard of airborne particles or other materials.
CAUTION:
lWhen cylinder body is open, do not depress brake pedal
because piston will pop out.
lBe careful not to damage piston boot or get oil on rotor.
Always replace shims when replacing pads.
lIf shims are rusted or show peeling of the rubber coat,
replace them with new shims.
lIt is not necessary to remove connecting bolt except for
disassembly or replacement of caliper assembly. In this
case, suspend cylinder body with wire so as not to
stretch brake hose.
lBurnish the brake contact surfaces after refinishing or
replacing rotors, after replacing pads, or if a soft pedal
occurs at very low mileage.
Refer to ªBrake Burnishing Procedureº, ªCHECK AND
ADJUSTMENTº, BR-7.
NBR439
FRONT DISC BRAKESR20DE - M/T
BR-26
Page 151 of 2267
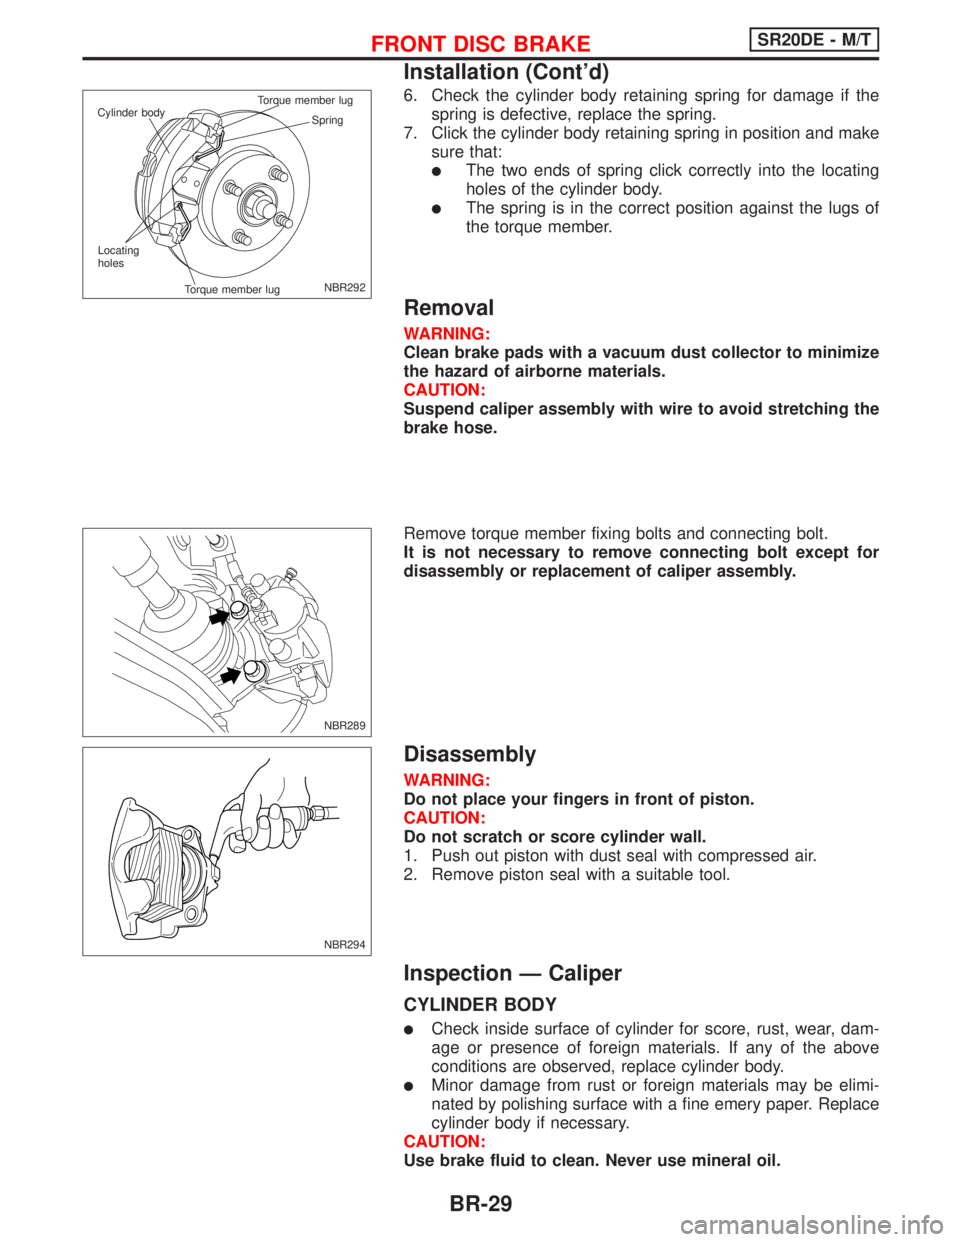
6. Check the cylinder body retaining spring for damage if the
spring is defective, replace the spring.
7. Click the cylinder body retaining spring in position and make
sure that:
lThe two ends of spring click correctly into the locating
holes of the cylinder body.
lThe spring is in the correct position against the lugs of
the torque member.
Removal
WARNING:
Clean brake pads with a vacuum dust collector to minimize
the hazard of airborne materials.
CAUTION:
Suspend caliper assembly with wire to avoid stretching the
brake hose.
Remove torque member fixing bolts and connecting bolt.
It is not necessary to remove connecting bolt except for
disassembly or replacement of caliper assembly.
Disassembly
WARNING:
Do not place your fingers in front of piston.
CAUTION:
Do not scratch or score cylinder wall.
1. Push out piston with dust seal with compressed air.
2. Remove piston seal with a suitable tool.
Inspection Ð Caliper
CYLINDER BODY
lCheck inside surface of cylinder for score, rust, wear, dam-
age or presence of foreign materials. If any of the above
conditions are observed, replace cylinder body.
lMinor damage from rust or foreign materials may be elimi-
nated by polishing surface with a fine emery paper. Replace
cylinder body if necessary.
CAUTION:
Use brake fluid to clean. Never use mineral oil.
NBR292 Spring Cylinder bodyTorque member lug
Torque member lug Locating
holes
NBR289
NBR294
FRONT DISC BRAKESR20DE - M/T
Installation (Cont'd)
BR-29
Page 155 of 2267
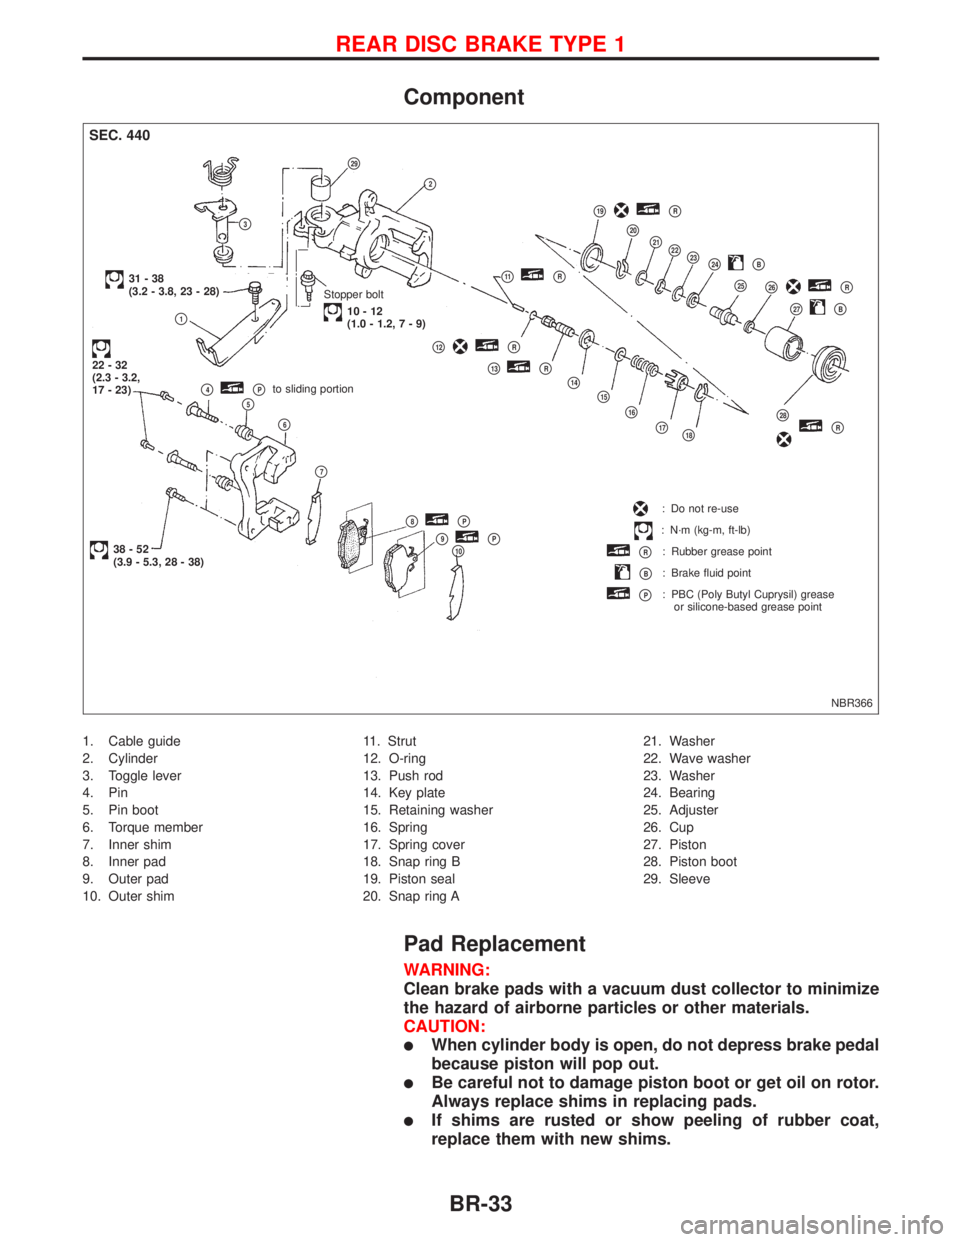
Component
1. Cable guide
2. Cylinder
3. Toggle lever
4. Pin
5. Pin boot
6. Torque member
7. Inner shim
8. Inner pad
9. Outer pad
10. Outer shim11. Strut
12. O-ring
13. Push rod
14. Key plate
15. Retaining washer
16. Spring
17. Spring cover
18. Snap ring B
19. Piston seal
20. Snap ring A21. Washer
22. Wave washer
23. Washer
24. Bearing
25. Adjuster
26. Cup
27. Piston
28. Piston boot
29. Sleeve
Pad Replacement
WARNING:
Clean brake pads with a vacuum dust collector to minimize
the hazard of airborne particles or other materials.
CAUTION:
lWhen cylinder body is open, do not depress brake pedal
because piston will pop out.
lBe careful not to damage piston boot or get oil on rotor.
Always replace shims in replacing pads.
lIf shims are rusted or show peeling of rubber coat,
replace them with new shims.
NBR366
SEC. 440
Stopper bolt
10-12
(1.0-1.2,7-9)
31-38
(3.2 - 3.8, 23 - 28)
p1
22-32
(2.3 - 3.2,
17 - 23)
38-52
(3.9 - 5.3, 28 - 38)p10p9pPp8pP
p7
p6
p5p4pPto sliding portion
p12pR
p13pR
p14
p15
p16
p17p18
p28pR
: Do not re-use
: N´m (kg-m, ft-lb)
pR: Rubber grease point
pB: Brake fluid point
pP: PBC (Poly Butyl Cuprysil) grease
or silicone-based grease point
p23
p27pB
p26pRp25
p24pBp22p21p20
p19pR
p11pR
p3
p2
p29
REAR DISC BRAKE TYPE 1
BR-33
Page 156 of 2267
lIt is not necessary to remove connecting bolt except for
disassembly or replacement of caliper assembly. In this
case, suspend cylinder body with wire so as not to
stretch brake hose.
lBurnish the brake contact surfaces after refinishing or
replacing rotors, after replacing pads, or if a soft pedal
occurs at very low mileage.
Refer to ªBrake Burnishing Procedureº, ªCHECK AND
ADJUSTMENTº, BR-7.
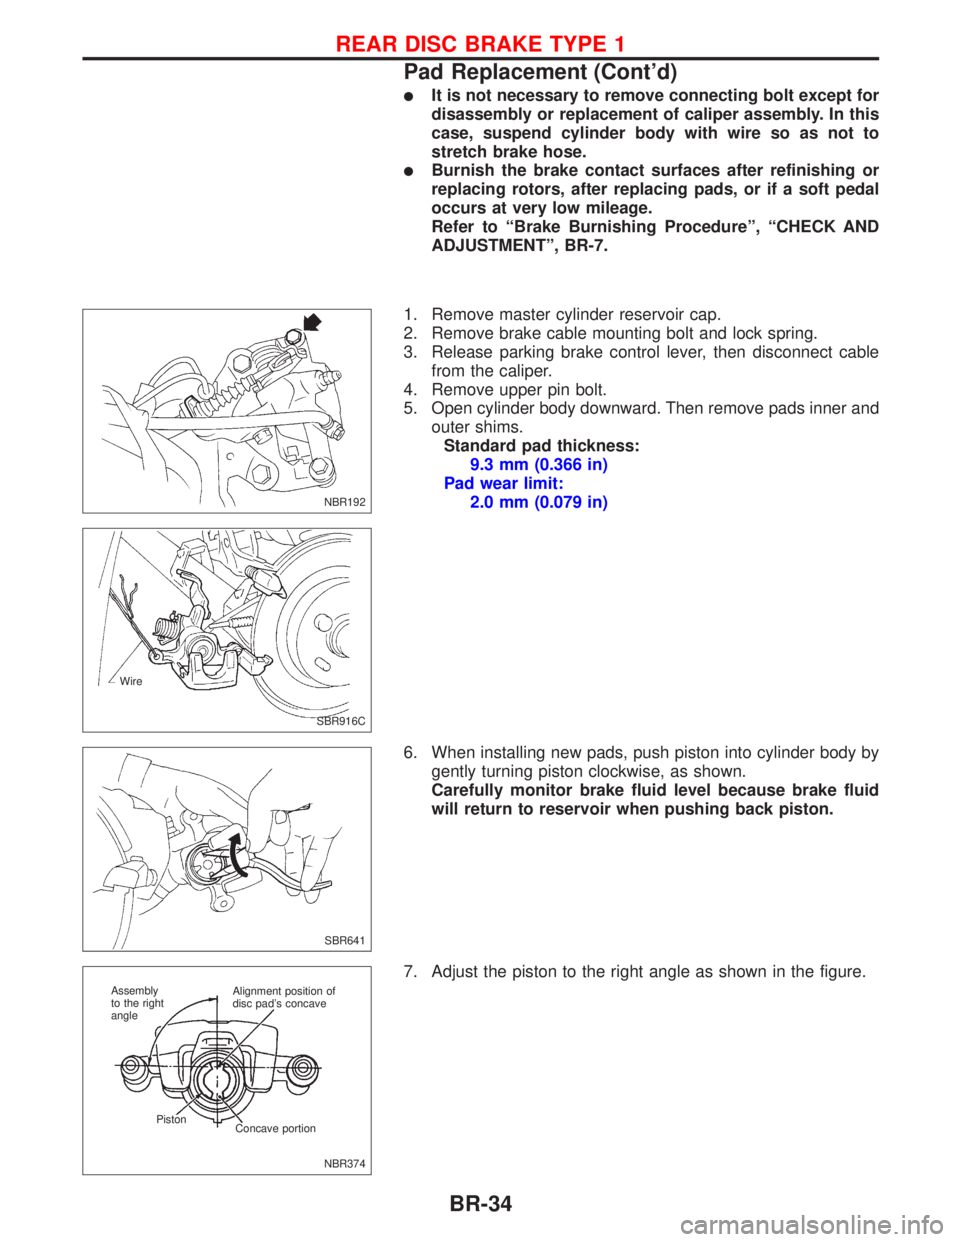
1. Remove master cylinder reservoir cap.
2. Remove brake cable mounting bolt and lock spring.
3. Release parking brake control lever, then disconnect cable
from the caliper.
4. Remove upper pin bolt.
5. Open cylinder body downward. Then remove pads inner and
outer shims.
Standard pad thickness:
9.3 mm (0.366 in)
Pad wear limit:
2.0 mm (0.079 in)
6. When installing new pads, push piston into cylinder body by
gently turning piston clockwise, as shown.
Carefully monitor brake fluid level because brake fluid
will return to reservoir when pushing back piston.
7. Adjust the piston to the right angle as shown in the figure.
NBR192
SBR916C Wire
SBR641
NBR374 Alignment position of
disc pad's concave
Concave portion Piston Assembly
to the right
angle
REAR DISC BRAKE TYPE 1
Pad Replacement (Cont'd)
BR-34
Page 157 of 2267
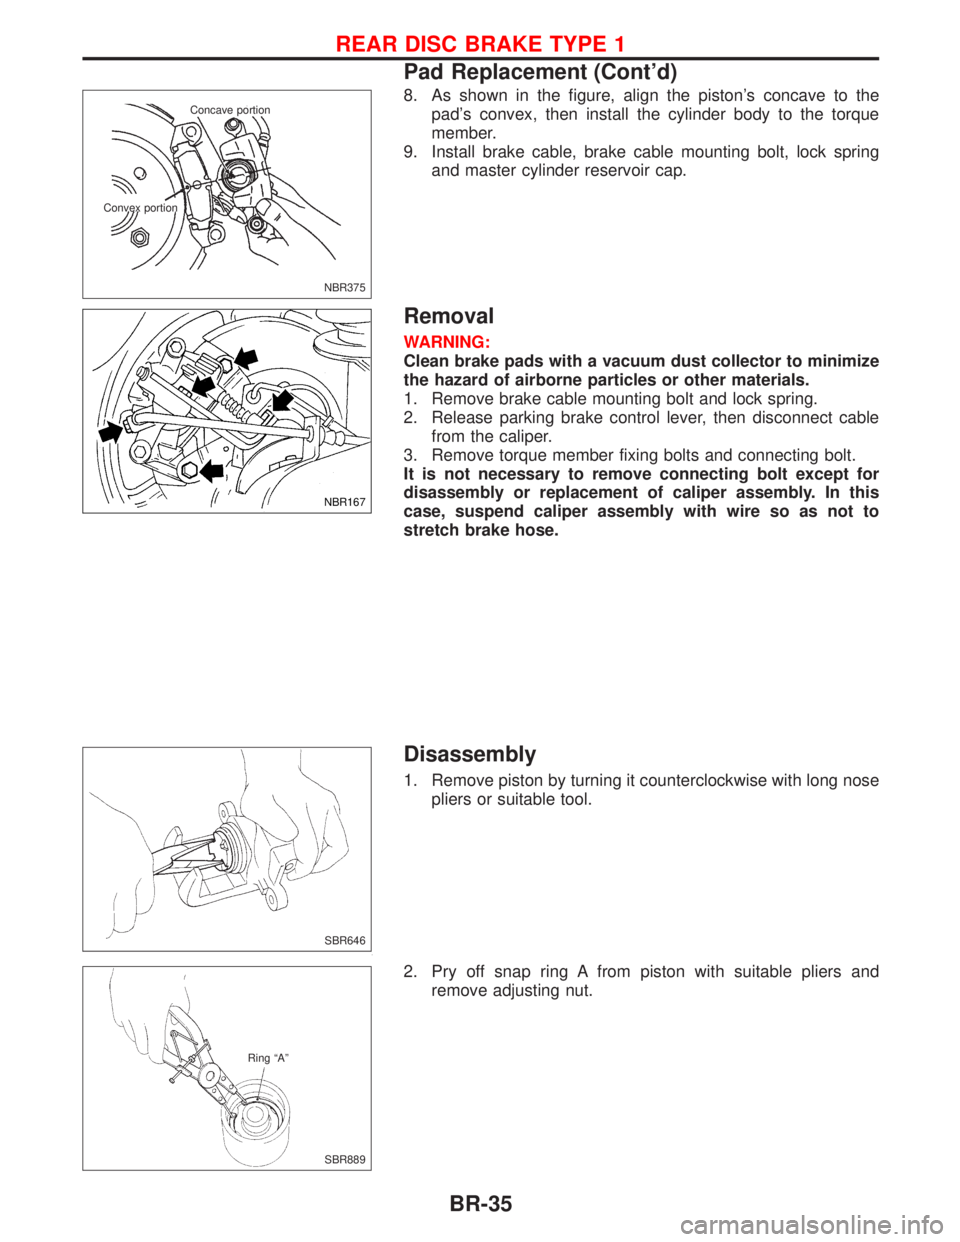
8. As shown in the figure, align the piston's concave to the
pad's convex, then install the cylinder body to the torque
member.
9. Install brake cable, brake cable mounting bolt, lock spring
and master cylinder reservoir cap.
Removal
WARNING:
Clean brake pads with a vacuum dust collector to minimize
the hazard of airborne particles or other materials.
1. Remove brake cable mounting bolt and lock spring.
2. Release parking brake control lever, then disconnect cable
from the caliper.
3. Remove torque member fixing bolts and connecting bolt.
It is not necessary to remove connecting bolt except for
disassembly or replacement of caliper assembly. In this
case, suspend caliper assembly with wire so as not to
stretch brake hose.
Disassembly
1. Remove piston by turning it counterclockwise with long nose
pliers or suitable tool.
2. Pry off snap ring A from piston with suitable pliers and
remove adjusting nut.
NBR375 Concave portion
Convex portion
NBR167
SBR646
SBR889 Ring ªAº
REAR DISC BRAKE TYPE 1
Pad Replacement (Cont'd)
BR-35
Page 162 of 2267
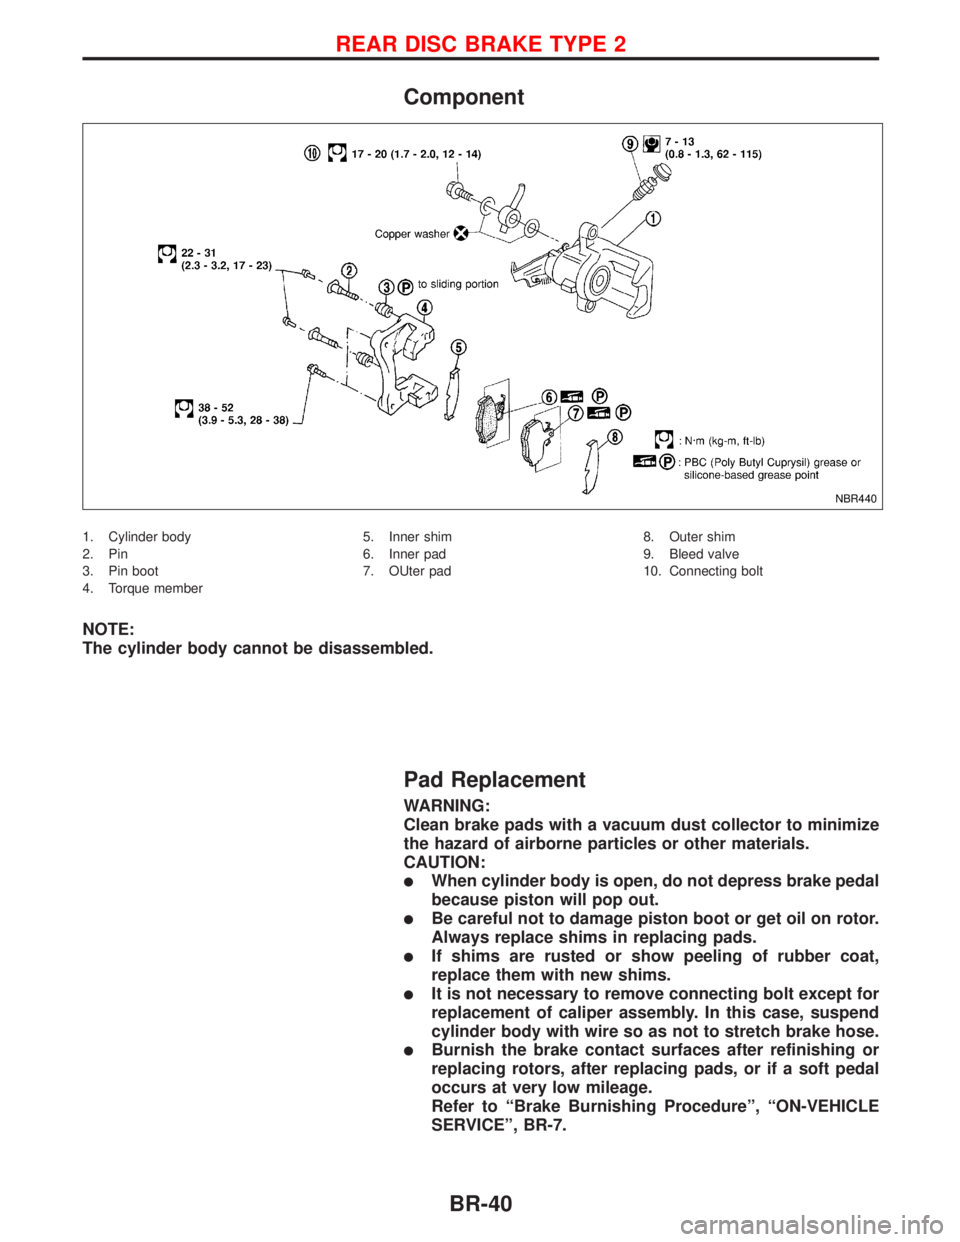
Component
1. Cylinder body
2. Pin
3. Pin boot
4. Torque member5. Inner shim
6. Inner pad
7. OUter pad8. Outer shim
9. Bleed valve
10. Connecting bolt
NOTE:
The cylinder body cannot be disassembled.
Pad Replacement
WARNING:
Clean brake pads with a vacuum dust collector to minimize
the hazard of airborne particles or other materials.
CAUTION:
lWhen cylinder body is open, do not depress brake pedal
because piston will pop out.
lBe careful not to damage piston boot or get oil on rotor.
Always replace shims in replacing pads.
lIf shims are rusted or show peeling of rubber coat,
replace them with new shims.
lIt is not necessary to remove connecting bolt except for
replacement of caliper assembly. In this case, suspend
cylinder body with wire so as not to stretch brake hose.
lBurnish the brake contact surfaces after refinishing or
replacing rotors, after replacing pads, or if a soft pedal
occurs at very low mileage.
Refer to ªBrake Burnishing Procedureº, ªON-VEHICLE
SERVICEº, BR-7.
NBR440
REAR DISC BRAKE TYPE 2
BR-40