Page 984 of 1659
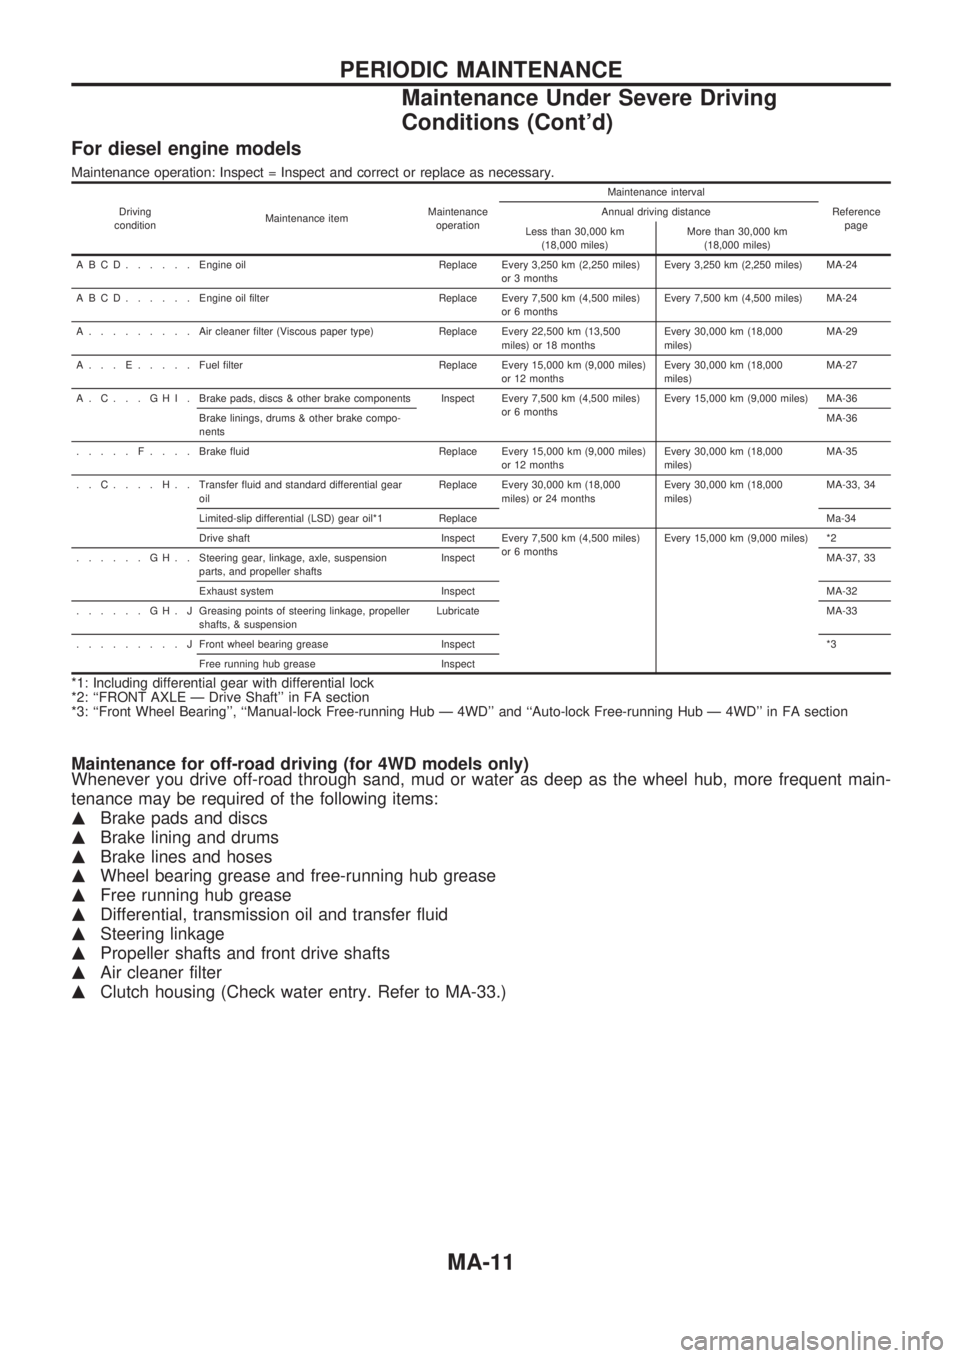
For diesel engine models
Maintenance operation: Inspect = Inspect and correct or replace as necessary.
Driving
conditionMaintenance itemMaintenance
operationMaintenance interval
Reference
page Annual driving distance
Less than 30,000 km
(18,000 miles)More than 30,000 km
(18,000 miles)
ABCD......Engine oil Replace Every 3,250 km (2,250 miles)
or 3 monthsEvery 3,250 km (2,250 miles) MA-24
ABCD......Engine oil filter Replace Every 7,500 km (4,500 miles)
or 6 monthsEvery 7,500 km (4,500 miles) MA-24
A.........Aircleaner filter (Viscous paper type) Replace Every 22,500 km (13,500
miles) or 18 monthsEvery 30,000 km (18,000
miles)MA-29
A...E.....Fuel filter Replace Every 15,000 km (9,000 miles)
or 12 monthsEvery 30,000 km (18,000
miles)MA-27
A.C...GHI.Brake pads, discs & other brake components Inspect Every 7,500 km (4,500 miles)
or 6 monthsEvery 15,000 km (9,000 miles) MA-36
Brake linings, drums & other brake compo-
nentsMA-36
.....F....Brake fluid Replace Every 15,000 km (9,000 miles)
or 12 monthsEvery 30,000 km (18,000
miles)MA-35
..C....H..Transfer fluid and standard differential gear
oilReplace Every 30,000 km (18,000
miles) or 24 monthsEvery 30,000 km (18,000
miles)MA-33, 34
Limited-slip differential (LSD) gear oil*1 ReplaceMa-34
Drive shaft Inspect Every 7,500 km (4,500 miles)
or 6 monthsEvery 15,000 km (9,000 miles) *2
......GH..Steering gear, linkage, axle, suspension
parts, and propeller shaftsInspectMA-37, 33
Exhaust system InspectMA-32
......GH.JGreasing points of steering linkage, propeller
shafts, & suspensionLubricateMA-33
.........JFront wheel bearing grease Inspect*3
Free running hub grease Inspect
*1: Including differential gear with differential lock
*2: ``FRONT AXLE Ð Drive Shaft'' in FA section
*3: ``Front Wheel Bearing'', ``Manual-lock Free-running Hub Ð 4WD'' and ``Auto-lock Free-running Hub Ð 4WD'' in FA section
Maintenance for off-road driving (for 4WD models only)
Whenever you drive off-road through sand, mud or water as deep as the wheel hub, more frequent main-
tenance may be required of the following items:
mBrake pads and discs
mBrake lining and drums
mBrake lines and hoses
mWheel bearing grease and free-running hub grease
mFree running hub grease
mDifferential, transmission oil and transfer fluid
mSteering linkage
mPropeller shafts and front drive shafts
mAir cleaner filter
mClutch housing (Check water entry. Refer to MA-33.)
PERIODIC MAINTENANCE
Maintenance Under Severe Driving
Conditions (Cont'd)
MA-11
Page 988 of 1659
Checking Drive Belts
1. Inspect for cracks, fraying, wear or oil. If necessary, replace
with a new one.
2. Inspect drive belt deflections by pushing midway between
pulleys.
Adjust if belt deflections exceed the limit.
Belt deflection:
Unit: mm (in)
Used belt deflection
Deflection of new
belt
LimitDeflection after
adjustment
Alternator 17 (0.67)10-12
(0.39 - 0.47)8-10
(0.31 - 0.39)
Air conditioner
compressor16 (0.63)10-12
(0.39 - 0.47)8-10
(0.31 - 0.39)
Power steering oil
pump15 (0.59)9-11
(0.35 - 0.43)7-9
(0.28 - 0.35)
Applied pushing
force98 N (10 kg, 22 lb)
Inspect drive belt deflections when engine is cold.
SMA916C
ENGINE MAINTENANCEKA
MA-15
Page 990 of 1659
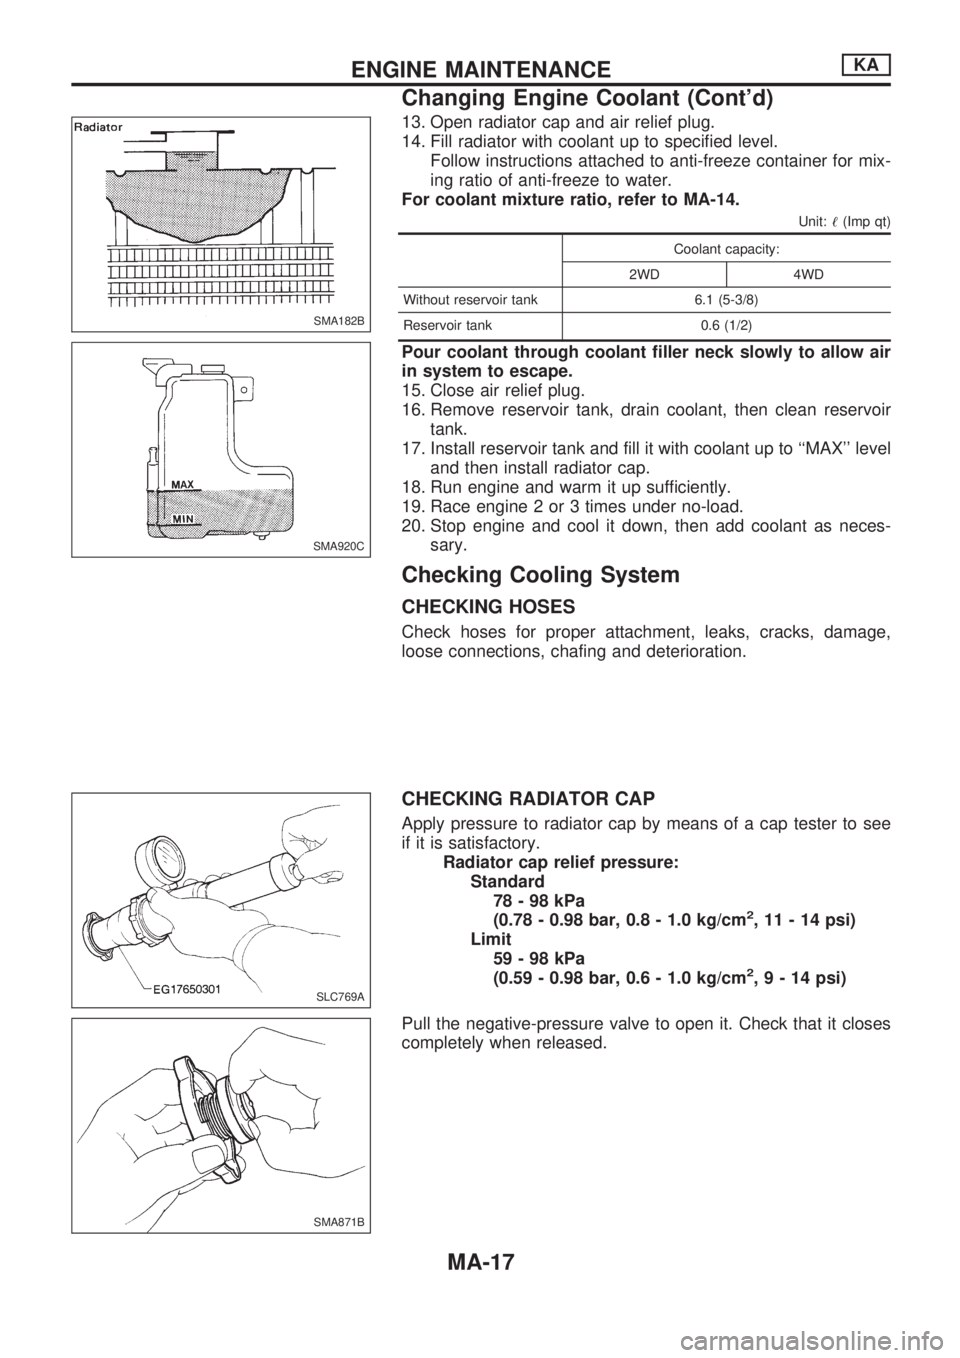
13. Open radiator cap and air relief plug.
14. Fill radiator with coolant up to specified level.
Follow instructions attached to anti-freeze container for mix-
ing ratio of anti-freeze to water.
For coolant mixture ratio, refer to MA-14.
Unit:!(Imp qt)
Coolant capacity:
2WD 4WD
Without reservoir tank 6.1 (5-3/8)
Reservoir tank 0.6 (1/2)
Pour coolant through coolant filler neck slowly to allow air
in system to escape.
15. Close air relief plug.
16. Remove reservoir tank, drain coolant, then clean reservoir
tank.
17. Install reservoir tank and fill it with coolant up to ``MAX'' level
and then install radiator cap.
18. Run engine and warm it up sufficiently.
19. Race engine 2 or 3 times under no-load.
20. Stop engine and cool it down, then add coolant as neces-
sary.
Checking Cooling System
CHECKING HOSES
Check hoses for proper attachment, leaks, cracks, damage,
loose connections, chafing and deterioration.
CHECKING RADIATOR CAP
Apply pressure to radiator cap by means of a cap tester to see
if it is satisfactory.
Radiator cap relief pressure:
Standard
78-98kPa
(0.78 - 0.98 bar, 0.8 - 1.0 kg/cm
2, 11 - 14 psi)
Limit
59-98kPa
(0.59 - 0.98 bar, 0.6 - 1.0 kg/cm
2,9-14psi)
Pull the negative-pressure valve to open it. Check that it closes
completely when released.
SMA182B
SMA920C
SLC769A
SMA871B
ENGINE MAINTENANCEKA
Changing Engine Coolant (Cont'd)
MA-17
Page 991 of 1659
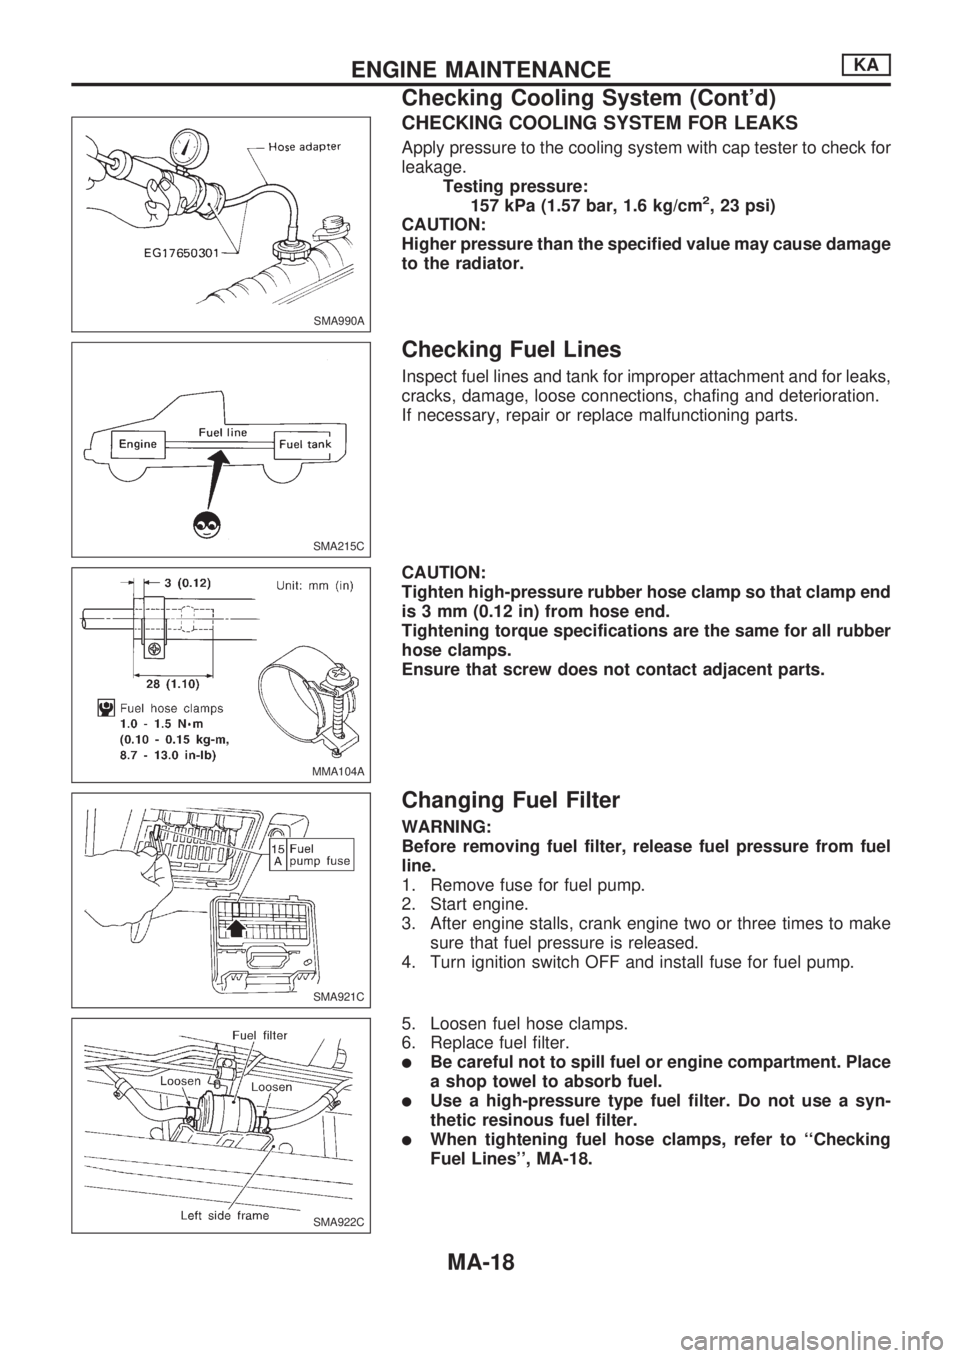
CHECKING COOLING SYSTEM FOR LEAKS
Apply pressure to the cooling system with cap tester to check for
leakage.
Testing pressure:
157 kPa (1.57 bar, 1.6 kg/cm
2, 23 psi)
CAUTION:
Higher pressure than the specified value may cause damage
to the radiator.
Checking Fuel Lines
Inspect fuel lines and tank for improper attachment and for leaks,
cracks, damage, loose connections, chafing and deterioration.
If necessary, repair or replace malfunctioning parts.
CAUTION:
Tighten high-pressure rubber hose clamp so that clamp end
is 3 mm (0.12 in) from hose end.
Tightening torque specifications are the same for all rubber
hose clamps.
Ensure that screw does not contact adjacent parts.
Changing Fuel Filter
WARNING:
Before removing fuel filter, release fuel pressure from fuel
line.
1. Remove fuse for fuel pump.
2. Start engine.
3. After engine stalls, crank engine two or three times to make
sure that fuel pressure is released.
4. Turn ignition switch OFF and install fuse for fuel pump.
5. Loosen fuel hose clamps.
6. Replace fuel filter.
lBe careful not to spill fuel or engine compartment. Place
a shop towel to absorb fuel.
lUse a high-pressure type fuel filter. Do not use a syn-
thetic resinous fuel filter.
lWhen tightening fuel hose clamps, refer to ``Checking
Fuel Lines'', MA-18.
SMA990A
SMA215C
MMA104A
SMA921C
SMA922C
ENGINE MAINTENANCEKA
Checking Cooling System (Cont'd)
MA-18
Page 992 of 1659
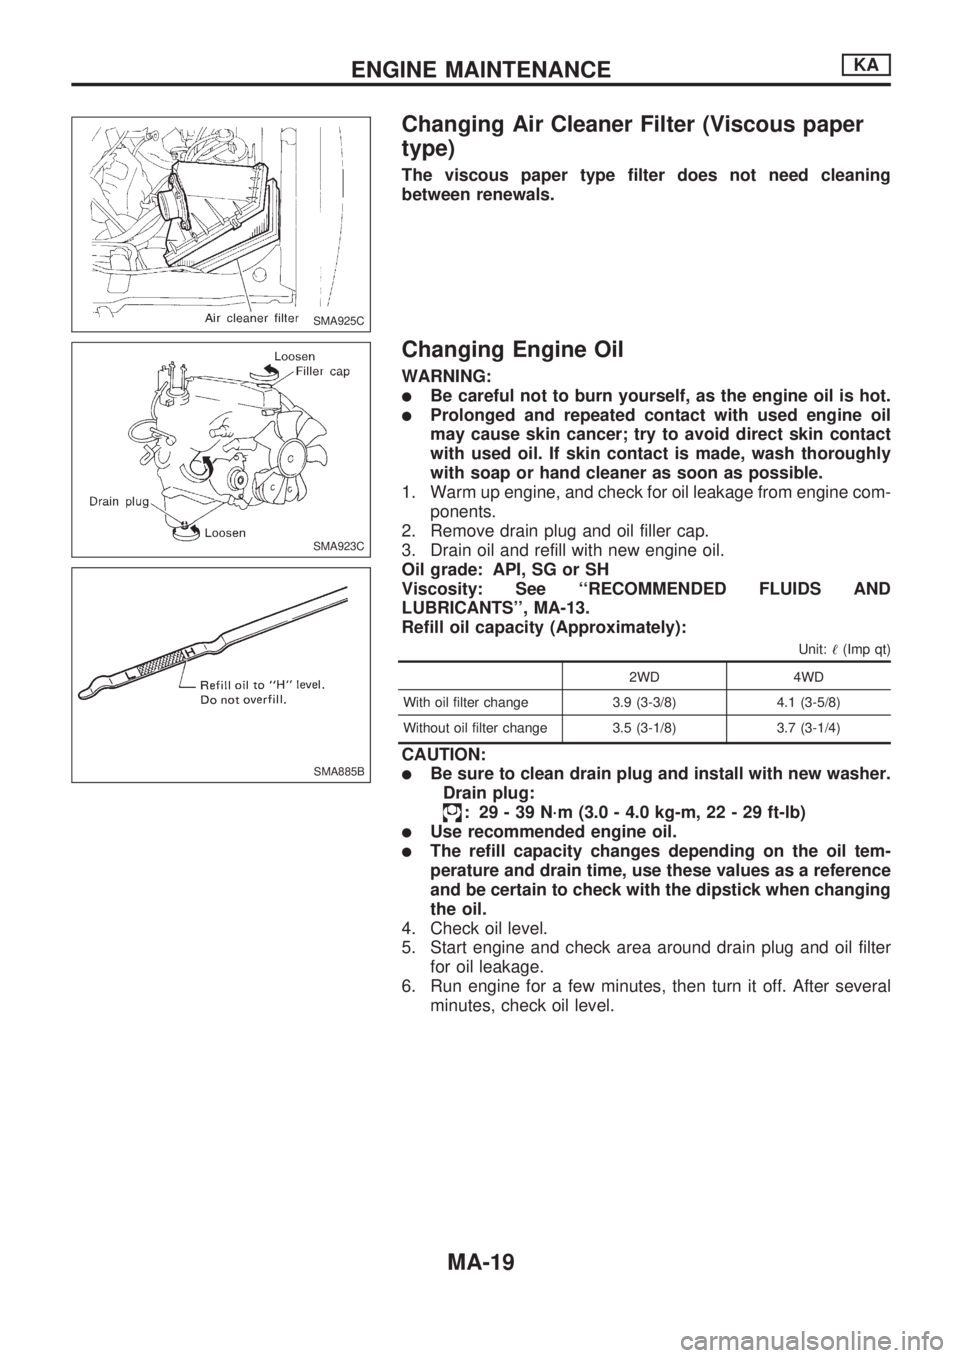
Changing Air Cleaner Filter (Viscous paper
type)
The viscous paper type filter does not need cleaning
between renewals.
Changing Engine Oil
WARNING:
lBe careful not to burn yourself, as the engine oil is hot.
lProlonged and repeated contact with used engine oil
may cause skin cancer; try to avoid direct skin contact
with used oil. If skin contact is made, wash thoroughly
with soap or hand cleaner as soon as possible.
1. Warm up engine, and check for oil leakage from engine com-
ponents.
2. Remove drain plug and oil filler cap.
3. Drain oil and refill with new engine oil.
Oil grade: API, SG or SH
Viscosity: See ``RECOMMENDED FLUIDS AND
LUBRICANTS'', MA-13.
Refill oil capacity (Approximately):
Unit:!(Imp qt)
2WD 4WD
With oil filter change 3.9 (3-3/8) 4.1 (3-5/8)
Without oil filter change 3.5 (3-1/8) 3.7 (3-1/4)
CAUTION:
lBe sure to clean drain plug and install with new washer.
Drain plug:
: 29 - 39 N´m (3.0 - 4.0 kg-m, 22 - 29 ft-lb)
lUse recommended engine oil.
lThe refill capacity changes depending on the oil tem-
perature and drain time, use these values as a reference
and be certain to check with the dipstick when changing
the oil.
4. Check oil level.
5. Start engine and check area around drain plug and oil filter
for oil leakage.
6. Run engine for a few minutes, then turn it off. After several
minutes, check oil level.
SMA925C
SMA923C
SMA885B
ENGINE MAINTENANCEKA
MA-19
Page 993 of 1659

Changing Oil Filter
1. Remove oil filter with a suitable tool.
WARNING:
Be careful not to burn yourself, as the engine and the engine
oil are hot.
2. Before installing a new oil filter, clean the oil filter mounting
surface on cylinder block, and coat the rubber seal of oil fil-
ter with a little engine oil.
3. Screw in the oil filter until a slight resistance is felt, then
tighten additionally more than 2/3 turn.
4. Add engine oil.
Refer to ``Changing Engine Oil'', MA-19.
Checking and Changing Spark Plugs
1. Disconnect ignition wires from spark plugs at boot.
Do not pull on the wire.
2. Remove spark plugs with spark plug wrench.
3. Clean plugs in sand blast cleaner.
4. Check insulator for cracks or chips, gasket for damage or
deterioration and electrode for wear and burning. If they are
excessively worn away, replace with new spark plugs.
Spark plug:
Make NGK
Standard type ZFR5E-11
Hot type ZFR4E-11
Cold type ZFR6E-11
SMA946C
SMA010
SMA229B
SMA017-A
SMA581C
ENGINE MAINTENANCEKA
MA-20
Page 994 of 1659

Use standard type spark plug for normal condition.
The hot type spark plug is suitable when fouling occurs with the
standard type spark plug under conditions such as:
lfrequent engine starts
llow ambient temperatures
The cold type spark plug is suitable when spark knock occurs
with the standard type spark plug under conditions such as:
lextended highway driving
lfrequent high engine revolution
5. Check spark plug gap.
Gap: 1.0 - 1.1 mm (0.039 - 0.043 in)
6. Install spark plugs. Reconnect ignition wires according to
numbers indicated on them.
Spark plug:
: 20-29N´m
(2.0 - 3.0 kg-m, 14 - 22 ft-lb)
Checking Ignition Wires
1. Check the high tension wires for cracks, damage, burned
terminals and for proper fit.
2. Measure the resistance of the high tension wires, by shak-
ing them and checking for intermittent breaks.
Resistance: Less than 12.2 kW/m (3.72 kW/ft)
Checking Positive Crankcase Ventilation
(PCV) System
CHECKING PCV VALVE
With engine running at idle, remove ventilation hose from PCV
valve; if valve is working properly, a hissing noise will be heard
as air passes through it and a strong vacuum should be felt
immediately when a finger is placed over valve inlet.
CHECKING VENTILATION HOSES
1. Check hoses and hose connections for leaks.
2. Disconnect all hoses and clean with compressed air. If any
hose cannot be freed of obstructions, replace.
Changing Positive Crankcase Ventilation
(PCV) Filter
Remove air cleaner cover and take out PCV filter located inside
air cleaner cover. Then install new PCV filter.
SMA476
SMA015A
SMA048
SMA587C
ENGINE MAINTENANCEKA
Checking and Changing Spark Plugs
(Cont'd)
MA-21
Page 995 of 1659
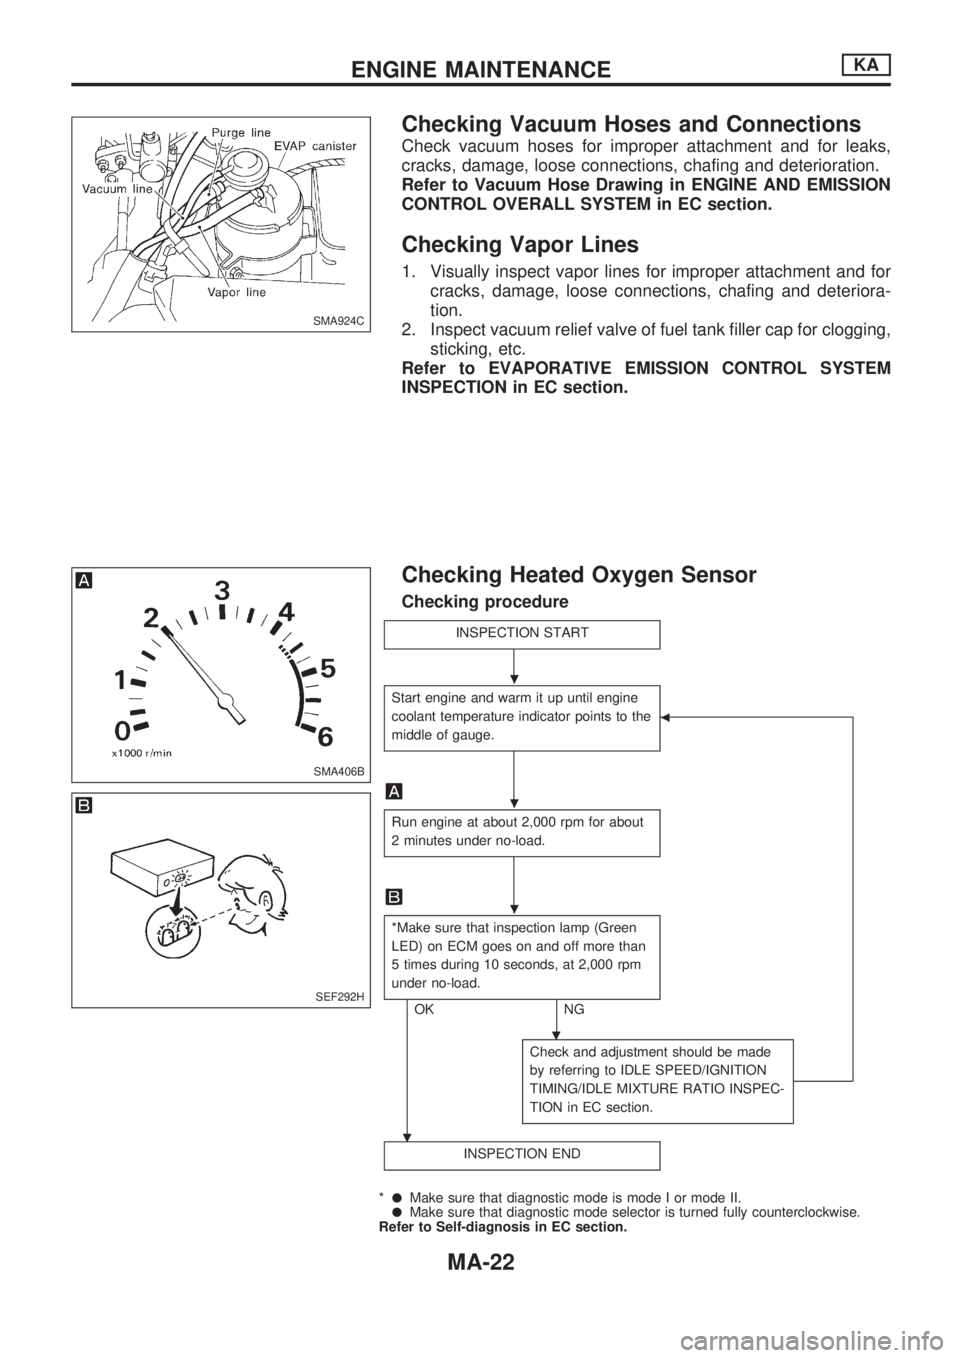
Checking Vacuum Hoses and Connections
Check vacuum hoses for improper attachment and for leaks,
cracks, damage, loose connections, chafing and deterioration.
Refer to Vacuum Hose Drawing in ENGINE AND EMISSION
CONTROL OVERALL SYSTEM in EC section.
Checking Vapor Lines
1. Visually inspect vapor lines for improper attachment and for
cracks, damage, loose connections, chafing and deteriora-
tion.
2. Inspect vacuum relief valve of fuel tank filler cap for clogging,
sticking, etc.
Refer to EVAPORATIVE EMISSION CONTROL SYSTEM
INSPECTION in EC section.
Checking Heated Oxygen Sensor
Checking procedure
INSPECTION START
Start engine and warm it up until engine
coolant temperature indicator points to the
middle of gauge.
b
Run engine at about 2,000 rpm for about
2 minutes under no-load.
*Make sure that inspection lamp (Green
LED) on ECM goes on and off more than
5 times during 10 seconds, at 2,000 rpm
under no-load.
OK NG
.
.
Check and adjustment should be made
by referring to IDLE SPEED/IGNITION
TIMING/IDLE MIXTURE RATIO INSPEC-
TION in EC section.
INSPECTION END
*lMake sure that diagnostic mode is mode I or mode II.lMake sure that diagnostic mode selector is turned fully counterclockwise.
Refer to Self-diagnosis in EC section.
SMA924C
SMA406B
SEF292H
.
.
.
ENGINE MAINTENANCEKA
MA-22