1998 NISSAN PICK-UP warning
[x] Cancel search: warningPage 977 of 1659
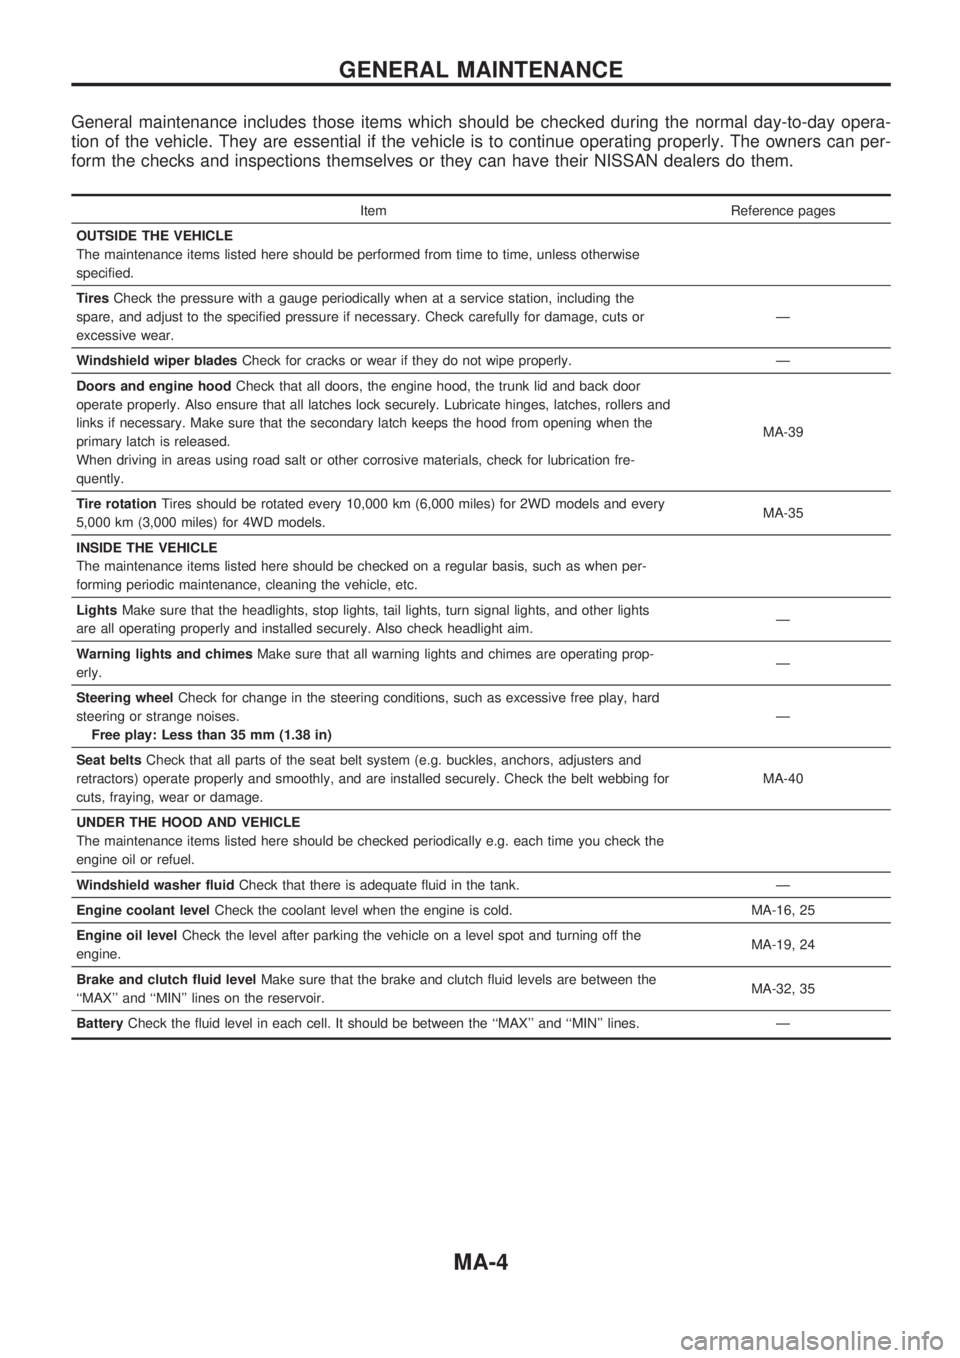
General maintenance includes those items which should be checked during the normal day-to-day opera-
tion of the vehicle. They are essential if the vehicle is to continue operating properly. The owners can per-
form the checks and inspections themselves or they can have their NISSAN dealers do them.
Item Reference pages
OUTSIDE THE VEHICLE
The maintenance items listed here should be performed from time to time, unless otherwise
specified.
TiresCheck the pressure with a gauge periodically when at a service station, including the
spare, and adjust to the specified pressure if necessary. Check carefully for damage, cuts or
excessive wear.Ð
Windshield wiper bladesCheck for cracks or wear if they do not wipe properly. Ð
Doors and engine hoodCheck that all doors, the engine hood, the trunk lid and back door
operate properly. Also ensure that all latches lock securely. Lubricate hinges, latches, rollers and
links if necessary. Make sure that the secondary latch keeps the hood from opening when the
primary latch is released.
When driving in areas using road salt or other corrosive materials, check for lubrication fre-
quently.MA-39
Tire rotationTires should be rotated every 10,000 km (6,000 miles) for 2WD models and every
5,000 km (3,000 miles) for 4WD models.MA-35
INSIDE THE VEHICLE
The maintenance items listed here should be checked on a regular basis, such as when per-
forming periodic maintenance, cleaning the vehicle, etc.
LightsMake sure that the headlights, stop lights, tail lights, turn signal lights, and other lights
are all operating properly and installed securely. Also check headlight aim.Ð
Warning lights and chimesMake sure that all warning lights and chimes are operating prop-
erly.Ð
Steering wheelCheck for change in the steering conditions, such as excessive free play, hard
steering or strange noises.
Free play: Less than 35 mm (1.38 in)Ð
Seat beltsCheck that all parts of the seat belt system (e.g. buckles, anchors, adjusters and
retractors) operate properly and smoothly, and are installed securely. Check the belt webbing for
cuts, fraying, wear or damage.MA-40
UNDER THE HOOD AND VEHICLE
The maintenance items listed here should be checked periodically e.g. each time you check the
engine oil or refuel.
Windshield washer fluidCheck that there is adequate fluid in the tank. Ð
Engine coolant levelCheck the coolant level when the engine is cold. MA-16, 25
Engine oil levelCheck the level after parking the vehicle on a level spot and turning off the
engine.MA-19, 24
Brake and clutch fluid levelMake sure that the brake and clutch fluid levels are between the
``MAX'' and ``MIN'' lines on the reservoir.MA-32, 35
BatteryCheck the fluid level in each cell. It should be between the ``MAX'' and ``MIN'' lines. Ð
GENERAL MAINTENANCE
MA-4
Page 989 of 1659
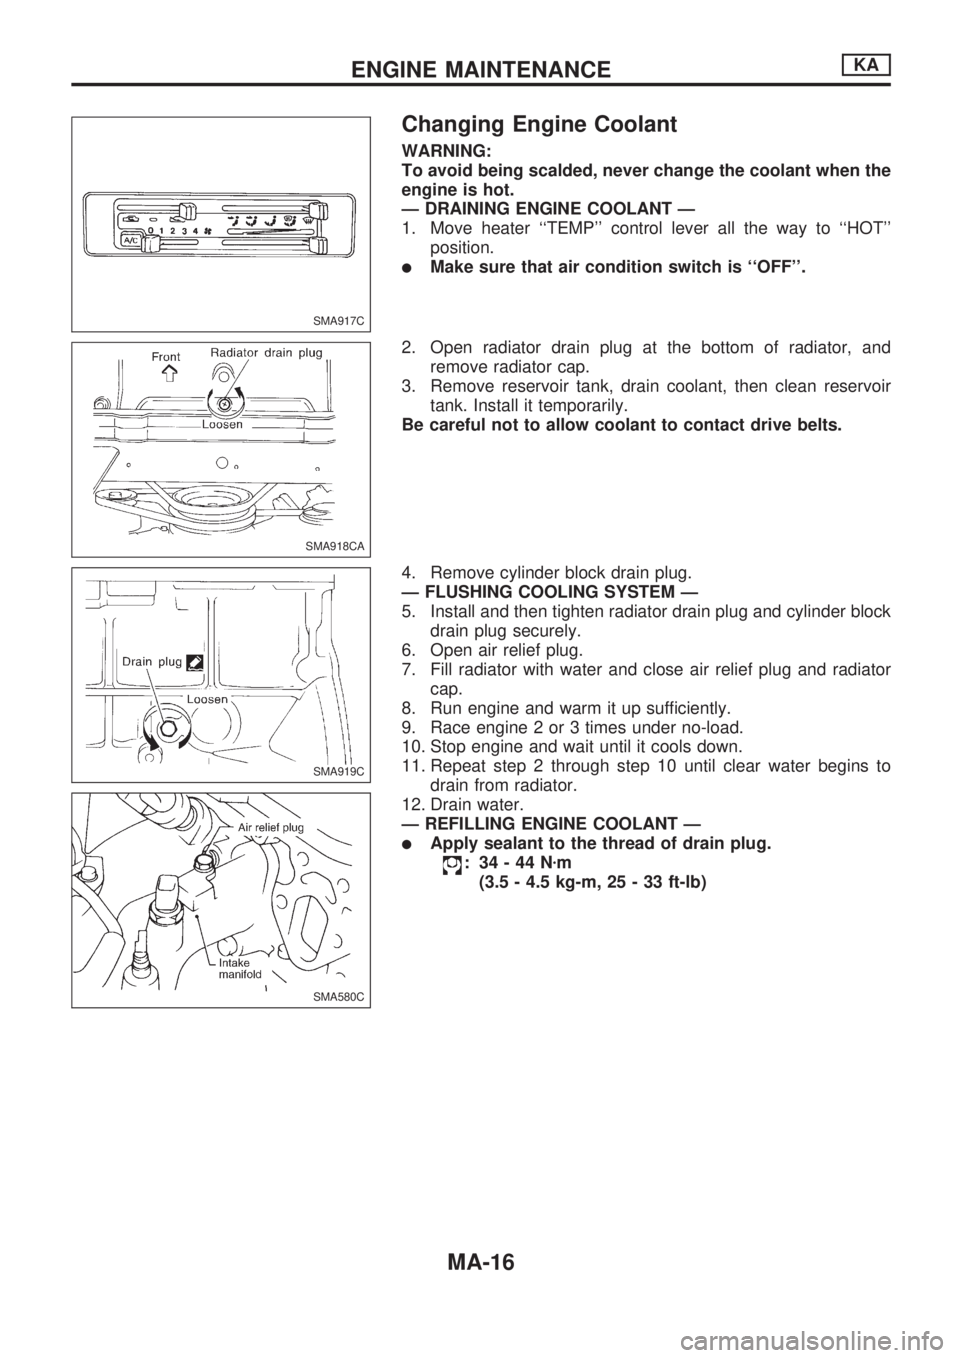
Changing Engine Coolant
WARNING:
To avoid being scalded, never change the coolant when the
engine is hot.
Ð DRAINING ENGINE COOLANT Ð
1. Move heater ``TEMP'' control lever all the way to ``HOT''
position.
lMake sure that air condition switch is ``OFF''.
2. Open radiator drain plug at the bottom of radiator, and
remove radiator cap.
3. Remove reservoir tank, drain coolant, then clean reservoir
tank. Install it temporarily.
Be careful not to allow coolant to contact drive belts.
4. Remove cylinder block drain plug.
Ð FLUSHING COOLING SYSTEM Ð
5. Install and then tighten radiator drain plug and cylinder block
drain plug securely.
6. Open air relief plug.
7. Fill radiator with water and close air relief plug and radiator
cap.
8. Run engine and warm it up sufficiently.
9. Race engine 2 or 3 times under no-load.
10. Stop engine and wait until it cools down.
11. Repeat step 2 through step 10 until clear water begins to
drain from radiator.
12. Drain water.
Ð REFILLING ENGINE COOLANT Ð
lApply sealant to the thread of drain plug.
: 34-44Nzm
(3.5 - 4.5 kg-m, 25 - 33 ft-lb)
SMA917C
SMA918CA
SMA919C
SMA580C
ENGINE MAINTENANCEKA
MA-16
Page 991 of 1659
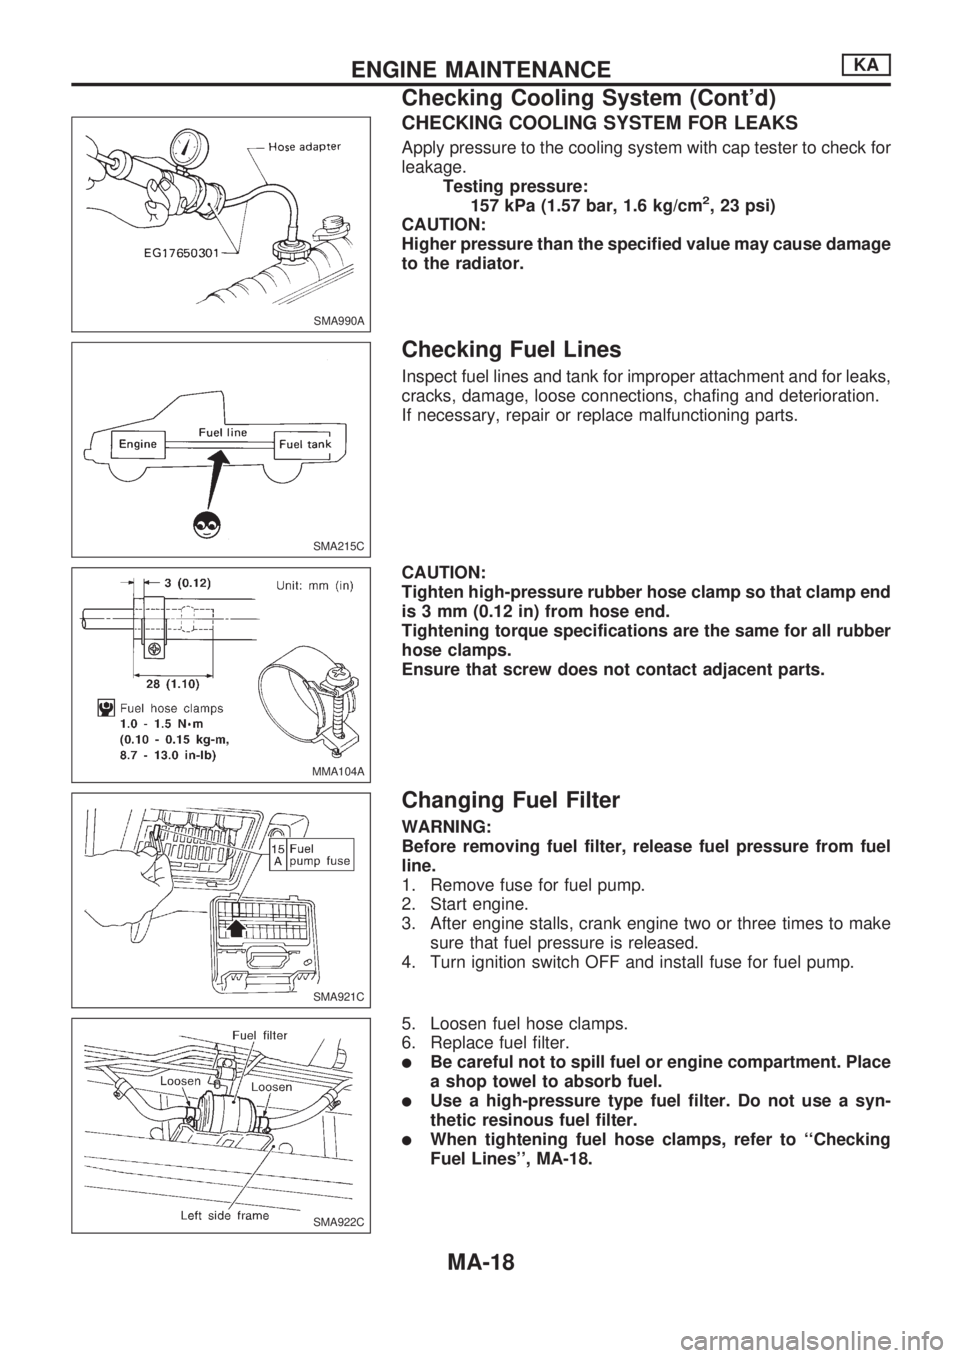
CHECKING COOLING SYSTEM FOR LEAKS
Apply pressure to the cooling system with cap tester to check for
leakage.
Testing pressure:
157 kPa (1.57 bar, 1.6 kg/cm
2, 23 psi)
CAUTION:
Higher pressure than the specified value may cause damage
to the radiator.
Checking Fuel Lines
Inspect fuel lines and tank for improper attachment and for leaks,
cracks, damage, loose connections, chafing and deterioration.
If necessary, repair or replace malfunctioning parts.
CAUTION:
Tighten high-pressure rubber hose clamp so that clamp end
is 3 mm (0.12 in) from hose end.
Tightening torque specifications are the same for all rubber
hose clamps.
Ensure that screw does not contact adjacent parts.
Changing Fuel Filter
WARNING:
Before removing fuel filter, release fuel pressure from fuel
line.
1. Remove fuse for fuel pump.
2. Start engine.
3. After engine stalls, crank engine two or three times to make
sure that fuel pressure is released.
4. Turn ignition switch OFF and install fuse for fuel pump.
5. Loosen fuel hose clamps.
6. Replace fuel filter.
lBe careful not to spill fuel or engine compartment. Place
a shop towel to absorb fuel.
lUse a high-pressure type fuel filter. Do not use a syn-
thetic resinous fuel filter.
lWhen tightening fuel hose clamps, refer to ``Checking
Fuel Lines'', MA-18.
SMA990A
SMA215C
MMA104A
SMA921C
SMA922C
ENGINE MAINTENANCEKA
Checking Cooling System (Cont'd)
MA-18
Page 992 of 1659
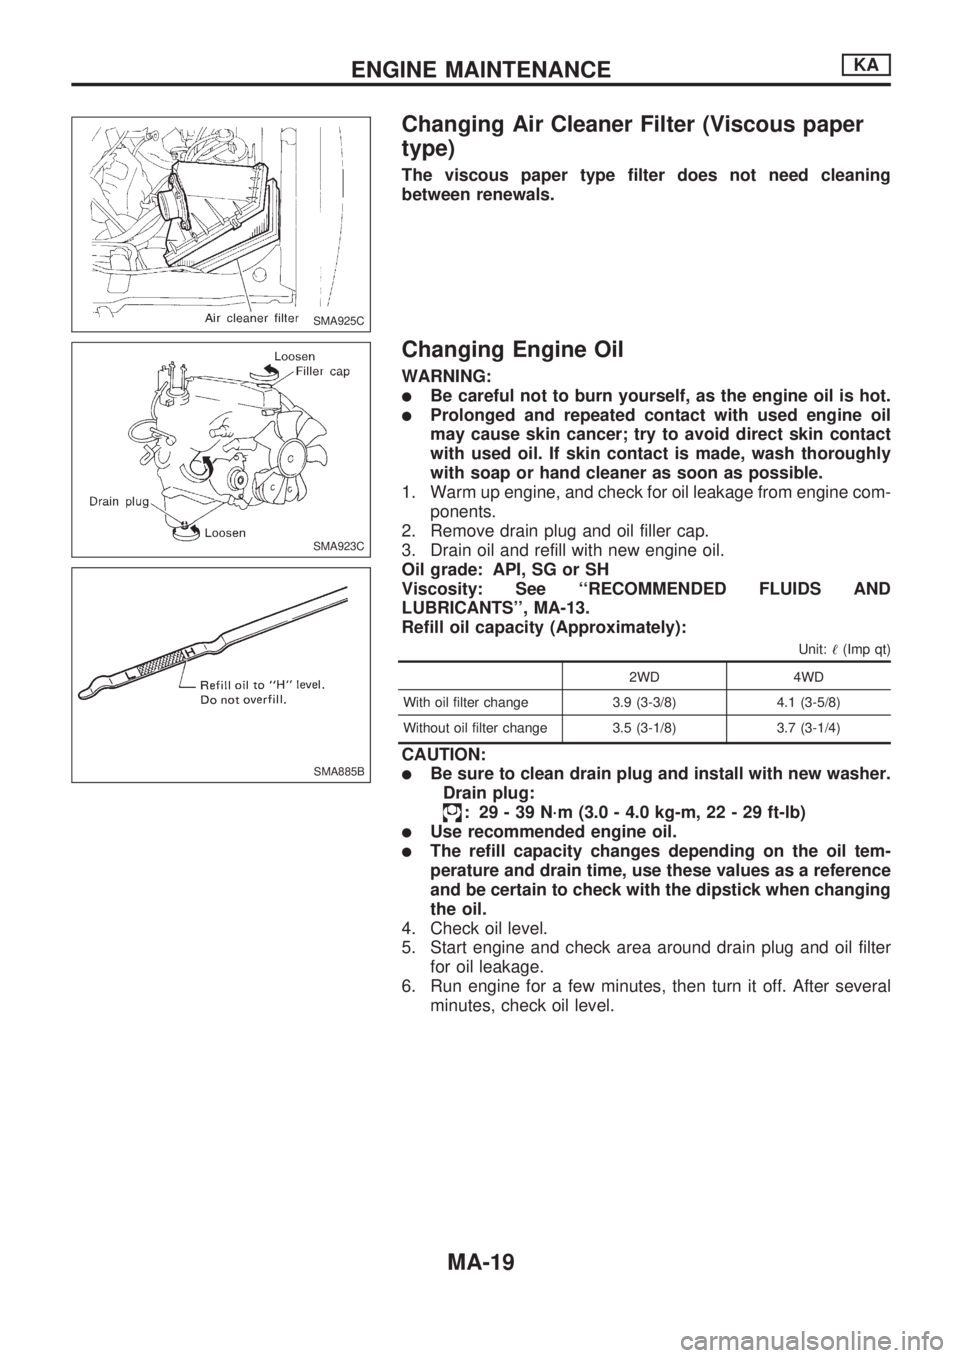
Changing Air Cleaner Filter (Viscous paper
type)
The viscous paper type filter does not need cleaning
between renewals.
Changing Engine Oil
WARNING:
lBe careful not to burn yourself, as the engine oil is hot.
lProlonged and repeated contact with used engine oil
may cause skin cancer; try to avoid direct skin contact
with used oil. If skin contact is made, wash thoroughly
with soap or hand cleaner as soon as possible.
1. Warm up engine, and check for oil leakage from engine com-
ponents.
2. Remove drain plug and oil filler cap.
3. Drain oil and refill with new engine oil.
Oil grade: API, SG or SH
Viscosity: See ``RECOMMENDED FLUIDS AND
LUBRICANTS'', MA-13.
Refill oil capacity (Approximately):
Unit:!(Imp qt)
2WD 4WD
With oil filter change 3.9 (3-3/8) 4.1 (3-5/8)
Without oil filter change 3.5 (3-1/8) 3.7 (3-1/4)
CAUTION:
lBe sure to clean drain plug and install with new washer.
Drain plug:
: 29 - 39 N´m (3.0 - 4.0 kg-m, 22 - 29 ft-lb)
lUse recommended engine oil.
lThe refill capacity changes depending on the oil tem-
perature and drain time, use these values as a reference
and be certain to check with the dipstick when changing
the oil.
4. Check oil level.
5. Start engine and check area around drain plug and oil filter
for oil leakage.
6. Run engine for a few minutes, then turn it off. After several
minutes, check oil level.
SMA925C
SMA923C
SMA885B
ENGINE MAINTENANCEKA
MA-19
Page 993 of 1659

Changing Oil Filter
1. Remove oil filter with a suitable tool.
WARNING:
Be careful not to burn yourself, as the engine and the engine
oil are hot.
2. Before installing a new oil filter, clean the oil filter mounting
surface on cylinder block, and coat the rubber seal of oil fil-
ter with a little engine oil.
3. Screw in the oil filter until a slight resistance is felt, then
tighten additionally more than 2/3 turn.
4. Add engine oil.
Refer to ``Changing Engine Oil'', MA-19.
Checking and Changing Spark Plugs
1. Disconnect ignition wires from spark plugs at boot.
Do not pull on the wire.
2. Remove spark plugs with spark plug wrench.
3. Clean plugs in sand blast cleaner.
4. Check insulator for cracks or chips, gasket for damage or
deterioration and electrode for wear and burning. If they are
excessively worn away, replace with new spark plugs.
Spark plug:
Make NGK
Standard type ZFR5E-11
Hot type ZFR4E-11
Cold type ZFR6E-11
SMA946C
SMA010
SMA229B
SMA017-A
SMA581C
ENGINE MAINTENANCEKA
MA-20
Page 997 of 1659
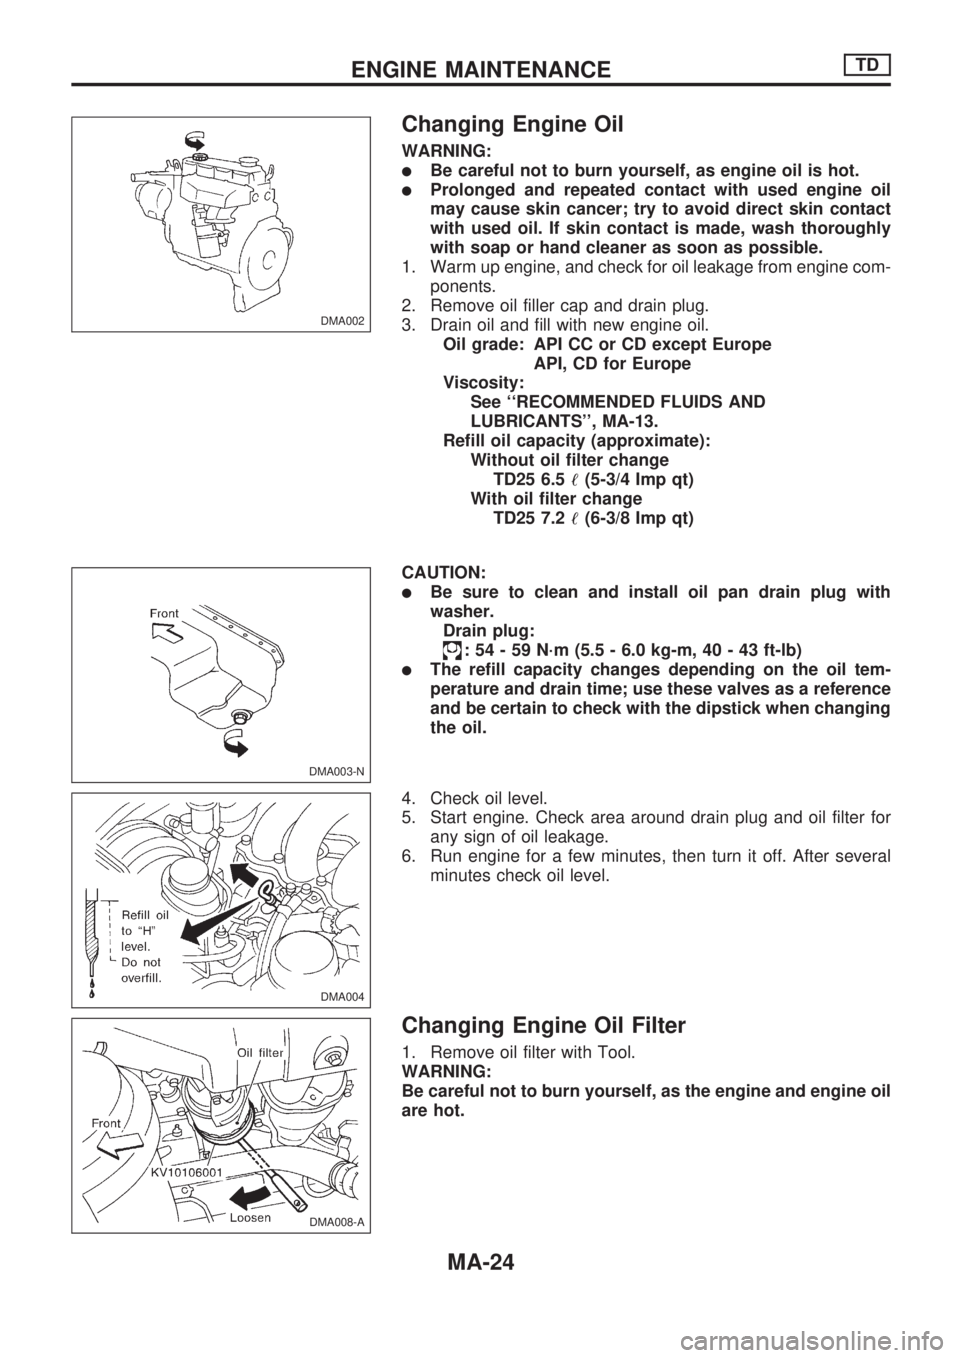
Changing Engine Oil
WARNING:
lBe careful not to burn yourself, as engine oil is hot.
lProlonged and repeated contact with used engine oil
may cause skin cancer; try to avoid direct skin contact
with used oil. If skin contact is made, wash thoroughly
with soap or hand cleaner as soon as possible.
1. Warm up engine, and check for oil leakage from engine com-
ponents.
2. Remove oil filler cap and drain plug.
3. Drain oil and fill with new engine oil.
Oil grade: API CC or CD except Europe
API, CD for Europe
Viscosity:
See ``RECOMMENDED FLUIDS AND
LUBRICANTS'', MA-13.
Refill oil capacity (approximate):
Without oil filter change
TD25 6.5!(5-3/4 Imp qt)
With oil filter change
TD25 7.2!(6-3/8 Imp qt)
CAUTION:
lBe sure to clean and install oil pan drain plug with
washer.
Drain plug:
: 54 - 59 N´m (5.5 - 6.0 kg-m, 40 - 43 ft-lb)
lThe refill capacity changes depending on the oil tem-
perature and drain time; use these valves as a reference
and be certain to check with the dipstick when changing
the oil.
4. Check oil level.
5. Start engine. Check area around drain plug and oil filter for
any sign of oil leakage.
6. Run engine for a few minutes, then turn it off. After several
minutes check oil level.
Changing Engine Oil Filter
1. Remove oil filter with Tool.
WARNING:
Be careful not to burn yourself, as the engine and engine oil
are hot.
DMA002
DMA003-N
.
DMA004
DMA008-A
ENGINE MAINTENANCETD
MA-24
Page 998 of 1659
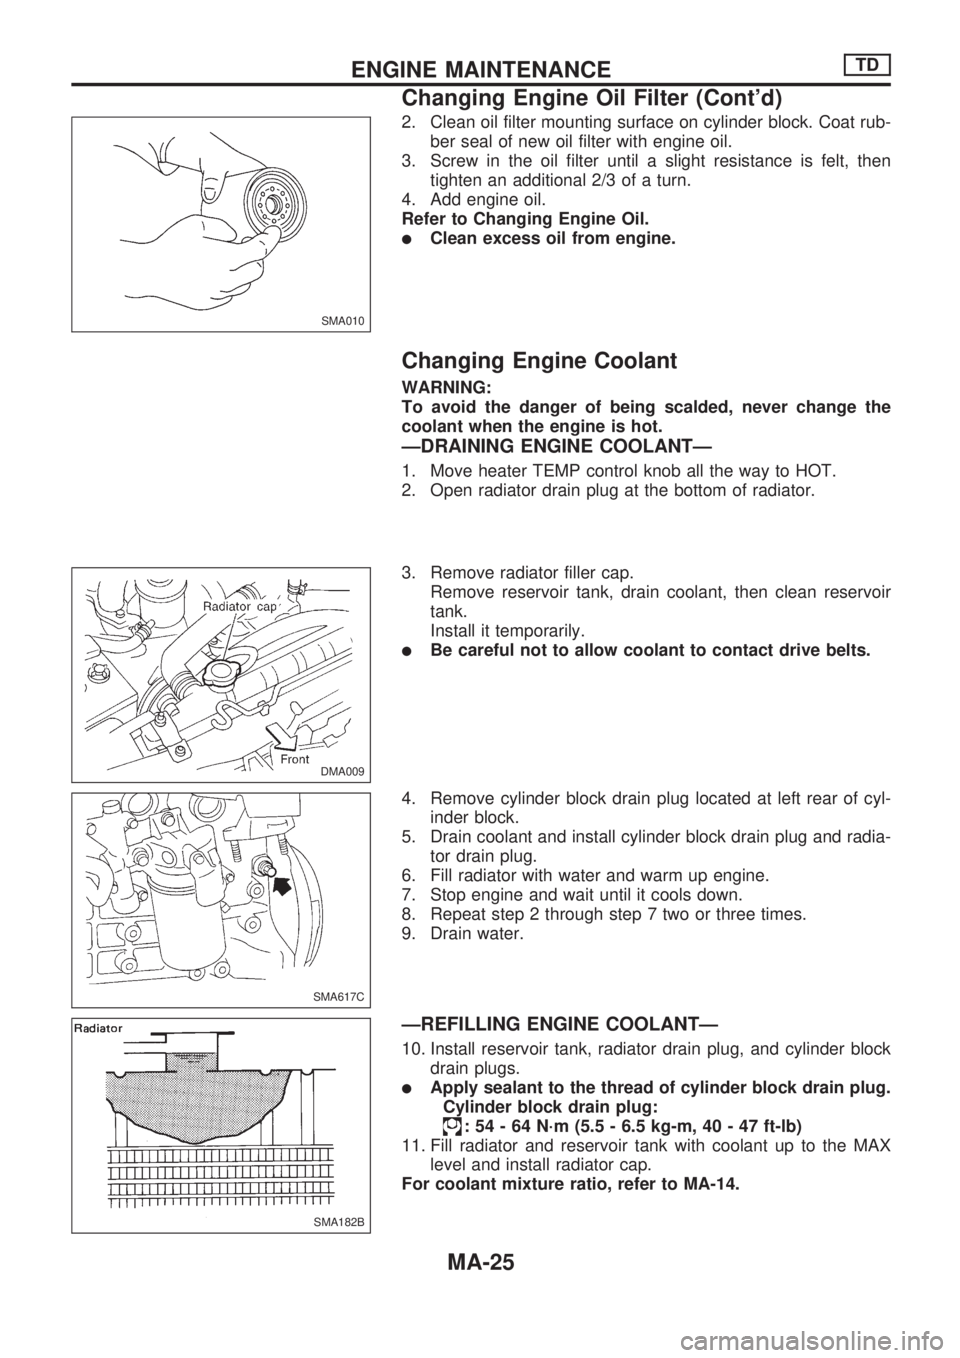
2. Clean oil filter mounting surface on cylinder block. Coat rub-
ber seal of new oil filter with engine oil.
3. Screw in the oil filter until a slight resistance is felt, then
tighten an additional 2/3 of a turn.
4. Add engine oil.
Refer to Changing Engine Oil.
lClean excess oil from engine.
Changing Engine Coolant
WARNING:
To avoid the danger of being scalded, never change the
coolant when the engine is hot.
ÐDRAINING ENGINE COOLANTÐ
1. Move heater TEMP control knob all the way to HOT.
2. Open radiator drain plug at the bottom of radiator.
3. Remove radiator filler cap.
Remove reservoir tank, drain coolant, then clean reservoir
tank.
Install it temporarily.
lBe careful not to allow coolant to contact drive belts.
4. Remove cylinder block drain plug located at left rear of cyl-
inder block.
5. Drain coolant and install cylinder block drain plug and radia-
tor drain plug.
6. Fill radiator with water and warm up engine.
7. Stop engine and wait until it cools down.
8. Repeat step 2 through step 7 two or three times.
9. Drain water.
ÐREFILLING ENGINE COOLANTÐ
10. Install reservoir tank, radiator drain plug, and cylinder block
drain plugs.
lApply sealant to the thread of cylinder block drain plug.
Cylinder block drain plug:
: 54 - 64 N´m (5.5 - 6.5 kg-m, 40 - 47 ft-lb)
11. Fill radiator and reservoir tank with coolant up to the MAX
level and install radiator cap.
For coolant mixture ratio, refer to MA-14.
SMA010
DMA009
SMA617C
SMA182B
ENGINE MAINTENANCETD
Changing Engine Oil Filter (Cont'd)
MA-25
Page 1002 of 1659
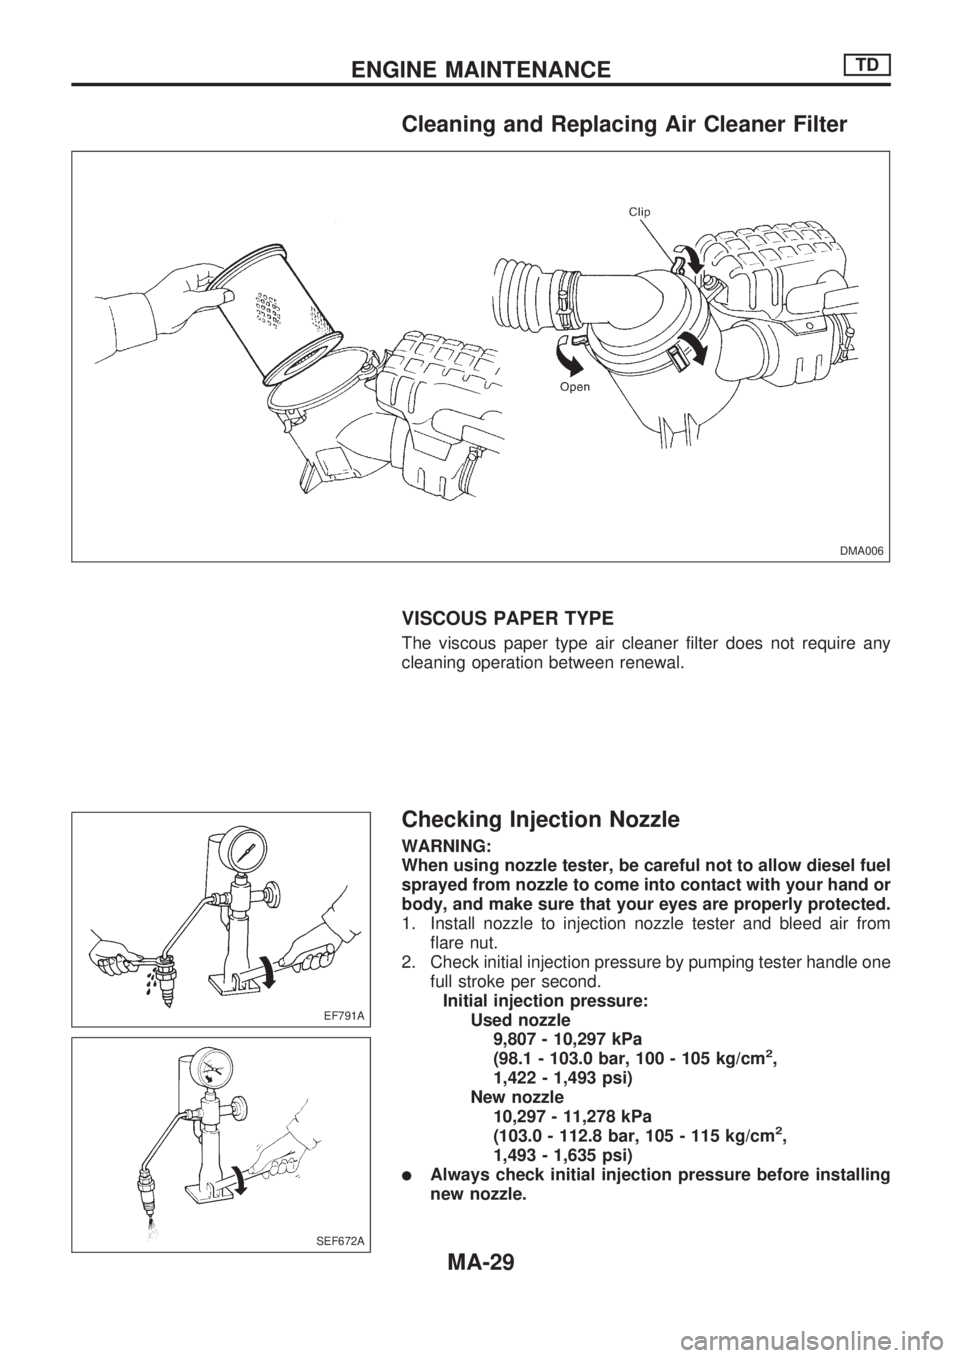
Cleaning and Replacing Air Cleaner Filter
VISCOUS PAPER TYPE
The viscous paper type air cleaner filter does not require any
cleaning operation between renewal.
Checking Injection Nozzle
WARNING:
When using nozzle tester, be careful not to allow diesel fuel
sprayed from nozzle to come into contact with your hand or
body, and make sure that your eyes are properly protected.
1. Install nozzle to injection nozzle tester and bleed air from
flare nut.
2. Check initial injection pressure by pumping tester handle one
full stroke per second.
Initial injection pressure:
Used nozzle
9,807 - 10,297 kPa
(98.1 - 103.0 bar, 100 - 105 kg/cm
2,
1,422 - 1,493 psi)
New nozzle
10,297 - 11,278 kPa
(103.0 - 112.8 bar, 105 - 115 kg/cm
2,
1,493 - 1,635 psi)
lAlways check initial injection pressure before installing
new nozzle.
DMA006
EF791A
SEF672A
ENGINE MAINTENANCETD
MA-29